はじめに
皆さんはフロントエンドのテストを書いてますでしょうか?
コンポーネントごとに特有の振る舞いがあった際には、テストを書いて動作を保証し、リリースに挑みたいところです。
今回はシンプルなフォームを作成し、testing-libraryを使ってテストを書いてみたいと思います。
実際に実装したコードはこちらにあります。
サンプルプログラムの作成
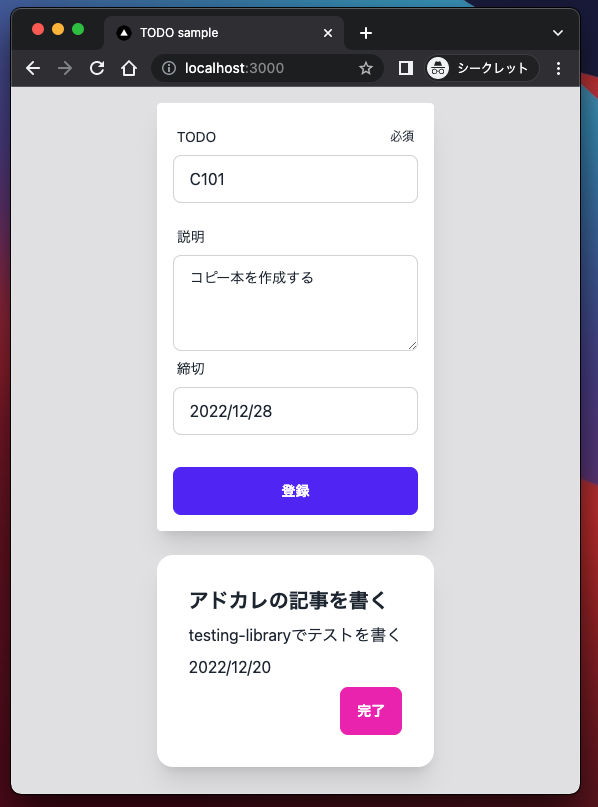
今回はNextjsのTurbopackサンプルを使って、シンプルなTODOアプリを作りました。こちらのクイックスタート1ではTailwindCSSを導入されていることもあり、TailwindCSSやdaisyUI2でコーディングしました。
フォームの状態管理はreact-hook-form3、TODOの一覧や追加、完了の状態管理はRecoilで作成しました。
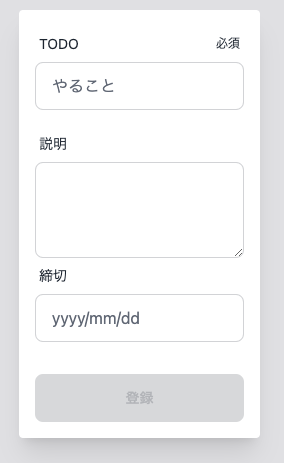
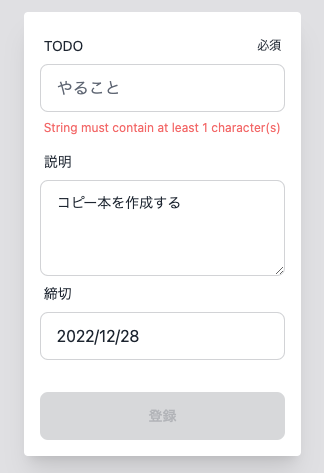
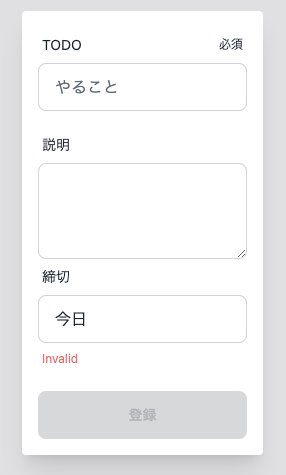
フォームの項目は「TODO」「説明」「締切」としており、TODOは必須項目、締切には正規表現でバリデーションを設定してあります。各フォームのバリデーションが通ることで、登録ボタンが活性化し、TODOを登録できるようになります。また、登録し終えるとフォームがリセットされ、次のTODOを登録できる状態になります。
| 初期状態の画面例 | TODOのバリデーションエラーの画面例 | 締切のバリデーションエラーの画面例 |
|---|---|---|
 |
 |
 |
'use client'
import { useForm, FormProvider } from 'react-hook-form'
import { zodResolver } from '@hookform/resolvers/zod'
import { TodoInput, TodoInputSchema } from '@/lib/types/TodoInput'
import TitleInputField from './fields/TitleInputField'
import DescriptionTextArea from './fields/DescriptionTextArea'
import DateInputField from './fields/DateInputField'
import { todoManager } from '@/lib/stores/Todo'

const Form = () => {
  const methods = useForm<TodoInput>({
    mode: 'onChange',
    resolver: zodResolver(TodoInputSchema),
  })
  const handleSubmit = methods.handleSubmit
  const isValid = methods.formState.isValid
  const setTodo = todoManager.useSetTodo()
  const onSubmit = handleSubmit((data) => {
    setTodo(data)
    methods.reset()
  })

  return (
    <FormProvider {...methods}>
      <form onSubmit={onSubmit} className="rounded bg-white p-4 shadow-xl">
        <TitleInputField />
        <DescriptionTextArea />
        <DateInputField />
        <div className="form-control mt-4 w-full max-w-xs">
          <button
            type="submit"
            className="btn-primary btn"
            disabled={!isValid}
            data-testid="submitButton"
          >
            登録
          </button>
        </div>
      </form>
    </FormProvider>
  )
}

export default Form
上記のフォームのコンポーネントに対して、テストを書いていきます。
テストの作成
testing-libraryの準備
Next.jsでは、JestとReact Testing Libraryのセットアップ方法が記載されており4、Next.js v12からJestに対してビルドインの設定ができるようになっているとのことで、そちらに準じて対応しました。
$ yarn add -D jest jest-environment-jsdom @testing-library/react @testing-library/user-event @testing-library/jest-dom
// jest.config.js
// eslint-disable-next-line @typescript-eslint/no-var-requires
const nextJest = require('next/jest')

const createJestConfig = nextJest({
  // Provide the path to your Next.js app to load next.config.js and .env files in your test environment
  dir: './',
})

// Add any custom config to be passed to Jest
/** @type {import('jest').Config} */
const customJestConfig = {
  // Add more setup options before each test is run
  // setupFilesAfterEnv: ['<rootDir>/jest.setup.js'],
  // if using TypeScript with a baseUrl set to the root directory then you need the below for alias' to work
  moduleDirectories: ['node_modules', '<rootDir>/'],
  testEnvironment: 'jest-environment-jsdom',
  moduleNameMapper: {
    '^@/ui/(.*)$': '<rootDir>/ui/$1',
    '^@/lib/(.*)$': '<rootDir>/lib/$1',
    '^@/styles/(.*)$': '<rootDir>/styles/$1',
  },
}

// createJestConfig is exported this way to ensure that next/jest can load the Next.js config which is async
module.exports = createJestConfig(customJestConfig)
テストの設計
今回のフォームに対して、テストとして書いていく内容を決めていきます。ユーザの振る舞いとして担保しておきたい事柄を洗い出します。
- TODOを登録できる/できない状態であること
- 各項目のバリデーションが有効であること
- TODOを登録した後に入力フォームがリセットされること
今回は、上記3つを対応していきます。
react-hook-formのサイトにてテストの書き方5が掲載されてますので、そちらを参考にしました。
また、テストを書いて期待通りに成功したら良いのかもしれませんが、テストを書く段階では期待通りに失敗することも検証しておくと良いかもしれません。
テスト駆動開発では、新しいテストが失敗することを確認する、その後に小さな修正をし、すべてのテストが成功することを確認する事柄が述べられています6。
そのテストは正しく動作を保証しているものなのかを確認する上でも大事なことだと思いますので、ぜひやってみてください。
TODOを登録できる/できない状態を検証するテスト
TODOを登録できる/できない状態(=登録ボタンが活性/非活性)であることを検証するテストは以下のようになりました。
こちらのテストでは、toBeEnableとtoBeDisabledを入れ替えると失敗することを確認しております。
describe('登録ボタンの活性非活性', () => {
  test('未記入のとき', async () => {
    render(<Form />)
    expect(screen.getByTestId('submitButton')).toBeDisabled()
  })

  test('TODOのみを入力したとき', async () => {
    render(<Form />)
    await userEvent.type(screen.getByTestId('titleInputField'), 'Title')
    expect(screen.getByTestId('submitButton')).toBeEnabled()
  })

  describe('締切を入力したとき', () => {
    test('フォーマットが正しいとき', async () => {
      render(<Form />)
      await userEvent.type(screen.getByTestId('dateInputField'), '2022/01/01')
      await userEvent.type(screen.getByTestId('titleInputField'), 'Title')
      expect(screen.getByTestId('submitButton')).toBeEnabled()
    })
    test('フォーマットが誤っているとき', async () => {
      render(<Form />)
      await userEvent.type(screen.getByTestId('dateInputField'), '緊急')
      await userEvent.type(screen.getByTestId('titleInputField'), 'Title')
      expect(screen.getByTestId('submitButton')).toBeDisabled()
    })
  })
})
各項目のバリデーションが有効であることを検証するテスト
ここでは「締切」の項目に対して、バリデーションのテストを書いてみました。バリデーションエラーだった場合にはInvalidが表示されるため、表示有無を確認しております。
useFormのonChange modeにてバリデーションを評価させるべく、項目に入力した後に再レンダリングを走らせています。
describe('バリデーションエラーのメッセージ', () => {
  test('緊急を入力するとき', async () => {
    const { rerender } = render(<Form />)
    await userEvent.type(screen.getByTestId('dateInputField'), '緊急')
    rerender(<Form />)
    expect(screen.getByTestId('dateErrorMessage')).toHaveTextContent(
      'Invalid',
    )
  })

  test('2022/01/01を入力するとき', async () => {
    const { rerender } = render(<Form />)
    await userEvent.type(screen.getByTestId('dateInputField'), '2022/01/01')
    rerender(<Form />)
    expect(screen.getByTestId('dateErrorMessage')).not.toHaveTextContent(
      'Invalid',
    )
  })
})
TODOを登録した後に入力フォームがリセットされること検証するテスト
こちらでは各項目を入力して登録すると、フォームが初期化されていることを検証しています。
ボタンをクリックする処理をコメントアウトすることで、テストが失敗することを確認できます。
test('登録したら入力されていたデータはリセット', async () => {
  render(
    <RecoilRoot>
      <Form />
    </RecoilRoot>,
  )
  await userEvent.type(screen.getByTestId('titleInputField'), 'Title')
  await userEvent.type(screen.getByTestId('descriptionTextArea'), '説明')
  await userEvent.type(screen.getByTestId('dateInputField'), '2022/01/01')
  await userEvent.click(screen.getByTestId('submitButton'))
  expect(screen.getByTestId('titleInputField')).toHaveValue('')
  expect(screen.getByTestId('descriptionTextArea')).toHaveValue('')
  expect(screen.getByTestId('dateInputField')).toHaveValue('')
})
テストの動作検証
実際にテストが動くのか、動作検証します。
$ yarn test ui/form/__test__/Form.test.tsx
warn  - You have enabled experimental feature (appDir) in next.config.js.
warn  - Experimental features are not covered by semver, and may cause unexpected or broken application behavior. Use at your own risk.
info  - Thank you for testing `appDir` please leave your feedback at https://nextjs.link/app-feedback

 PASS  ui/form/__test__/Form.test.tsx
  Form
    ✓ 登録したら入力されていたデータはリセット (139 ms)
    登録ボタンの活性非活性
      ✓ 未記入のとき (45 ms)
      ✓ TODOのみを入力したとき (116 ms)
      締切を入力したとき
        ✓ フォーマットが正しいとき (110 ms)
        ✓ フォーマットが誤っているとき (68 ms)
    バリデーションエラーのメッセージ
      ✓ 緊急を入力するとき (33 ms)
      ✓ 2022/01/01を入力するとき (68 ms)

Test Suites: 1 passed, 1 total
Tests:       7 passed, 7 total
Snapshots:   0 total
Time:        1.957 s, estimated 3 s
Ran all test suites matching /ui\/form\/__test__\/Form.test.tsx/i.
各テストが成功していることを確認することができました。
おわりに
今回はシンプルなフォームを作成し、testing-libraryを用いてテストを書いてみました7。
今回取り扱ったテスト以外にも、E2Eテストや単体テスト、静的テスト、ビジュアルリグレッションテストなどの様々なテスト手法、テストの実装方法があります。
テストを書くスキルを持ってて損はありません。みなさんも是非この機会にテストの書き方を覚えていってみてください。
2022年12月も残りわずかになってきました。引き続きアドカレへの投稿が続きますので、Ateam Finergy Inc.× Ateam CommerceTech Inc.× Ateam Wellness Inc. Advent Calendar 2022を定期購読していただけると幸いです。
-
別途、個人的にはNext.js v13とTurbopackを実際に触る機会ができ、良い経験が得られました。 ↩
