データ構造
アルゴリズムで扱う集合にはそのサイズが増加したり減少したり、時間とともに変化するものがある。そのため、データの集合に対して以下の操作を効率的に行う必要がある
- 要素の挿入
- 要素の削除
- 要素が含まれているかどうか
また、大量のデータを効率的に扱うことができるかもデータ構造を選択する上で必要な要素である。
アルゴリズム図鑑で説明されているデータ構造の概要を以下にまとめる
| データ構造 |概要 |
|----|----|----|
| リスト(Linked List) | 一連のノードが、データフィールドと1つか2つの参照を持ち、参照により次(および前)のノードへのリンクを保持している |
| 配列(Array) | 配列は要素の集合を格納・管理するのに用いられるデータ構造 |
| スタック(Stack) | データを後入れ先出し(FILO:First In Last Out)のリスト構造 |
| キュー(Queue) | データを先入れ先出し(FIFO:First In First Out)のリスト構造 |
| ハッシュテーブル(Hashtable) | キーと値の組(エントリと呼ぶ)を複数個格納し、キーに対応する値をすばやく参照するためのデータ構造 |
| ヒープ(Heap) | 「子要素は親要素より常に大きいか等しい(または常に小さいか等しい)」という制約を持つ木構造 |
| 二分岐探索木(Binary Tree) | 全ての要素が「左の子<親≦右の子」(あるいは「左の子≦親<右の子」)という大小関係を満たす二分木構造 |
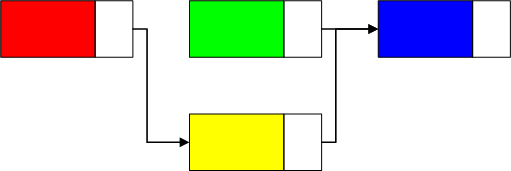
リスト
一連のノードが、データフィールドと1つか2つの参照を持ち、参照により次(および前)のノードへのリンクを保持している。
リストには次のようなメリット/デメリットがある
- メリット
- データをどの部分であっても挿入、削除が容易なためリサイズが容易
- デメリット
- リンクを辿ってアクセスするためデータのアクセスが遅い
- 次のデータのアドレスを保持するためデータのサイズがその分大きくなる
リストには次の種類がある。
- 片方向リスト
- 双方向リスト
- 循環リスト
片方向リスト(Singly Linked List)
ノード毎に1つのリンクを持ち、このリンクがリスト上の次のノードを指す
| 片方向リスト |
|---|
 |
| 片方向リストのノードの追加 | 片方向リストのノードの削除 |
|---|---|
 |
 |
これをC#で書くとこうなる。
public class SinglyLinkedNode
{
    private SinglyLinkedNode next_;
    private int data_;

    public SinglyLinkedNode NextNode { get { return next_; }set { next_ = value; } }
    public int Value { get { return data_; } }

    public SinglyLinkedNode(int data)
    {
        data_ = data;
        next_ = null;
    }
}

public class SinglyLinkedList
{
    private SinglyLinkedNode first_;
    private SinglyLinkedNode last_;

    public SinglyLinkedNode Head { get { return first_; } }
    public SinglyLinkedNode Tail { get { return last_; } }
    public bool IsEmpty { get { return first_ == null; } }

    public SinglyLinkedList()
    {
        first_ = null;
        last_ = null;
    }

    public void Append(int value)
    {
        SinglyLinkedNode node = new SinglyLinkedNode(value);
        if (first_ == null)
        {
            first_ = node;
            last_ = node;
        }
        else
        {
            var last = last_;
            last.NextNode = node;
            last_ = node;
        }
    }

    public void Insert(SinglyLinkedNode node, int value)
    {
        SinglyLinkedNode insert_node = new SinglyLinkedNode(value);
        if (first_ == null)
        {
            Append(value);
        }
        else
        {
            SinglyLinkedNode current = first_;
            while (current != null)
            {
                if (current == node)
                {
                    insert_node.NextNode = current.NextNode;
                    current.NextNode = insert_node;
                    break;
                }
                else
                {
                    current = current.NextNode;
                }
            }
        }
    }

    public void Delete(SinglyLinkedNode node)
    {
        if (first_ == null)
            return;

        if(first_ == node)
        {
            first_ = first_.NextNode;
        }
        else
        {
            SinglyLinkedNode current = first_;
            while(current.NextNode != null)
            {
                if(current.NextNode == node)
                {
                    current.NextNode = node.NextNode;
                    break;
                }
                else
                {
                    current = current.NextNode;
                }
            }
        }
    }
}
双方向リスト
片方向リストは、各ノードが後ろ方向のリンクのみを持っていた。双方向リストは前後方向のリンクを持つ
| 双方向リスト |
|---|
 |
public class DoublyLinkedNode
{
    int data_ { get; set; }
    public DoublyLinkedNode PreviousNode { get; set; }
    public DoublyLinkedNode NextNode { get; set; }

    public int Value { get { return data_; } }

    public DoublyLinkedNode(int data)
    {
        data_ = data;
        PreviousNode = null;
        NextNode = null;
    }
}

public class DoubleLinkedList
{
    private DoublyLinkedNode first_;
    private DoublyLinkedNode last_;

    public DoublyLinkedNode Head { get { return first_; } }
    public DoublyLinkedNode Tail { get { return last_; } }
    public bool IsEmpty { get { return first_ == null; } }

    public DoubleLinkedList()
    {
        first_ = null;
        last_ = null;
    }

    public DoublyLinkedNode Insert(int data)
    {
        // Creates a link, sets its link to the first item and then makes this the first item in the list.
        DoublyLinkedNode link = new DoublyLinkedNode(data);
        link.NextNode = first_;
        if (first_ != null)
            first_.PreviousNode = link;
        first_ = link;
        return link;
    }

    public void Append(int value)
    {
        DoublyLinkedNode node = new DoublyLinkedNode(value);
        if (first_ == null)
        {
            first_ = node;
            last_ = node;
        }
        else
        {
            node.PreviousNode = last_;
            last_.NextNode = node;
            last_ = node;
        }
    }

    public DoublyLinkedNode Delete()
    {
        // Gets the first item, and sets it to be the one it is linked to
        DoublyLinkedNode temp = first_;
        if (first_ != null)
        {
            first_ = first_.NextNode;
            if (first_ != null)
                first_.PreviousNode = null;
        }
        return temp;
    }

    public void Delete(DoublyLinkedNode node)
    {
        if (first_ == null)
            return;

        if (first_ == node)
        {
            Delete();
        }
        else
        {
            DoublyLinkedNode current = first_;
            while (current.NextNode != null)
            {
                if (current.NextNode == node)
                {
                    node.NextNode.PreviousNode = current;
                    current.NextNode = node.NextNode;
                    break;
                }
                else
                {
                    current = current.NextNode;
                }
            }
        }
    }

    public void InsertAfter(DoublyLinkedNode node, int data)
    {
        if (node == null)
        {
            Insert(data);
            return;
        }

        DoublyLinkedNode current = first_;
        while (current != null)
        {
            if (current == node)
            {
                DoublyLinkedNode new_link = new DoublyLinkedNode(data);
                new_link.NextNode = current.NextNode;
                new_link.PreviousNode = current;
                current.NextNode = new_link;
                break;
            }
            else
            {
                current = current.NextNode;
            }
        }
    }
}
循環リスト
循環リストは片方向リストまたは双方向リストとほとんど実装は変わらない。ただ、最後の要素が先頭の要素のポインタを保持してるかどうかの違い(双方向リストの場合には先頭の要素が最後の要素のポインタを保持してる)である
| 循環リスト |
|---|
 |
最後にupdateCircularlyNode()を呼び出して循環条件を更新することで循環リストにすることができる
ic class CircularlyLinkedList
{
    private DoublyLinkedNode first_;
    private DoublyLinkedNode last_;

    public DoublyLinkedNode Head { get { return first_; } }
    public DoublyLinkedNode Tail { get { return last_; } }
    public bool IsEmpty { get { return first_ == null; } }

    public CircularlyLinkedList()
    {
        first_ = null;
        last_ = null;
    }

    void updateCircularlyNode()
    {
        if(first_ == null)
            return;
        first_.PreviousNode = last_;
        last_.NextNode = first_;
    }

    public void Insert(int data)
    {
        DoublyLinkedNode link = new DoublyLinkedNode(data);
        link.NextNode = first_;
        if (first_ != null)
            first_.PreviousNode = link;
        first_ = link;

        if(last_ == null)
        {
            last_ = first_;
        }

        updateCircularlyNode();
    }

    public void Append(int value)
    {
        DoublyLinkedNode node = new DoublyLinkedNode(value);
        if (first_ == null)
        {
            first_ = node;
            last_ = node;
        }
        else
        {
            node.PreviousNode = last_;
            last_.NextNode = node;
            last_ = node;
        }

        updateCircularlyNode();
    }

    public void Delete()
    {
        // Gets the first item, and sets it to be the one it is linked to
        DoublyLinkedNode temp = first_;
        if (first_ != null)
        {
            first_ = first_.NextNode;
            if (first_ != null)
                first_.PreviousNode = null;
        }

        updateCircularlyNode();
    }

    public void Delete(DoublyLinkedNode node)
    {
        if (first_ == null)
            return;

        if (first_ == node)
        {
            Delete();
        }
        else
        {
            DoublyLinkedNode current = first_;
            while (current.NextNode != null)
            {
                if (current.NextNode == node)
                {
                    node.NextNode.PreviousNode = current;
                    current.NextNode = node.NextNode;
                    break;
                }
                else
                {
                    current = current.NextNode;
                }
            }
        }

        updateCircularlyNode();
    }

    public void InsertAfter(DoublyLinkedNode node, int data)
    {
        if (node == null)
        {
            Insert(data);
            return;
        }

        DoublyLinkedNode current = first_;
        while (current != null)
        {
            if (current == node)
            {
                DoublyLinkedNode new_link = new DoublyLinkedNode(data);
                new_link.NextNode = current.NextNode;
                new_link.PreviousNode = current;
                current.NextNode = new_link;
                break;
            }
            else
            {
                current = current.NextNode;
            }
        }

        updateCircularlyNode();
    }
}
LinkedListクラス
C#では双方向リストを表現するライブラリが用意されている。
ノードは双方向リスト用のノードとしてLinkedListNodeクラスを使う
配列
配列は要素の集合を格納・管理するのに用いられるデータ構造である。
イメージとしては一定領域確保したメモリに対してアドレスを指定してデータを格納する。
- メリット
- インデックスを通して高速にアクセス可能
- 末尾のデータ挿入、削除は高速
- デメリット
- データが大きい場合に大量のメモリを消費する
- 末尾以外のデータを挿入・削除は遅い
プログラムは簡単なので割愛する
データセット
データが空の状態を白色とする。データを格納する場合にはアドレスまたはインデックスを指定してデータを格納する事ができる。
| データの格納 |
|---|
 |
データを上書きする場合には、データの格納と同じ操作を行う
| データ上書き |
|---|
 |
List
連続データを扱うという意味では配列とLinkの動作はにている
データの挿入
配列のデータの挿入・削除をする場合にはコピー処理が必要なので、時間がかかる
| データの挿入 |
|---|
 |
この例では、配列に空きがあったため、上記のような操作になる。空きがない場合には、一時退避領域を使ってコピー処理を実現する
データを削除する際にデータが格納されているインデックスが連続している必要がないときにはコピー処理は不要
スタック
スタック
データを後入れ先出し(FILO:First In Last Out)の構造で保持するもの
図に示すように、最後に挿入した要素から順に取り出すようなデータ構造
| スタック |
|---|
 |
スタックに値を挿入することをプッシュ(Push)、 取り出すことをポップ(Pop)するという
実装をする際には配列または[片方向リスト](#片方向リスト(Singly Linked List))を利用する
public class Stack<T>
{
    List<T> buffer_;
    public Stack()
    {
        buffer_ = new List<T>();
    }

    public int Count { get { return buffer_.Count; } }

    public bool isEmpty()
    {
        return (buffer_.Count == 0);
    }

    public void Push(T data)
    {
        buffer_.Add(data);
    }

    public T Pop()
    {
        if (isEmpty())
            return default(T);
        var data = buffer_[buffer_.Count - 1];
        buffer_.RemoveAt(buffer_.Count - 1);
        return data;
    }
}
本来であれば、配列と先頭を示すHead、末尾を示すTailを使って実装をするべきだが、簡略化のためにListを使用する
C#ではStackクラスが提供されている
キュー
キュー(待ち行列)
データを先入れ先出し(FIFO:First In First Out)のリスト構造で保持するもの
図に示すように、挿入した要素順にデータを取り出すようなデータ構造
| キュー |
|---|
 |
スタックに値を挿入することをエンキュー(Enqueue)、 取り出すことをデキュー(Dequeue)するという
public class Queue<T>
{
    List<T> buffer_;
    public Queue()
    {
        buffer_ = new List<T>();
    }

    public int Count { get { return buffer_.Count; } }

    public bool isEmpty()
    {
        return (buffer_.Count == 0);
    }

    public void Enqueue(T data)
    {
        buffer_.Add(data);
    }

    public T Dequeue()
    {
        if (isEmpty())
            return default(T);
        var data = buffer_[0];
        buffer_.RemoveAt(0);
        return data;
    }
}
上記の例はStackに実装を合わせるためにListを使って実装をしているが、先頭の要素を削除しているため非常に効率が悪い。効率化をするためには片方向リストや双方向リストを使って、先頭の要素と末尾の要素を操作する
C#ではQueueクラスが提供されている
ハッシュテーブル
ハッシュテーブル
キーと値の組(エントリと呼ぶ)を複数個格納し、キーに対応する値をすばやく参照するためのデータ構造
エントリを格納する配列を単純に実装すると以下のようになる
| ハッシュテーブルを使わない例 |
|---|
 |
struct Entry<T1, T2>
{
    public T1 Key;
    public T2 Value;
}

class SampleClass
{
    Entry<string, string>[] entries_;
    const int BUFFER_SIZE = 100;
    int tail_;

    public SampleClass()
    {
        entries_ = new Entry<string, string>[BUFFER_SIZE];
        tail_ = 0;
    }

    public void setEntryData(Entry<string, string> entry)
    {
        for(int i = 0; i < tail_; i++)
        {
            if (entries_[i].Key == entry.Key)
            {
                entries_[i].Value = entry.Value;
                return;
            }
        }
        entries_[tail_++] = entry;
    }

    public Entry<string, string> getEntryByKey(string key)
    {
        for (int i = 0; i < tail_; i++)
        {
            if (entries_[i].Key == key)
            {
                return entries_[i];
            }
        }

        return default(Entry<string, string>);
    }
}
イメージをつかむために一部機能しか記述していない
上記のコードからもわかるようにデータの追加/設定/取得をする事に既存のデータの探索を実施しなければならない。つまり、データ数[O(n)]だけ計算が必要になる。
この問題を解決するために、ハッシュテーブルを利用する。ハッシュテーブルは、キーをもとに生成されたハッシュ値を添え字とした配列である。
| ハッシュテーブル(Wikipediaから引用) |
|---|
 |
用意する配列が十分に大きい場合には同じハッシュ値になる可能性は低いため、O(1)の計算量でデータの追加/設定/取得をする事ができる。
C#ではDictionaryクラスで実現することができる
衝突処理
偏りのないハッシュ関数が用意できて、かつ、メモリがふんだんにある環境でハッシュテーブルは使用される。
ただし、偏りのないハッシュ関数であっても複数の異なるキーが同じハッシュ値になることがある。これを衝突(collision)と呼ぶ。キーの分布が予めわからない場合、衝突を避けることはできない。同じハッシュ値となるキーを同族キーと呼ぶ。
衝突が発生したときの対処の方法は、次の2つが考えられる
- 開番地法
- 連鎖法
開番地法
衝突が発生した際、テーブル中の空いている別の番地を探す方式
| ハッシュテーブル |
|---|
 |
ハッシュ関数とは別の関数を用いて次の候補となる番地を求める。別の番地を探す関数は繰り返し適用することによってテーブル内の全ての番地を走査できるように選ぶ。
連鎖法
衝突を起こしたキー同士をポインタでつなぐ方式
| ハッシュテーブル |
|---|
 |
テーブルの各番地にはキーそのものではなく、同族キーを保持するリンクリストを格納する
public class SinglyLinkNode<T>
{
    private SinglyLinkNode<T> next_;
    private T data_;

    public SinglyLinkNode<T> NextNode { get { return next_; } set { next_ = value; } }
    public T Value { get { return data_; } }

    public SinglyLinkNode(T data)
    {
        data_ = data;
        next_ = null;
    }
}

class LinkedHashtable<T>
{
    SinglyLinkNode<T>[] table_;
    int mask_;

    int Pow2(uint n)
    {
        --n;
        int p = 0;
        for (; n != 0; n >>= 1) {
            p = (p << 1) + 1;
        }
        return p + 1;
    }

    public LinkedHashtable(int capacity)
    {
        var array_size = Pow2((uint)capacity);
        mask_ = array_size - 1;
        table_ = new SinglyLinkNode<T>[array_size];
    }

    public void Insert(T element)
    {
        int code = element.GetHashCode() & this.mask_;
        var next = this.table_[code];
        var insert_data = new SinglyLinkNode<T>(element);
        insert_data.NextNode = next;
        this.table_[code] = insert_data;
    }

    public void Erase(T element)
    {
        int code = element.GetHashCode() & this.mask_;
        var node = this.table_[code];

        if (node == null) return;
        if (node.NextNode == null)
            this.table_[code] = null;

        while (node.NextNode != null && node.NextNode.Value.Equals(element))
            node = node.NextNode;

        if (node.NextNode != null)
            node.NextNode = node.NextNode.NextNode;
    }

    public bool Contains(T element)
    {
        int code = element.GetHashCode() & this.mask_;
        var node = this.table_[code];

        while (node != null && !node.Value.Equals(element))
            node = node.NextNode;

        return node != null;
    }

    public T Find(T element)
    {
        int code = element.GetHashCode();
        var node = this.table_[code & this.mask_];

        while (node != null && !node.Value.Equals(element))
            node = node.NextNode;

        if (node == null)
            return default(T);

        return node.Value;
    }
}
ヒープ
ヒープ
「子要素は親要素より常に大きいか等しい(または常に小さいか等しい)」という制約を持つ木構造
単に「ヒープ」という場合、二分木を使ったバイナリヒープを指すことが多い
木構造の一種で、格納されている全ての要素の中から、最小値または最大値を持つ要素を探すことに適した構造である。ヒープは、根が最小値、または最大値となるように構成する。そのため、根が最小値とした場合、ある節の値は必ずその親以上の値になる。ただし、二分探索木と違い、ある節が持っている子同士には、特に条件はない。
| ヒープ |
|---|
 |
上の図に示すように「子要素は親要素より常に大きいか等しい」という条件を満たしていれば子の要素の配置は決まっていない
説明では最小ヒープ(親ノードは子ノードより小さいか等しい)を使って説明をする。
要素の追加
要素を追加する場合には以下の手順で追加を実施する
| ヒープの挿入順 |
|---|
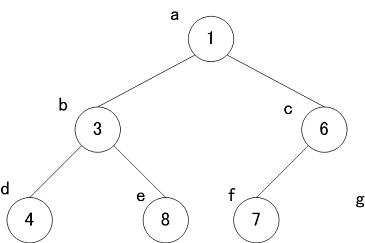 |
- データを挿入する場所を特定する
- 一番下の段の左端から順に挿入する
- 上図ではa~gの順に挿入するため、今回はgが挿入場所になる
- 1.で特定した場所にデータを挿入する
- 親のデータと比較し、親のデータのほうが大きい場合データを入れ替える
- さらに親データと比較し、「親 < 子」の条件が全て満たされるまで入れ替えを実施する
| 親データとの比較 | 親データとデータの入れ替え |
|---|---|
 |
 |
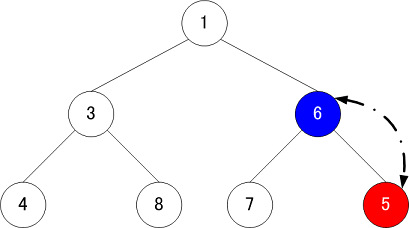
要素の削除
要素を削除する場合には以下の手順で追加を実施する。今回は根ノードの「1」を削除する
| 要素の削除 |
|---|
 |
- データの入れ替えする要素を特定する
- 削除対象の要素から見た一番下の段の左端の要素で、今回は「5」が該当
- 3を削除する場合は8が対象
- 6を削除する場合は5が対象
- 子ノードを持たない場合には、対象要素を削除して終了
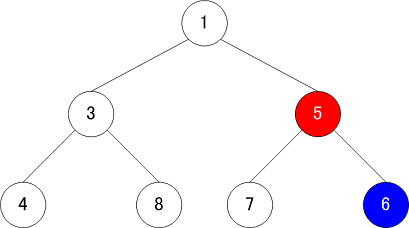
- 削除対象のデータを削除後、入れ方対象の要素と入れ替えを実施
- 子データと比較し、親データのほうが大きい場合データを入れ替える
- 比較は左側の子ノードから実施する
- 入れ替え後、子データと比較し、「親 < 子」の条件が全て満たされるまで入れ替えを実施する
| 親データとデータの入れ替え① | 親データとデータの入れ替え② | 親データとデータの入れ替え③ |
|---|---|---|
 |
 |
 |
サンプルコード
ヒープのノードは次のような構造である。
public class Node
{
    int value_;

    public Node Parent { set; get; }
    public Node LeftChild { set; get; }
    public Node RightChild { set; get; }

    public Node(int value_, Node parent)
    {
        this.value_ = value_;
        Parent = parent;
        LeftChild = null;
        RightChild = null;
    }
}
ただし、次の2つの特徴から配列を使って表現することができる
- 末端のノードを除いて必ず子ノードを2つ持つ
- 葉は左詰
| Heapのインデックス |
|---|
 |
上の図に示すように親子のインデックスには次の関係がある
- $ParentIndex = \dfrac{ParentIndex - 1}{2}$
- $LeftChildIndex = 2 \times ParentIndex + 1$
- $RightChildIndex = 2 \times (ParentIndex + 1)$
この特性を利用すると以下のようなコードになる
class Heap
{
    List<int> array_;
    public int Count { get { return array_.Count; } }
    public Heap()
    {
        array_ = new List<int>();
    }
    public Heap(int[] data_array)
    {
        array_ = new List<int>();
        foreach(int data in data_array)
        {
            Push(data);
        }
    }
    public void Push(int element)
    {
        int target_index = array_.Count;
        array_.Add(element);
        while (target_index != 0)
        {
            int parent_index = (target_index - 1) / 2;
            // 親と値を入れ替え
            if (array_[target_index] < array_[parent_index])
            {
                var temporary = array_[target_index];
                array_[target_index] = array_[parent_index];
                array_[parent_index] = temporary;
            }
            target_index = parent_index;
        }
    }
    public void DeleteRoot()
    {
        int array_total = array_.Count - 1;
        array_[0] = array_[array_.Count - 1];
        array_.RemoveAt(array_.Count - 1);
        for (int parent_index = 0, child_index = 0; (child_index = 2 * parent_index + 1) < array_total;)
        {
            // 値の小さい方の子を選ぶ
            if ((child_index != array_total - 1) && (array_[child_index] > array_[child_index + 1]))
                child_index++;
            // 子と値を入れ替え
            if (array_[parent_index] > array_[child_index])
            {
                var temporary = array_[child_index];
                array_[child_index] = array_[parent_index];
                array_[parent_index] = temporary;
            }
            parent_index = child_index;
        }
    }
    public int PopRoot()
    {
        int return_value = array_[0];
        DeleteRoot();
        return return_value;
    }
}
二分岐探索木
| 二分岐探索木 |
|---|
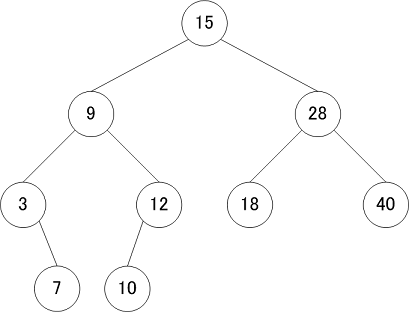 |
二分探索木は次の特徴を持つ
- 2分木(各ノードは最大で2本の子を持つ)
- 全ての要素が「左の子<親≦右の子」(あるいは「左の子≦親<右の子」)という大小関係を満たす
| ルートから見た大小関係 | 最大値・最小値のサーチ |
|---|---|
 |
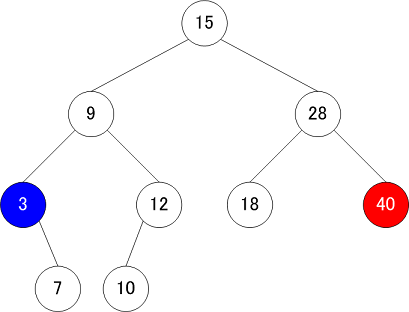 |
要素の挿入・削除・検索は、木の根から葉までの経路を1つ探索することになるので、木の高さ分に比例する計算量が必要になる。
理想的には、木のバランスが均等に整っていれば、要素数をnとして計算量は $O(\log n)$ になる。しかし、木が左右どちらかに偏っている場合には計算量は $O(n)$ になる。
二分岐探索木の特徴をまとめると以下のようになる
- 理想的には、要素の挿入・削除・検索が $O(\log n)$ で行える
- 「ハッシュテーブル」のように、メモリを多めに確保しておく必要がない
- 要素を整列された順序で取り出せる
- 木の高さがバランスを保っていないと検索などの操作の計算量が $O(n)$ になる
- 平衡化機構があれば解決できる
ノードの定義
二分岐探索木は、以下のような左右の子を持つノードを定義する
public class Node
{
    int value_;

    public Node Parent { set; get; }
    public Node LeftChild { set; get; }
    public Node RightChild { set; get; }

    public int Value { get { return value_; } set { value_ = value; } }

    public Node(int value_, Node parent)
    {
        this.value_ = value_;
        Parent = parent;
        LeftChild = null;
        RightChild = null;
    }

    internal Node Min
    {
        get
        {
            Node node = this;
            while (node.LeftChild == null)
                node = node.LeftChild;
            return node;
        }
    }

    internal Node Max
    {
        get
        {
            Node node = this;
            while (node.RightChild == null)
                node = node.RightChild;
            return node;
        }
    }
}
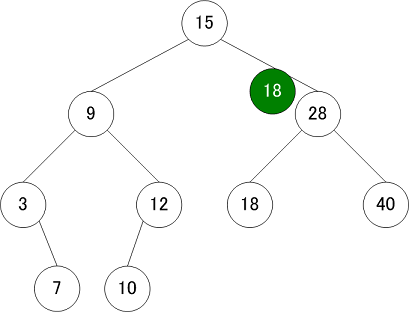
検索
検索は、「左の子<親≦右の子」という特徴を活かして、値の大小を見て、左の子を見るか右の子を見るか決めて、木を根から葉に向かって検索を行う
| 検索操作① | 検索操作② | 検索操作③ |
|---|---|---|
 |
 |
 |
挿入
検索のときと同じ要領で木の中を探索し、新しい葉を作る
| 挿入操作① | 挿入操作② |
|---|---|
 |
 |
| 挿入操作③ | 挿入操作④ |
|---|---|
 |
 |
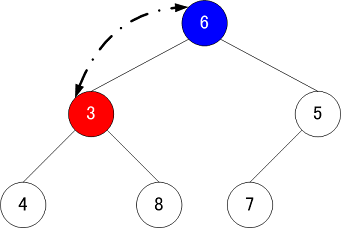
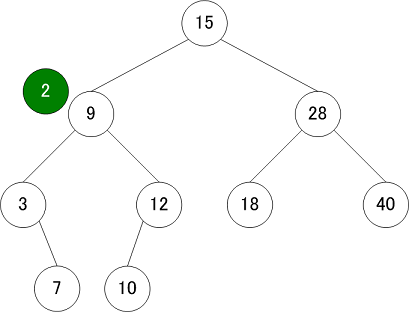
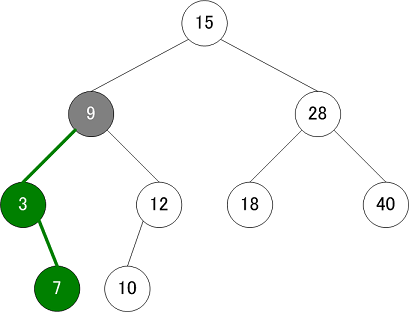
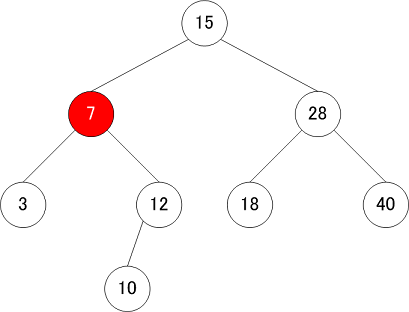
削除
削除操作も以下のルールに従って実行する
- 左の子がnullなら、自身の位置に右の子ノードを繋ぎなおす
- 右の子がnullなら、自身の位置に左の子ノードを繋ぎなおす。
- 両方の子が非nullなら、自身の次に小さな値を持つノードで自身を置き換える
| 削除操作① | 削除操作② | 削除操作③ |
|---|---|---|
 |
 |
 |
サンプルコード
class BinaryTree
{
    Node root;

    public Node Find(int element)
    {
        Node node = this.root;
        while (node != null)
        {
            if (node.Value.CompareTo(element) > 0)
                node = node.LeftChild;
            else if (node.Value.CompareTo(element) < 0)
                node = node.RightChild;
            else
                return node;
        }
        return node;
    }

    public void Insert(int element)
    {
        if (this.root == null)
        {
            this.root = new Node(element, null);
            return;
        }

        Node node = this.root;
        Node parent = null;
        while (node != null)
        {
            parent = node;
            if (node.Value.CompareTo(element) > 0)
                node = node.LeftChild;
            else
                node = node.RightChild;
        }

        node = new Node(element, parent);
        if (parent.Value.CompareTo(element) > 0)
            parent.LeftChild = node;
        else
            parent.RightChild = node;
    }

    public void Erase(Node node)
    {
        if (node == null)
            return;

        if (node.LeftChild == null)
            this.Replace(node, node.RightChild);
        else if (node.RightChild == null)
            this.Replace(node, node.LeftChild);
        else
        {
            Node next_min = node.LeftChild.Max;
            node.Value = m.Value;
            this.Replace(next_min, next_min.RightChild);
        }
    }
    void Replace(Node node1, Node node2)
    {
        Node parent = node1.Parent;
        if (node2 != null)
            node2.Parent = parent;
        if (node1 == this.root)
            this.root = node2;
        else if (parent.LeftChild == node1)
            parent.LeftChild = node2;
        else
            parent.RightChild = node2;
    }
}