はじめに
最近、FirebaseのStorageが有料化 したりなど、個人開発でFirebaseを使うのがだんだんと躊躇われるようになってきました。
そこで、次世代Firebaseとも呼び声の高いSupabaseを使って、iPhoneアプリを作っていきます。
Supabaseとは?
Supabaseは、オープンソースのBackend as a Service(BaaS)で、PostgreSQLを基盤としたリアルタイムデータベース、認証機能、ストレージ、サーバーレス関数などを提供します。これにより、開発者は複雑なバックエンドの構築を最小限に抑えつつ、高速かつ安全にアプリケーションを開発できます。また、リアルタイム同期やロールベースのアクセス制御などの高度な機能が特徴で、Firebaseの代替として注目されています。
Supabaseでプロジェクトを作成しよう
アカウントを作成すると、New projectから新しいプロジェクトを作成できます。
作成するとこんな感じ。
次に左のメニューからSQL Editorを開きます。
ここにSQLを書くことで、テーブルを作成できます。
今回はサンプルとして、usersテーブルとscoresテーブルを作り、1対多の関係を持たせます。
create table public.users (
  id uuid default gen_random_uuid() primary key,
  name text not null,
  created_at timestamp with time zone default now()
);
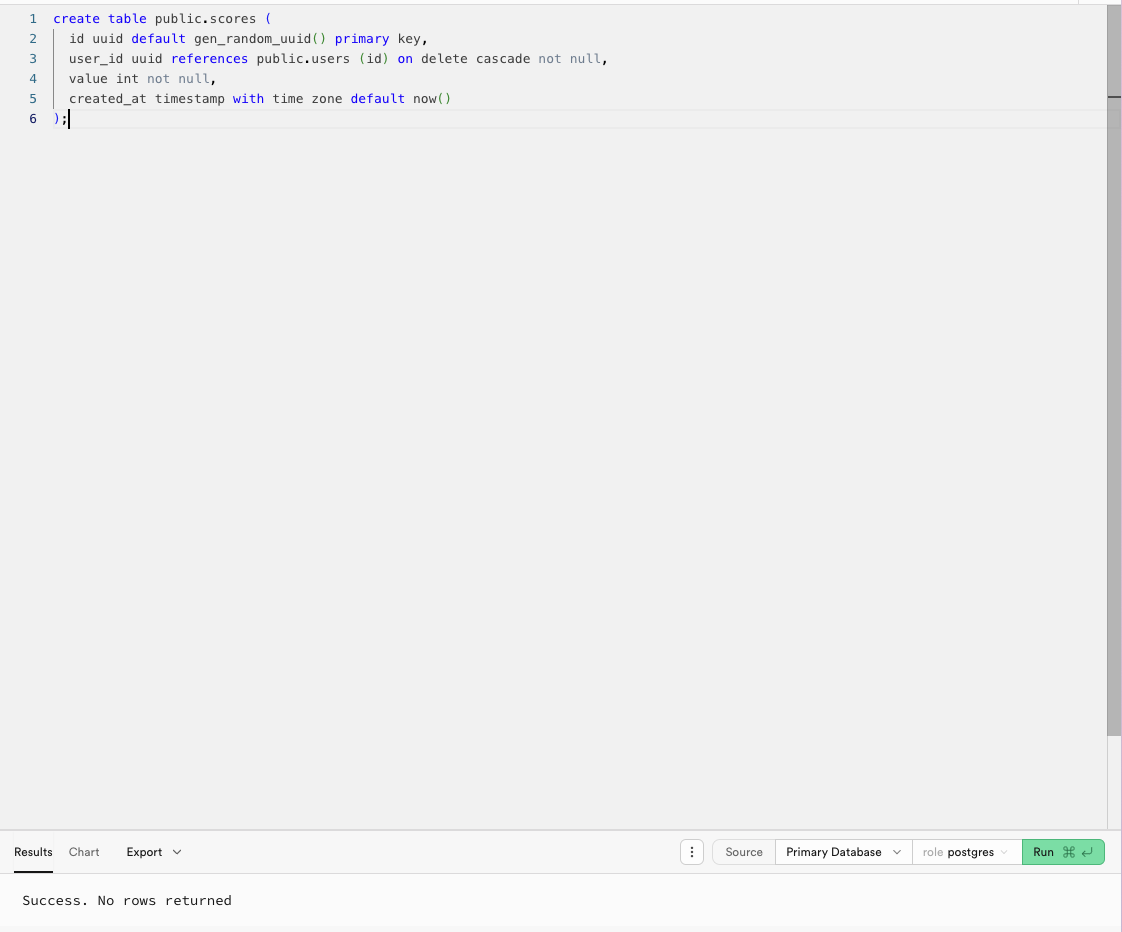
create table public.scores (
  id uuid default gen_random_uuid() primary key,
  user_id uuid references public.users (id) on delete cascade not null,
  value int not null,
  created_at timestamp with time zone default now()
);
実行が成功すると画面下部に「Success. No rows returned」と表示されます。
次に、それぞれのテーブルにテストデータを追加しましょう。
-- Insert test data into the 'users' table
INSERT INTO users (id, name, created_at)
VALUES
    ('11111111-1111-1111-1111-111111111111', 'Alice', NOW()),
    ('22222222-2222-2222-2222-222222222222', 'Bob', NOW()),
    ('33333333-3333-3333-3333-333333333333', 'Charlie', NOW());

-- Insert test data into the 'scores' table
INSERT INTO scores (id, user_id, value, created_at)
VALUES
    ('44444444-4444-4444-4444-444444444444', '11111111-1111-1111-1111-111111111111', 100, NOW()),
    ('55555555-5555-5555-5555-555555555555', '11111111-1111-1111-1111-111111111111', 150, NOW()),
    ('66666666-6666-6666-6666-666666666666', '22222222-2222-2222-2222-222222222222', 200, NOW()),
    ('77777777-7777-7777-7777-777777777777', '33333333-3333-3333-3333-333333333333', 50, NOW()),
    ('88888888-8888-8888-8888-888888888888', '33333333-3333-3333-3333-333333333333', 75, NOW());
左のメニューからDatabase > Schema Visualizerを選ぶと、現在のテーブルの関係が見られます。
また、Table Editorから現在のデータ一覧が確認できます。
Supabaseをアプリに組み込もう
次に、Supabaseを用いてアプリを作成していきます。
Swift Package ManagerでSupabaseを追加
まずはSwift Package ManagerでSupabaseを追加します。
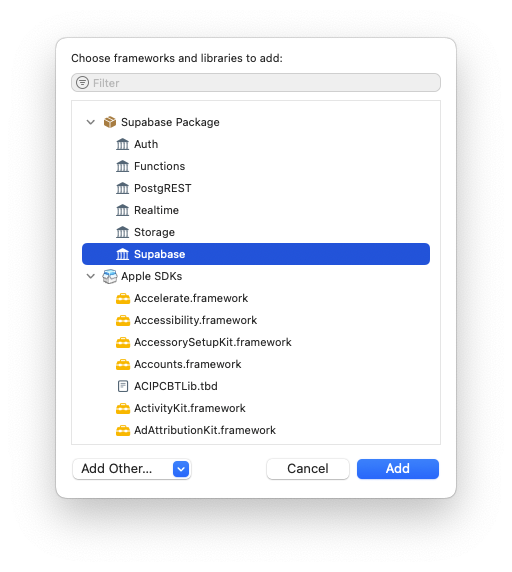
ここで、import Supabaseがうまく反応しない場合は、ライブラリとしてSupabaseが認識されていない場合があります。
Frameworks, Libraries, and Embedded Contentの+ボタンから、Supabaseを追加します。
コードを書く
次にコードを書いていきます。
// Models.swift
import Foundation

struct User: Identifiable, Decodable {
    let id: UUID
    let name: String
    let created_at: Date
}

struct Score: Identifiable, Decodable {
    let id: UUID
    let user_id: UUID
    let value: Int
    let created_at: Date
}
import Foundation
import Supabase

class SupabaseManager {
    static let shared = SupabaseManager()

    let client: SupabaseClient

    private init() {
        // Supabase URLとAnon Keyで置き換え
        let url = URL(string: "https://your url.supabase.co")!
        let key = "Your API KEY"
        client = SupabaseClient(supabaseURL: url, supabaseKey: key)
    }
}
ここで、Supabase URLとAnon Keyは画面右下のProject Setting > APIから確認できます。
// ContentView.swift
import SwiftUI

struct ContentView: View {
    @StateObject private var viewModel = UserListViewModel()

    var body: some View {
        NavigationView {
            List(viewModel.users) { user in
                NavigationLink(destination: ScoreListView(user: user)) {
                    Text(user.name)
                }
            }
            .navigationTitle("Users")
            .task {
                await viewModel.fetchUsers()
            }
        }
    }
}
// UserListViewModel.swift
import Foundation
import Supabase

@MainActor
class UserListViewModel: ObservableObject {
    @Published var users: [User] = []
    @Published var error: String?

    func fetchUsers() async {
        do {
            let response: PostgrestResponse<[User]> = try await SupabaseManager.shared.client
                .from("users")
                .select()
                .execute()

            users = response.value
        } catch {
            self.error = error.localizedDescription
        }
    }
}
// ScoreListView.swift
import SwiftUI

struct ScoreListView: View {
    let user: User
    @StateObject private var viewModel = ScoreListViewModel()

    var body: some View {
        List(viewModel.scores) { score in
            HStack {
                Text("Score: \(score.value)")
                Spacer()
                Text("\(score.created_at, formatter: dateFormatter)")
                    .font(.caption)
                    .foregroundColor(.gray)
            }
        }
        .navigationTitle("\(user.name)'s Scores")
        .task {
            await viewModel.fetchScores(for: user.id)
        }
    }
}

let dateFormatter: DateFormatter = {
    let formatter = DateFormatter()
    formatter.dateStyle = .short
    formatter.timeStyle = .short
    return formatter
}()
// ScoreListViewModel.swift
import Foundation
import Supabase

@MainActor
class ScoreListViewModel: ObservableObject {
    @Published var scores: [Score] = []
    @Published var error: String?

    func fetchScores(for userId: UUID) async {
        do {
            let response: PostgrestResponse<[Score]> = try await SupabaseManager.shared.client
                .from("scores")
                .select()
                .eq("user_id", value: userId)
                .execute()

            scores = response.value
        } catch {
            self.error = error.localizedDescription
        }
    }
}
これで実行すると、ちゃんとデータを取得することができます。
まとめ
GraphQLなどもサポートされていてかなり使い勝手が良い印象を受けるので、これからも使い倒していきたいなと思います!皆さんも使っていきましょう!


