はじめに
大学の研究の一環でロボットアームの可動範囲を計算する必要があり,方法を調べてみたのですが,意外と資料が少ないと感じました.
そこで,この記事では平面2リンクマニピュレータを対象に可動範囲をmatplotlibで描画する方法を紹介したいと思います.
実行環境は以下の通りです.
- Python 3.12.7
- matplotlib 3.9.2
- numpy 2.1.2
2リンクマニピュレータ
取り扱うマニピュレータ
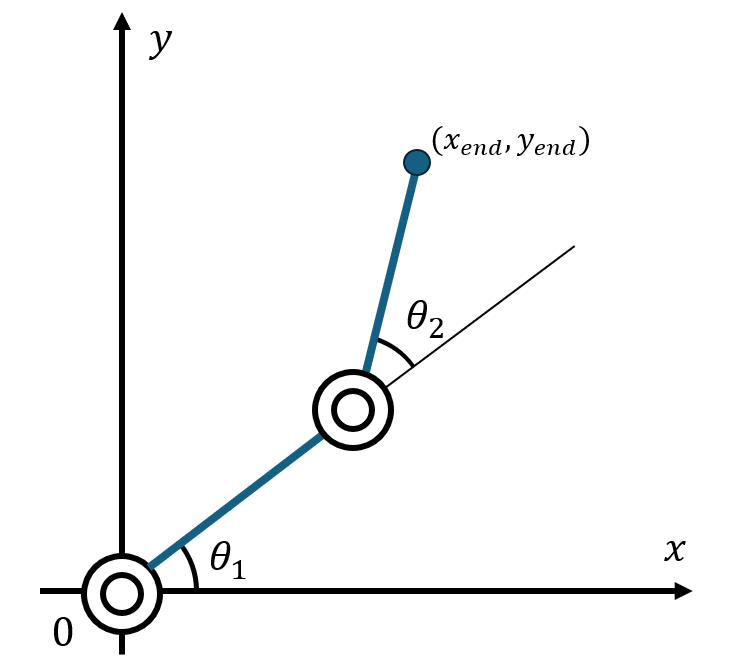
まず,取り扱うマニピュレータのパラメータを定義します.
- リンク1の長さ: $l1$
- リンク2の長さ: $l2$
- 関節1: $θ1$
- 関節2: $θ2$
簡単のため,ジョイント1は原点に固定されています.
また,関節は反時計回りが回転の正の方向となっています.
順運動学解
可動範囲を描くためには少なくとも順運動学解を求める必要があります.
ちなみに,順運動学と逆運動学について簡単に説明すると,
- 順運動学:関節角度から手先座標を求めること
- 逆運動学:手先座標から関節角度を求めること
です.
2リンクマニピュレータの順運動学解は以下のように求められます.
x_{end} = l1 cos(θ1) + l2 cos(θ1 + θ2)
y_{end} = l1 sin(θ1) + l2 sin(θ1 + θ2)
シンプルな三角関数の問題ですね.繰り返しにはなりますが,上図のように関節角度を定義しており,反時計回りが正の方向となっていることに留意してください.
Pythonで順運動学解を求める
以下にPythonで順運動学解を求めるプログラムを示します.スライダーで関節角度を変更すると,リンクマニピュレータの位置が更新されるようにします.
また,l1やl2を変更することでリンクの長さを変更でき,theta1_minやtheta1_max,theta2_minやtheta2_maxを変更することで関節角度の範囲を変更できます.初期値は$l1 = l2 = 1.0$であり,関節角度は$-π/2$から$π/2$までの範囲で変更できます.
実行結果

スライダーを操作することで,マニピュレータがアニメーションします.
コード
import numpy as np
import matplotlib.pyplot as plt
from matplotlib.widgets import Slider

class TwoLinkManipulator:
    def __init__(self, l1, l2):
        # リンクの長さ
        self.l1 = l1
        self.l2 = l2

        # 関節角度のパラメータ
        self.theta1_min = -np.pi / 2
        self.theta1_max = np.pi / 2
        self.theta2_min = -np.pi / 2
        self.theta2_max = np.pi / 2

        # ベースの位置
        self.base = (0, 0)

    def forward_kinematics(self, theta1, theta2):
        x1 = self.base[0]
        y1 = self.base[1]
        x2 = x1 + self.l1 * np.cos(theta1)
        y2 = y1 + self.l1 * np.sin(theta1)
        x_end = x2 + self.l2 * np.cos(theta1 + theta2)
        y_end = y2 + self.l2 * np.sin(theta1 + theta2)
        return (x1, y1), (x2, y2), (x_end, y_end)

def main():
    theta1_init = 0.0  # 関節1の初期角度
    theta2_init = 0.0  # 関節2の初期角度
    link1_length = 1.0  # リンク1の長さ
    link2_length = 1.0  # リンク2の長さ

    robot = TwoLinkManipulator(l1=link1_length, l2=link2_length)

    # 図の設定
    fig, ax = plt.subplots()
    plt.subplots_adjust(left=0.25, bottom=0.25)

    # 初期位置の計算と描画
    (x1, y1), (x2, y2), (x_end, y_end) = robot.forward_kinematics(theta1_init, theta2_init)
    line, = ax.plot([x1, x2, x_end], [y1, y2, y_end], 'o-', lw=2)

    # 軸の設定
    width = (link1_length + link2_length) * 1.1
    ax.set_xlim(-width, width)
    ax.set_ylim(-width, width)
    ax.set_aspect('equal')

    # スライダーの作成
    ax_theta1 = plt.axes([0.25, 0.1, 0.65, 0.03], facecolor='lightgoldenrodyellow')
    ax_theta2 = plt.axes([0.25, 0.15, 0.65, 0.03], facecolor='lightgoldenrodyellow')

    slider_theta1 = Slider(ax_theta1, 'Theta1',
                           robot.theta1_min, robot.theta1_max, valinit=theta1_init)
    slider_theta2 = Slider(ax_theta2, 'Theta2',
                           robot.theta2_min, robot.theta2_max, valinit=theta2_init)

    # スライダー更新時のコールバック関数
    def update(val):
        theta1 = slider_theta1.val
        theta2 = slider_theta2.val
        (x1, y1), (x2, y2), (x_end, y_end) = robot.forward_kinematics(theta1, theta2)
        line.set_xdata([x1, x2, x_end])
        line.set_ydata([y1, y2, y_end])
        fig.canvas.draw_idle()

    # スライダー変更時にupdate関数を呼び出す
    slider_theta1.on_changed(update)
    slider_theta2.on_changed(update)

    plt.show()

if __name__ == '__main__':
    main()
可動範囲の描画
さて,順運動学解が求められたので,次は可動範囲を描画します.
可動範囲を描画するためには,関節角度を変化させて手先座標を求め,その座標をプロットすればよいです.関節角度は次のように変化させます.
- 関節1の角度を$θ1_{min}$から$θ1_{max}$まで変化させ,関節2の角度を$0$にする
- 関節1の角度を$θ1_{min}$から$θ1_{max}$まで変化させ,関節2の角度を$θ2_{max}$にする
- 関節1の角度を$θ1_{min}$にし,関節2の角度を$0$から$θ2_{max}$まで変化させる
- 関節1の角度を$θ1_{max}$にし,関節2の角度を$0$から$θ2_{max}$まで変化させる
これに加えて,
- 関節1の角度を$θ1_{min}$から$θ1_{max}$まで変化させ,関節2の角度を$θ2_{min}$にする
- 関節1の角度を$θ1_{min}$から$θ1_{max}$まで変化させ,関節2の角度を$0$にする
- 関節1の角度を$θ1_{min}$にし,関節2の角度を$θ2_{min}$から$0$まで変化させる
- 関節1の角度を$θ1_{max}$にし,関節2の角度を$θ2_{min}$から$0$まで変化させる
こうすることで,マニピュレータの可動範囲を描画できます.
以下に先ほどのコードに可動範囲を表示する処理を加えたプログラムを示します.
実行結果

緑の範囲と,赤の範囲はそれぞれ逆運動学解の±を描画したものです.
すなわち,ふたつの範囲が重なる部分では逆運動学解がふたつ存在することを示しています.
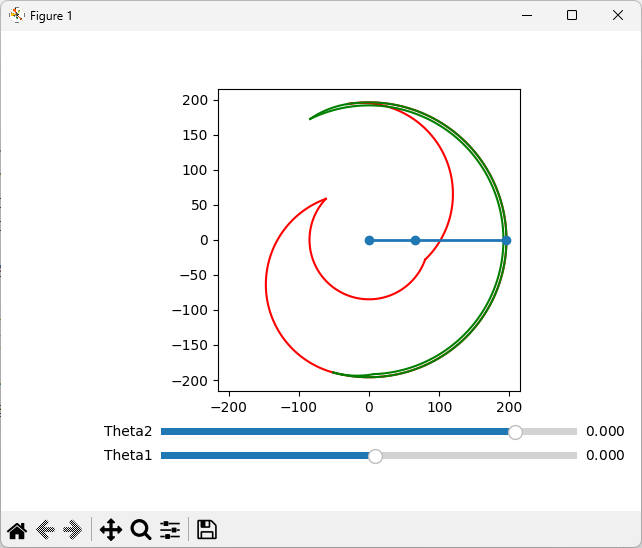
パラメータを変えてみたものが上の図です.それぞれ,
$l1 = 66$,$l2 = 130$,
$θ1_{min}=-105[deg]$,$θ1_{max}=99[deg]$,
$θ2_{min}=-145[deg]$,$θ2_{max}=25.5[deg]$
に変更しております.
コード
import numpy as np
import matplotlib.pyplot as plt
from matplotlib.widgets import Slider

class TwoLinkManipulator:
    def __init__(self, l1, l2):
        # リンクの長さ
        self.l1 = l1
        self.l2 = l2

        # 関節角度のパラメータ
        self.theta1_min = -np.pi / 2
        self.theta1_max = np.pi / 2
        self.theta2_min = -np.pi / 2
        self.theta2_max = np.pi / 2

        # ベースの位置
        self.base = (0, 0)

    def forward_kinematics(self, theta1, theta2):
        x1 = self.base[0]
        y1 = self.base[1]
        x2 = x1 + self.l1 * np.cos(theta1)
        y2 = y1 + self.l1 * np.sin(theta1)
        x_end = x2 + self.l2 * np.cos(theta1 + theta2)
        y_end = y2 + self.l2 * np.sin(theta1 + theta2)
        return (x1, y1), (x2, y2), (x_end, y_end)

    def get_workspace(self, t1min, t1max, t2min, t2max):
        theta1_list = np.linspace(t1min, t1max, 100)
        theta2_list = np.linspace(t2min, t2max, 100)

        x_list1, y_list1 = [], []
        x_list2, y_list2 = [], []

        for theta1 in theta1_list:
            theta2 = t2min
            (x_end, y_end) = self.forward_kinematics(theta1, theta2)[2]
            x_list1.append(x_end)
            y_list1.append(y_end)

            theta2 = t2max
            (x_end, y_end) = self.forward_kinematics(theta1, theta2)[2]
            x_list2.append(x_end)
            y_list2.append(y_end)

        x_list3, y_list3 = [], []
        x_list4, y_list4 = [], []

        for theta2 in theta2_list:
            theta1 = t1min
            (x_end, y_end) = self.forward_kinematics(theta1, theta2)[2]
            x_list3.append(x_end)
            y_list3.append(y_end)

            theta1 = t1max
            (x_end, y_end) = self.forward_kinematics(theta1, theta2)[2]
            x_list4.append(x_end)
            y_list4.append(y_end)

        return (x_list1, x_list2), (y_list1, y_list2), (x_list3, x_list4), (y_list3, y_list4)


def main():
    theta1_init = 0.0  # 関節1の初期角度
    theta2_init = 0.0  # 関節2の初期角度
    link1_length = 1.0  # リンク1の長さ
    link2_length = 1.0  # リンク2の長さ

    robot = TwoLinkManipulator(l1=link1_length, l2=link2_length)

    # 図の設定
    fig, ax = plt.subplots()
    plt.subplots_adjust(left=0.25, bottom=0.25)

    # 可動範囲の計算と描画
    res1 = robot.get_workspace(robot.theta1_min, robot.theta1_max, robot.theta2_min, 0)
    ax.plot(res1[0][0], res1[1][0], 'r')
    ax.plot(res1[0][1], res1[1][1], 'r')
    ax.plot(res1[2][0], res1[3][0], 'r')
    ax.plot(res1[2][1], res1[3][1], 'r')

    res2 = robot.get_workspace(robot.theta1_min, robot.theta1_max, 0, robot.theta2_max)
    ax.plot(res2[0][0], res2[1][0], 'g')
    ax.plot(res2[0][1], res2[1][1], 'g')
    ax.plot(res2[2][0], res2[3][0], 'g')
    ax.plot(res2[2][1], res2[3][1], 'g')

    # 初期位置の計算と描画
    (x1, y1), (x2, y2), (x_end, y_end) = robot.forward_kinematics(theta1_init, theta2_init)
    line, = ax.plot([x1, x2, x_end], [y1, y2, y_end], 'o-', lw=2)

    # 軸の設定
    width = (link1_length + link2_length) * 1.1
    ax.set_xlim(-width, width)
    ax.set_ylim(-width, width)
    ax.set_aspect('equal')

    # スライダーの作成
    ax_theta1 = plt.axes([0.25, 0.1, 0.65, 0.03], facecolor='lightgoldenrodyellow')
    ax_theta2 = plt.axes([0.25, 0.15, 0.65, 0.03], facecolor='lightgoldenrodyellow')

    slider_theta1 = Slider(ax_theta1, 'Theta1',
                           robot.theta1_min, robot.theta1_max, valinit=theta1_init)
    slider_theta2 = Slider(ax_theta2, 'Theta2',
                           robot.theta2_min, robot.theta2_max, valinit=theta2_init)

    # スライダー更新時のコールバック関数
    def update(val):
        theta1 = slider_theta1.val
        theta2 = slider_theta2.val
        (x1, y1), (x2, y2), (x_end, y_end) = robot.forward_kinematics(theta1, theta2)
        line.set_xdata([x1, x2, x_end])
        line.set_ydata([y1, y2, y_end])
        fig.canvas.draw_idle()

    # スライダー変更時にupdate関数を呼び出す
    slider_theta1.on_changed(update)
    slider_theta2.on_changed(update)

    plt.show()

if __name__ == '__main__':
    main()