はじめに
今回は前回の記事の続きとなります。
Githubからのデプロイと、Webサーバー・アプリケーションサーバの設定まで終わらせるのが目標です。頑張っていきましょう!
Githubからのデプロイ
公開用ディレクトリの作成
次にGitHubからクローンしてくるアプリの保存先を作成します。
/var/www/アプリ名とするのが一般的みたいなので、今回もそれに従ってディレクトリを作成していきます。/var/www/realworld_apiとしておきましょう。
[test@ip-10-0-1-202 /]$ cd /var
[test@ip-10-0-1-202 var]$ mkdir www
ルート直下のディレクトリ構成を確認すると/varが既に作成されていますが、パーミッションに問題がありそうです。
所有者及び所有者グループがrootになっているためtestユーザーでは書き込みが許可されていません。
[test@ip-10-0-1-202 ~]$ cd /
[test@ip-10-0-1-202 /]$ ls -al
drwxr-xr-x  19 root root  269  6月 30 08:07 var
そうしましたらchmodコマンドを使用してディレクトリの権限をtestに変更をしておきます。
[test@ip-10-0-1-202 ~]$ sudo chown test:test /var
Githubとの連携
次はEC2とGithubを連携させていきたいと思います。
主に以下の手順で連携させていきます。
1.Githubの認証情報をEC2上に登録
2.Github上に公開鍵の登録
3.EC2からGithubにSSH接続
まずはEC2の.sshディレクトリへ移動します。
[test@ip-10-0-1-202 /]$ cd ~/.ssh
次にconfigファイルを接続用に編集します。
[test@ip-10-0-1-202 .ssh]$ vim config
以下のように設定してください。
Host github
  Hostname github.com
  User git
  IdentityFile ~/.ssh/id_rsa
これにより、githubというホストエイリアスが作成され、GitHubに接続する際にはgithubをホスト名として使用します。また、gitユーザーとして接続し、~/.ssh/id_rsaが秘密鍵として使用されます。
そしてSSH接続用の公開鍵&秘密鍵を作成していきます。
[test@ip-10-0-1-202 /]$ cd ~/.ssh
[test@ip-10-0-1-202 .ssh]$ ssh-keygen -t rsa
Generating public/private rsa key pair.
Enter file in which to save the key (/home/test/.ssh/id_rsa):
Enter passphrase (empty for no passphrase):
Enter same passphrase again:
Your identification has been saved in /home/test/.ssh/id_rsa.
Your public key has been saved in /home/test/.ssh/id_rsa.pub.
The key fingerprint is:
これでid_rsa.pubというファイルに公開鍵が作成されました!
次にcatコマンドで中身を確認しコピーしましょう。
[test@ip-10-0-1-202 .ssh]$ cat id_rsa.pub
ssh-rsa AAAAB3NzaC1yc2EAAAADAQABAAABAQCk・・・
コピーしたらこちらのページに移動してください。
そうしましたら下記のボタンをクリックして公開鍵を登録していきます。

登録できると以下のような表示が出現すると思います。
これが緑色になると認証完了の合図なので手続きしていきます。

では接続していきます。
[test@ip-10-0-1-202 .ssh]$ ssh -T github
The authenticity of host 'github.com (20.27.177.113)' can't be established.
ECDSA key fingerprint is SHA256:p2QAMXNIC1TJYWeIOttrVc98/R1BUFWu3/LiyKgUfQM.
ECDSA key fingerprint is MD5:7b:99:81:1e:4c:91:a5:0d:5a:2e:2e:80:13:3f:24:ca.
Are you sure you want to continue connecting (yes/no)? yes
Warning: Permanently added 'github.com,20.27.177.113' (ECDSA) to the list of known hosts.
Hi ASONE0923! You've successfully authenticated, but GitHub does not provide shell access.
yesと打ち込んだ後に歓迎のメッセージが返って来れば接続完了です。
アプリケーションクローン
それではアプリケーションをクローンしていきます。
まずはクローンしたいアプリのgithubページへ移動します。
そうしましたらSSH用のクローンURLをコピーしましょう。

ではクローンしていきましょう。
[test@ip-10-0-1-202 www]$ git clone git@github.com:ASONE0923/realworld_api.git
Cloning into 'realworld_api'...
remote: Enumerating objects: 82, done.
remote: Counting objects: 100% (82/82), done.
remote: Compressing objects: 100% (65/65), done.
remote: Total 82 (delta 2), reused 82 (delta 2), pack-reused 0
Receiving objects: 100% (82/82), 19.95 KiB | 4.99 MiB/s, done.
Resolving deltas: 100% (2/2), done.
成功しました。
きちんと/var/wwwのは以下にあるかも確認していきます。
[test@ip-10-0-1-202 www]$ ls
realworld_api
大丈夫そうですね。
bundle installの実行
次にクローンしたアプリのgemをEC2インスタンス内にインストールしていきたいと思います。
まずはbundlerをインストールしましょう。
- Bundlerは、Rubyプログラミング言語向けの依存関係管理ツールです。Rubyプロジェクトで使用されるGem(Rubyのパッケージ)の依存関係を管理し、Gemのバージョンの互換性を確保するために使用されます。
bundlerはローカルにインストールされているバージョンと揃えたいので確認しておいてください。
% bundler -v
Bundler version 2.4.13
次にEC2インスタンス内にも同じものをインストールします。
[test@ip-10-0-1-202 www]$ cd realworld_api/
[test@ip-10-0-1-202 realworld_api]$ gem install bundler -v 2.4.13
Successfully installed bundler-2.4.13
Parsing documentation for bundler-2.4.13
Done installing documentation for bundler after 0 seconds
1 gem installed
成功しました。
次にgemもインストールしていきます。
- gemは、Rubyプログラミング言語で使用されるパッケージ管理システムです。Rubyのコード、ライブラリ、ツール、アプリケーションなど、再利用可能なコンポーネントをパッケージ化して配布するために使用されます
[test@ip-10-0-1-202 realworld_api]$ bundle install
Fetching gem metadata from https://rubygems.org/..........
Resolving dependencies...
yarn installの実行
それではyarnもついでにインストールしちゃいましょう。
- Yarnは、パッケージの追加やバージョン管理を効率的に行うためのツールです。
- RailsプロジェクトでYarnを使用すると、JavaScriptのパッケージを管理し、フロントエンドのビルドツールやライブラリを簡単に導入できます
[test@ip-10-0-1-202 realworld_api]$ yarn install
yarn install v1.22.19
info No lockfile found.
[1/4] Resolving packages...
[2/4] Fetching packages...
[3/4] Linking dependencies...
[4/4] Building fresh packages...
success Saved lockfile.
Done in 0.11s.
Doneと出たので成功です。
ここまででEC2とGithubを接続し、さまざまなパッケージのインストールをしてきました。
しかし、まだRailsアプリは動いてくれません。
Railsには独自の認証機能などがあるためそれらを設定してようやくWeb上で動くようになります。
引き続き頑張っていきましょう!
サーバーの設定
Webサーバー
Webサーバーは、クライアントからのHTTPリクエストを受け取り、要求されたウェブページやコンテンツを提供するコンピュータープログラムまたはソフトウェアです。ウェブブラウザなどのクライアントからの要求に応答して、HTML、CSS、JavaScript、画像、動画などのファイルを提供します。代表的なものとしてApacheやNginxなどが挙げられます。
アプリケーションサーバー
アプリケーションサーバーは、ウェブアプリケーションやモバイルアプリケーションなどのソフトウェアアプリケーションを実行するためのサーバーソフトウェアです。ウェブサーバーとは異なり、動的なコンテンツの生成やビジネスロジックの処理など、アプリケーションの実行に特化しています。代表的なものとしてunicornやpumaなどがあります。
Webサーバーの導入方法 Nginx
それではまずWebサーバーの設定から行なっていきます。
今回はNginx(エンジンエックスを使用していきます。
- Nginx(エンジンエックス)は、高性能なリバースプロキシサーバーやウェブサーバーとして広く使用されているオープンソースのソフトウェアです。Nginxは、高い並行性と効率性を持ち、大規模なウェブトラフィックに対しても優れたパフォーマンスを発揮します。
下記のコマンドでNginxをインストールします。
途中でIs this ok [y/d/N]:と聞かれるのでyと入力しenterキーを押します。
[test@ip-10-0-1-202 ~]$ sudo amazon-linux-extras install nginx1
きちんとインストールされているか確認します。
[test@ip-10-0-1-202 ~]$ nginx -v
nginx version: nginx/1.22.1
インストール完了後、/etc/nginxというディレクトリが作成され、そこに様々なファイルが追加されたと思います。これらは、Nginxにアクセスされた時の動作を設定するファイルです。
デフォルトの設定はnginx.confファイルで定義されています。
自分で設定ファイルを作成する際は最初から作られているnginx.conf.defaultファイルを参考に記述していきます。
細かい部分を取り上げるとキリがないので、今回は必要な部分だけを編集してRails用の設定ファイルを作成していきます。
[test@ip-10-0-1-202 conf.d]$ sudo vim realworld_api.conf
上記のコマンドによりvimによる編集が行えるようになります。
それでは下記のように編集してください。
upstream puma {
  server unix:/var/www/realworld_api/tmp/sockets/puma.sock;
}

server {
  server_name  realworldapi.com;  # 実際のドメイン名に置き換える

  keepalive_timeout 0;

  access_log  /var/log/nginx/realworld_api.access.log  main;
  client_max_body_size 4G;

  root /var/www/realworld_api/public;

  location ~ .*\.(swf|SWF|ico|ICO|jar|txt|gz|js) {
    expires 15m;
    break;
  }

  location ~ ^\/fonts\/* {
    expires 15m;
    break;
  }

  location ~ ^\/assets\/* {
    # もしassetsがprecompiledされている場合は、次の行のコメントアウトを解除します
    # gzip_static on;
    break;
  }

  location ~ ^\/favicon\/* {
    break;
  }

  location = /manifest.json {
    break;
  }

  location / {
    proxy_set_header X-Forwarded-For $proxy_add_x_forwarded_for;
    proxy_set_header Host $http_host;
    proxy_redirect off;

    # Basic認証を使用する場合は、必要に応じて次の3行のコメントアウトを解除します
    # auth_basic "Restricted";
    # auth_basic_user_file /etc/nginx/.htpasswd;

    # HTTPSへのリダイレクトが必要な場合は、次の2行のコメントアウトを解除します
    # if ($http_x_forwarded_proto = "http") {
    #   return 301 https://$server_name$request_uri;
    # }

    proxy_pass http://puma;
  }
}
上記の設定では、"realworld_api"アプリケーションに必要な変更を行っています。
具体的には、server_nameディレクティブで実際のドメイン名を指定し、rootディレクティブでアプリケーションのルートディレクトリを設定しています。
また、upstreamディレクティブのパスも"realworld_api"アプリケーションのソケットパスに変更しました。
編集が完了したらescキーでINSERTモードから抜け、:wqと入力し編集モードから抜けましょう。
ファイルの内容につきましては、こちらの記事を参考に編集させていただきました。
設定が完了したら試しに起動してみます。
[test@ip-10-0-1-202 ~]$ sudo nginx
[sudo] test のパスワード:
nginx: [emerg] bind() to 0.0.0.0:80 failed (98: Address already in use)
nginx: [emerg] bind() to 0.0.0.0:80 failed (98: Address already in use)
nginx: [emerg] bind() to 0.0.0.0:80 failed (98: Address already in use)
nginx: [emerg] bind() to 0.0.0.0:80 failed (98: Address already in use)
nginx: [emerg] bind() to 0.0.0.0:80 failed (98: Address already in use)
nginx: [emerg] still could not bind()
既に起動していたみたいですね。
変更内容を反映させたい場合は再起動が必要なので以下のコマンドを入力してください。
[test@ip-10-0-1-202 ~]$ sudo nginx -s reload
エラーが出なければ完了です。
アプリケーションサーバーの導入方法 puma
それでは次にpumaを導入していきます。
Pumaは、Rubyプログラムで動作するマルチスレッドのWebサーバーです。Pumaは軽量で効率的なスレッドモデルを使用しており、複数のスレッドを使用してリクエストを並行して処理することができます。
Railsアプリにおいて作成した際に基本的にpumaはGemfileに記載がされていると思います。
gem 'puma', '~> 5.6.5'
そしてpumaに関する設定をする際見るのconfig/puma.rbです。
下記の内容に変更してください。
max_threads_count = ENV.fetch("RAILS_MAX_THREADS") { 5 }
min_threads_count = ENV.fetch("RAILS_MIN_THREADS") { max_threads_count }
threads min_threads_count, max_threads_count

bind "unix:///var/www/realworld_api/tmp/sockets/puma.sock"

environment ENV.fetch("RAILS_ENV") { "development" }

pidfile ENV.fetch("PIDFILE") { "tmp/pids/server.pid" }

plugin :tmp_restart
#port ENV.fetch("PORT") { 3000 } という記述を消し、bind "unix:///var/www/realworld_api/tmp/sockets/puma.sock"を追加しました。
ここのディレクトリ設定を間違えてしまうとエラーが起きるので注意してください。
それではpumaを起動させてみましょう。
っとその前に変更したファイルをgithubにpushして、サーバー上からEC2内へpullしないと変更が反映されませんね。
[test@ip-10-0-1-202 ~]$ cd /var/www/realworld_api/
[test@ip-10-0-1-202 realworld_api]$ git pull
remote: Enumerating objects: 18, done.
remote: Counting objects: 100% (18/18), done.
remote: Compressing objects: 100% (3/3), done.
remote: Total 10 (delta 7), reused 9 (delta 7), pack-reused 0
Unpacking objects: 100% (10/10), 1.80 KiB | 924.00 KiB/s, done.
From github.com:ASONE0923/realworld_api
   1a86c77..66a0733  main       -> origin/main
 * [new branch]      AWS_deploy -> origin/AWS_deploy
Updating 1a86c77..66a0733
変更した差分が取り込まれました!
そしたらpumaを起動させてみましょう!
[test@ip-10-0-1-202 realworld_api]$ bundle exec pumactl start
Puma starting in single mode...
* Puma version: 5.6.5 (ruby 3.2.2-p53) ("Birdie's Version")
*  Min threads: 5
*  Max threads: 5
*  Environment: development
*          PID: 31495
* Listening on http://0.0.0.0:3000
Use Ctrl-C to stop
きちんと動いてますね!無事にpumaを導入することができました。
DBの接続方法
最後にDBの接続設定をしていきます。
このままでは前回作成したRDSと接続ができていないため、きちんとデプロイできるように設定していきます。
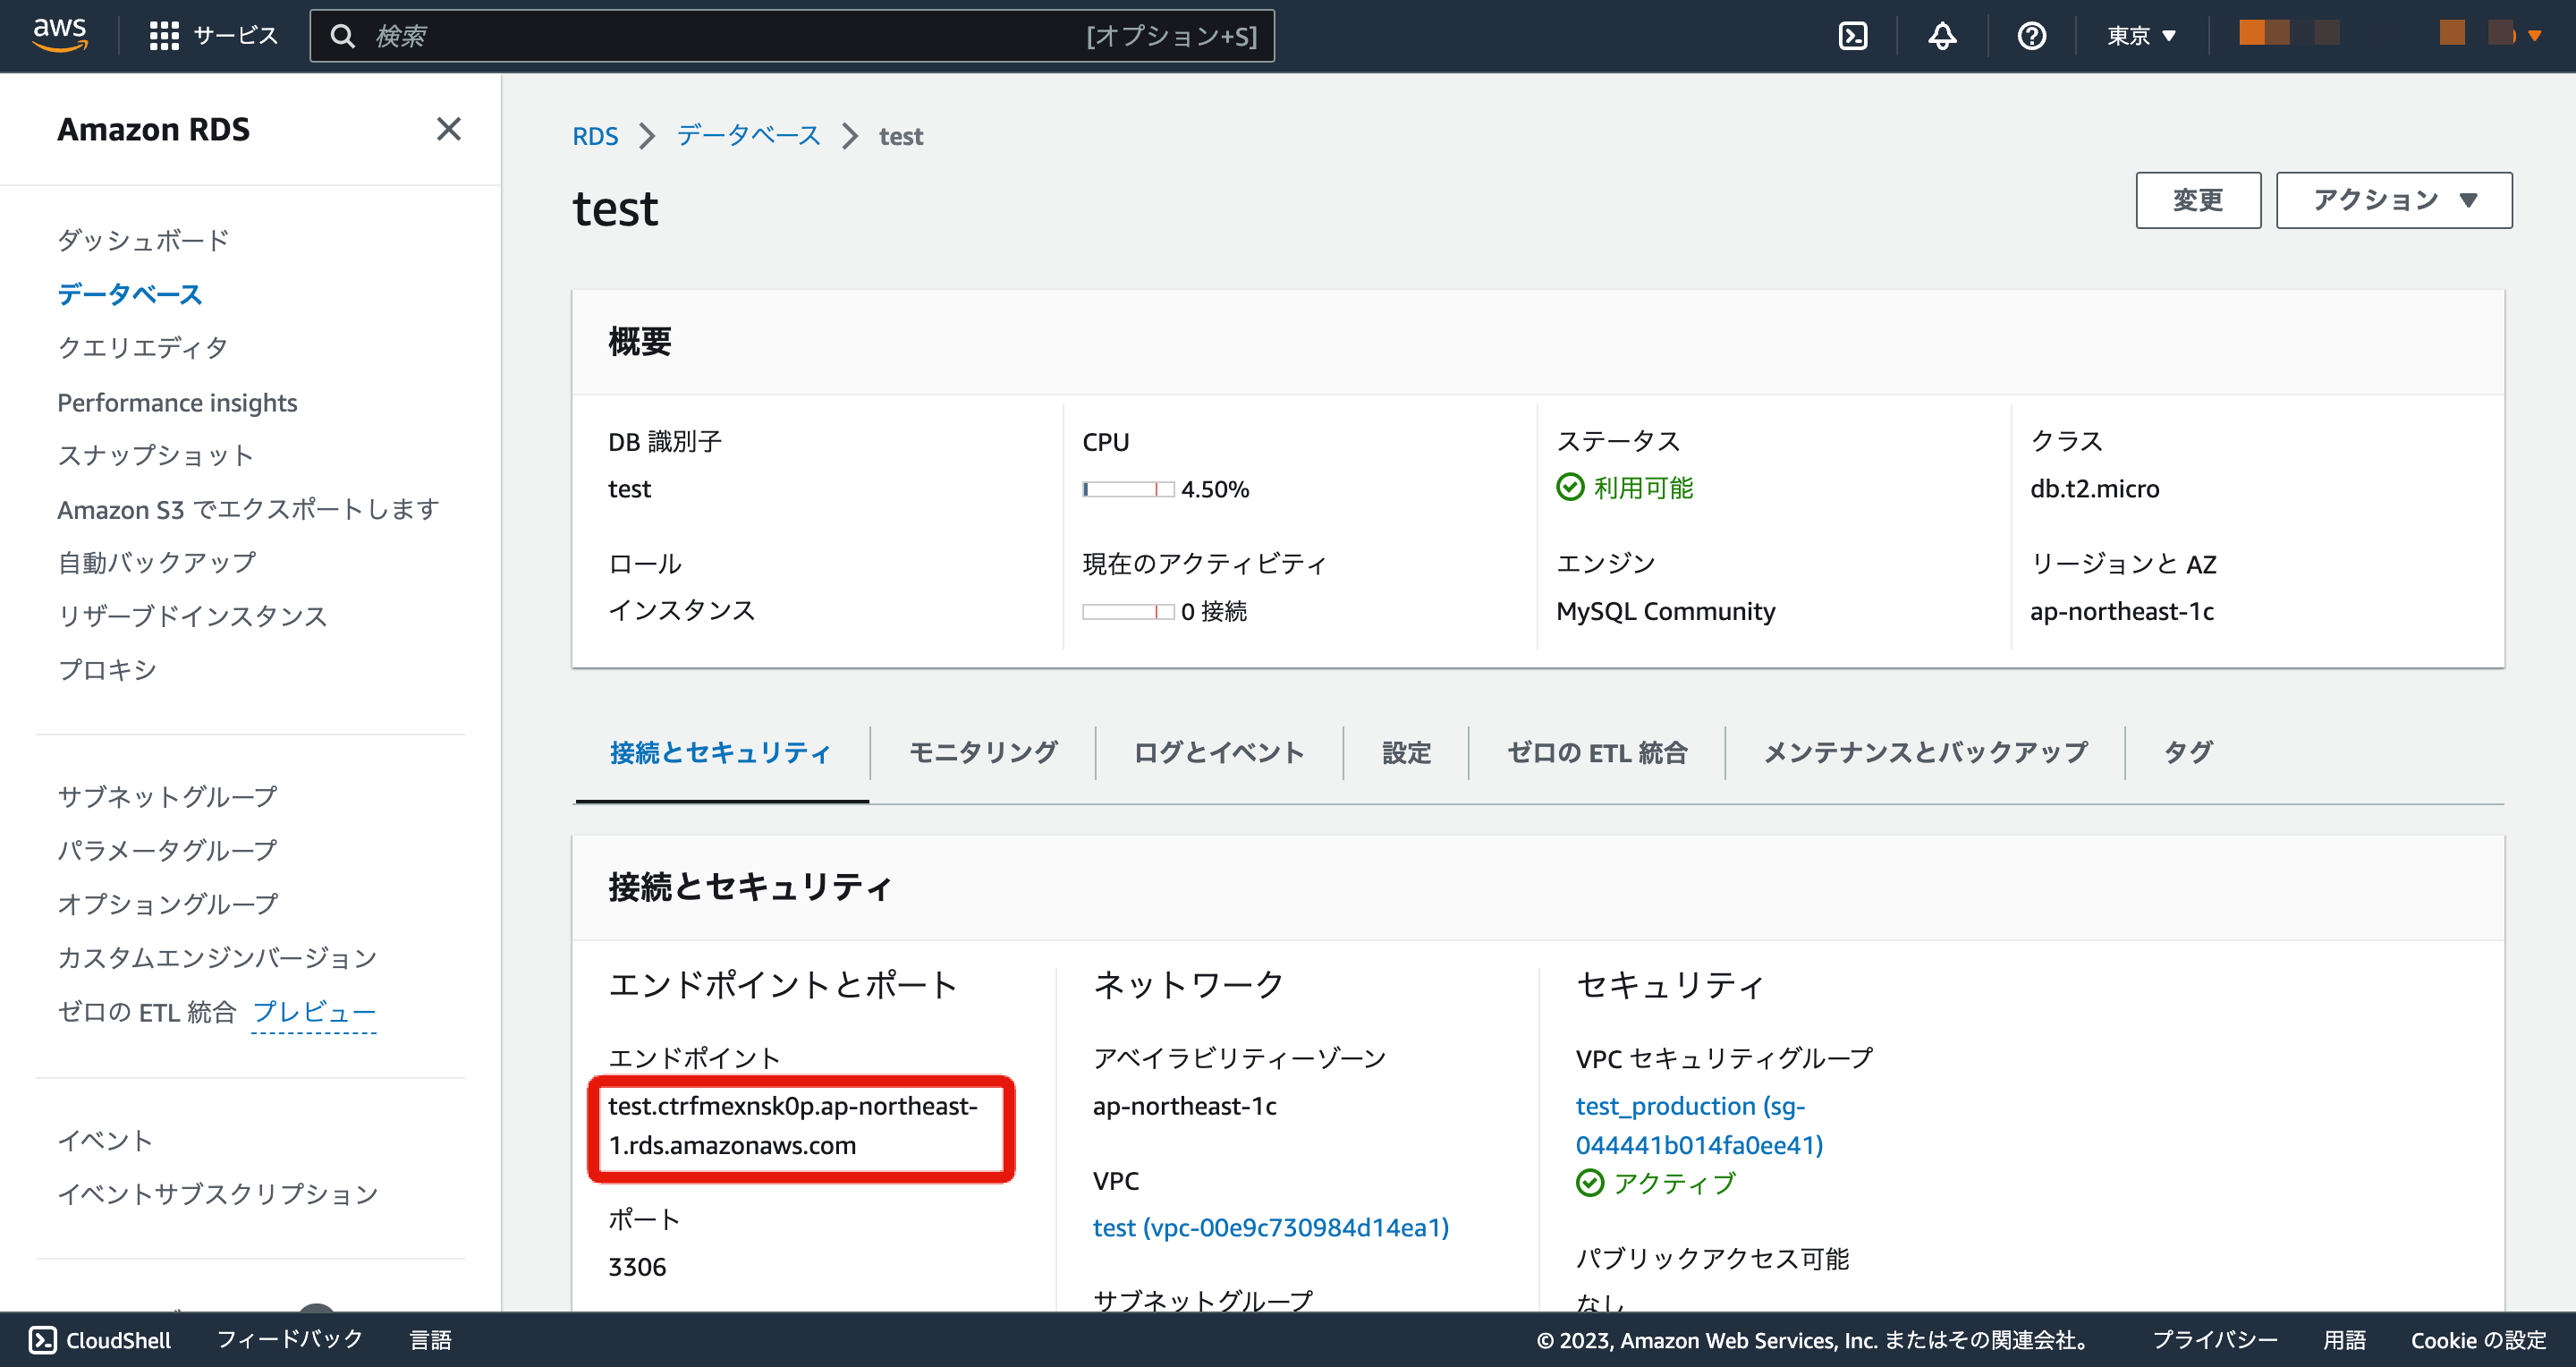
まずはRDSのページ移動し前回作成したtestのエンドポイントを取得してください。
次にCredentialを利用した設定を行なっていきます。
Credentials(資格情報)は、システムやサービスへのアクセスや認証を行うための情報です。一般的には、ユーザーまたはシステムが識別され、認証されるために使用されます。
手元のRailsアプリにて
% EDITOR="vi" bin/rails credentials:edit
というコマンドを使用すると、vimエディタが開き、同時に機密情報を編集する為のファイルが開かれます。
ここにyml形式で機密情報を記載していき、vimエディタを閉じると
- master.keyという暗号化、復号のための鍵ファイルが生成(既にある場合はそれを利用)
- 今入力した情報が暗号化された状態で、credentials.yml.encという名前で生成(既にある場合は上書き)
といった処理が自動で行ってくれるため、暗号化されたcredentials.yml.encをソースとして共有し、master.keyは個人間でのみ共有、機密情報をネット上に上げることなく共有することができるようになるです。
ではEC2サーバーにログインした状態でやっていきましょう!
configディレクトリまで移動します。
[test@ip-10-0-1-202 ~]$ cd /var/www/realworld_api/config
lsコマンドを使用してcredentials.yml.encというファイルが存在しているか確認してください。
[test@ip-10-0-1-202 config]$ ls
application.rb  credentials.yml.enc  environments  storage.yml
boot.rb         database.yml         initializers  puma.rb
cable.yml       environment.rb       locales       routes.rb
credentials.yml.encはいわば暗号化されたファイルですが、今の状態ではmaster.keyという解錠用の鍵が存在していないということになっています。
ではどうすればいいのか?
答えは簡単。EC2内にローカルのものを複製すればいいのです。
[test@ip-10-0-1-202 config]$ touch master.key
[test@ip-10-0-1-202 config]$ chmod 600 master.key
鍵用のファイルを作成したら次は、ローカルのマスターキーをコピーしてください。
config/master.keyにあるはずです。それではコピーしましょう。
[test@ip-10-0-1-202 config]$ vim master.key
そうするとEC2内の方で、下記のコマンドが使用できるようになります。
[test@ip-10-0-1-202 config]$ EDITOR='vi' bundle exec rails credentials:edit
File encrypted and saved.
# aws:
#   access_key_id: 123
#   secret_access_key: 345

# Used as the base secret for all MessageVerifiers in Rails, including the one protecting cookies.
無事に鍵の情報をコピーすることができました。
また、マスターキーについての設定でエラーが起きた場合こちらの記事を参照ください。
設定が完了した後は、それでは以下の手順に従って機密情報の更新をEC2に反映させてください。
- ローカルのRailsプロジェクトでターミナルを開きます。
- 次のコマンドを実行して、エディタを開きます。
EDITOR='vi' bundle exec rails credentials:editlocal# aws: # access_key_id: 123 # secret_access_key: 345 db: endpoint: test.ctrfmexnsk0p.ap-northeast-1.rds.amazonaws.com # エンドポイント user_name: test # RDS接続用に設定したユーザ名 password: ⚪︎⚪︎⚪︎⚪︎ # RDS接続用に設定したユーザのパスワード - エディタが開かれたら、機密情報を更新します。必要な変更を行い、保存します。
- 更新された
credentials.yml.encファイルのみをGitHubにプッシュします。master.keyファイルを誤ってプッシュしないように注意してください。 - EC2インスタンスにログインします。
- プロジェクトのディレクトリに移動します。
- 次のコマンドを実行して、最新のコードを取得します。
git pull - EC2上で実行しているアプリケーションを再起動します。具体的な方法は、アプリケーションのデプロイ方法によって異なります。一般的な方法は、PumaやNginxを再起動することです。
以上の手順に従うことで、機密情報の更新をEC2に反映させることができます。
次はローカルのdatabase.ymlを設定していきます。
productionのところは以下のように編集してください。
default: &default

  adapter: mysql2
  database: apprentice
  username: apprentice
  password: ⚪︎⚪︎⚪︎⚪︎⚪︎
  host: 127.0.0.1
  encoding: utf8

development:
  <<: *default

test:
  <<: *default

production:
  production:
  database: realworld_api_production
  adapter: mysql2
  encoding: utf8mb4
  charset: utf8mb4
  collation: utf8mb4_general_ci
  username: <%= Rails.application.credentials.db[:user_name] %>
  password: <%= Rails.application.credentials.db[:password] %>
  host: <%= Rails.application.credentials.db[:endpoint] %>
  pool: 20
  timeout: 1000
設定後はGithubにプッシュして、EC2でpullしてください。
では、接続したRDS内にRailsアプリのDBを作成していきます。
[test@ip-10-0-1-202 realworld_api]$ bundle exec rake db:create RAILS_ENV=production
Created database 'realworld_api_production'
マイグレーションもきちんとやります。
[test@ip-10-0-1-202 realworld_api]$ bundle exec rake db:migrate RAILS_ENV=production
== 20230618053324 CreateArticles: migrating ===================================
-- create_table(:articles)
   -> 0.0299s
== 20230618053324 CreateArticles: migrated (0.0302s) ==========================
これでテーブル情報も共有され、DB接続はバッチリです。
環境設定
最後に、このサーバー環境をproduction環境に設定します。
[test@ip-10-0-1-202 realworld_api]$ export RAILS_ENV=production
その後ブラウザにEC2サーバーのIPアドレスを打ち込んでサイトが表示されていればデプロイ完了です。
お疲れ様でした!
おわりに
こんなにたくさんのことを一度にアウトプットする機会はおそらく初めてです。
少しはインフラに強くなった気がするので、自作のアプリケーションも早くデプロイできるよう努力します。
ここまでお付き合いいただきありがとうございました。
引用文献