Spring InitializrにSpring Boot Admin(Server),Spring Boot Admin(Client)が追加されていたので、触ってみることにした。
Spring Boot AdminはSpring Bootアプリケーションのモニタリングができるライブラリ。
構築
環境
OS: macOS Sierra 10.12.6
Java: 1.8.0_102
Spring Boot: 1.5.10.RELEASE
Spring Boot Admin: 1.5.7
構築手順
Spring Boot AdminはServer-Clientの構成になっている。
Serverがモニタリング画面を提供し、Clientがモニタリング対象のアプリケーションとなる。
Spring Boot Admin Server
Spring InitializrからSpring Boot Admin (Server)を選択してアプリケーションを作成する。
depenedencyにspring-boot-admin-starter-serverが追加されていればOK。
(上記のようにSpring Initializrから作れば自然と追加されているのでpom.xmlの編集はいらないはず)
	<dependencies>
		<dependency>
			<groupId>de.codecentric</groupId>
			<artifactId>spring-boot-admin-starter-server</artifactId>
		</dependency>

		<dependency>
			<groupId>org.springframework.boot</groupId>
			<artifactId>spring-boot-starter-test</artifactId>
			<scope>test</scope>
		</dependency>
	</dependencies>
あとはApplicationクラスの@SpringBootApplicationアノテーションを削除して、以下のようにアノテーションを追加する必要がある。
@Configuration
@EnableAutoConfiguration
@EnableAdminServer
public class SpringBootAdminServerApplication {

	public static void main(String[] args) {
		SpringApplication.run(SpringBootAdminServerApplication.class, args);
	}
}
これでアプリケーションとして起動すればServer側はOK。
http://localhost:8080にアクセスすればモニタリングのWebページが表示される。
Spring Boot Admin Client
Spring InitializrからSpring Boot Admin (Client)を選択してアプリケーションを作成する。
Client自体がアプリケーションとして起動すべきなので、ここでWEBアプリケーションを想定して、Webも追加しておく。
上記のようにして作成すれば、dependencyにspring-boot-admin-starter-client(とspring-boot-starter-web)が追加されているはず。
	<dependencies>
		<dependency>
			<groupId>org.springframework.boot</groupId>
			<artifactId>spring-boot-starter-web</artifactId>
		</dependency>
		<dependency>
			<groupId>de.codecentric</groupId>
			<artifactId>spring-boot-admin-starter-client</artifactId>
		</dependency>

		<dependency>
			<groupId>org.springframework.boot</groupId>
			<artifactId>spring-boot-starter-test</artifactId>
			<scope>test</scope>
		</dependency>
	</dependencies>
Serverへの接続情報をapplication.yml(propertiesよりymlのほうが個人的には好きなので変更した)に記載すれば一旦はOK。
server:
  port: 3000 # ①
spring:
  boot:
    admin:
      url: http://localhost:8080 # ②
management:
  security:
    enabled: false # ③
各プロパティについて解説しておく。
①: Spring Boot Admin Serverが(とくに設定していないので)デフォルトの8080ポートで起動するため、起動ポートが被らないようにする。
②: Spring Boot Amdin Serverへの接続情報。
③: Spring Boot 1.5.x から全てのエンドポイントがセキュアになっているため。確認のために無効化しているので、本番ではsecurity sectionに記載されている対応が必要。
あとは、ビルド時の情報(バージョンやartifactなど)が表示されるように、pom.xmlにbuild-infoを追加しておいたほうがよい。
	<build>
		<plugins>
			<plugin>
				<groupId>org.springframework.boot</groupId>
				<artifactId>spring-boot-maven-plugin</artifactId>
				<executions>
					<execution>
						<goals>
							<goal>build-info</goal>
						</goals>
					</execution>
				</executions>
			</plugin>
		</plugins>
	</build>
あとは起動すればOK。
所感
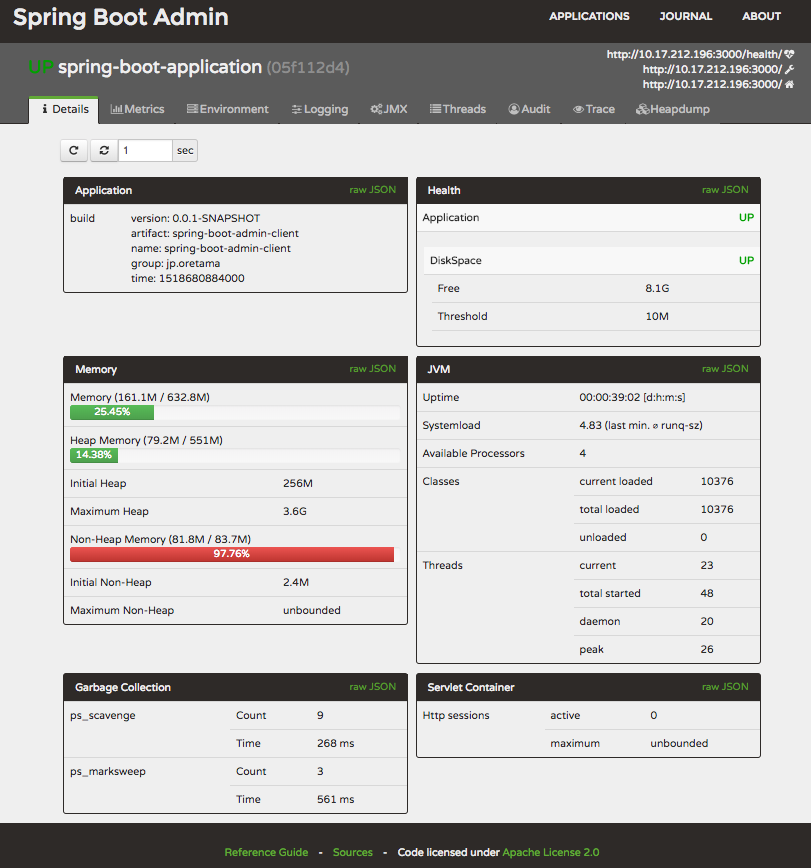
画面はこんな感じ。
デメリット
すぐに違和感を持ったのは、表示が時間経過ではないことだ。
つまり、いまのスナップショットの状態しか表示されていないのだ。
そのため、その状態が通常より負荷がかかっている状態なのかどうかが分からない。
これは最大のデメリットだと思う。正直見づらいし、感覚的に正常かどうかつかめないから使いにくい。
メリット
- すぐに構築することができること
- 綺麗なUIで表示されること
- (ここでは話していないが)Eurekaなどにも対応していること
ちょっと追求してみた
内部の作り(Spring Boot Admin Client)
de.codecentric.boot.admin.client.registrationパッケージにメインの処理が記述されている。
Client側はスケジューリングして、Server側へ登録処理をしているだけ。
| クラス | 処理概要 |
|---|---|
| RegistrationApplicationListener | スケジューリングの登録、解除を行う。ApplicationRegistratorクラスのメソッドを起動時 or 定期的に呼び出すようにしている。 |
| ApplicationRegistrator | Spring Boot Server AdminにHTTP通信を行い、Server側に登録依頼する処理をしている。 |
内部の作り(Spring Boot Admin Server)
ざっくりはHTTPを受けて登録する処理と定期的にステータスを更新する処理がある。
HTTPを受けて登録する処理に主に関係するクラスはこちら。
| パッケージ | クラス | 処理概要 |
|---|---|---|
| de.codecentric.boot.admin.registry.web | RegistryController | Client側からのAPIを受けるController。 |
| de.codecentric.boot.admin.registry | ApplicationRegistry | Client側から受けた情報を元に、Clientの情報を登録しておく。 |
定期的にステータスを更新する処理はこちら。
| パッケージ | クラス | 処理概要 |
|---|---|---|
| de.codecentric.boot.admin.registry | StatusUpdateApplicationListener | スケジューリングの登録、解除を行う。 |
| de.codecentric.boot.admin.registry | StatusUpdater | Client側のActuator APIへアクセスし、ステータスを更新する。 |
Tips:Gitコミット情報の表示
デフォルトで作成すると、Gitのコミット情報(コミットIDやブランチなど)が表示されなかったので、設定を調べてみた。
Spring Boot AdminはSpring Boot Actuatorの/infoの情報を表示しているので、/infoにGitの情報を追加すればよい。やり方は以下の通りだ。
pom.xmlにgit-commit-id-pluginを追加する。
<build>
    <plugins>
        <plugin>
            <groupId>pl.project13.maven</groupId>
            <artifactId>git-commit-id-plugin</artifactId>
        </plugin>
    </plugins>
</build>
これだけでOK!
git-commit-id-pluginはgit.propertiesファイルを作成するだけだが、Spring Boot ActuatorのGitInfoContributorクラスが自動でファイルを見つけ、/infoに追加してくれる。
まとめ
やっぱり時間経過がないのがイタいですね。
自分だったらプロジェクトにわざわざ採用しないかなぁ、と思いました。
これからもっと使い勝手がよくなるように改善されていくことを期待しています。
あとライブラリの中身まで見ると、勉強になりますね。
ときどきはこうやってライブラリを確認する時間を取りたいですね。
GitHub
自身のGitHubにアップしたので参考にどうぞ。
spring-boot-admin-sample
