はじめに
未経験からエンジニアに転職して、3ヶ月ほど経つエンジニアです。
業務にあたりながらも、小規模なアプリを作って楽しんでいます。

rails7で作成されたアプリにAuth0を導入します。
rails6+Auth0の記事はあるのですが、rails7でAuth0を導入している記事はほぼ見かけないです。
基本的には公式のクイックスタートを踏襲すればOKです。
一部修正が必要なので、そこを解説していきます。
なお、↓で作成したアプリにAuth0を導入していきます。
rails7アプリがないよ、、という方も参考に作成してみてください!(30分くらいで作れます)
Auth0に登録する
上記リンクから登録してください。(無料です)
メールアドレスの他に、Googleアカウントでログインもできます。
Auth0で新規アプリを作成する(登録する)
アプリをAuth0 Dashboardに登録します。
メニューから Applications > Applications を選択します。
そして、 Create Application します。
Create Applicationでは、"Regular Web Applications"を選択します。
Name はなんでもOKです!
今回は例として「rails7app」としました。

Dashboardでパラメータを設定する
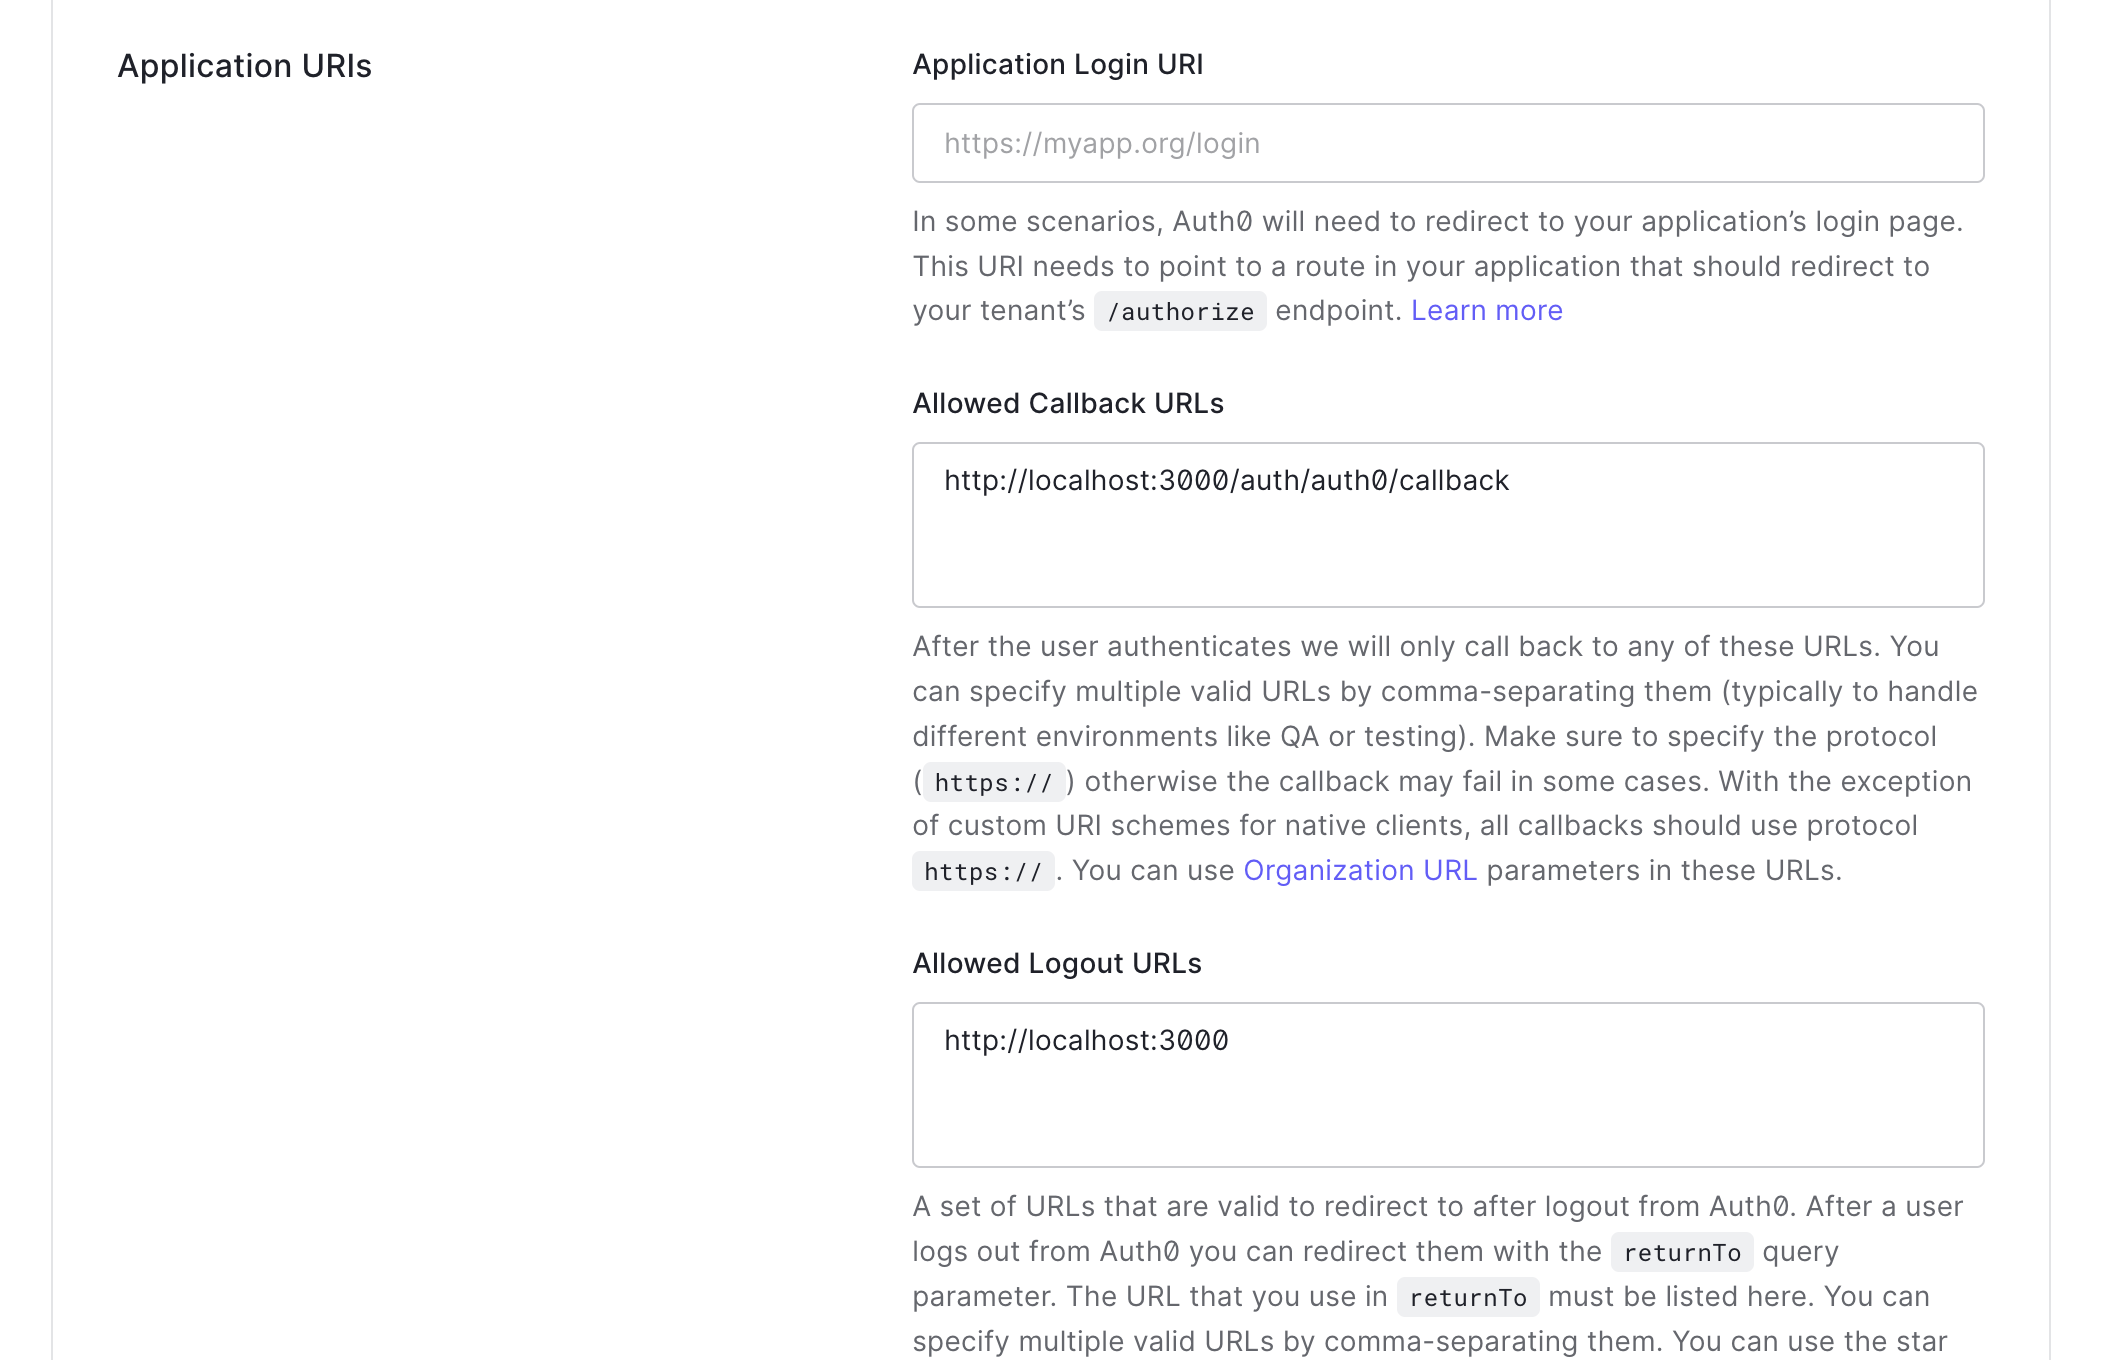
キャプチャのように↓を入力します。
Allowed Callback URLs: http://localhost:3000/auth/auth0/callback
Allowed Logout URLs: http://localhost:3000
ページの最後にあるSave Changesボタンを押下して保存します。

公式のチュートリアル通りに実装する
↑のrails用のチュートリアル通りに設定していきます。
いくつか修正する必要があります。
修正点1
https://auth0.com/docs/quickstart/webapp/rails#add-login-to-your-application:~:text=No-,Add%20Login%20to%20Your%20Application,-A%20user%20can
↑のリンクの部分です。
  <%= button_to 'Login', '/auth/auth0', method: :post %>

  # ↓修正後

  <%= button_to 'login', '/auth/auth0', method: :post, data: { turbo: false } %>
   <%= button_to 'Logout', 'auth/logout', method: :get %>

  # ↓修正後

  <%= button_to "logout", "auth/logout", method: :get, data: { turbo: false } %>
修正点3
https://auth0.com/docs/quickstart/webapp/rails#add-logout-to-your-application:~:text=No-,Add%20Logout%20to%20Your%20Application,-Now%20that%20you
↑のリンクの部分です。
  def logout
    reset_session
    redirect_to logout_url
  end
  # ↓修正後

  def logout
    reset_session
    redirect_to logout_url, allow_other_host: true
  end
これらの修正点以外はチュートリアル通り実装すればOKです!
既存のアプリのヘッダーにログインのリンクを追加する
冒頭で紹介した記事のアプリにAuth0を導入した場合、
以下の手順をさらに行うことでアプリを拡張できます。
では、↑の記事にヘッダーを追加していきます。
↑の記事からdaisyUIのテーマを変更しています。
wireframeというテーマに変更しています。
↑から好きなヘッダーを選びましょう。
今回は例として↓を使っていきます。

$ mkdir app/views/partial
$ touch app/views/partial/_navbar.html.erb
選んだヘッダーのHTMLを貼り付けます。
自分のアプリ用に中身を少し変更しましょう。
また、先ほど導入したAuth0のログインとログアウトボタンも設置してみます。
<div class="navbar bg-base-100">
  <div class="navbar-start">
    <div class="dropdown">
      <label tabindex="0" class="btn btn-ghost btn-circle">
        <svg xmlns="http://www.w3.org/2000/svg" class="h-5 w-5" fill="none" viewBox="0 0 24 24" stroke="currentColor"><path stroke-linecap="round" stroke-linejoin="round" stroke-width="2" d="M4 6h16M4 12h16M4 18h7" /></svg>
      </label>
      <ul tabindex="0" class="menu menu-compact dropdown-content mt-3 p-2 shadow bg-base-100 rounded-box w-52">
        <li><a>Homepage</a></li>
        <li><a>Portfolio</a></li>
        <li><a>About</a></li>
      </ul>
    </div>
  </div>
  <div class="navbar-center">

   # ここから編集
    <div class="btn btn-ghost normal-case text-xl"><%= link_to 'Rails7app', root_path %></div>
   # ここまで編集

  </div>
  <div class="navbar-end">

   # ここから追加
    <button class="btn btn-ghost btn-circle">
		<%= button_to 'ログイン', '/auth/auth0', method: :post, data: { turbo: false } %>
		<%= button_to "ログアウト", "auth/logout", method: :get, data: { turbo: false } %>
    </button>
     # ここまで追加

    <button class="btn btn-ghost btn-circle">
      <svg xmlns="http://www.w3.org/2000/svg" class="h-5 w-5" fill="none" viewBox="0 0 24 24" stroke="currentColor"><path stroke-linecap="round" stroke-linejoin="round" stroke-width="2" d="M21 21l-6-6m2-5a7 7 0 11-14 0 7 7 0 0114 0z" /></svg>
    </button>
    <button class="btn btn-ghost btn-circle">
      <div class="indicator">
        <svg xmlns="http://www.w3.org/2000/svg" class="h-5 w-5" fill="none" viewBox="0 0 24 24" stroke="currentColor"><path stroke-linecap="round" stroke-linejoin="round" stroke-width="2" d="M15 17h5l-1.405-1.405A2.032 2.032 0 0118 14.158V11a6.002 6.002 0 00-4-5.659V5a2 2 0 10-4 0v.341C7.67 6.165 6 8.388 6 11v3.159c0 .538-.214 1.055-.595 1.436L4 17h5m6 0v1a3 3 0 11-6 0v-1m6 0H9" /></svg>
        <span class="badge badge-xs badge-primary indicator-item"></span>
      </div>
    </button>
  </div>
</div>
<!DOCTYPE html>
<html data-theme="wireframe">
  <head>
    <title>Rails7app</title>
    <meta name="viewport" content="width=device-width,initial-scale=1">
    <%= csrf_meta_tags %>
    <%= csp_meta_tag %>
    <%= stylesheet_link_tag "tailwind", "inter-font", "data-turbo-track": "reload" %>

    <%= stylesheet_link_tag "application", "data-turbo-track": "reload" %>
    <%= javascript_importmap_tags %>
  </head>

  <body>
    <%= render 'partial/navbar' %> # ここを追加
    <main class="container mx-auto px-5 flex">
      <%= yield %>
    </main>
  </body>
</html>
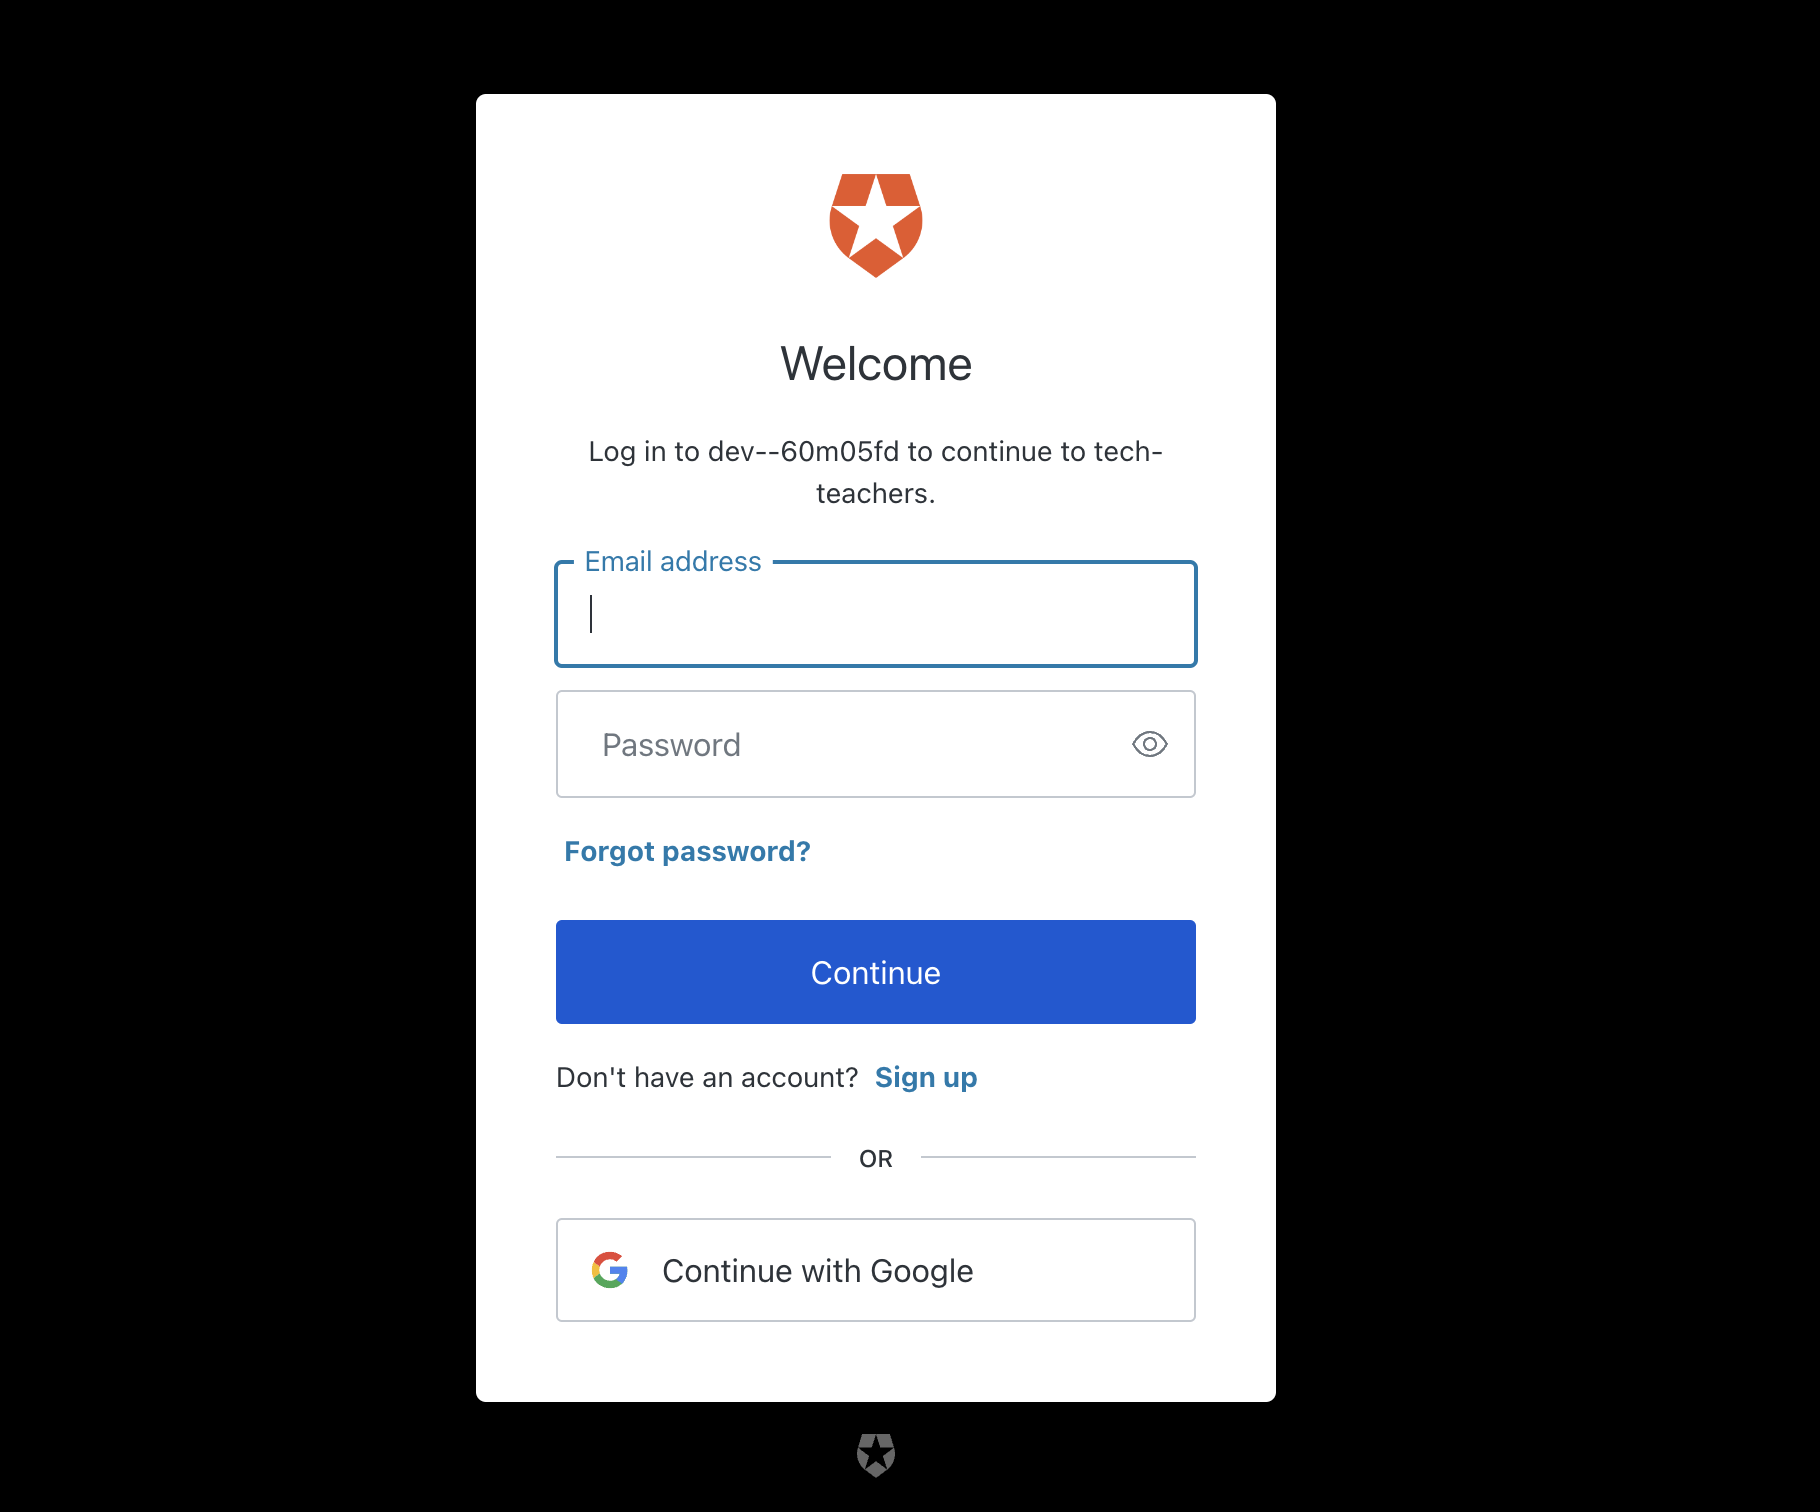
これで↓のキャプチャのようにヘッダーが表示されます!

ログインボタンを押下すると、Auth0のログインページに遷移します。
ここの背景なども変更できます。
ちゃんとログアウトもできるはずです。
まとめ
Auth0はセットアップすればリッチなログイン画面を使うことができますし、
カスタマイズ性もあって便利ですね!
railsを学習している方はdeviseを使って認証機能を作ることが多いと思いますが、
Auth0を使ってみると差別化できるかもしれませんね!
参考