スイッチボット風
Switchbotがほしかったんですが、スマートスピーカーで使うためにはHUBを追加購入しないといけないのがイヤだったので、先人の知恵をお借りして、作っちゃいました。
完成画像
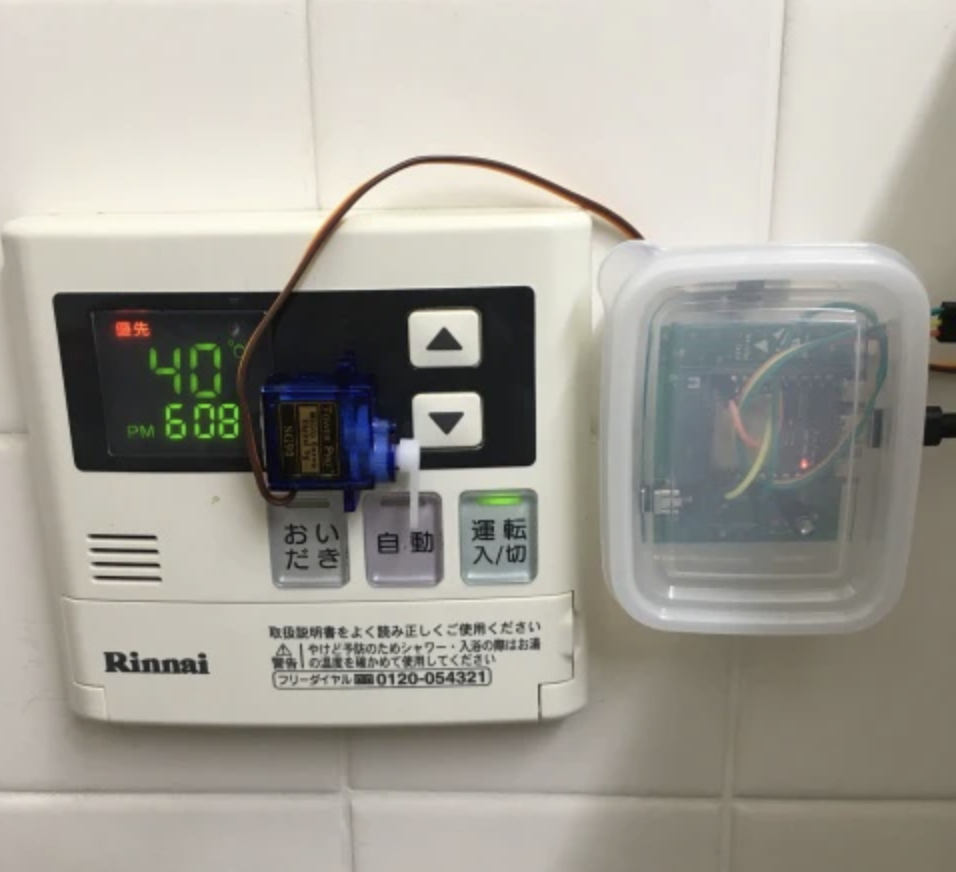
↑キッチンにあるリモコンに設置
使ったもの
・ESPr Developer (Switch Science製)
・SG90 マイクロサーボ (Amazonで購入)
・LEDと抵抗(適当に調達)
・Arduino IDE
・ESP8266ライブラリ
・fauxmoESPライブラリ
・ダイソーのフードコンテナ(おかず入れ)→大きさがちょうどよくて加工も簡単・・
・ジャンパー線
環境準備
IDEはインストールしてある前提で・・・
まず、スイッチサイエンスさんのサイトからもリンクされている下記サイトを参考に、IDEにESP8266ライブラリを追加しました。
https://www.mgo-tec.com/esp8266-board-install01-html
https://www.mgo-tec.com/blog-entry-ss-wroom-howto01.html
fauxmoESPライブラリは以下よりダウンロードしました。ダウンロードコーナーから、ZIP形式でダウンロードしました。
https://bitbucket.org/xoseperez/fauxmoesp/src/master/
さらに、指示に従い、今回はESP8266を使用しますので以下のライブラリも追加しました。
https://github.com/me-no-dev/ESPAsyncTCP
ハードウェア
1)ESPr Developer
以下のように結線しました。
ーーー
12ピン:SG90の信号線を接続
15ピン:青色LED+適当な抵抗を接続
3V3ピン:SG90の電源線
GND:SG90のGND、LEDのGND
ーーー

仕様
1)アレクサ対応
「Alexa お風呂をつけて」
「Alexa お風呂を消して」
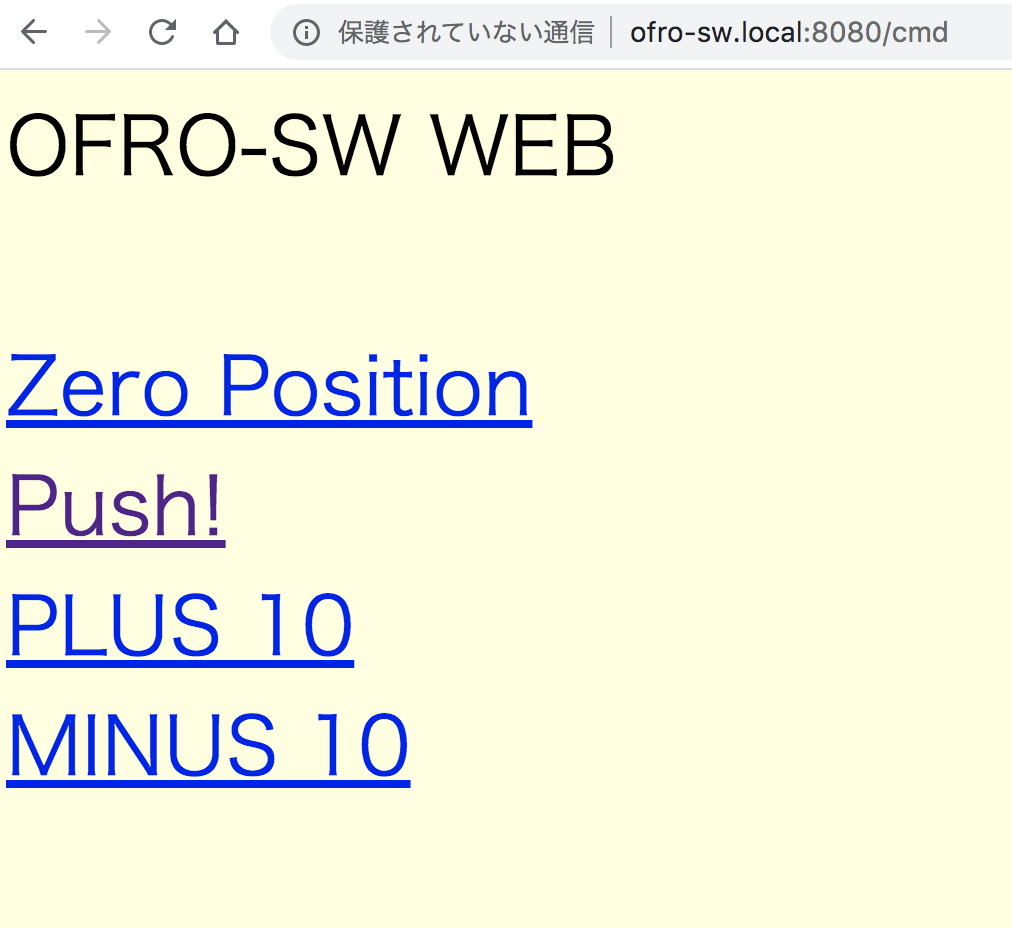
2)WEB画面で指示
「PUSH」「zero」「プラス10度」「マイナス10度」
の4つのボタンを準備。
Alexaのほうは、http(80)だと思ったので、念のため、WEBのポートは8080にします。
コーディング
下記サイトを参考にさせていただきました。とても助かりました。
https://homemadegarbage.com/espalexa04
https://www.pentacreation.com/blog/2017/08/170822.html
http://okiraku-camera.tokyo/blog/?p=3426
各サイトのソースをがっちゃんこしました(^^)
# include <ESP8266WiFi.h>
# include <ESP8266WebServer.h>
# include <fauxmoESP.h>
# include <Servo.h>

# define SERIAL_SPEED 115200

// Servo
Servo servo;
const int servoIni = 90;
const int servoOn = 120;  //試行錯誤でスイッチを押せる角度を決定
int servoState = 0;
int flag = 0;
int deg;

// Pin No
const int ServoPin = 12;
const int BlueLEDPin = 15;

// Alexa
fauxmoESP fauxmo;
# define ID "おふろ"  //インテント

// Web page (Port 8080)
ESP8266WebServer server(8080);
const char* ssid="XXXXXX";
const char* password="XXXXXXX";
static const char* cpResponse200 = "<HTML><BODY style='font-size:48px;'>SERVO WEB<br/><br/><br/>"
 "<a href=/cmd?POS=zero>zero position</a><br/>"
 "<a href=/cmd?POS=push>Push!</a><br/>"
 "<a href=/cmd?POS=PLUS10>PLUS10</a><br/>"
 "<a href=/cmd?POS=MINUS10>MINUS10</a><br/>"
 "</BODY></HTML>\r\n";


void setup() {
  Serial.begin(SERIAL_SPEED);
  // LED
  pinMode(BlueLEDPin, OUTPUT);
  digitalWrite(BlueLEDPin, LOW);
  // WiFi
  WiFi.mode(WIFI_STA);
  WiFi.begin(ssid,password);
  while(WiFi.status() != WL_CONNECTED){
    delay(500);
    Serial.print(".");
  }
  Serial.println("");
  Serial.println("WiFi connected");
  Serial.println(WiFi.localIP());
  digitalWrite(GreenLEDPin, HIGH);
  // WebServer
  server.on("/cmd", WebCommand);
  server.begin();
  Serial.println("Web Server started");
  Serial.println("0:deg=" +String(deg) );
  deg=servoIni; //スタート位置
  servo.write(deg);
  Serial.println("1:deg=" +String(deg) );
  // Alexa
  fauxmo.createServer(true);
  fauxmo.setPort(80);
  fauxmo.enable(true);

  // Add virtual devices
  fauxmo.addDevice(ID);
  fauxmo.onSetState([](unsigned char device_id, const char * device_name, bool state, unsigned char value) {
    Serial.printf("[MAIN] Device #%d (%s) state: %s value: %d\n", device_id, device_name, state ? "ON" : "OFF", value);
    // Checking for device_id is simpler if you are certain about the order they are loaded and it does not change.
    // Otherwise comparing the device_name is safer.
    if (strcmp(device_name, ID)==0) {
      if(state) flag = 1;
      else flag = 2;
    }
    });
}

void WebCommand() {
  String cmd = server.arg("POS");
  if (cmd == "zero")  { deg=0; servomove(deg); }
  else if (cmd == "push") livingOn();
  else if (cmd == "PLUS10") { if ((deg+=10)>180) deg=180; servomove(deg);}
  else if (cmd == "MINUS10") { if ((deg-=10)<0) deg=0; servomove(deg);}
  Serial.print("deg=" +String(deg) );
  Serial.println("  cmd=" + cmd);
  server.send(200, "text/html", cpResponse200);
}

void loop() {
  server.handleClient();
  fauxmo.handle();
  if (flag==1) {
      livingOn();
      flag=0;
  }
  else if (flag==2) {
      livingOff();
      flag = 0;
  }
}

void livingOn() {
  digitalWrite(BlueLEDPin, HIGH);
  servo.attach(ServoPin);
  delay(300);
  servo.write(servoOn);
  delay(500);
  servo.write(servoIni);
  delay(300);
  servo.detach();
  digitalWrite(BlueLEDPin, LOW);
  Serial.println("Switch turn on ...");
}

void livingOff() {
  digitalWrite(BlueLEDPin, HIGH);
  servo.attach(ServoPin);
  delay(300);
  servo.write(servoOn);
  delay(500);
  servo.write(servoIni);
  delay(300);
  servo.detach();
  digitalWrite(BlueLEDPin, LOW);
  Serial.println("Switch turn off ...");
}

void servomove(int d) {
  digitalWrite(BlueLEDPin, HIGH);
  servo.attach(ServoPin);
  servo.write(d);
  delay(100);
  servo.detach();
  digitalWrite(BlueLEDPin, LOW);
}
アレクサに登録
スマホのAlexaアプリで「おふろ」デバイスをホームデバイスとして追加します。
アプリの”デバイス”をクリック
⊕をクリック
“デバイス追加”をクリック
“その他”をクリック
“デバイスを検出”をクリック
しばらくすると検出されますが、自分は「文字化け」してました。
アプリで、打ち直して登録しました。
web
http://XXX.XXX.XXX.XXX:8080/cmd
で操作もできます。
問題は、IPアドレスがシリアルモニターをみないとわかんないこと。
基本いれっぱなしなんで、同じIPアドレスなんで、なんとかなってる感じです・・
END