Qiitaの投稿テストも含めて自分用にメモ
ほとんどドットインストール様を参考にしています。
http://dotinstall.com/lessons/basic_local_development_v2
1.Vagrantのインストール
http://www.vagrantup.com/
この辺りから
2.Boxの追加
$ vagrant box add centos65 https://github.com/2creatives/vagrant-centos/releases/download/v6.5.1/centos65-x86_64-20131205.box
http://www.vagrantbox.es/
から適当なOSを選んで追加
30分くらいかかった ながい
3.ネットワークの設定
$ vagrant init centos65
A `Vagrantfile` has been placed in this directory. You are now
ready to `vagrant up` your first virtual environment! Please read
the comments in the Vagrantfile as well as documentation on
`vagrantup.com` for more information on using Vagrant.
$ vim Vagrantfile
initするとVagrantfileなるものができるので編集
# config.vm.network "private_network", ip: "192.168.33.10"
コメントアウトを外す
config.vm.network "private_network", ip: "192.168.33.10"
4.仮想マシンの起動と接続
$ vagrant up
これで立ち上がるので
Bringing machine 'default' up with 'virtualbox' provider...
==> default: Importing base box 'centos65'...
==> default: Matching MAC address for NAT networking...
==> default: Setting the name of the VM: localdev_default_1398767498278_42276
==> default: Clearing any previously set network interfaces...
==> default: Preparing network interfaces based on configuration...
    default: Adapter 1: nat
    default: Adapter 2: hostonly
==> default: Forwarding ports...
    default: 22 => 2222 (adapter 1)
==> default: Booting VM...
==> default: Waiting for machine to boot. This may take a few minutes...
    default: SSH address: 127.0.0.1:2222
    default: SSH username: vagrant
    default: SSH auth method: private key
    default: Warning: Connection timeout. Retrying...
==> default: Machine booted and ready!
==> default: Checking for guest additions in VM...
==> default: Configuring and enabling network interfaces...
==> default: Mounting shared folders...
    default: /vagrant => /Users/840_/Documents/Vagrant/localdev
Warningが出ているが問題なさそう
起動できたらSSHしてみる
$ vagrant ssh
[vagrant@vagrant-centos65 ~]$
はいれました
4.必要になりそうな物の導入
$ sudo yum update
$ sudo vi /etc/resolv.conf
以下を先頭に加える
options single-request-reopen
調べたところ、CentOS6からはFQDNの仕様変更に伴い、場合によって遅延が発生することがあるらしく、それを防ぐためのおまじない?
とりあえずCentOS6以降ならつけておけば良さそう
ファイアウォールはOFFに。
[vagrant@vagrant-centos65 ~]$ sudo service iptables stop
[vagrant@vagrant-centos65 ~]$ sudo chkconfig iptables off
- httpd
$ sudo yum install -y httpd
yumでインストール
$ sudo service httpd start
Starting httpd: httpd: apr_sockaddr_info_get() failed for vagrant-centos65.vagrantup.com
httpd: Could not reliably determine the server's fully qualified domain name, using 127.0.0.1 for ServerName
                                                           [  OK  ]
$ sudo chkconfig httpd on
インストールしたら起動しておく
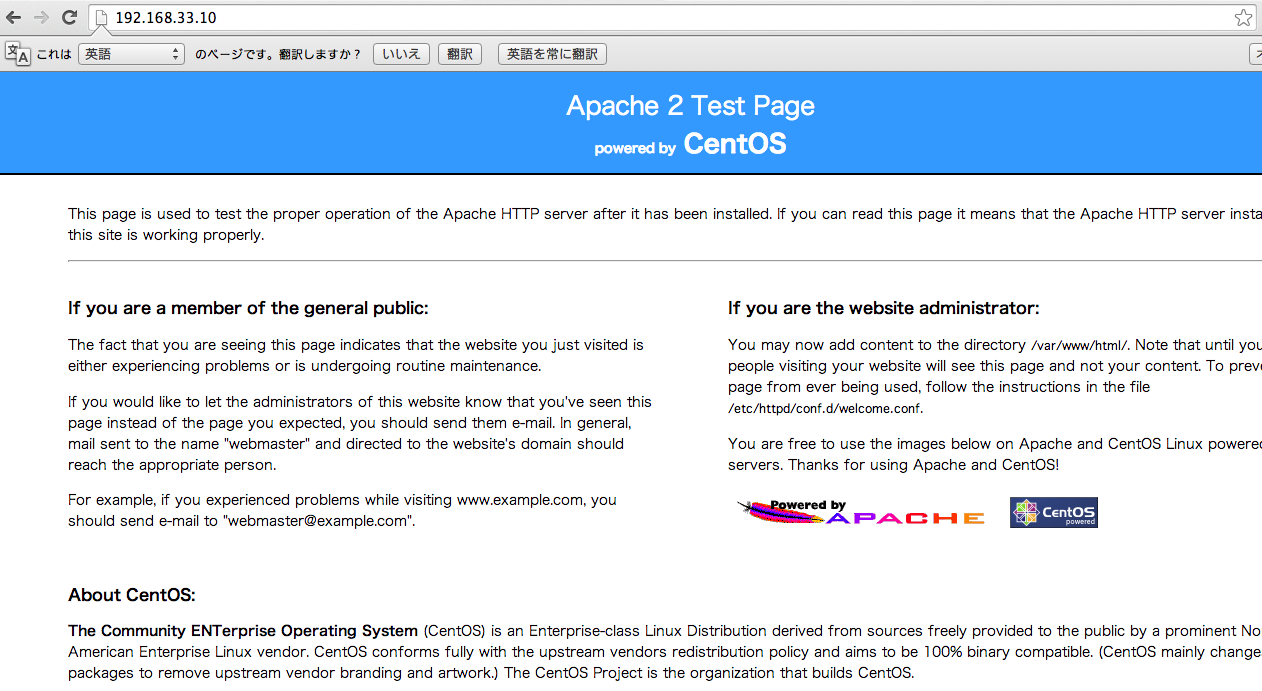
ここまで来たら仮想マシンのIPアドレスでApacheのテストページを見れる段階になっているはず
$ sudo chown -R vagrant:vagrant /var/www/html/
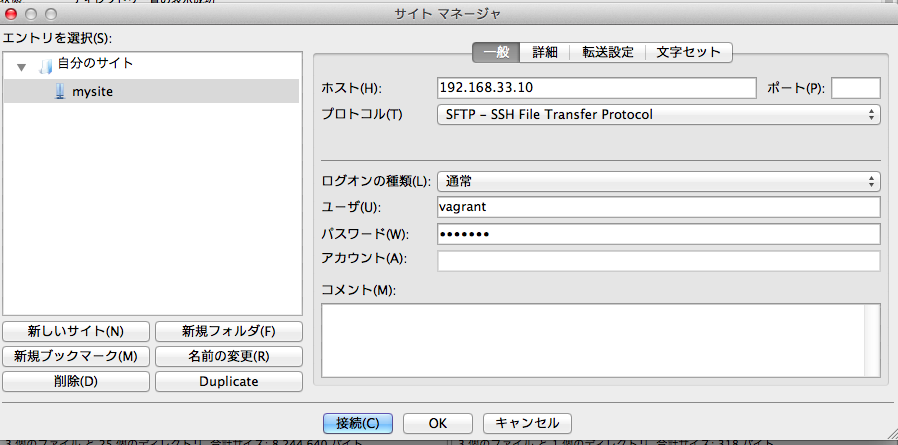
5.仮想サーバーへのファイル転送
CyberduckなりFilezilaなりを使ってSFTPで転送する
FilezilaはVer3以降でないとディレクトリ名に空白が入っていた時にエラーで転送できないっぽい
IP:Vagrantfileで設定したIP
ユーザー名:vagrant
パスワード:vagrant
プロトコル:SFTP
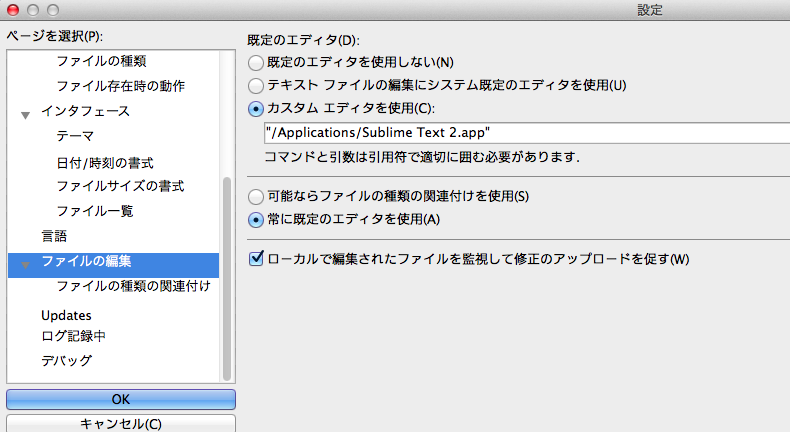
次に仮想サーバー上のhtmlを好きなエディタでいじれるように関連付けの設定
メニューからFilezila->Preferences->ファイルの編集->既存のエディタで"カスタムエディタを仕様"にチェックを入れて好きなエディタのパスを入れる
自分の場合は、その下の常に既定のエディタを使用にもチェックを入れておきました。
仮想サーバー上でファイルを作成し、編集して保存・終了するとファイルをサーバーに戻すためにアップロードしますか?的なダイアログが出てくるのでアップロードすれば仮想サーバーに編集内容がアップロードされます
これでローカルでもエディタを使って編集・アップロードして動作確認っていう流れができました
6.hostsの編集
hosterを使って仮想サーバーのIPに適当な名前を紐付けます
http://www.redwinder.com/macapp/hoster/
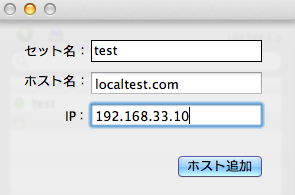
hosterでセットの追加ボタンを押して
セット名:任意
ホスト名:紐付けたい名前
IP:仮想サーバーに設定したIPアドレス
を入力し、ホスト追加
ホスト名で入力した名前で仮想サーバーにアクセスできるようになってるはず
Chromeのサジェストもあるし、ローカル開発環境であればわざわざ設定しなくてもいい気がする