経緯
- 趣味の自転車で使っている室内トレーニングアプリ(zwift,rouvyなど)でトレーニング中にスクリーンショットを保存したい
- Macではスクリーショットはcommand+shift+3で保存できますが、トレーニング中に操作するのは危険なので、片手でも実行できるようにしたい
作ったもの
MESHのボタンタグを押すとMacのスクリーンショットを指定したフォルダに保存します。
MESHを選択した理由
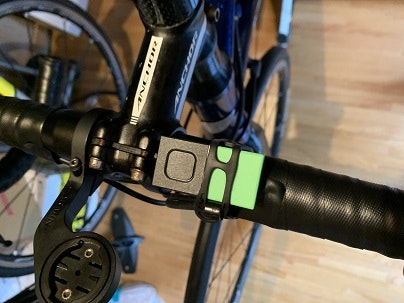
- バッテリー内蔵で単体で動作し、自転車に取付け可能で片手で操作できること
- SDK(JavaScript)があり、RaspberryPiと連携できること
構成
MESH
- MESHハブアプリケーションでボタンタグをトリガーにHTTP GETを送るカスタムタグのレシピを作成します
カスタムタグとレシピはMESHハブアプリケーションを試してみるを参考にCode:Executeに下記コードを書いて作成します。
var apiURL = "http://ローカルホスト名:ポート番号/";

ajax ({
    url : apiURL,
    type : "get",
    timeout : 1000,
    success : function ( contents ) {
        log("HTTP receive.");
        callbackSuccess( {
            resultType : "continue"
        } );
    },
    error : function ( request, errorMessage ) {
        log("http request error occured");
        callbackSuccess( {
            resultType : "continue"
        } );
    }
});

return {
    resultType : "pause"
};
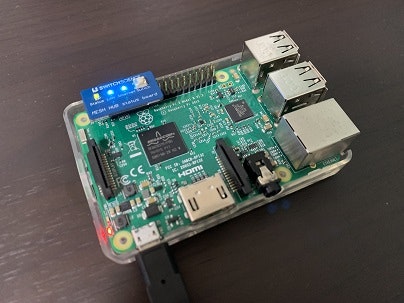
RaspberryPi
Raspberry Piに「MESH ハブ」アプリをインストールする方法を教えてほしいを参考にMESHハブで作成したレシピの実行環境をラズパイに構築し、HTTPリクエストを受けるローカルサーバー(Node.js + Express + child_process)を起動し、SSH接続(公開鍵認証)でAppleScriptをosascriptコマンドで実行します。
const express = require('express')
const app = express()
const {exec} = require('child_process')

//要ユーザ設定ファイル作成(~/.ssh/config)
const sshcmd = "ssh [接続するsshのエイリアス名]"
//ファイル形式
const fileformat = "defaults write com.apple.screencapture type [ファイル形式]"
//画像ファイルの保存先パス
const savefilepath ="defaults write com.apple.screencapture location [画像ファイルの保存先パス] "
//AppleScriptのパス
const applescriptpath = "osascript [AppleScriptのパス] "
//AppleScript実行(ファイル形式と保存先指定)
//const cmd = sshcmd + fileformat + "&& " + sshcmd + savefilepath + "&& " + sshcmd + applescriptpath
//AppleScript実行
const cmd = sshcmd + applescriptpath

app.get('/', function (req, res) {
    exec(cmd, (error, stdout, stderr) => {
        if (error) {
            console.error(`exec error: ${error}`);
            return;
        }
        res.status(200)
        res.send('OK')
    })
})

app.listen(3000,() => console.log('Listening on port 3000'));
プログラムはサーバーが落ちても再起動するようにforeverコマンドを指定します。
【Node.js】 RaspberryPiのプログラムを自動起動・永続化・SSH ログアウト後もプロセスを残すを参考にサービス登録、再起動し、Foreverのプロセスを下記コマンドから確認します。
sudo -u pi /usr/local/bin/node /usr/local/bin/forever start -a -d [動かしたいスクリプトのパス]
$ forever list
info:    Forever processes running
data:        uid  command             script                 forever pid  id logfile                    uptime
data:    [0] EL4C /usr/local/bin/node [動かしたいスクリプトのパス]  1447    1705    /home/pi/.forever/EL4C.log 0:0:0:14.962
SSHはMacから公開鍵を取得し、ユーザ設定ファイル(~/.ssh/config)を作成します。
Host [接続するsshのエイリアス名]
  HostName [ローカルホスト名]
  User [ユーザー名]
  IdentityFile [秘密鍵のパス]
  Port [ボート番号(デフォルトは22)]
Mac
- スクリーショットを実行するAppleScriptをスクリプトエディタで作成します
AppleScript形式
on fullscreenshot()
	tell application "System Events"
                // Command+Shift+3を入力
		key code 20 using {command down, shift down}
	end tell
end fullscreenshot

fullscreenshot()
JavaScript形式
sys = Application("System Events");
// Command+Shift+3を入力
sys.keyCode("20", { using: ["command down", "shift down"]});
スクリプト保存時にファイルフォーマットを「スクリプト」に指定すると「.script」で保存されるため、これをosascriptコマンドで実行します。
なお、AppleScript形式の場合、ファイルフォーマットを「テキスト」に指定すると「.applescript」で保存されますが、それぞれosascriptで実行することが可能です。
最後に
このスクリプトを作成した後、Zwiftではショートカットキーの設定でF10キーでスクリーンショットを指定のフォルダに保存できることを知りました。
ただ、スクリーンショット操作は運動に集中しているとキーでもボタンでも押せないことや押し忘れることがあったため、自動で実行できるような仕組みがあると良いかと思いました。こちらは今後検討予定ですが、映像解析や他デバイスからのトリガーから実行できる仕組みを検討してみようと思います。