Zuul は、SauceLabs 上で、ブラウザごとにテストを実行できるコマンドラインツールです。

セットアップ
後述の理由のために、依存関係を記録する package.json が必要になります。以下のようなファイルを用意してください。
{
  "name": "zuul-example",
  "private": true,
  "scripts": {
    "start": "zuul test.js --local 8080 --ui jasmine2",
    "test": "zuul test.js"
  }
}
インストール
テストフレームワークにjasmine2,mocha,qunit,tapeを利用できます。当記事は、Jasmine2を使用します。
$ npm install zuul jasmine --save
インストール後、--saveコマンドによって、依存関係がpackage.jsonに追記されていることを確認してください。
{
  "name": "zuul-example",
  "private": true,
  "scripts": {
    "start": "zuul test.js --local 8080 --ui jasmine2",
    "test": "zuul test.js"
  },
  "dependencies": {
    "jasmine": "^2.3.1",
    "zuul": "^3.0.0"
  }
}
ローカルでの動作確認
実験として、WebAudioAPI を使用したライブラリのテストを書いてみます。
// Dependencies
var Sound= require('./lib.js');

// Environment
var fixture= 'https://cdn.rawgit.com/59798/zuul-example/master/fixture.wav';

// Specs
describe('Sound',function(){
  it('Play url',function(done){
    var sound= new Sound;
    sound.src= fixture;
    sound.onload= function(){
      source= sound.play();
      source.onended= done;
    }
  });
});
// Dependencies
var AudioContext= (window.AudioContext || window.webkitAudioContext);
var audioContext= new AudioContext;

// Class Sound
var Sound= (function(){
  function Sound(){}
  Object.defineProperty(Sound.prototype,"src",{
    set: function src(url){
      var self= this;

      var xhr= new XMLHttpRequest;
      xhr.open('GET',url,true);
      xhr.responseType= 'arraybuffer';
      xhr.send();
      xhr.onload= function(){
        self.audioContext.decodeAudioData(xhr.response,function(buffer){
          self.buffer= buffer;
          if(typeof self.onload==='function'){
            self.onload(self.buffer);
          }
        });
      }
    }
  });

  Sound.prototype.audioContext= audioContext;
  Sound.prototype.play= function(){
    var source= this.audioContext.createBufferSource();
    source.buffer= this.buffer;
    source.connect(this.audioContext.destination);
    source.start(0);
    return source;
  }
  return Sound;
})();

module.exports= Sound;
音声ファイルを読み込み、再生終了後に done が呼び出され、テスト成功となります。
これをZuulで実行します。
$ npm start
#
# > zuul-example@ start /Users/59naga/Downloads/zuul-example
# > zuul test.js --local 8080 --ui jasmine2

# open the following url in a browser:
# http://localhost:8080/__zuul
$ zuul --localコマンドはブラウザ上で動作を確認するためのコマンドです。
http://localhost:8080/__zuul を開くと、test.js の実行結果を確認できます。
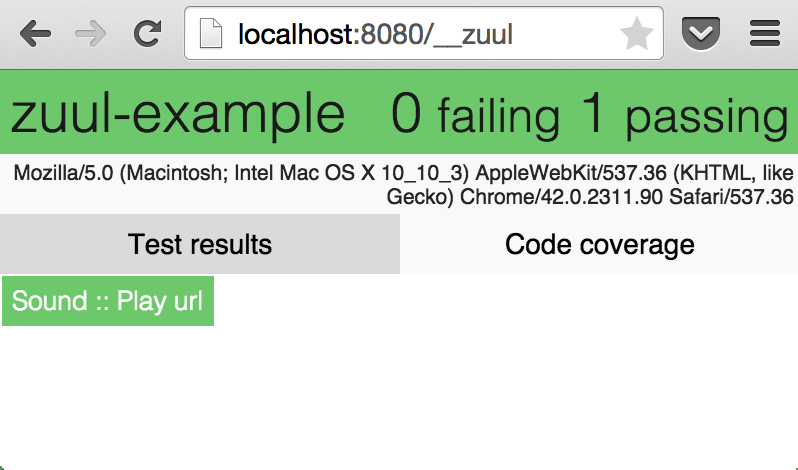
テスト結果は、開いたブラウザに依存したものになります。
SauceLabsでテスト
アカウントの取得
前述のテストを、各ブラウザで実行するためには、SauceLabsのアカウントが必要です。
Opensauce の CREATE YOUR ACCOUNT ボタンから、アカウントを作成してください。
アカウントを作成すると、APIキーが発行されます。
sauce_usernameとsauce_keyをホームディレクトリの.zuulrcに記入します。
sauce_username: my_awesome_username
sauce_key: 550e8400-e29b-41d4-a716-446655440000
クラウドテスト
SauceLabs上で実行するブラウザを指定するために、./zuul.ymlを作成します。
ui: jasmine2
browsers:
  - name: iphone
    version: [7.1,latest]
  - name: android
    version: [4.1,latest]
  - name: ie
    version: 9..latest
  - name: safari
    version: latest
  - name: opera
    version: latest
  - name: firefox
    version: latest
  - name: chrome
    version: latest
select browsers to test | Cloud testing · defunctzombie/zuul Wiki
以上で、テスト可能な環境が整いました。これまでの作業で、ディレクトリ構造は以下のようになります。
$ tree -L 1 -a
# .
# ├── .zuul.yml
# ├── lib.js
# ├── node_modules
# ├── package.json
# └── test.js
OSXの場合, homebrewから
$ brew install treeでtreeコマンドをインストール可能です。
$ npm testコマンドで、テストをSauceLabs上で実行します。
$ npm test
#
# > zuul-example@ test /Users/59naga/Downloads/zuul-example
# > zuul test.js
#
# /Users/59naga/.zuulrc:2
# sauce_key: 550e8400-e29b-41d4-a716-446655440000
#            ^^
# ...
# - failed: <iphone 8.2 on Mac 10.10> (1 failed, 0 passed)
# - failed: <iphone 7.1 on Mac 10.9> (1 failed, 0 passed)
# - failed: <internet explorer 10 on Windows 2012> (0 failed, 0 passed)
# - passed: <android 5.1 on Linux>
# - failed: <internet explorer 11 on Windows 2012 R2> (0 failed, 0 passed)
# - failed: <opera 12 on Windows 2003> (0 failed, 0 passed)
# - failed: <safari 8 on Mac 10.10> (1 failed, 0 passed)
# - failed: <internet explorer 9 on Windows 2008> (0 failed, 0 passed)
# - passed: <chrome 42 on Windows 2012 R2>
# - failed: <firefox 37 on Mac 10.6> (1 failed, 0 passed)
# 4 browser(s) failed
# npm ERR! Test failed.  See above for more details.
テストは5ブラウザ並列して実行され、1つでもテストが失敗すれば、ステータス1で終了します。
http://で始まる URL へ XMLHttpRequest を行うと失敗します。これは、SauceLabs上はhttps://で始まるURLでテストしており、Mixed Contentセキュリティに抵触するためです。
Mixed Content - Security | MDN
httpsを使用したくない場合は、sauce-connectを事前に起動しておき、
zuul test --sauce-connectオプションを使用することで、Mixed Contentを回避できます。

TravisCIでテスト
TravisCI から、上記のテストを実行できます。
手順:
- リポジトリを作成する
- 作成したリポジトリを TravisCI に登録する
-
.travis.ymlを作成する - 環境変数を追記する
- リポジトリに
.travis.ymlを登録し、テストを実行する
1. リポジトリを作成する
Create a New Repository から、リモートリポジトリを作成します。
echo "# zuul-example" >> README.md
git init
git add README.md
git commit -m "first commit"
git remote add origin https://github.com/59naga/zuul-example.git
git push -u origin master
作成後、上記のようなガイドラインが表示されますので、以下のようにして、リモートリポジトリへファイルを登録します。
$ git init
# Initialized empty Git repository in /Users/59naga/Downloads/zuul-example/.git/
# Initial

$ git status
# On branch master
#
# Initial commit
#
# Untracked files:
#   (use "git add <file>..." to include in what will be committed)
#
#   .zuul.yml
#   lib.js
#   package.json
#   test.js
#
# nothing added to commit but untracked files present (use "git add" to track)

$ git add -A
$ git commit -m 'Initial'
# [master (root-commit) 18b3397] Initial
#  4 files changed, 79 insertions(+)
#  create mode 100644 .zuul.yml
#  create mode 100644 lib.js
#  create mode 100644 package.json
#  create mode 100644 test.js

$ git remote add origin https://github.com/59naga/zuul-example.git
$ git push -u origin master
# ...
#  * [new branch]      master -> master
# Branch master set up to track remote branch master from origin.
node_modules は package.json を使用して$ npm installで解消できます。そのため、リポジトリに登録する必要はありません。
2. 作成したリポジトリを TravisCI に登録する
TravisCIにレポジトリを登録します。
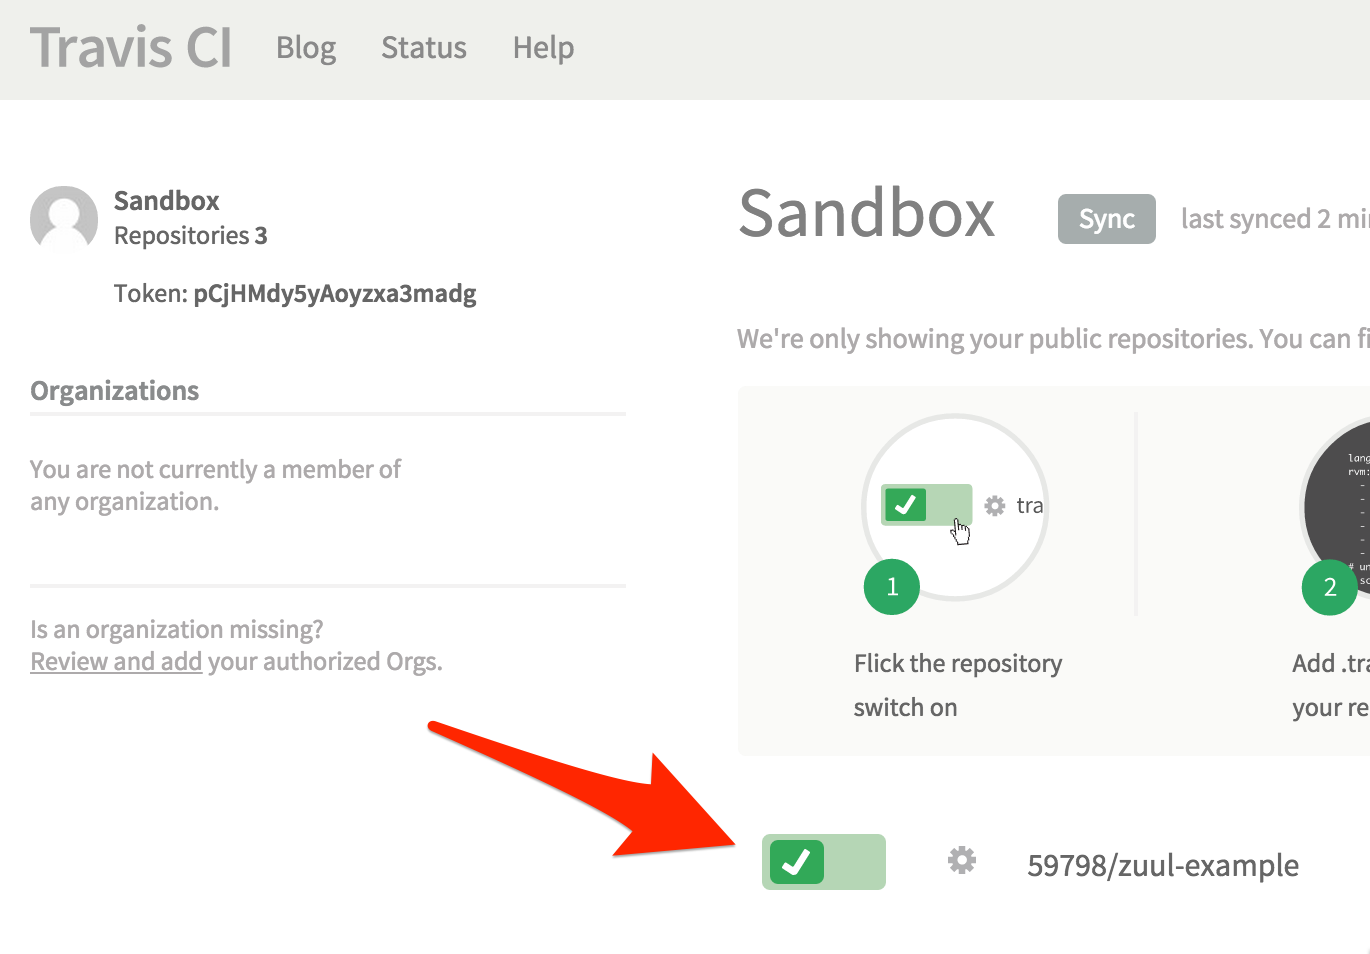
灰色のスイッチをONにすると、TravisCI がリポジトリの監視を始めます。
3. .travis.ymlを作成する
使用する言語、バージョンを設定します。
# Language options
language: node_js
node_js:
  - '0.10'
デフォルトでnpm installのあとnpm testを実行するので、基本的な設定は以上です。
4. 環境変数を追記する
CLI から Zuul で SauceLabs のテストを実行した時は~/.zuulrcを使用しましたが、TravisCIでは、環境変数を使用します。
.travis.ymlに暗号化した環境変数を追記することで、TravisCI上で使用することができます。
以下のようなコマンド実行します。
$ gem install travis

$ travis encrypt SAUCE_USERNAME=my_awesome_username -r 59naga/zuul-example --add
$ travis encrypt SAUCE_ACCESS_KEY=550e8400-e29b-41d4-a716-446655440000 -r 59naga/zuul-example --add
my_awesome_username,59naga,zuul-exampleにはそれぞれ、自身のSauceLabsアカウント、githubユーザ名、レポジトリ名をそれぞれ入力します。
.travis.ymlに環境変数が追記されました。
# Language options
language: node_js
node_js:
  - '0.10'

env:
  global:
  - secure: ##########################
  - secure: ##########################
正しく認識されている場合、TravisCI 内のビルドログで確認できます。
暗号化されたこの環境変数は、TravisCI に登録した、このリポジトリでのみ有効です。他のリポジトリでこの
./travis.ymlを使いまわす事はできません。
./travis.yml をリポジトリに追加します。
$ git add -A
$ git commit -m ':white_check_mark: Add .travis.yml'
# [master b8518e2] :white_check_mark: Add .travis.yml
#  1 file changed, 9 insertions(+)
#  create mode 100644 .travis.yml
$ git push
# Counting objects: 3, done.
# ...
#    2d57f4f..b8518e2  master -> master
5. リポジトリに.travis.ymlを登録し、テストを実行する
TravisCI にリポジトリの更新が検知されれば、テストが実行されます。
それ以降も、リポジトリの更新毎に、テストを実行します。
SauceLabsステッカー
以下のURLから、テスト結果を画像で確認できます。
https://saucelabs.com/browser-matrix/my_awesome_username.svg
例:

この画像を README に添付し、ブラウザの対応状況をユーザーに通知できるでしょうし、アップデートで動作しなくなったブラウザがあれば、ひと目で分かります。
SauceLabsのこの機能は、アカウントごとの最終結果のみです。特定のテスト結果のみを表示させたい場合、サブアカウントを作成し、そのサブアカウントでZuulを実行してください。
運用例
es6は未対応(追伸:平成27年6月10日)
動作を確認しました。import文では、brfsが動作しないというissueが存在するので、そちらが原因でしょう。