はじめに
以前から、JDBC Thinドライバーを用いたアプリケーションはAutonomous Databaseにウォレットを使用せずにTLS認証で接続できましたが、2022/1からOracle Call Interfaceを用いたアプリケーションも、一定の条件のもとで、Autonomous Databaseにウォレットを使用せずにTLS認証で接続できるようになりました。
今回は、最もポピュラーなOracle Call Interfaceを用いたアプリケーションであるSQL*Plusで検証してみました。
1.Computeインスタンスの作成
OSとしてAutonomous Linux 7.9を選択し、Computeインスタンスを作成しました。
作成したComputeインスタンスのパブリックIPをコピーし、メモしておきます。
2.Autonomous Databaseの作成
Autonomous Databaseを作成します。
OCIコンソールのAutonomous Databaseの画面に移動し、「Autonomous Databaseの作成」をクリックします。

Autonomous Databaseの作成画面が表示されます。

基本情報を入力します。

ワークロード・タイプを選択します。
今回はトランザクション処理(Autonomous Transaction Processing)を選択しました

デプロイメント・タイプを選択します。
「共有インフラストラクチャ」を選択します。

データベースの構成を入力します。
今回は検証目的のため、最小構成の1 OCPU、ストレージ1TBとしました。

管理者ユーザadminのパスワードを入力します。

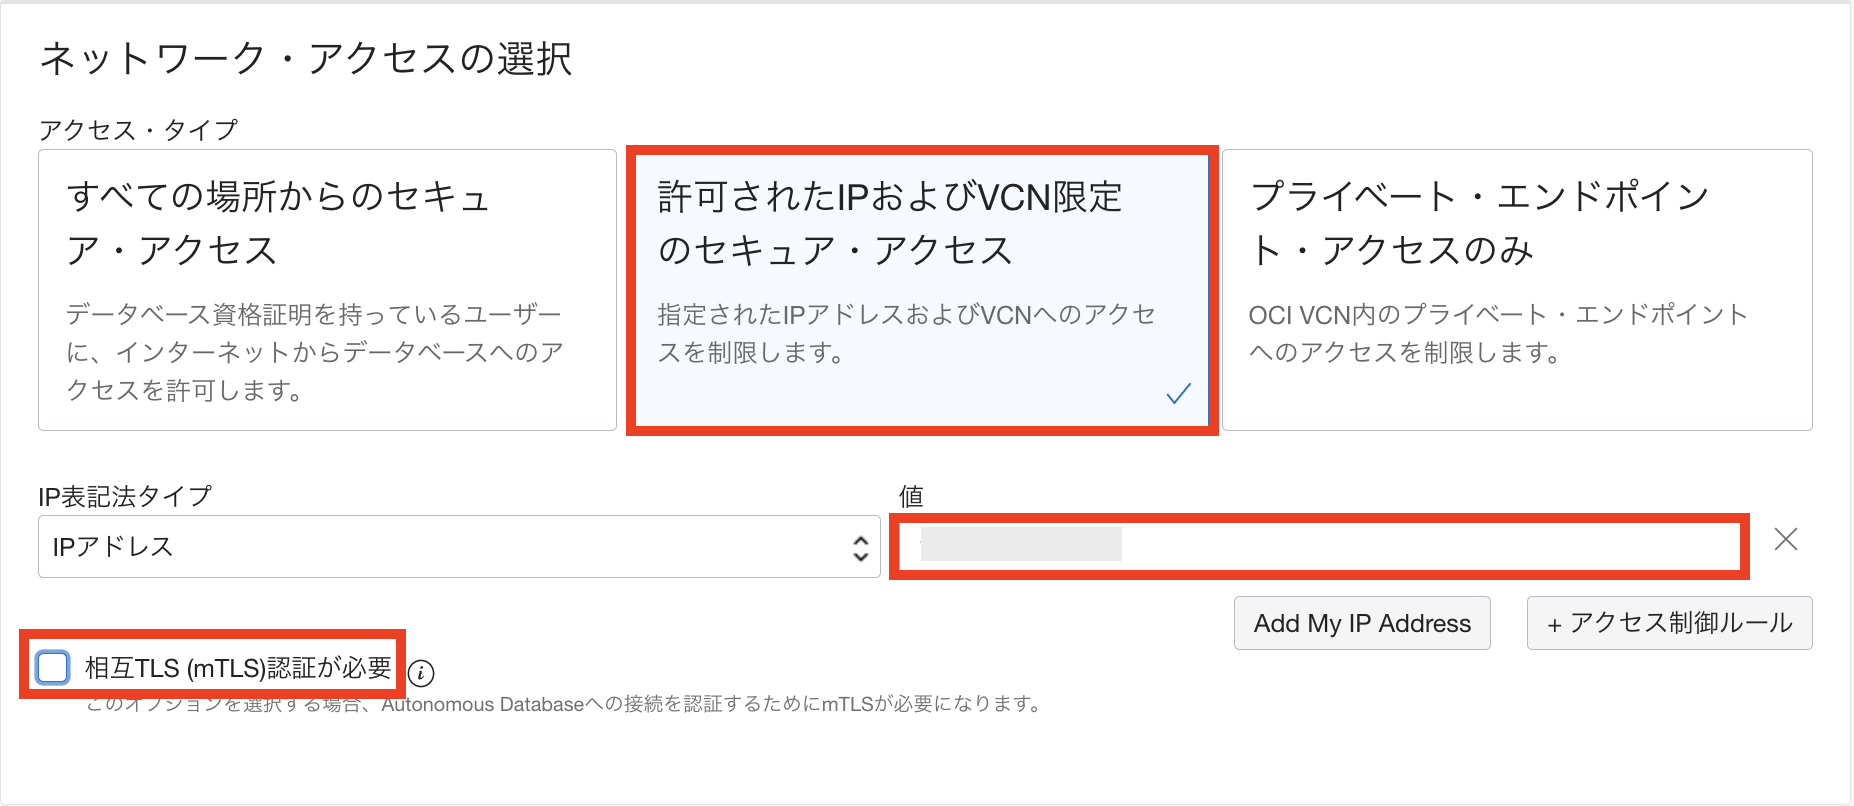
次のネットワーク・アクセスの選択がポイントです。
ウォレットを使わずにTLS認証でAutonomous Databaseに接続するには、Autonomous Databaseのアクセス・タイプが「許可されたIPおよびVCN限定のセキュア・アクセス」または「プライベート・エンドポイント・アクセスのみ」である必要があります。
今回はアクセス・タイプとして「許可されたIPおよびVCN限定のセキュア・アクセス」を選択します。
「IP表記法タイプ」として"IPアドレス"を選択し、「値」に先ほど作成したComputeインスタンスのパブリックIPアドレスを入力します。
「相互TLS(mTLS)認証が必要」のチェックをオフにします。このチェックをオフにすることで、アクセスを許可したIPアドレスからはウォレットを使用せずにTLS認証でAutonomous Databaseに接続できるようになります。
ライセンス・タイプとして「ライセンス込み」を選択します。

通知先のメールアドレスを入力します。

入力が完了したら、「Autonomous Databaseの作成」をクリックします。

数分待つとAutonomous Databaseが使用可能になります。
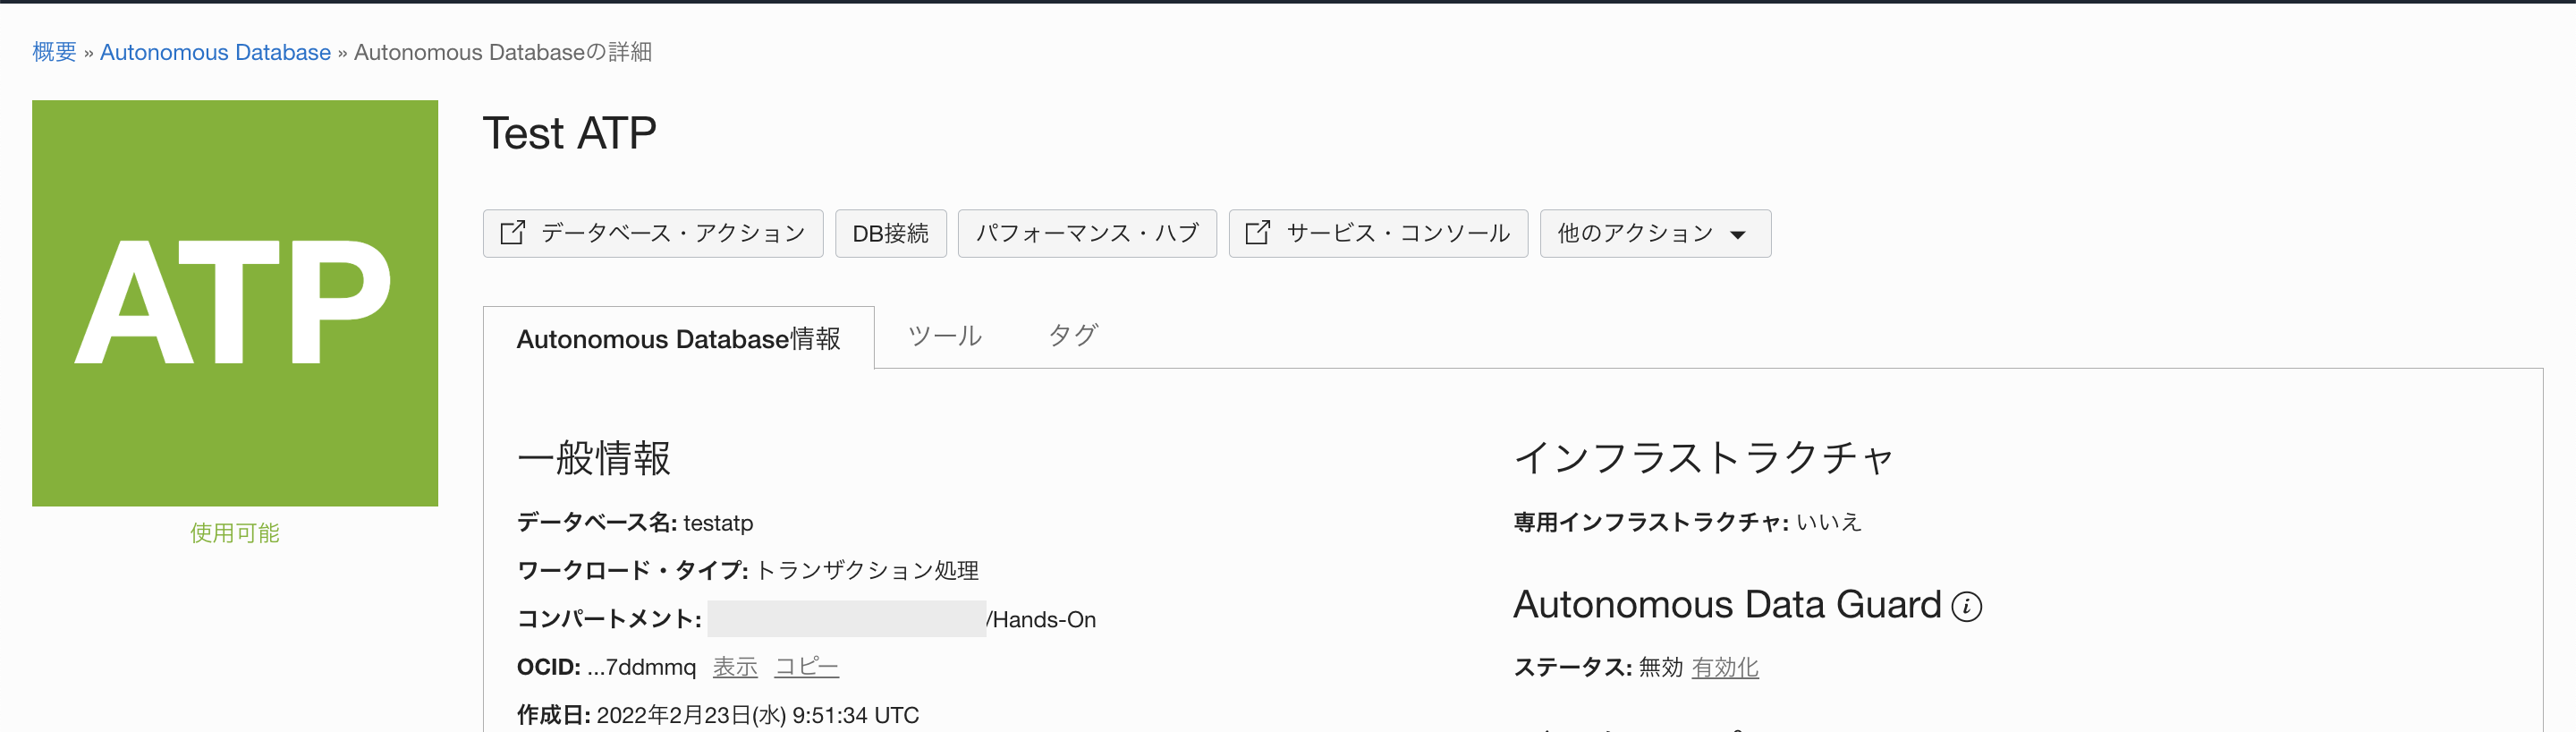
ネットワークの欄を見ると、通常と異なる設定になっていることがわかります。
なお、アクセス制御リスト、相互TLS(mTLS)認証の設定は、Autonomous Database作成後も変更が可能です。

3.TLS認証で接続するための接続文字列の取得
「DB接続」をクリックします。

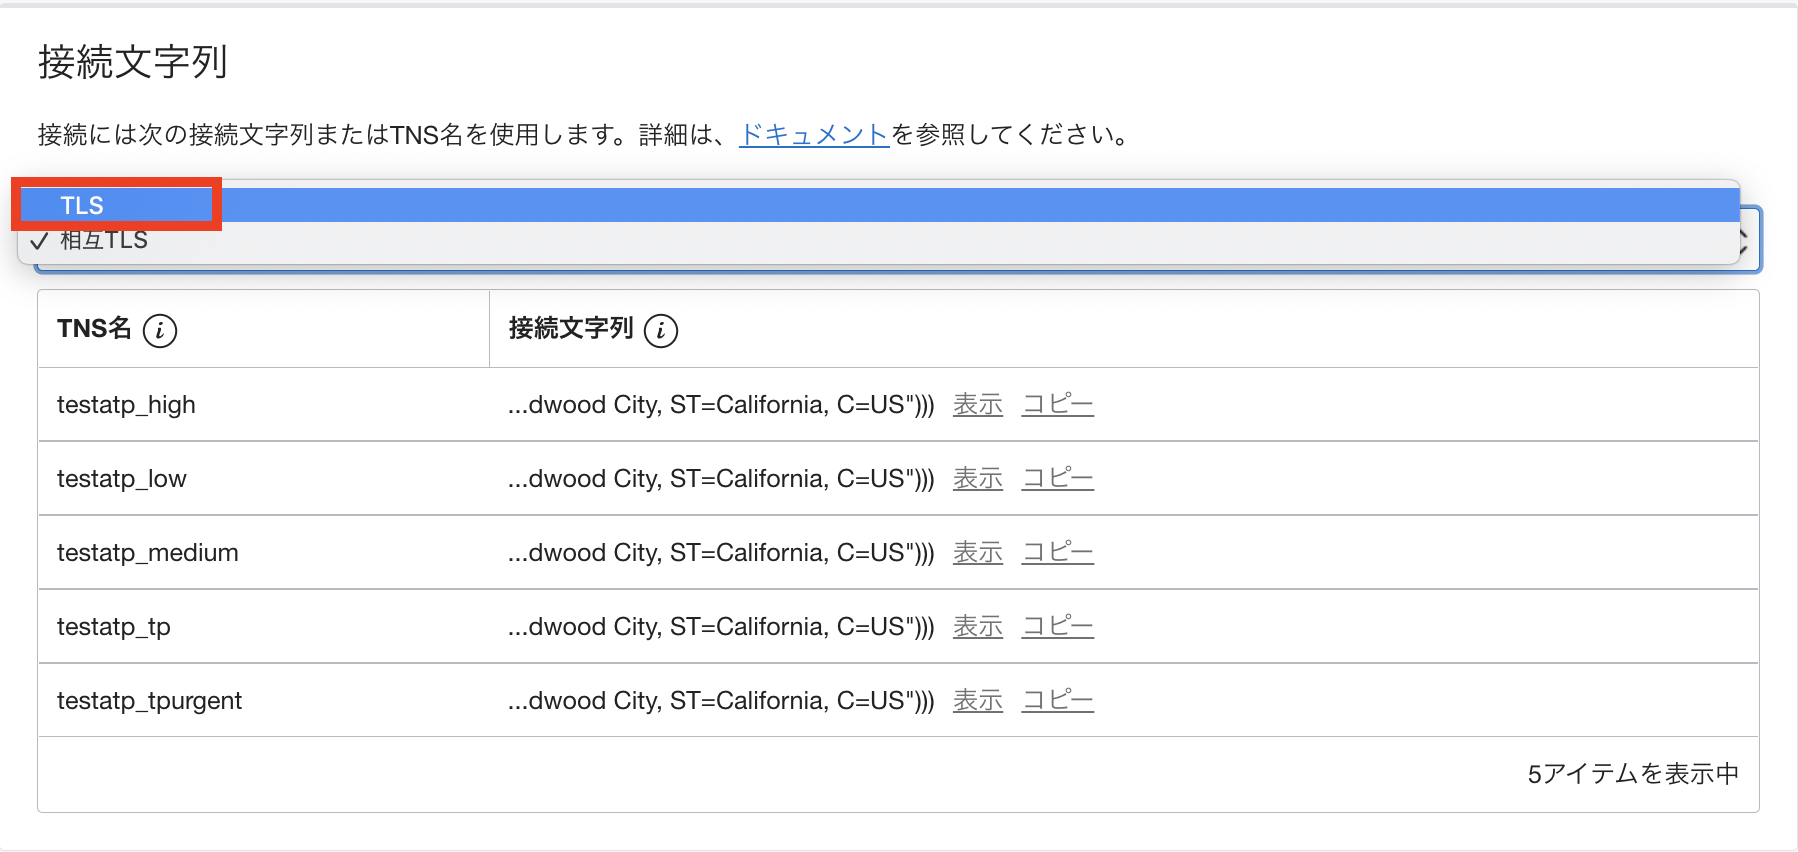
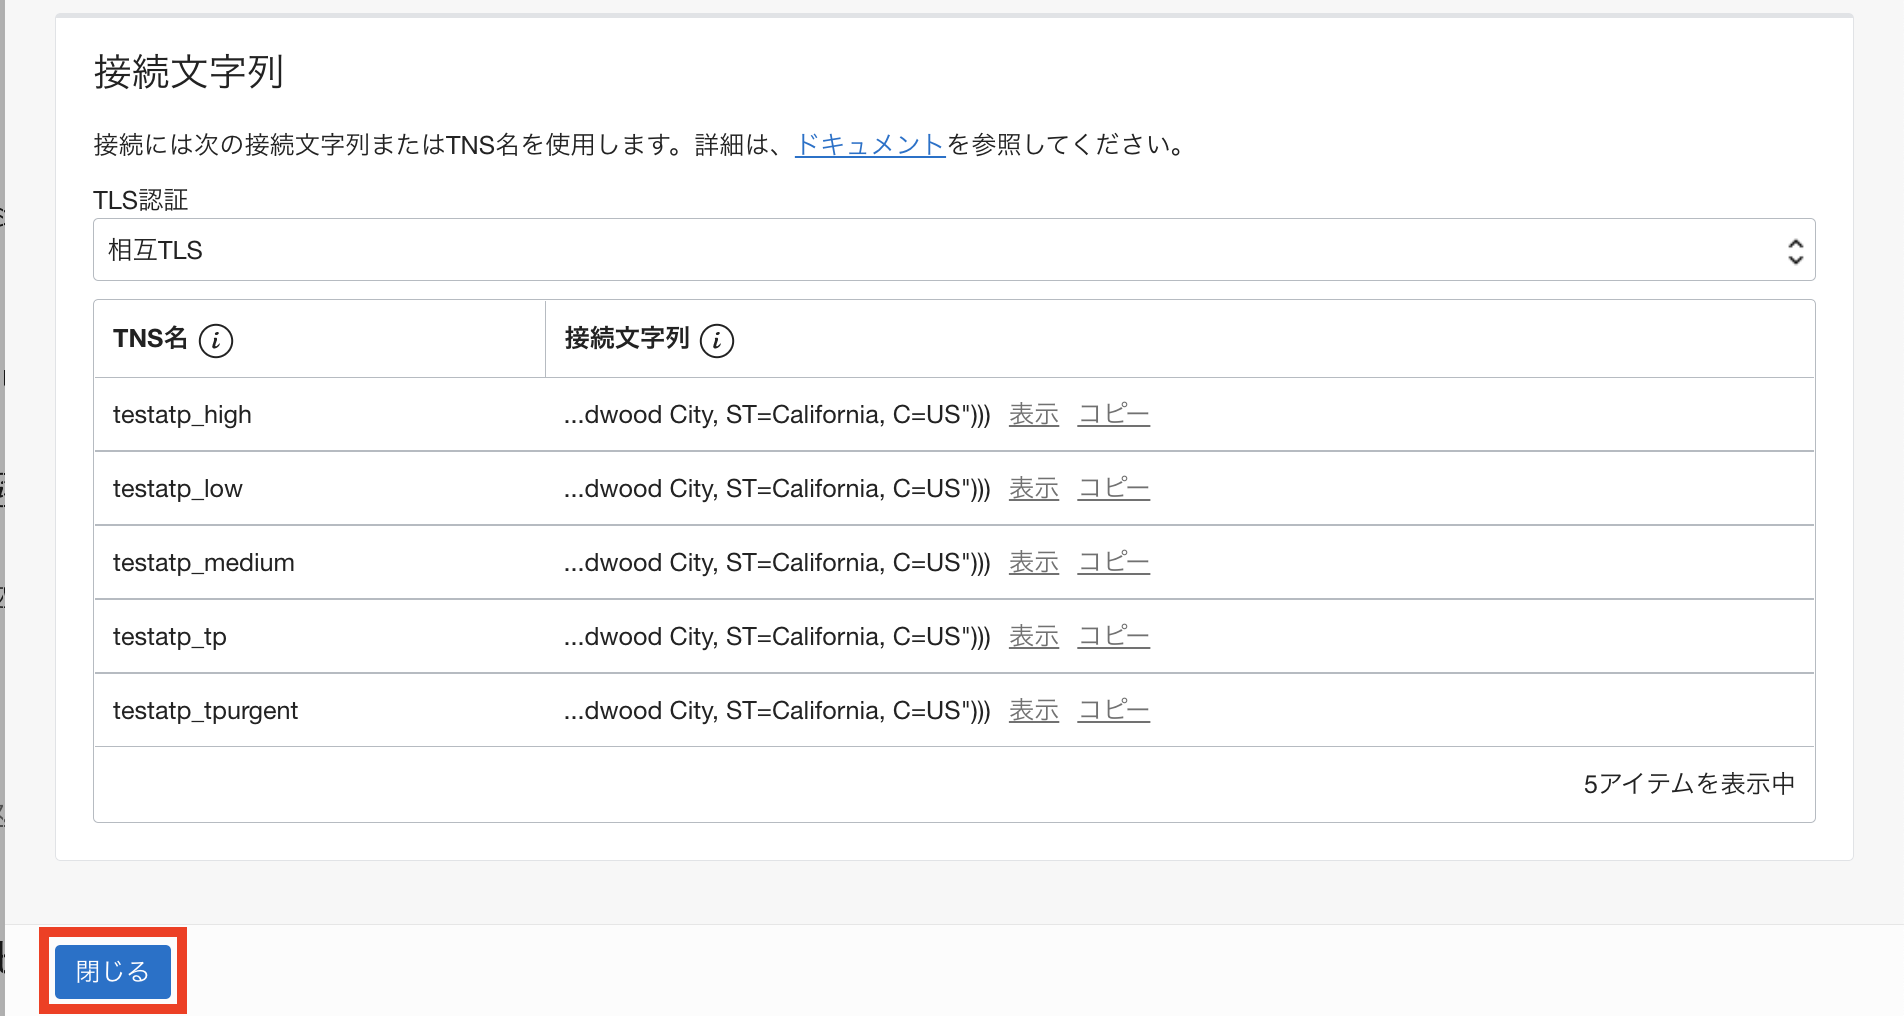
データベース接続の画面が表示されます。

接続文字列蘭のTLS認証をTLSに変更します。
接続文字列をコピーし、メモしておきます。
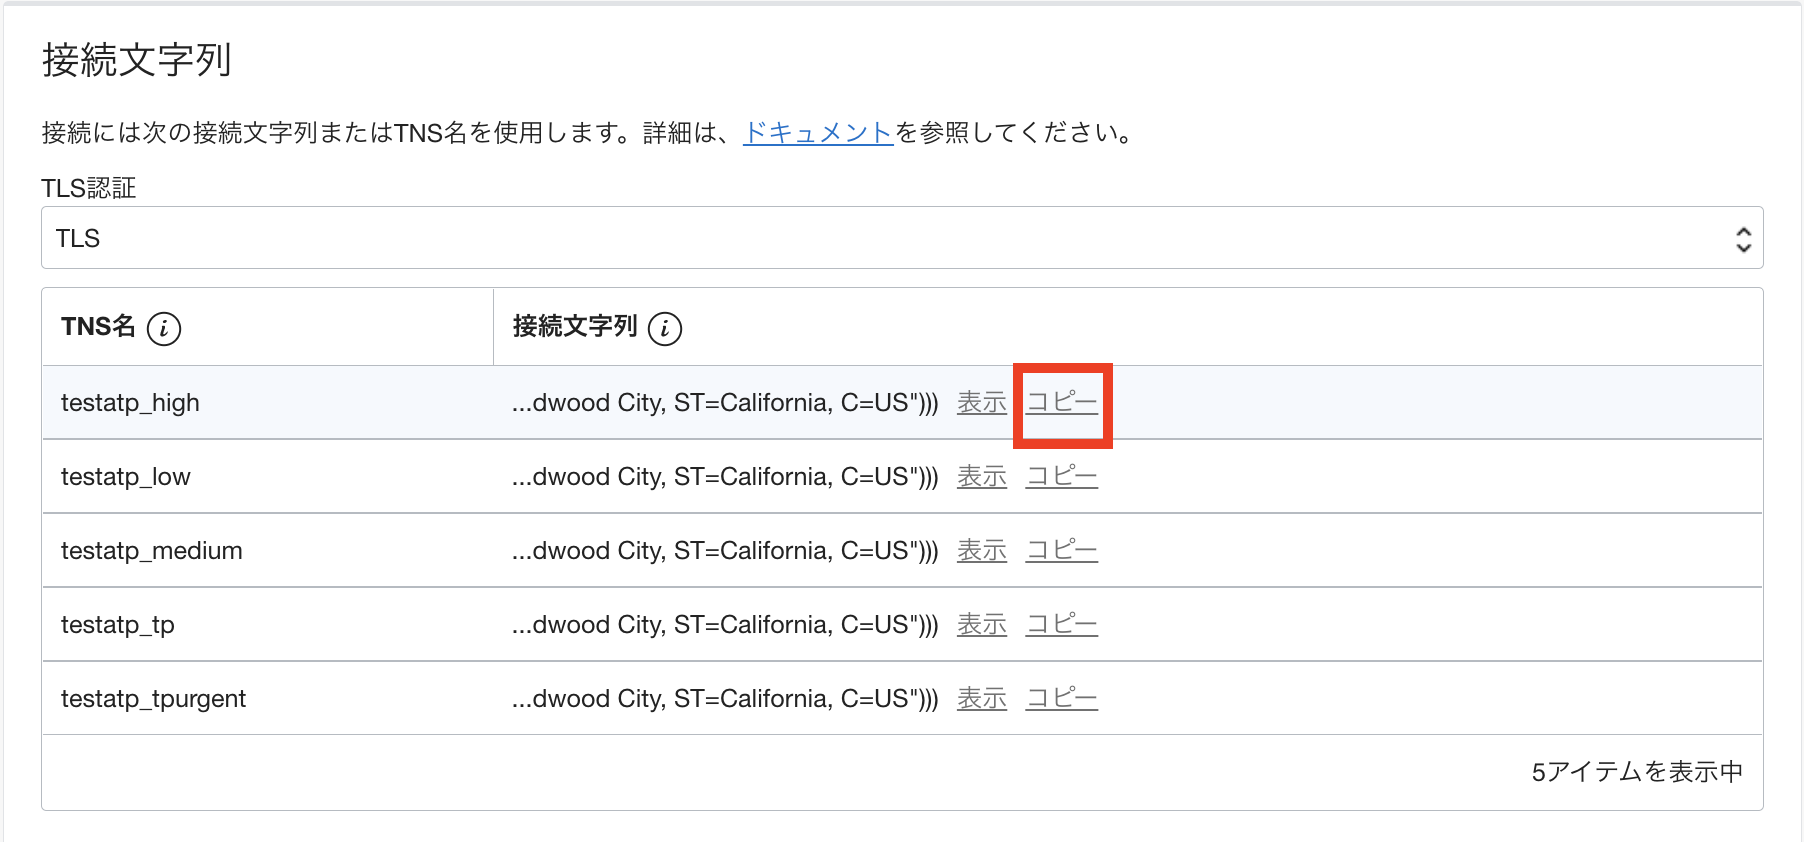
「閉じる」をクリックします。
4.ComputeインスタンスへのOracle Instant Clientのインストール
SSHでopcユーザとしてComputeインスタンスにログインします。
Welcome to Autonomous Linux
Effective kernel version is 5.4.17-2136.302.7.2.1.el7uek.x86_64
[opc@compute1 ~]$
yumコマンドでOracle Instant Clientをインストールします。
ウォレットを使用せずにAutonomous Databaseに接続するためには、Linux x64プラットフォームでOracle Clientのバージョンが19.13以上である必要があります。
ということで、今回はOracle Instant Client 19.14をインストールしました。
[opc@compute1 ~]$ sudo yum install -y oracle-release-el7
Loaded plugins: langpacks, ulninfo
ol7_UEKR6                                                                                   | 3.0 kB  00:00:00
ol7_addons                                                                                  | 3.0 kB  00:00:00
ol7_ksplice                                                                                 | 3.0 kB  00:00:00
ol7_latest                                                                                  | 3.6 kB  00:00:00
ol7_oci_included                                                                            | 2.9 kB  00:00:00
ol7_optional_latest                                                                         | 3.0 kB  00:00:00
ol7_software_collections                                                                    | 3.0 kB  00:00:00
ol7_x86_64_userspace_ksplice                                                                | 3.0 kB  00:00:00
(1/16): ol7_UEKR6/x86_64/updateinfo                                                         | 439 kB  00:00:00
(2/16): ol7_addons/x86_64/updateinfo                                                        | 137 kB  00:00:00
(3/16): ol7_latest/x86_64/group_gz                                                          | 136 kB  00:00:00
(4/16): ol7_ksplice/primary_db                                                              | 2.6 MB  00:00:00
(5/16): ol7_ksplice/updateinfo                                                              | 7.9 kB  00:00:00
(6/16): ol7_oci_included/x86_64/primary_db                                                  | 917 kB  00:00:00
(7/16): ol7_latest/x86_64/updateinfo                                                        | 3.4 MB  00:00:00
(8/16): ol7_optional_latest/x86_64/updateinfo                                               | 1.4 MB  00:00:00
(9/16): ol7_addons/x86_64/primary_db                                                        | 218 kB  00:00:00
(10/16): ol7_software_collections/x86_64/updateinfo                                         | 8.9 kB  00:00:00
(11/16): ol7_x86_64_userspace_ksplice/updateinfo                                            |  80 kB  00:00:00
(12/16): ol7_x86_64_userspace_ksplice/primary_db                                            | 265 kB  00:00:00
(13/16): ol7_optional_latest/x86_64/primary_db                                              | 5.6 MB  00:00:00
(14/16): ol7_software_collections/x86_64/primary_db                                         | 5.8 MB  00:00:00
(15/16): ol7_UEKR6/x86_64/primary_db                                                        |  30 MB  00:00:00
(16/16): ol7_latest/x86_64/primary_db                                                       |  39 MB  00:00:00
Resolving Dependencies
--> Running transaction check
---> Package oracle-release-el7.x86_64 0:1.0-4.el7 will be installed
--> Finished Dependency Resolution

Dependencies Resolved

===================================================================================================================
 Package                           Arch                  Version                   Repository                 Size
===================================================================================================================
Installing:
 oracle-release-el7                x86_64                1.0-4.el7                 ol7_latest                 14 k

Transaction Summary
===================================================================================================================
Install  1 Package

Total download size: 14 k
Installed size: 18 k
Downloading packages:
oracle-release-el7-1.0-4.el7.x86_64.rpm                                                     |  14 kB  00:00:00
Running transaction check
Running transaction test
Transaction test succeeded
Running transaction
  Installing : oracle-release-el7-1.0-4.el7.x86_64                                                             1/1
  Verifying  : oracle-release-el7-1.0-4.el7.x86_64                                                             1/1

Installed:
  oracle-release-el7.x86_64 0:1.0-4.el7

Complete!
[opc@compute1 ~]$
[opc@compute1 ~]$ sudo yum install -y oracle-instantclient19.14-sqlplus
Loaded plugins: langpacks, ulninfo
ol7_oracle_instantclient                                                                    | 2.9 kB  00:00:00
(1/2): ol7_oracle_instantclient/x86_64/updateinfo                                           |   71 B  00:00:00
(2/2): ol7_oracle_instantclient/x86_64/primary_db                                           |  27 kB  00:00:00
Resolving Dependencies
--> Running transaction check
---> Package oracle-instantclient19.14-sqlplus.x86_64 0:19.14.0.0.0-1 will be installed
--> Processing Dependency: oracle-instantclient19.14-basic >= 19.14.0.0.0 for package: oracle-instantclient19.14-sqlplus-19.14.0.0.0-1.x86_64
--> Running transaction check
---> Package oracle-instantclient19.14-basic.x86_64 0:19.14.0.0.0-1 will be installed
--> Finished Dependency Resolution

Dependencies Resolved

===================================================================================================================
 Package                                  Arch          Version              Repository                       Size
===================================================================================================================
Installing:
 oracle-instantclient19.14-sqlplus        x86_64        19.14.0.0.0-1        ol7_oracle_instantclient        687 k
Installing for dependencies:
 oracle-instantclient19.14-basic          x86_64        19.14.0.0.0-1        ol7_oracle_instantclient         51 M

Transaction Summary
===================================================================================================================
Install  1 Package (+1 Dependent package)

Total download size: 52 M
Installed size: 230 M
Downloading packages:
(1/2): oracle-instantclient19.14-sqlplus-19.14.0.0.0-1.x86_64.rpm                           | 687 kB  00:00:00
(2/2): oracle-instantclient19.14-basic-19.14.0.0.0-1.x86_64.rpm                             |  51 MB  00:00:00
-------------------------------------------------------------------------------------------------------------------
Total                                                                               57 MB/s |  52 MB  00:00:00
Running transaction check
Running transaction test
Transaction test succeeded
Running transaction
  Installing : oracle-instantclient19.14-basic-19.14.0.0.0-1.x86_64                                            1/2
  Installing : oracle-instantclient19.14-sqlplus-19.14.0.0.0-1.x86_64                                          2/2
  Verifying  : oracle-instantclient19.14-sqlplus-19.14.0.0.0-1.x86_64                                          1/2
  Verifying  : oracle-instantclient19.14-basic-19.14.0.0.0-1.x86_64                                            2/2

Installed:
  oracle-instantclient19.14-sqlplus.x86_64 0:19.14.0.0.0-1

Dependency Installed:
  oracle-instantclient19.14-basic.x86_64 0:19.14.0.0.0-1

Complete!
[opc@compute1 ~]$
環境変数を設定します。
/etc/profileを編集します。
[opc@compute1 ~]$ sudo vi /etc/profile
ファイルの末尾に以下の内容を追加します。
export ORACLE_HOME=/usr/lib/oracle/19.14/client64/lib
export LD_LIBRARY_PATH=$ORACLE_HOME:$LD_LIBRARY_PATH
export NLS_LANG=Japanese_Japan.AL32UTF8
export PATH=/usr/lib/oracle/19.14/client64/bin:$PATH
環境変数を適用します。
[opc@comp1 ~]$ source /etc/profile
Welcome to Autonomous Linux
Effective kernel version is 5.4.17-2136.302.7.2.1.el7uek.x86_64
[opc@compute1 ~]$
5.tnsnames.oraファイルの作成
Autonomous Databaseに接続するためのtnsnames.oraファイルを作成します。
[opc@comp1 ~]$ sudo vi $ORACLE_HOME/network/admin/tnsnames.ora
以下のようなエントリーを追加します。
接続文字列のエイリアス=先ほどコピーしたAutonomous DatabaseのTLS接続文字列
tnsnames.oraの内容は、こちらのファイルのようになります。
testatp1_high = (description= (retry_count=20)(retry_delay=3)(address=(protocol=tcps)(port=1521)(host=adb.ap-tokyo-1.oraclecloud.com))(connect_data=(service_name=xxxxxx_demoatp1_high.adb.oraclecloud.com))(security=(ssl_server_dn_match=yes)(ssl_server_cert_dn="CN=adb.ap-tokyo-1.oraclecloud.com, OU=Oracle ADB TOKYO, O=Oracle Corporation, L=Redwood City, ST=California, C=US")))
6.SQL*PlusからAutonomous Databaseに接続
SQL*PlusからAutonomous Databaseに接続してみます。
[opc@compute1 ~]$ sqlplus admin/Demo#1Demo#1@testatp1_high

SQL*Plus: Release 19.0.0.0.0 - Production on 水 2月 23 09:43:19 2022
Version 19.14.0.0.0

Copyright (c) 1982, 2021, Oracle.  All rights reserved.

最終正常ログイン時間: 水 2月  23 2022 09:04:58 +00:00


Oracle Database 19c Enterprise Edition Release 19.0.0.0.0 - Production
Version 19.14.0.1.0
に接続されました。
SQL>
ウォレットを使用せずに、SQL*PlusからAutonomous DatabaseにTLS認証で接続できました。
おまけ:Oracle Instant Client 19.12からの接続
同様に、SQL*Plus 19.12(Oracle Instant Client 19.2)からAutonomous Databaseに接続してみました。
[opc@compute1 ~]$ sqlplus admin/Demo#1Demo#1@demoatp1_high

SQL*Plus: Release 19.0.0.0.0 - Production on Wed Feb 23 02:59:56 2022
Version 19.12.0.0.0

Copyright (c) 1982, 2021, Oracle.  All rights reserved.

ERROR:
ORA-28759: failure to open file


Enter user-name:
SQL*Plus 19.12(Oracle Instant Client 19.2)は、ウォレットを使用せずにAutonomous DatabaseにTLS認証で接続できないため、エラーになりました。
参考情報
Autonomous DatabaseでTLSまたは相互TLS (mTLS)認証のみを許可するためのネットワーク・オプションの更新
Prepare for Oracle Call Interface, ODBC, and JDBC OCI Connections Using TLS Authentication