はじめに
以前の記事で,Photonを用いたマルチプレイ対応のアバターシステムを紹介しましたが,アバターの歩き方がかなり不自然でした.
VRIKのパラメータをいじることで多少はましになると思いますが,アニメーションを用いてよりよくする方法を紹介します.
開発環境
開発環境は以前の記事と同じです.Oculus Linkを使用して開発を行っていますが,Oculus Integrationが使えれば問題ないかと思います.(他の環境でためしたことないのでわかりませんが)
- Windows10
- Oculus Link対応GPU搭載PC
- Unity version: 2021.3.26f1
目次
1. 完成イメージ
2. 前提条件
3. Animationのインストール
4. Animatorの作成
5. Animationを制御するScriptの作成
6. コンポーネントのアタッチ
7. おわりに
完成イメージ

前提条件
Oculus integrationやVRMアバターの導入や,VRIKの設定等は,以前の記事などを参考にしてください.
次のような動きができれば大丈夫かと思います.

Animationのインストール
今回はBasic Motions FREEをUnity Asset Storeからダウンロードします.

Animatorの作成
Animationの配置
AvatarWalkというAnimatorを作成します.
まず,以下のように先ほどダウンロードしたアニメーションを配置して,遷移を作成します.

walkF,walkB,walkR,walkLは,\Assets\Kevin Iglesias\Basic Motions\Animations\Movement\Basic Motions@Walk01.fbxのAnimationを使用しており,その対応は以下のようになっています.
-
walkF->BasicMotions@Walk01 - Forwards -
walkB->BasicMotions@Walk01 - Backwards -
walkR->BasicMotions@Walk01 - Right -
walkL->BasicMotions@Walk01 - Left
パラメータの作成
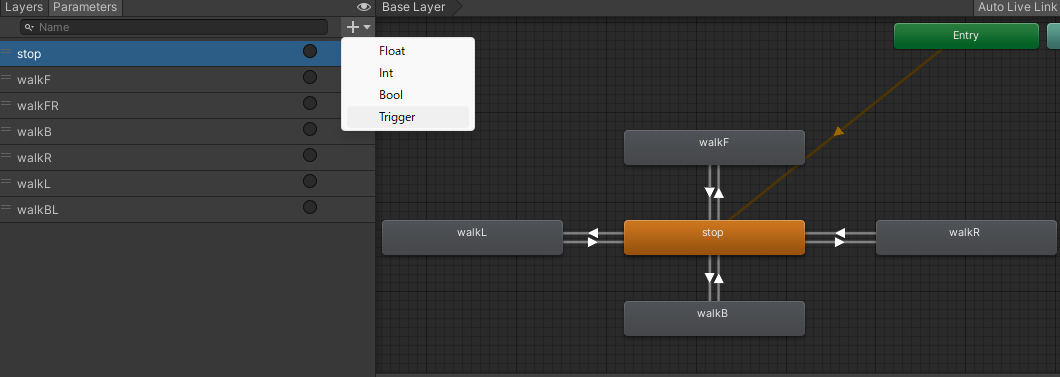
Parametersから,+をおして,Triggerを選択します,
今回は画像の中でstop,walkF,walkB,walkR,walkLの4つ用います.
遷移の作成
まず,上画像のような遷移を作成し,全ての遷移でHas Exit Timeのチェックを外してください.

また,それぞれのConditionは以下の通りです.(遷移先の名前のParameterを設定すればOKです)
- stop -> walkF :
walkF - walkF -> stop :
stop - stop -> walkB :
walkB - walkB -> stop :
stop - stop -> walkR :
walkR - walkR -> stop :
stop - stop -> walkR :
walkR - walkR -> stop :
stop
Animationを制御するScriptの作成
次のスクリプトを作成します.
using System.Collections;
using System.Collections.Generic;
using UnityEngine;

public class AvatarAnimationController : MonoBehaviour
{
    private Animator controller;

    // Start is called before the first frame update
    void Start()
    {
        controller = this.GetComponent<Animator>();
        ResetAnimation();
        controller.SetTrigger("stop");
    }

    void ResetAnimation()
    {
        controller.ResetTrigger("walkF");
        controller.ResetTrigger("walkB");
        controller.ResetTrigger("walkR");
        controller.ResetTrigger("walkL");
        // controller.ResetTrigger("stop");
    }

    // Update is called once per frame
    void Update()
    {
        // 前進Animation
        if (OVRInput.Get(OVRInput.Button.PrimaryThumbstickUp, OVRInput.Controller.LTouch)){
            ResetAnimation();
            controller.SetTrigger("walkF");
        }

        // 後退Animation
        if (OVRInput.Get(OVRInput.Button.PrimaryThumbstickDown, OVRInput.Controller.LTouch)){
            ResetAnimation();
            controller.SetTrigger("walkB");
        }

        // 右横歩き
        if (OVRInput.Get(OVRInput.Button.PrimaryThumbstickRight, OVRInput.Controller.LTouch)){
            ResetAnimation();
            controller.SetTrigger("walkR");
        }

        // 左横歩き
        if (OVRInput.Get(OVRInput.Button.PrimaryThumbstickLeft, OVRInput.Controller.LTouch)){
            ResetAnimation();
            controller.SetTrigger("walkL");
        }

        // idle状態
        if (OVRInput.GetUp(OVRInput.Button.PrimaryThumbstickUp, OVRInput.Controller.LTouch)
            || OVRInput.GetUp(OVRInput.Button.PrimaryThumbstickDown, OVRInput.Controller.LTouch)
            || OVRInput.GetUp(OVRInput.Button.PrimaryThumbstickRight, OVRInput.Controller.LTouch)
            || OVRInput.GetUp(OVRInput.Button.PrimaryThumbstickLeft, OVRInput.Controller.LTouch)
        ){
            ResetAnimation();
            controller.SetTrigger("stop");
        }

    }
}
コンポーネントのアタッチ
最後に,今まで作成したアニメーター,スクリプトをアタッチします.
アバターとして用いたいVRMアバターのAnimatorコンポーネントのControllerを先ほど作成したAvatarWalkとします.

また,Avatar Animation Controllerもアタッチしましょう.(先ほど作成したスクリプトです.)
また,VRIKコンポーネントものLocomotion内のWeightを0にしましょう.

これで完成です!!!
おわりに
今回は,以前作成したアバターシステムのアップデートを行いました.
導入は簡単かと思うので参考にしてみてください.