画像の領域検出(image segmentation)ではおなじみのU-Netの改良版として、
UNet++: A Nested U-Net Architecture for Medical Image Segmentationが提案されています。
構造が簡単、かつGithubに著者のKerasによる実装しかなさそうだったのでPyTorchで実装してみました。
ソースコードはこちら
https://github.com/4uiiurz1/pytorch-nested-unet
UNet++ とは
U-Net
前提としてU-Netについて知っている必要があるので、簡単に説明します。
U-Netは以下のようなEncoder-Decoder構造を持つモデルです。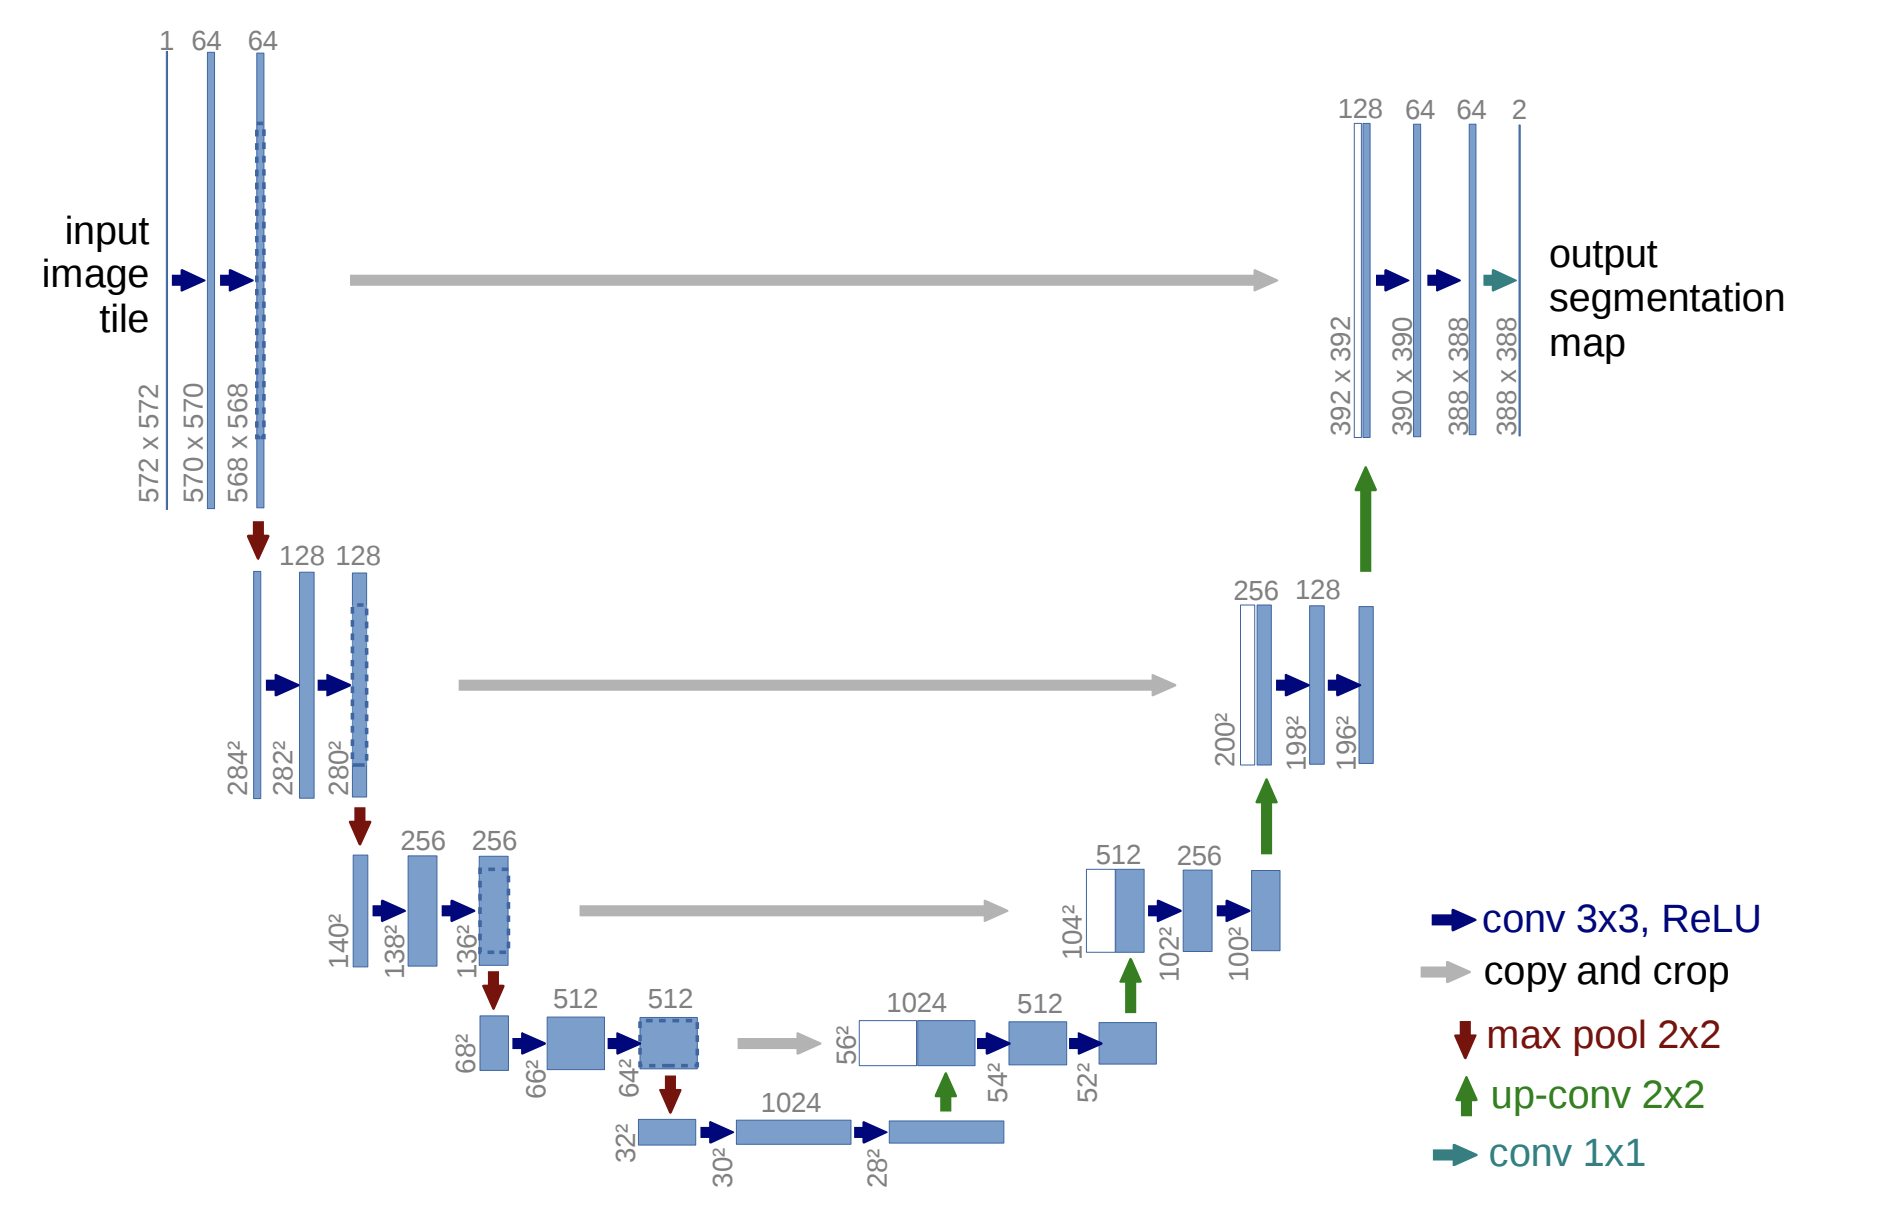
U-Net: Convolutional Networks for Biomedical Image Segmentation
各スケールごとにEncoderの特徴マップをDecoderの特徴マップに連結しているのが特徴です。
これによってPoolingで失われる空間的な情報が保持されるため、より正確に領域検出ができると言われています。
この構造はcontracting pathやskip connectionと呼ばれます。
UNet++ (Nested U-Net)
UNet++は以下のような構造を持つモデルです。

UNet++: A Nested U-Net Architecture for Medical Image Segmentation
各スケールのEncoder部分からDecodeを行い、それらをskip connectionによってDecoderに連結します。
これによって、Encoder-Decoder間の特徴マップの表現上のギャップを減らすことができるそうです。
異なる深さのU-Netがネストになっているようにも見えますね。
また、最終出力だけではなく各スケールからのDecode出力についてもLossを計算します。
これは、Deeply-Supervised Netsで提案されたDeep supervisionという手法です。
UNet++の論文によると、一部のデータセットでは性能向上したみたいです。
UNet++の実装
PyTorchによる実装は以下のようになりました。
class VGGBlock(nn.Module):
    def __init__(self, in_channels, middle_channels, out_channels, act_func=nn.ReLU(inplace=True)):
        super(VGGBlock, self).__init__()
        self.act_func = act_func
        self.conv1 = nn.Conv2d(in_channels, middle_channels, 3, padding=1)
        self.bn1 = nn.BatchNorm2d(middle_channels)
        self.conv2 = nn.Conv2d(middle_channels, out_channels, 3, padding=1)
        self.bn2 = nn.BatchNorm2d(out_channels)

    def forward(self, x):
        out = self.conv1(x)
        out = self.bn1(out)
        out = self.act_func(out)

        out = self.conv2(out)
        out = self.bn2(out)
        out = self.act_func(out)

        return out

class NestedUNet(nn.Module):
    def __init__(self, args):
        super().__init__()

        self.args = args

        nb_filter = [32, 64, 128, 256, 512]

        self.pool = nn.MaxPool2d(2, 2)
        self.up = nn.Upsample(scale_factor=2, mode='bilinear', align_corners=True)

        self.conv0_0 = VGGBlock(args.input_channels, nb_filter[0], nb_filter[0])
        self.conv1_0 = VGGBlock(nb_filter[0], nb_filter[1], nb_filter[1])
        self.conv2_0 = VGGBlock(nb_filter[1], nb_filter[2], nb_filter[2])
        self.conv3_0 = VGGBlock(nb_filter[2], nb_filter[3], nb_filter[3])
        self.conv4_0 = VGGBlock(nb_filter[3], nb_filter[4], nb_filter[4])

        self.conv0_1 = VGGBlock(nb_filter[0]+nb_filter[1], nb_filter[0], nb_filter[0])
        self.conv1_1 = VGGBlock(nb_filter[1]+nb_filter[2], nb_filter[1], nb_filter[1])
        self.conv2_1 = VGGBlock(nb_filter[2]+nb_filter[3], nb_filter[2], nb_filter[2])
        self.conv3_1 = VGGBlock(nb_filter[3]+nb_filter[4], nb_filter[3], nb_filter[3])

        self.conv0_2 = VGGBlock(nb_filter[0]*2+nb_filter[1], nb_filter[0], nb_filter[0])
        self.conv1_2 = VGGBlock(nb_filter[1]*2+nb_filter[2], nb_filter[1], nb_filter[1])
        self.conv2_2 = VGGBlock(nb_filter[2]*2+nb_filter[3], nb_filter[2], nb_filter[2])

        self.conv0_3 = VGGBlock(nb_filter[0]*3+nb_filter[1], nb_filter[0], nb_filter[0])
        self.conv1_3 = VGGBlock(nb_filter[1]*3+nb_filter[2], nb_filter[1], nb_filter[1])

        self.conv0_4 = VGGBlock(nb_filter[0]*4+nb_filter[1], nb_filter[0], nb_filter[0])

        if self.args.deepsupervision:
            self.final1 = nn.Conv2d(nb_filter[0], 1, kernel_size=1)
            self.final2 = nn.Conv2d(nb_filter[0], 1, kernel_size=1)
            self.final3 = nn.Conv2d(nb_filter[0], 1, kernel_size=1)
            self.final4 = nn.Conv2d(nb_filter[0], 1, kernel_size=1)
        else:
            self.final = nn.Conv2d(nb_filter[0], 1, kernel_size=1)


    def forward(self, input):
        x0_0 = self.conv0_0(input)
        x1_0 = self.conv1_0(self.pool(x0_0))
        x0_1 = self.conv0_1(torch.cat([x0_0, self.up(x1_0)], 1))

        x2_0 = self.conv2_0(self.pool(x1_0))
        x1_1 = self.conv1_1(torch.cat([x1_0, self.up(x2_0)], 1))
        x0_2 = self.conv0_2(torch.cat([x0_0, x0_1, self.up(x1_1)], 1))

        x3_0 = self.conv3_0(self.pool(x2_0))
        x2_1 = self.conv2_1(torch.cat([x2_0, self.up(x3_0)], 1))
        x1_2 = self.conv1_2(torch.cat([x1_0, x1_1, self.up(x2_1)], 1))
        x0_3 = self.conv0_3(torch.cat([x0_0, x0_1, x0_2, self.up(x1_2)], 1))

        x4_0 = self.conv4_0(self.pool(x3_0))
        x3_1 = self.conv3_1(torch.cat([x3_0, self.up(x4_0)], 1))
        x2_2 = self.conv2_2(torch.cat([x2_0, x2_1, self.up(x3_1)], 1))
        x1_3 = self.conv1_3(torch.cat([x1_0, x1_1, x1_2, self.up(x2_2)], 1))
        x0_4 = self.conv0_4(torch.cat([x0_0, x0_1, x0_2, x0_3, self.up(x1_3)], 1))

        if self.args.deepsupervision:
            output1 = self.final1(x0_1)
            output2 = self.final2(x0_2)
            output3 = self.final3(x0_3)
            output4 = self.final4(x0_4)
            return [output1, output2, output3, output4]

        else:
            output = self.final(x0_4)
            return output
詳しくは以下のリポジトリを見てください。
https://github.com/4uiiurz1/pytorch-nested-unet
性能評価
データセット
論文でも使われていたKaggleの2018 Data Science Bowlのデータセットを用います。
細胞核の画像とそのマスク画像それぞれ670枚で構成されています。
今回は全体の20%をバリデーション兼テストデータとします。
画像サイズがバラバラなので96×96pxにリサイズして使います。
評価指標
評価指標にはIoUを用います。
def iou_score(output, target):
    smooth = 1e-5

    if torch.is_tensor(output):
        output = torch.sigmoid(output).data.cpu().numpy()
    if torch.is_tensor(target):
        target = target.data.cpu().numpy()
    output = output > 0.5
    target = target > 0.5
    intersection = (output & target).sum()
    union = (output | target).sum()

    return (intersection + smooth) / (union + smooth)
損失関数
損失関数には論文と同様に、Diceの類似度係数とバイナリクロスエントロピーを組み合わせた以下のものを使います。
L(Y,\hat{Y}) = \frac{1}{N} \sum_{b=1}^N \left(\frac{1}{2} Y_b \log\hat{Y}_b + \frac{2Y_b\hat{Y}_b}{Y_b + \hat{Y}_b} \right)
$Y_b$: predicted probabilities
$\hat{Y}_b$: ground truth
$N$: batch size
class BCEDiceLoss(nn.Module):
    def __init__(self):
        super(BCEDiceLoss, self).__init__()

    def forward(self, input, target):
        bce = F.binary_cross_entropy_with_logits(input, target)
        smooth = 1e-5
        input = torch.sigmoid(input)
        num = target.size(0)
        input = input.view(num, -1)
        target = target.view(num, -1)
        intersection = (input * target)
        dice = (2. * intersection.sum(1) + smooth) / (input.sum(1) + target.sum(1) + smooth)
        dice = 1 - dice.sum() / num
        return 0.5 * bce + dice
ハイパーパラメータ
Optimizerは論文と同様にAdamを使います。learning rateは3e-4で固定です。
batch sizeは16です。
学習中はValidation dataに対するIoUをモニタリングし、20epoch連続で改善しない場合は学習を終了します。
Data augmentationは行いません。
結果
結果は以下のようになりました。
| model | IoU |
|---|---|
| U-Net | 0.8347 |
| UNet++ (Deep supervision なし) | 0.8321 |
| UNet++ (Deep supervision あり) | 0.8367 |
かなり微妙ですね…
一応Deep supervisionありのUNet++が最も良いIoUを示していますが、Deep supervisionなしのUNet++はU-Netに負けています。
これだとUNetにDeep supervision使ったら一番良い性能になりそうです。
ちなみに論文での実験結果は以下の通りです。
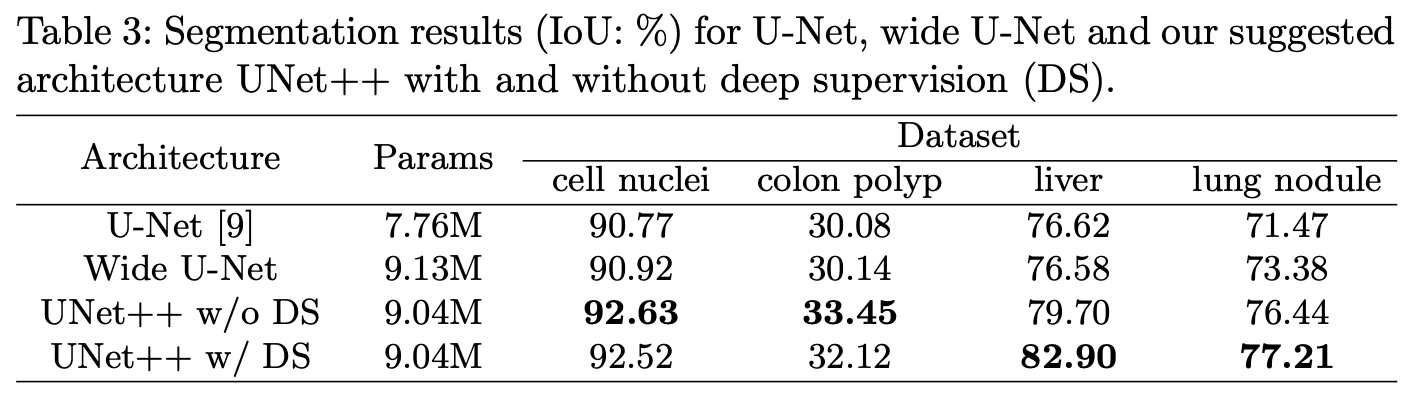
論文だとUNet++が明らかに良い性能を示しているのですが…
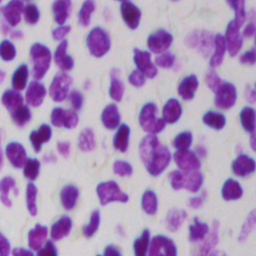
それぞれのモデルの予測結果はこんな感じです。
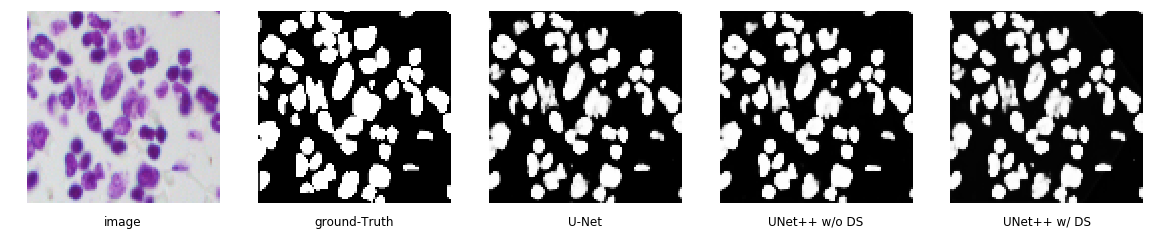
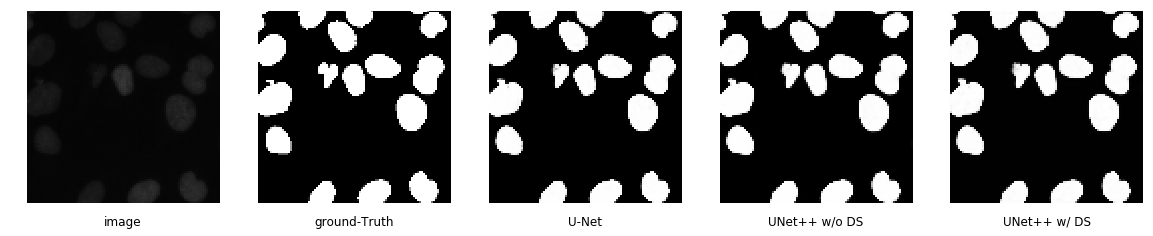
違いがわからないですね。
画像のサイズについて論文に倣って96×96pxにしたのですが、もっと大きい方が良かったかもしれません。
学習の際のlossとIoUの変化は以下の通りです。
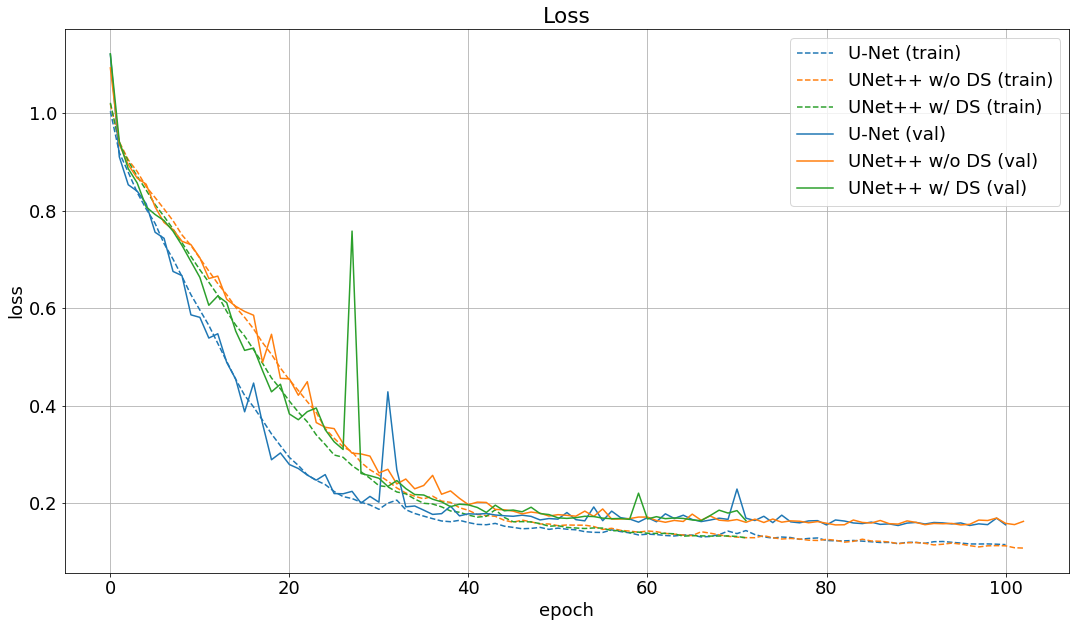
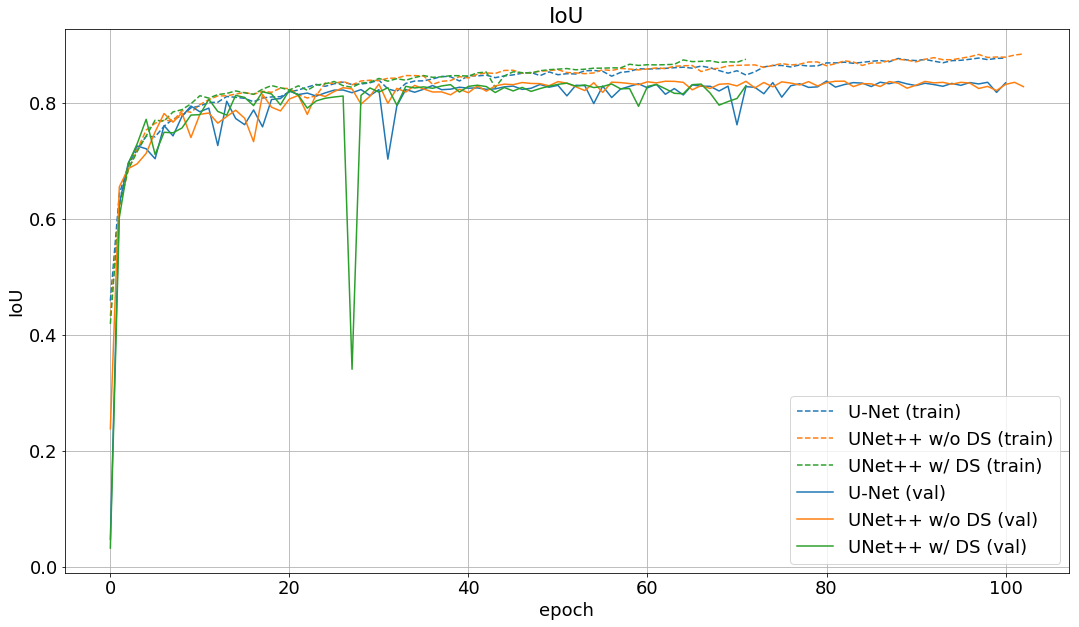
validation lossはUNet++の方が下がっているようです。
まとめ
今回の実験では論文に載っているようなUNet++の性能を確認することができませんでした。
著者の実装を見るとBatch Normalizationを使っていなかったり、全てのConv層の直後にDropout層を入れていたりするので、このあたり合わせると良い結果が得られるのかもしれません。
また、論文にはbatch sizeやData augmentationについての記述が無いため、今回の実験ではテキトーに決めましたが、最適な設定を見つける必要がありそうです。
気が向いたら色々と試してみようと思います。みなさんもぜひ動かしてみてください。
ソースコードや記事におかしい箇所があったら、教えていただけるとありがたいです。