##はじめに
この記事は SLP KBIT Advent Calendar 2020 の22日目(12月22日)の記事です。
UnityではじめるC# に従い作りました。
目次
開発環境
Windows10
Unity2019.4.16f1
事前準備
Android向けに設定する。

アスペクト比を800×1280にする。

プロジェクトの[Assets]フォルダに「Resources」「Scene」「Script」の3つのフォルダを作り、わかりやすくする。
タイトル画面を作る
Assets>Scene に新たにSceneを作る。ファイルから新しいシーンを選択し、名前を付けて保存する。

最初にキャンバスを作成する。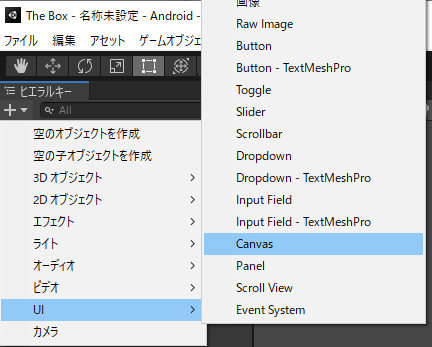
次に、キャンパスのサイズをメインカメラに合わせる。
インスペクター内のレンダーモードをスクリーンスペース-カメラに変更する。

その後メインカメラをレンダーカメラにドラッグ&ドロップ

そして、UIスケールモードを変更。参照解像度をx=800 y=1280にして、マッチを1に変更。

これで、キャンパスがゲーム画面のサイズに合う。
画像を配置し、サイズを800×1280にする。
同様にUI->Textでテキストを配置し、UI->Buttonでスタートボタンを配置。
ボタンにスクリプトを関連付けて、機能をつける。
using UnityEngine.SceneManagement;
using System.Collections;
using System.Collections.Generic;
using UnityEngine;

public class TitleManager : MonoBehaviour {
public void PushStartButton() {
        SceneManager.LoadScene("GameScene"); //ゲームシーンへ遷移する
    }
}
ヒエラルキーに空のオブジェクトを作り、AddComponentをクリックし、Scriptを選択する。
ボタンのButtonコンポーネントにスクリプトを入れることでボタンが機能を持つようになる。
中身を作っていく(ここからはコードメイン)
ゲーム内に登場する物を定義する。
壁や色には数値を与える。
public const int WALL_FRONT = 1;
    public const int WALL_RIGHT = 2;
    public const int WALL_BACK = 3;
    public const int WALL_LEFT = 4;

    //定数定義:ボタンカラー
    public const int COLOR_GREEN = 0;
    public const int COLOR_RED = 1;
    public const int COLOR_BLUE = 2;
    public const int COLOR_WHITE = 3;
    public GameObject panelWalls; //壁全体
    public GameObject buttonHammer; //ボタン:トンカチ
    public GameObject buttonKey;    //ボタン:鍵
    public GameObject imageHammerIcon; //アイコン:トンカチ
    public GameObject imageKeyIcon;     //アイコン:鍵
    public GameObject buttonPig;
    public GameObject buttonMessage; //ボタン:メッセージ
    public GameObject buttonMessageText; //メッセージテキスト
    public GameObject[] buttonLamp = new GameObject[3];
    public Sprite[] buttonPicture = new Sprite[4];
    public Sprite hammerPicture;    //トンカチの絵
    public Sprite keyPicture;       //鍵の絵
    private int wallNo; //現在向いている方向
    private bool doesHaveHammer;            //トンカチを持っているか?
    private bool doesHaveKey;               //鍵を持っているか?
    private int[] buttonColor = new int[3]; //金庫のボタン
ゲームが始まったときの状況を与える。
オブジェクトを所持していないときはfalse。
 void Start() {
        wallNo = WALL_FRONT;
        doesHaveHammer = false;
        doesHaveKey = false;

        buttonColor[0] = COLOR_GREEN;
        buttonColor[1] = COLOR_RED;
        buttonColor[2] = COLOR_BLUE;
    }
それぞれオブジェクトに機能を持たす。
//ボックスをタップ
    public void PushButonBox() {
        if(doesHaveKey == false) {
            DisplayMessage("鍵がかかっている。");
        } else {
            SceneManager.LoadScene("ClearScene");
        }
    }
    //金庫のボタン1をタップ
    public void PushButtonLamp1() {
        ChangeButtonColor(0);
    }
    //金庫のボタン2をタップ
    public void PushButtonLamp2() {
        ChangeButtonColor(1);
    }
    //金庫のボタン3をタップ
    public void PushButtonLamp3() {
        ChangeButtonColor(2);
    }

    //金庫のボタンの色を変更
    void ChangeButtonColor(int buttonNo) {
        buttonColor [buttonNo]++;
        //白のときにボタンを押したら緑になる
        if(buttonColor[buttonNo] > COLOR_WHITE) {
            buttonColor[buttonNo] = COLOR_GREEN;
        }
        //画像を更新
        buttonLamp[buttonNo].GetComponent<Image>().sprite = buttonPicture[buttonColor[buttonNo]];

        //ボタンの色順チェック
        if((buttonColor[0] == COLOR_BLUE) &&(buttonColor[1] == COLOR_WHITE) &&(buttonColor[2] == COLOR_RED)) {
            //トンカチ持ってる?
            if(doesHaveHammer == false) {
                DisplayMessage("金庫の中にトンカチが入っていた。");
                buttonHammer.SetActive(true); //トンカチの絵を表示
                imageHammerIcon.GetComponent<Image>().sprite = hammerPicture;

                doesHaveHammer = true;
            }
        }

    }
    //メモをタップ
    public void PushButtonMemo() {
        DisplayMessage("エッフェル塔と書いてある。");
    }
    //貯金箱をタップ
    public void PushButtonPig() {
        if(doesHaveHammer == false) {
            DisplayMessage("素手では割れない。");
        } else {
            DisplayMessage("貯金箱が割れて中から鍵が出てきた。");
            buttonPig.SetActive(false); //貯金箱を消す
            buttonKey.SetActive(true);  //鍵の絵を表示
            imageKeyIcon.GetComponent<Image>().sprite = keyPicture;
            doesHaveKey = true;
        }
    }

    //トンカチの絵をタップ
    public void PushButtonHammer(){
        buttonHammer.SetActive(false);
    }
    //鍵の絵をタップ
    public void PushButtonKey() {
        buttonKey.SetActive(false);
    }
    //メッセージをタップ
    public void PushButtonMessage() {
        buttonMessage.SetActive(false); //メッセージを消す
    }
    public void PushButtonRight() {
        wallNo++;
        if (wallNo > WALL_LEFT) {
            wallNo = WALL_FRONT;
        }
        DisplayWall(); //壁表示更新
        ClearButtons(); //いらないものを消す
    }
    public void PushButtonLeft() {
        wallNo--;
        if (wallNo < WALL_FRONT) {
            wallNo = WALL_LEFT;
        }
        DisplayWall(); //壁表示更新
        ClearButtons(); //いらないものを消す
    }

    //各種表示をクリア
    void ClearButtons() {
        buttonHammer.SetActive(false);
        buttonKey.SetActive(false);
        buttonMessage.SetActive(false);
    }
    //メッセージを表示
    void DisplayMessage(string mes) {
        buttonMessage.SetActive(true);
        buttonMessageText.GetComponent<Text> ().text = mes;
    }

        //向いている方向の壁を表示
    void DisplayWall() {
        switch (wallNo) {
        case WALL_FRONT:
            panelWalls.transform.localPosition = new Vector3(0.0f, 0.0f, 0.0f);
            break;
        case WALL_RIGHT:
            panelWalls.transform.localPosition = new Vector3(-1000.0f, 0.0f, 0.0f);
            break;
        case WALL_BACK:
            panelWalls.transform.localPosition = new Vector3(-2000.0f, 0.0f, 0.0f);
            break;
        case WALL_LEFT:
            panelWalls.transform.localPosition = new Vector3(-3000.0f, 0.0f, 0.0f);
            break;
        }
    }

}
終わりに
今回は本に書かれた通りに作りました。
プログラムだけでなくUnityのエディタの使い方も学べてよかったです。
次はオリジナルで作りたいです。