この記事は Flutter #1 Advent Calendar 2020 5日目の記事です。
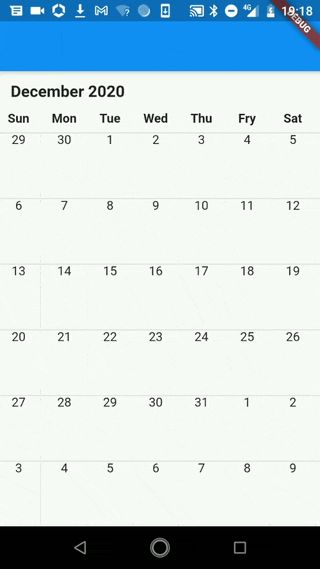
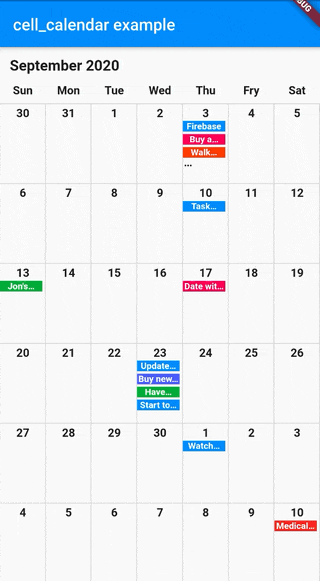
完成図
Google Calendarのように画面いっぱいに日付のセルが広がり、ページングで表示する月を更新するウィジェットを作ります。
カレンダーのレイアウトを作る
ここでいう「レイアウトを作る」は、以下のような曜日と月のラベル、そしてからっぽのカレンダーのセルが画面いっぱいに描画された状態を作ることを指します。
レイアウトの大枠を作る
CalendarPageViewクラス
class CalendarPageView extends StatelessWidget {
  const CalendarPageView({Key key}) : super(key: key);

  @override
  Widget build(BuildContext context) {
    return Column(
      crossAxisAlignment: CrossAxisAlignment.start,
      children: [
        Padding(
          padding: EdgeInsets.symmetric(vertical: 12, horizontal: 12),
          child: Text(
            "month and year",
            style: TextStyle(fontSize: 18, fontWeight: FontWeight.bold),
          ),
        ),
        /// スクロールできるコンポーネント
        Expanded(
          child: PageView.builder(
            controller: PageController(initialPage: 1200),
            itemBuilder: (context, index) {
              return const CalendarPage();
            },
          ),
        ),
      ],
    );
  }
}
CalendarPageクラス
class CalendarPage extends StatelessWidget {
  const CalendarPage({
    Key key,
  }) : super(key: key);

  @override
  Widget build(BuildContext context) {
    return Text("Calendar Page");
  }
}
initialPage:1200の意味
PageControllerのinitialPageが1200となっていますが、これはPageViewが"ほぼ無限"に左にも右にもスワイプできる状態にするために設定しています。ここの数字はデフォルトでは0なので、何も設定しないと始点から後ろにスクロールできないカレンダーになってしまいます。
今回は1200に設定しているので、始点から後ろに1200回スワイプできることになります。このカレンダーは1枚で1ヶ月を表すので、この設定によって100年分遡れることになります。(100年以上遡りたい場合はここの数字をよしなに調整してください)
この段階でこのように Calendar Pageという文字がスワイプで動くものが出来上がると思います。
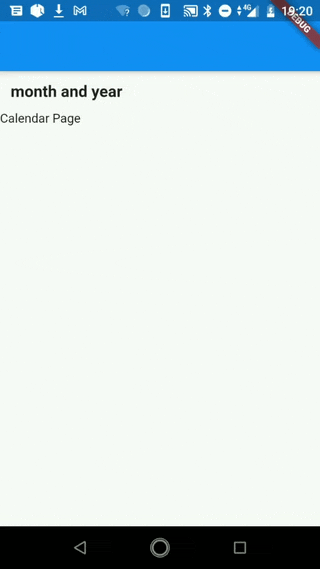
ここからはこの Calendar Pageにあたる部分(スクローラブルな部分)を実装していきます。
カレンダーのセル、曜日のラベルを作る
CalendarPageクラス
class CalendarPage extends StatelessWidget {
  const CalendarPage({
    Key key,
  }) : super(key: key);

  @override
  Widget build(BuildContext context) {
    return Column(
      children: [
        DaysOfTheWeek(),
        DatesRow(),
        DatesRow(),
        DatesRow(),
        DatesRow(),
        DatesRow(),
        DatesRow(),
      ],
    );
  }
}
DaysOfTheWeekクラス
const List<String> _DaysOfTheWeek = [
  'Sun',
  'Mon',
  'Tue',
  'Wed',
  'Thu',
  'Fry',
  'Sat'
];

/// 曜日のラベルを横並びに表示する。
class DaysOfTheWeek extends StatelessWidget {
  @override
  Widget build(BuildContext context) {
    return Row(
      children: _DaysOfTheWeek.map((day) {
        return Expanded(
          child: Padding(
            padding: EdgeInsets.only(bottom: 8),
            child: Text(
              day,
              textAlign: TextAlign.center,
              style: TextStyle(fontWeight: FontWeight.bold),
            ),
          ),
        );
      }).toList(),
    );
  }
}
DatesRow・DateCellクラス
/// 1列で1週間を表すため、[DateCell]を7つ並べる。
class DatesRow extends StatelessWidget {
  const DatesRow({Key key}) : super(key: key);

  @override
  Widget build(BuildContext context) {
    return Expanded(
      child: Row(
        children: [
          DateCell(),
          DateCell(),
          DateCell(),
          DateCell(),
          DateCell(),
          DateCell(),
          DateCell(),
        ],
      ),
    );
  }
}

/// 日付を表示するセル
class DateCell extends StatelessWidget {
  const DateCell({Key key}) : super(key: key);

  @override
  Widget build(BuildContext context) {
    return Expanded(
      child: DecoratedBox(
        /// カレンダーのセルを可視化するボーダー
        decoration: BoxDecoration(
          border: Border(
            top: BorderSide(color: Theme.of(context).dividerColor, width: 1),
            right: BorderSide(color: Theme.of(context).dividerColor, width: 1),
          ),
        ),
        child: Column(
          children: [
            ///日付が入る
            Text("day"),
          ],
        ),
      ),
    );
  }
}
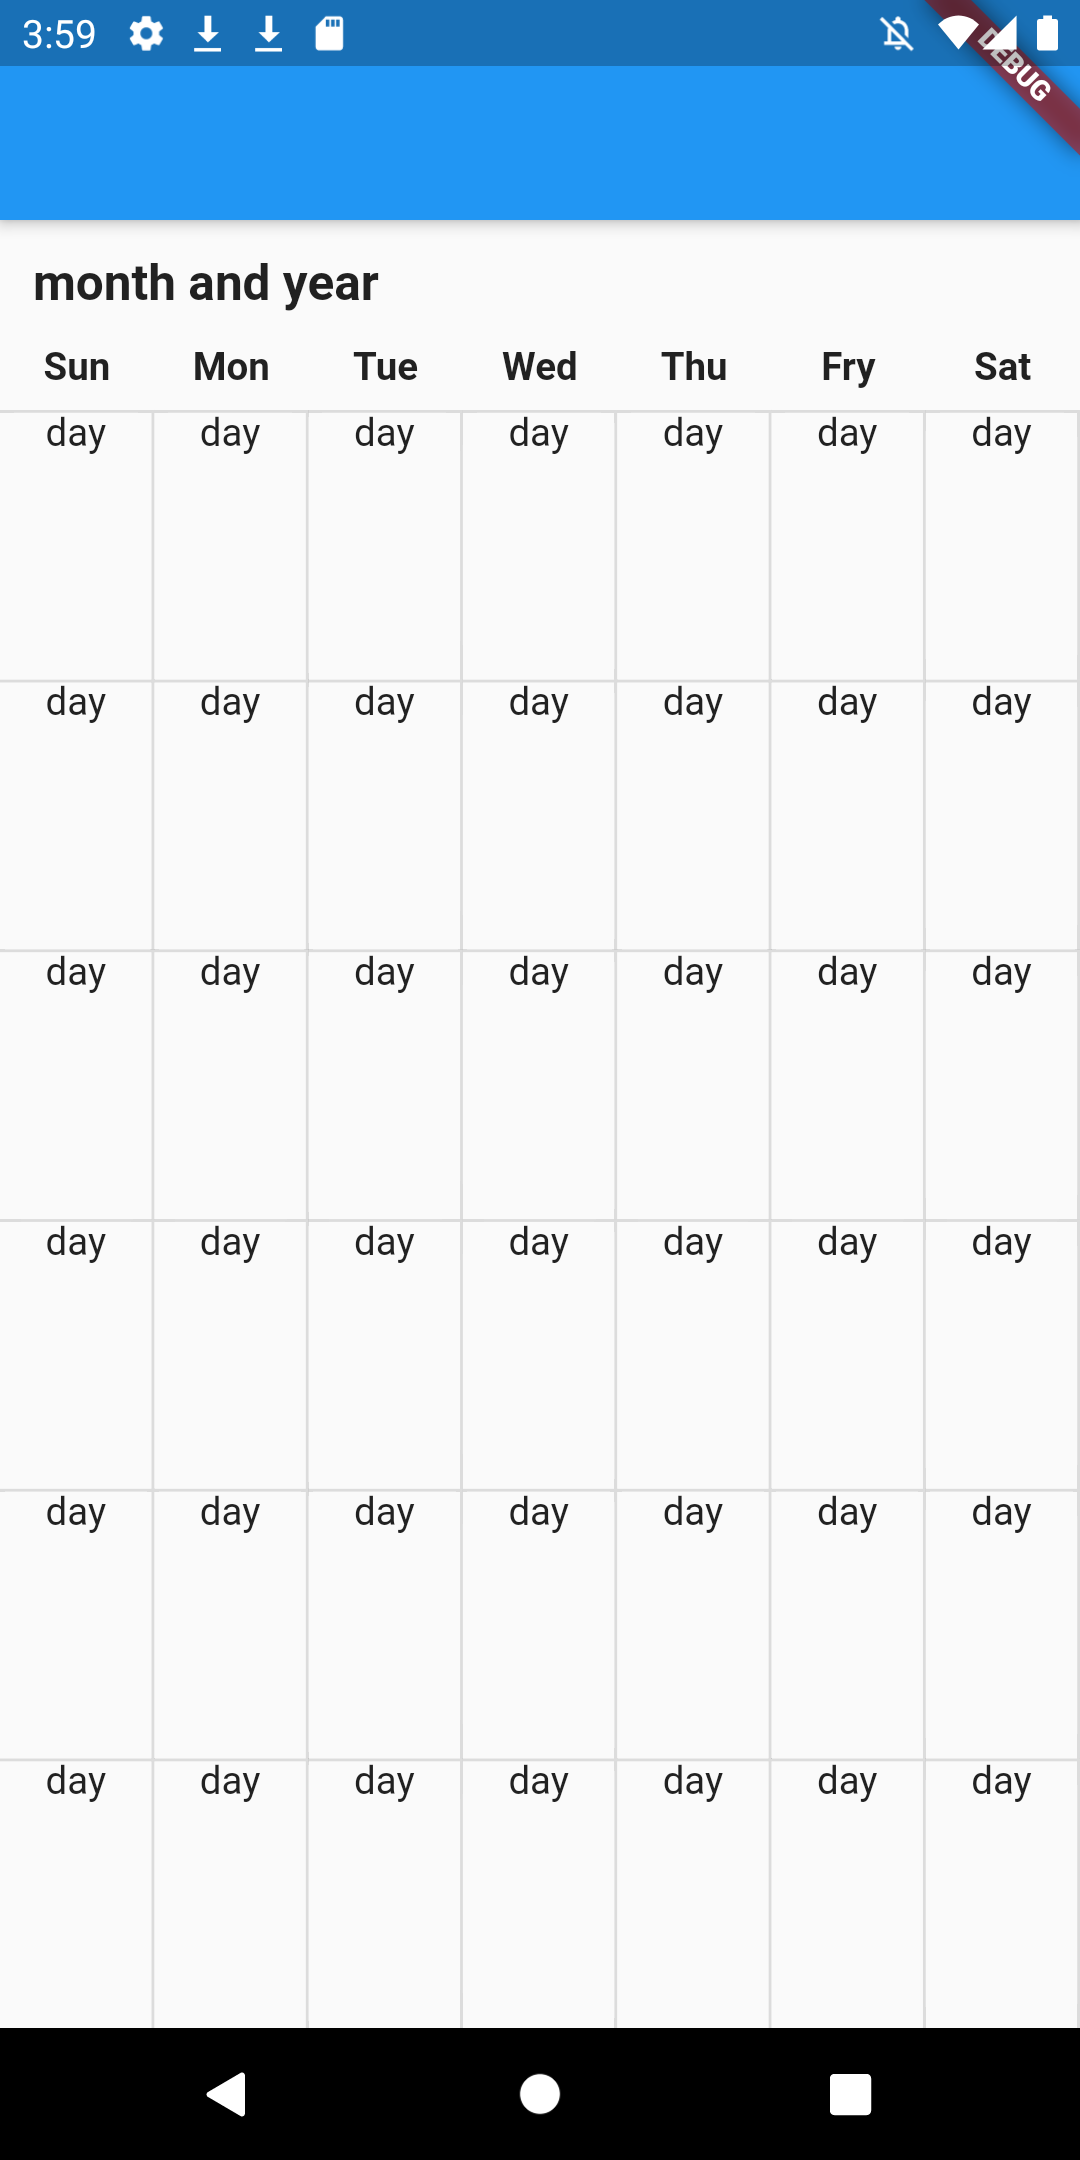
ここまで書くと下の画像のように大体のレイアウトは完成します!
ここからはカレンダーとして日付を表示する機能を実装していきます。
レイアウトにカレンダーの機能を埋め込む
ここらへんは色々な工夫ができると思いますが、今回はintに応じて適当なDateを返すextensionを作ってカレンダーの機能を作っていきます。
このextensionに関しては一旦全てここに貼り付けて、それぞれ使う箇所でその内容や意味について解説していこうと思います。
extension DateExtension on int {

  Duration get daysDuration {
    return Duration(days: (this == 7) ? 0 : -this);
  }

  String get monthName {
    final monthNameList = [
      "January",
      "February",
      "March",
      "April",
      "May",
      "June",
      "July",
      "August",
      "September",
      "October",
      "November",
      "December"
    ];
    return monthNameList[this - 1];
  }

  DateTime get visibleDateTime {
    final monthDif = this - 1200;
    final visibleYear = _visibleYear(monthDif);
    final visibleMonth = _visibleMonth(monthDif);
    return DateTime(visibleYear, visibleMonth);
  }

  int _visibleYear(int monthDif) {
    final currentMonth = DateTime.now().month;
    final currentYear = DateTime.now().year;
    final visibleMonth = currentMonth + monthDif;

    /// visibleMonthの表している月が
    /// 今年、もしくは来年以降の場合
    if (visibleMonth > 0) {
      return currentYear + (visibleMonth ~/ 12);

    /// visibleMonthが去年以前の場合
    } else {
      return currentYear + ((visibleMonth ~/ 12) - 1);
    }
  }

  int _visibleMonth(int monthDif) {
    final initialMonth = DateTime.now().month;
    final currentMonth = initialMonth + monthDif;

    /// visibleMonthの表している月が
    /// 今年、もしくは来年以降の場合
    if (currentMonth > 0) {
      return currentMonth % 12;

    /// visibleMonthが去年以前の場合
    } else {
      return 12 - (-currentMonth % 12);
    }
  }
}
次にこのextensionを使って先ほどの大枠に機能を敷き詰めていきます。
DateExtensionを使って日付の情報を表示する
CalendarPageViewクラス
class CalendarPageView extends StatelessWidget {
  const CalendarPageView({Key key}) : super(key: key);

  @override
  Widget build(BuildContext context) {
    return Column(
      crossAxisAlignment: CrossAxisAlignment.start,
      children: [
        Padding(
          padding: EdgeInsets.symmetric(vertical: 12, horizontal: 12),
          child: Text(
            "month and year",
            style: TextStyle(fontSize: 18, fontWeight: FontWeight.bold),
          ),
        ),
        Expanded(
          child: PageView.builder(
            controller: PageController(initialPage: 1200),
            itemBuilder: (context, index) {
              return CalendarPage(index.visibleDateTime);
            },
          ),
        ),
      ],
    );
  }
}
CalendarPageクラス
class CalendarPage extends StatelessWidget {
  const CalendarPage(
    this.visiblePageDate, {
    Key key,
  }) : super(key: key);

  final DateTime visiblePageDate;

  List<DateTime> _getCurrentDates(DateTime dateTime) {
    final List<DateTime> result = [];
    final firstDay = _getFirstDate(dateTime);
    result.add(firstDay);
    for (int i = 0; i + 1 < 42; i++) {
      result.add(firstDay.add(Duration(days: i + 1)));
    }
    return result;
  }

  DateTime _getFirstDate(DateTime dateTime) {
    final firstDayOfTheMonth = DateTime(dateTime.year, dateTime.month, 1);
    return firstDayOfTheMonth.add(firstDayOfTheMonth.weekday.daysDuration);
  }
  @override
  Widget build(BuildContext context) {
    final currentDates = _getCurrentDates(visiblePageDate);
    return Column(
      children: [
        DaysOfTheWeek(),
        DaysRow(
          dates: currentDates.getRange(0, 7).toList(),
        ),
        DaysRow(
          dates: currentDates.getRange(7, 14).toList(),
        ),
        DaysRow(
          dates: currentDates.getRange(14, 21).toList(),
        ),
        DaysRow(
          dates: currentDates.getRange(21, 28).toList(),
        ),
        DaysRow(
          dates: currentDates.getRange(28, 35).toList(),
        ),
        DaysRow(
          dates: currentDates.getRange(35, 42).toList(),
        ),
      ],
    );
  }
}
DatesRow・DateCellクラス
class DatesRow extends StatelessWidget {
  const DatesRow({
    @required this.dates,
    Key key,
  }) : super(key: key);

  final List<DateTime> dates;

  @override
  Widget build(BuildContext context) {
    return Expanded(
      child: Row(
        children: dates.map((date) {
          return _DateCell(date);
        }).toList(),
      ),
    );
  }
}

class _DateCell extends StatelessWidget {
  _DateCell(this.date);

  final DateTime date;

  @override
  Widget build(BuildContext context) {
    return Expanded(
      child: DecoratedBox(
          decoration: BoxDecoration(
            border: Border(
              top: BorderSide(color: Theme.of(context).dividerColor, width: 1),
              right:
                  BorderSide(color: Theme.of(context).dividerColor, width: 1),
            ),
          ),
          child: Column(
            children: [
              Text(date.day.toString()),
            ],
          ),
        ),
    );
  }
}
visibleDateTimeは何をしているのか
CalendarPageViewクラス内でCalendarPageクラスを返す際の引数にindex.visibleDatetimeというものを渡しています。これは先ほど貼ったDateExtensionに含まれる関数で、そのページで表示すべき年月を返します。
  DateTime get visibleDateTime {
    final monthDif = this - 1200;
    final visibleYear = _visibleYear(monthDif);
    final visibleMonth = _visibleMonth(monthDif);
    return DateTime(visibleYear, visibleMonth);
  }

  int _visibleYear(int monthDif) {
    final currentMonth = DateTime.now().month;
    final currentYear = DateTime.now().year;
    final visibleMonth = currentMonth + monthDif;

    /// visibleMonthの表している月が
    /// 今年、もしくは来年以降の場合
    if (visibleMonth > 0) {
      return currentYear + (visibleMonth ~/ 12);

    /// visibleMonthが去年以前の場合
    } else {
      return currentYear + ((visibleMonth ~/ 12) - 1);
    }
  }

  int _visibleMonth(int monthDif) {
    final initialMonth = DateTime.now().month;
    final currentMonth = initialMonth + monthDif;

    /// visibleMonthの表している月が
    /// 今年、もしくは来年以降の場合
    if (currentMonth > 0) {
      return currentMonth % 12;

    /// visibleMonthが去年以前の場合
    } else {
      return 12 - (-currentMonth % 12);
    }
  }
}
visibleDateTimeでmonthDifというものが定義されていますが、これはPageViewのindexから初期値の1200を引いて出た差分で、最初に表示された月から何ヶ月離れているのかということを示しています。
_getCurrentDateは何をしているのか
CalendarPageでは、CalendarPageViewから受け取ったvisiblePageDateと_getCurrentDatesを使って、そのページで表示すべき42個の日付を計算しています。
具体的に説明すれば、_getFirstDateでそのページの最初に表示すべき日付(firstDate)を取得してそれを一度リストに格納し、その後また「firstDateにi+1日を足してリストに格納する」を41回繰り返し、日付が42個入ったリストを作っています。
  List<DateTime> _getCurrentDates(DateTime dateTime) {
    final List<DateTime> result = [];
    final firstDay = _getFirstDate(dateTime);
    result.add(firstDay);
    for (int i = 0; i + 1 < 42; i++) {
      result.add(firstDay.add(Duration(days: i + 1)));
    }
    return result;
  }

  DateTime _getFirstDate(DateTime dateTime) {
    final firstDayOfTheMonth = DateTime(dateTime.year, dateTime.month, 1);
    return firstDayOfTheMonth.add(firstDayOfTheMonth.weekday.daysDuration);
  }
カレンダーの表示の軸は曜日で固定されているため、そのページの最初の日が必ずしもそのページの月の最初の日になるというわけではありません。_getFirstDateで使われてるDateExtensionのdaysDurationは適切なそのページの最初の日を取得するための調整の役を担っています。
  Duration get daysDuration {
    return Duration(days: (this == 7) ? 0 : -this);
  }
weekdayは月曜を1,日曜を7としているので、このdaysDurationでは「weekdayが7だったら調整をせず(0を返す)、それ以外であればその分引く」といったことをやっています。
ここまでくると完成が見えてきます。あとはmonth and yearと書かれているラベルを修正する必要があります。
年月を表示するラベルを作る
PageViewのindexの更新をラベルにも渡す必要があります。今回はシンプルにCalendarPageViewクラスをStatefulWidgetにして、PageViewのonPageChanged内でsetStateを叩き_currentIndexを更新することによって実装します。
CalendarPageViewクラス
class CalendarPageView extends StatefulWidget {
  const CalendarPageView({Key key}) : super(key: key);

  @override
  _CalendarPageViewState createState() => _CalendarPageViewState();
}

class _CalendarPageViewState extends State<CalendarPageView> {
  int _currentIndex = 1200;
  @override
  Widget build(BuildContext context) {
    final visibleMonth = _currentIndex.visibleDateTime.month.monthName;
    final visibleYear = _currentIndex.visibleDateTime.year.toString();
    return Column(
      crossAxisAlignment: CrossAxisAlignment.start,
      children: [
        Padding(
          padding: EdgeInsets.symmetric(vertical: 12, horizontal: 12),
          child: Text(
            visibleMonth + " " + visibleYear,
            style: TextStyle(fontSize: 18, fontWeight: FontWeight.bold),
          ),
        ),
        Expanded(
          child: PageView.builder(
            controller: PageController(initialPage: 1200),
            itemBuilder: (context, index) {
              return CalendarPage(index.visibleDateTime);
            },
            onPageChanged: (index) {
              setState(() {
                _currentIndex = index;
              });
            },
          ),
        ),
      ],
    );
  }
}
.monthNameの解説
ラベルで年月を表示するのに使われている.monthNameですが、これはDateExtensionのメソッドです。
  String get monthName {
    final monthNameList = [
      "January",
      "February",
      "March",
      "April",
      "May",
      "June",
      "July",
      "August",
      "September",
      "October",
      "November",
      "December"
    ];
    return monthNameList[this - 1];
  }
月の数字に対応する名前をmonthNameListのindexで引っ張ってきています。
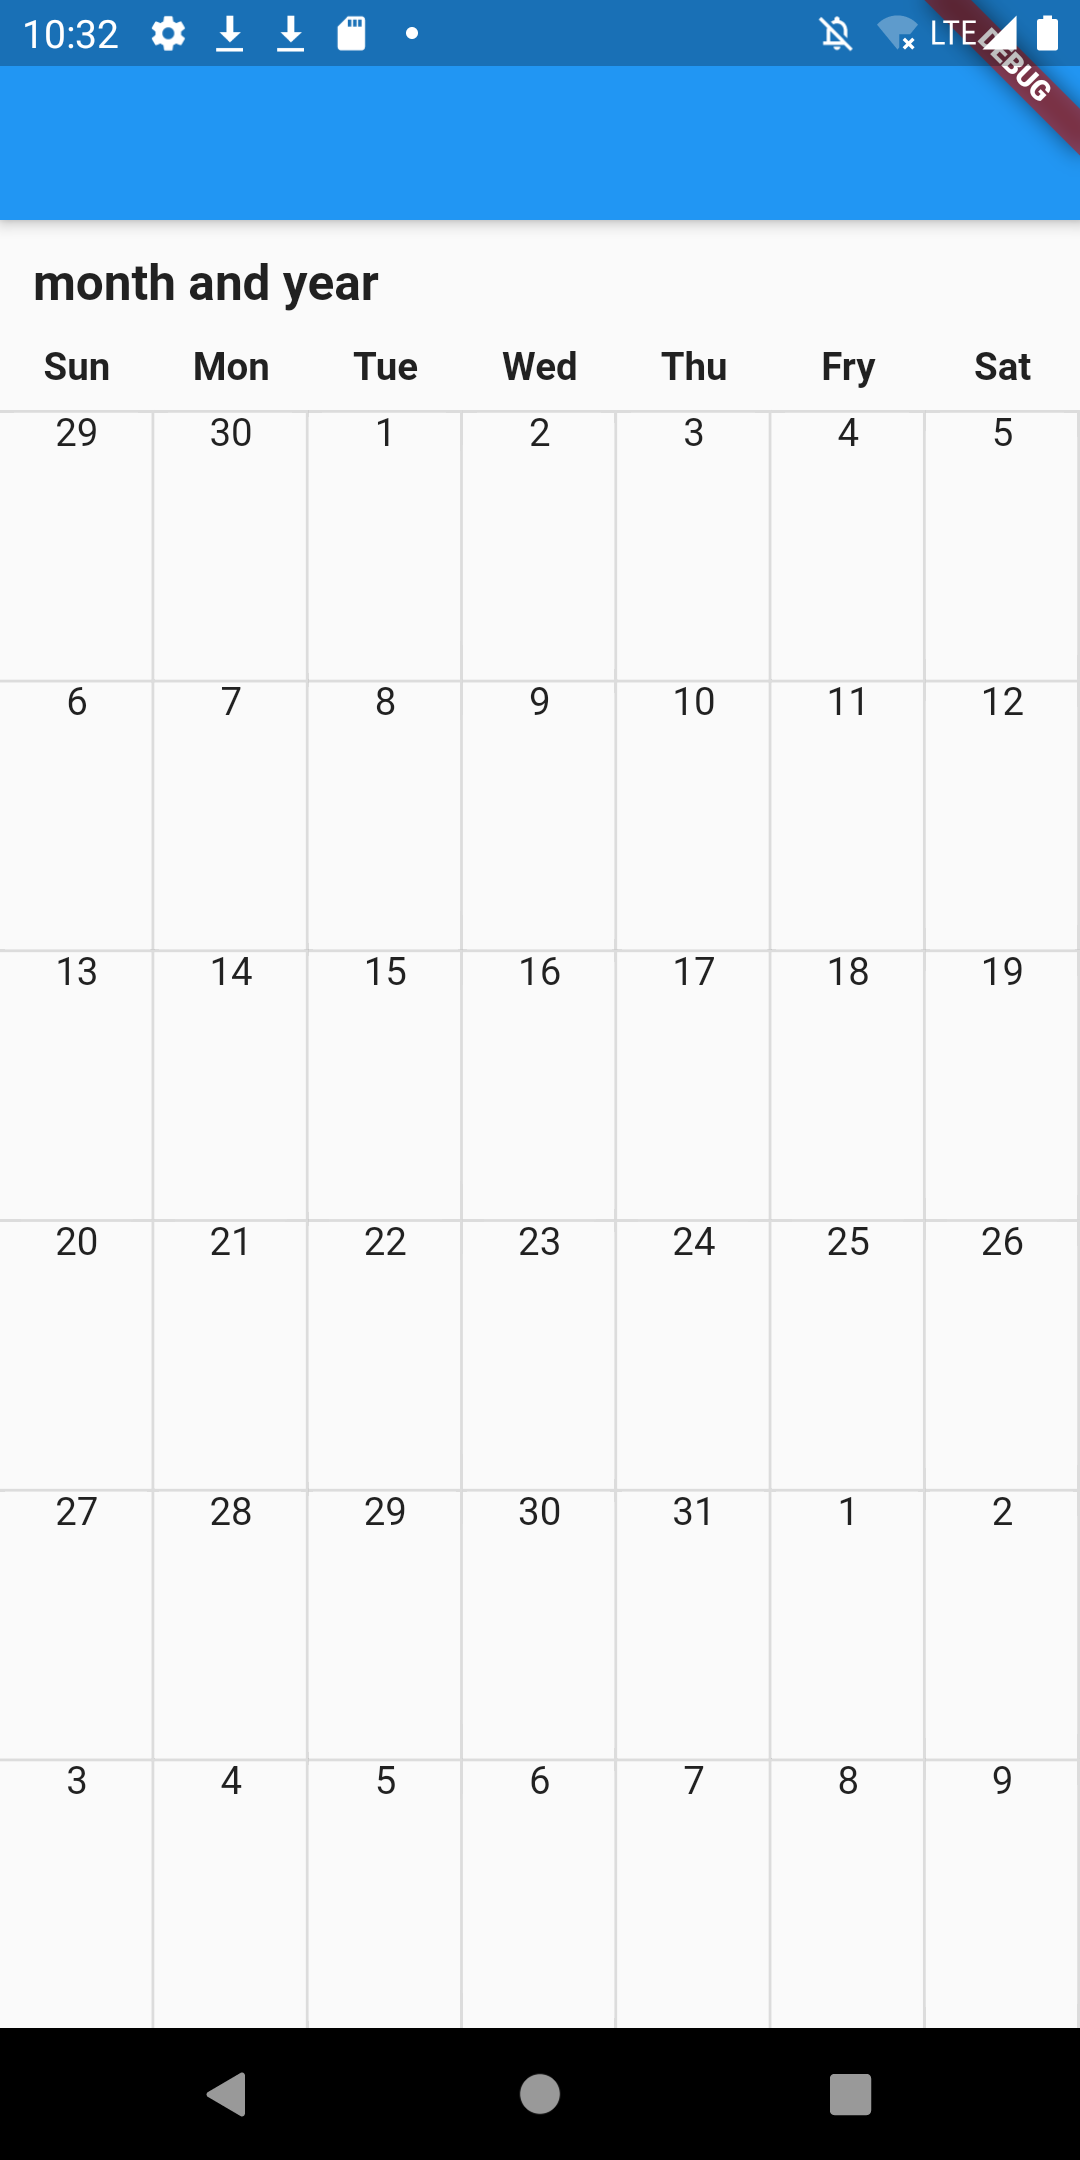
ここまでできれば完成です!🎉
最後に
時間の都合上記事の内容からは省きましたが、実装を進めればこんな感じでイベントをカレンダー上に表示させることも可能です!
このカレンダー自体はオープンソースとして公開してあるので、もし詳細が気になる方がいればこちらのソースコードを覗いてみてください。
