前回までofxOpenCvを色々いじってきましたが、
とりあえず第1章のシメとして、輪郭に線を引きたかったのです。
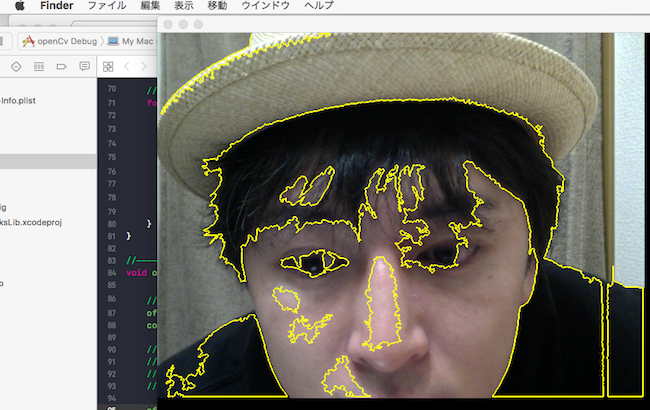
こんな感じ。こんくらいの精度で良いのかなぁ??
前回まで
http://www.sudara-bluse.tokyo/entry/openframeworks_11
処理内容
カメラから映像をキャプチャー
↓
グレースケールに変換
↓
スペースキーで背景画像を登録
↓
背景画像と現在の画像の差分を求める(grayDiff)
↓
差分の画像を2値化(grayDiff.threshold())
↓
2値化した画像から輪郭を抽出
↓
発見した輪郭の点を結んで線を描く
ofApp.h
# pragma once

# include "ofMain.h"
# include "ofxOpenCv.h"

class ofApp : public ofBaseApp{

    public:
        void setup();
        void update();
        void draw();

        void keyPressed(int key);
        void keyReleased(int key);
        void mouseMoved(int x, int y );
        void mouseDragged(int x, int y, int button);
        void mousePressed(int x, int y, int button);
        void mouseReleased(int x, int y, int button);
        void mouseEntered(int x, int y);
        void mouseExited(int x, int y);
        void windowResized(int w, int h);
        void dragEvent(ofDragInfo dragInfo);
        void gotMessage(ofMessage msg);

    // カメラ
    ofVideoGrabber cam;

    // カメラから入った1フレーム分の画像
    ofxCvColorImage colorImg;

    // カメラから入った1フレーム分のグレースケールの画像
    ofxCvGrayscaleImage grayImg;

    // グレースケール画像で背景用と差分
    ofxCvGrayscaleImage grayBase;
    ofxCvGrayscaleImage grayDiff;

    // フレームを保存したかどうかのフラグ
    bool isSave;

    // 輪郭検出用
    ofxCvContourFinder contourFinder;

    // しきい値
    int threshold;

    // 輪郭線を格納する動的配列
    vector <ofPolyline> edgeLines;


};
ofApp.cpp
# include "ofApp.h"


//--------------------------------------------------------------
void ofApp::setup(){

    // 背景を黒に
    ofBackground(0, 0, 0);


    /* 今回は1024*768です! */
    // カメラからの取り込み
    cam.initGrabber(640, 480);

    // それぞれを処理するメモリ領域を確保   allocate(割り当てる)
    colorImg.allocate(640, 480);
    grayImg.allocate(640, 480);
    grayBase.allocate(640, 480);
    grayDiff.allocate(640, 480);

    // フラグ初期化
    isSave = true;

    threshold = 80;

}

//--------------------------------------------------------------
void ofApp::update(){

    // カメラの更新
    cam.update();

    // 一個一個のピクセルデータをカラーイメージにほりこんでる
    colorImg.setFromPixels(cam.getPixels().getData(), 640, 480);
    colorImg.mirror(false, true);

    // グレースケールイメージにカラーデータを入れる
    grayImg = colorImg;

    // スペースキー押した時に、元画像に現在のグレーイメージを入れる
    if(isSave == true){
        grayBase = grayImg;
        isSave = false;
    }
    // 白黒画像と動体検知のベースとなる画像の差を求める
    grayDiff.absDiff(grayBase, grayImg);

    // 二値化 (白黒はっきりさせる)
    grayDiff.threshold(threshold);


    // 輪郭を描く
    // 第1引数 輪郭検出対象
    // 第2引数 検出する最小の大きさ(20)
    // 第3引数 検出する最大の大きさ
    // 第4引数 検出する数
    // 第5引数 穴が空いたものを検出するかどうか trueで 検出する
    contourFinder.findContours(grayDiff, 20, (640*480)/3, 10, true);


    // 動的配列をクリアする
    edgeLines.clear();

    //-----------------------------------------
    // 輪郭線の座標を結んで線にする
    //-----------------------------------------

    // 1周目for文で複数の輪郭にアクセス
    for(int i = 0; i< contourFinder.nBlobs; i++){
        ofPolyline line;
        // 2周目for文でそれぞれの輪郭の点にアクセスし、点を結んで線にする。
        for(int j =0; j<contourFinder.blobs[i].pts.size(); j++){
            // 点を線にする。
            line.addVertex(contourFinder.blobs[i].pts[j]);
        }
        // 作成した線を格納
        edgeLines.push_back(line);
    }
}

//--------------------------------------------------------------
void ofApp::draw(){

    // カラー画像の描画
    ofSetColor(255, 255, 255);
    colorImg.draw(0,0, 640, 480);

    // 境界線のサイズと色指定
    ofSetLineWidth(5);
    ofSetColor(255, 255, 0);
    // 輪郭線の描画
    for(int cnt = 0; cnt< edgeLines.size(); cnt++){
        edgeLines[cnt].draw();
    }


}

//--------------------------------------------------------------
void ofApp::keyPressed(int key){

    switch (key){
        case ' ':
            isSave = true;   // スペースキーを押す事によってフレームを保存
            break;
        case '+':
            threshold ++;     //しきい値を上げる
            if (threshold > 255) threshold = 255;
            break;
        case '-':
            threshold --;     //しきい値を下げる
            if (threshold < 0) threshold = 0;
            break;
    }

}