はじめに
当記事では,PythonによるB-spline registrationの使用を目的とします.画像registrationとは,二つの画像間の適切な変形場を求める最適化計算です.
Elastix
B-spline registrationを扱うためのソフトウェアとしてElastix1が広く知られています.コードはC++で書かれていますが,wrapされていてPythonライブラリとして取得可能であり,今回はそちらを使用します.ライブラリは以下のコマンドでインストールされます.
pip install itk-elastix
詳細は以下のリンクをご参照ください.
https://github.com/InsightSoftwareConsortium/ITKElastix
Data
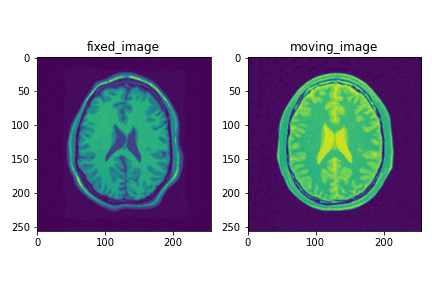
githubに置かれている2次元CT脳画像を用います.3次元画像を扱う場合も同様の流れになります.
fixed_image = itk.imread('data/CT_2D_head_fixed.mha', itk.F)
moving_image = itk.imread('data/CT_2D_head_moving.mha', itk.F)
Registration
画像registrationでは,線形変換を行った後,非線形変換を行います.Elastixの線形変換は,
- Translation(平行移動)
- Rigid(回転と平行移動)
- Affine(Rigidと拡大縮小)
が基本的なものであり,非線形変換としては,
- B-spline
- Thin-plate spline
が選択できます.Elastixでは,parameter_objectを用意し,parameter_mapを順次連結することで画像を変形することができます.
# Forward Parameter Map
parameter_object = itk.ParameterObject.New()
parameter_map_rigid = parameter_object.GetDefaultParameterMap('rigid')
parameter_object.AddParameterMap(parameter_map_rigid)
parameter_map_affine= parameter_object.GetDefaultParameterMap('affine')
parameter_object.AddParameterMap(parameter_map_affine)
parameter_map_bspline = parameter_object.GetDefaultParameterMap('bspline')
parameter_object.AddParameterMap(parameter_map_bspline)

# Registration
result_image, result_transform_parameters = itk.elastix_registration_method(
    fixed_image, moving_image,
    parameter_object=parameter_object,
    output_directory='exampleoutput/fwd'
)
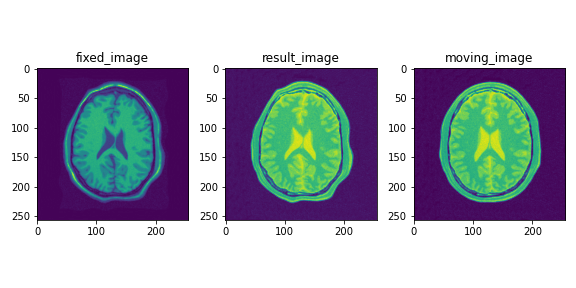
登録結果は以下のようになります.
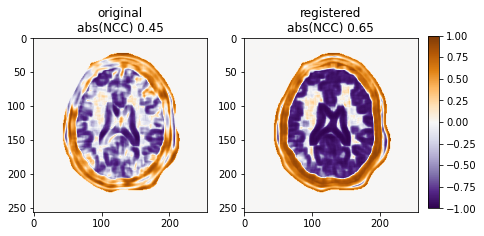
登録前後のLocal NCC2を計算すると,各ピクセルにおいてNCCの絶対値が向上していることが確認できます.
Point transform
画像変換と座標変換は逆方向であることに注意します.
moving画像からfixed画像へのregistrationとは,fixed空間のある座標をmoving空間のある座標に移動して,その座標のmoving画像の輝度値を補間することになります.これは,registrationによって疎な空間を作らないためです.
先のregistrationによって得られたmoving→fixed変形場を利用して,fixed空間の点群をmoving空間に移動します.例としてランダムな点を作成して,点群の移動を実行してみます.
# Create points
fixed_points = np.random.random([10,2])*200 + 30
np.savetxt("fixed_points.txt", fixed_points, fmt = "%.5f")

# Modify the file
with open("fixed_points.txt", 'r') as f:
    l = f.readlines()

l.insert(0, 'point\n')
l.insert(1, '10\n')

with open("fixed_points.txt", 'w') as f:
    f.writelines(l)
Elastixの点群移動関数itk.transformix_filterの入力ファイルは,冒頭にpointないしindexと点群数を記入する必要があります.
result_image = itk.transformix_filter(
    moving_image, result_transform_parameters,
    fixed_point_set_file_name='fixed_points.txt',
    output_directory = './point_transformed')
出力ファイルoutputpoints.txtの構造は,
Point	0	; InputIndex = [ 202 137 ]	; InputPoint = [ 201.934600 136.652650 ]	; OutputIndexFixed = [ 205 138 ]	; OutputPoint = [ 204.842360 138.311854 ]	; Deformation = [ 2.907760 1.659204 ]	; OutputIndexMoving = [ 205 138 ]
Point	1	; InputIndex = [ 212 157 ]	; InputPoint = [ 211.585340 156.863360 ]	; OutputIndexFixed = [ 211 158 ]	; OutputPoint = [ 210.705132 158.448602 ]	; Deformation = [ -0.880208 1.585242 ]	; OutputIndexMoving = [ 211 158 ]
のようになっているため,対象となるOutputPointの部分のみを読み込みます.
# for 2D
result_points = np.loadtxt('point_transformed/outputpoints.txt', dtype='str')[:,27:29].astype('float64')

# for 3D
# result_points = np.loadtxt('point_transformed/outputpoints.txt', dtype='str')[:,30:33].astype('float64')
得られたfixed空間の点群result_pointsをplotすると以下のようになります.
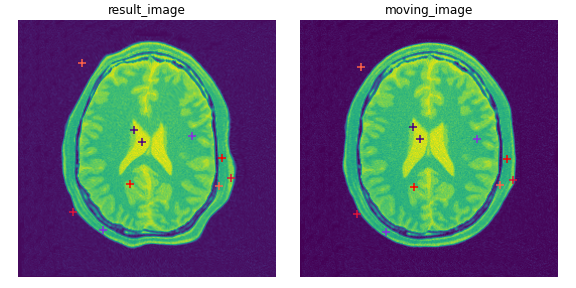
画像変形による点群の対応を確認することができました.
Inverse transform
変形のmetricをDisplacementMagnitudePenaltyに設定することで,逆変換が求められます.
変換$T_\mu$,座標$x$に対して,DisplacementMagnitudePenaltyとは,$T_\mu(x)-x$を表す変位に対するペナルティのことです.Registrationにおいては,入力画像と出力画像を同一に設定し,求めた順方向の変換を初期変換に与えます.
# Inverse Parameter Map
parameter_object_inv = itk.ParameterObject.New()
parameter_map_rigid = parameter_object_inv.GetDefaultParameterMap('rigid')
parameter_map_rigid['Metric'] = ["DisplacementMagnitudePenalty"]
parameter_object_inv.AddParameterMap(parameter_map_rigid)
parameter_map_affine= parameter_object_inv.GetDefaultParameterMap('affine')
parameter_map_affine['Metric'] = ["DisplacementMagnitudePenalty"]
parameter_object_inv.AddParameterMap(parameter_map_affine)
parameter_map_bspline = parameter_object_inv.GetDefaultParameterMap('bspline')
parameter_map_bspline['FinalGridSpacingInPhysicalUnits'] = np.array(['7'])
parameter_map_bspline['Metric'] = ["DisplacementMagnitudePenalty"]
parameter_object_inv.AddParameterMap(parameter_map_bspline)

# Registration
result_inverse_image, result_inverse_parameter = itk.elastix_registration_method(
    moving_image,  moving_image,
    initial_transform_parameter_file_name = './exampleoutput/fwd/TransformParameters.2.txt',
    parameter_object=parameter_object_inv,
    output_directory='./exampleoutput/inv/',
    log_to_console=True
)

順方向変換が与えられた時,逆方向変換を手に入れられることを確認できました.
Troubleshooting
Registrationがうまくいかない場合として考えられる要因がいくつかあります.
- Registration中にエラーが生じる
Too many samples map outside moving image buffer
というエラーメッセージが度々出てきます.これは初期Spacingか位置の大幅なずれがあると生じやすいです.手動でSpacingを調整した相似変換ファイルを作成し適用したのち,translationを行うことで良好に作動します.
- Registrationの結果が歪である
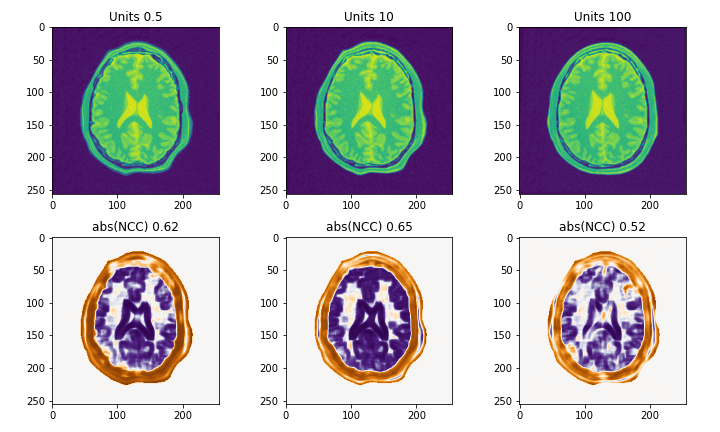
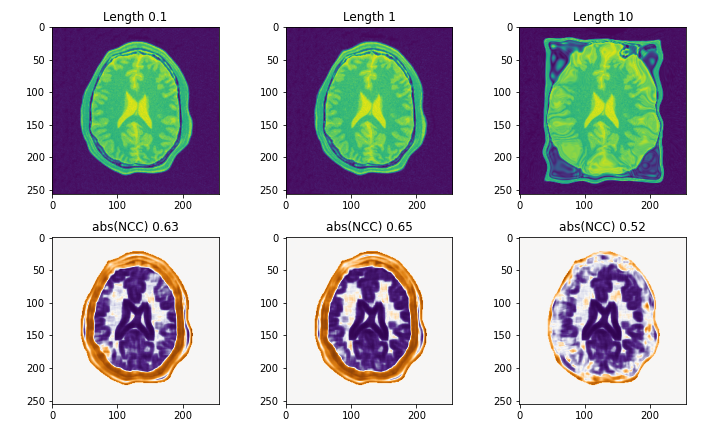
いくつかのparameterが原因ですが,B-splineのグリッド幅を決定するFinalGridSpacingInPhysicalUnitsと更新幅への制約であるMaximumStepLengthが特に重要です.3次元画像に適用するときには,一層気にかける必要があります.
FinalGridSpacingInPhysicalUnitsの比較
MaximumStepLengthの比較
まとめ
以上がElastixを用いたB-spline registrationの一連の流れとなります.
registration中のエラーや,結果が不適切であることが繰り返したため,当記事を執筆しました.Hyperparameterの調整は慎重に行う必要があると思います.
