概要
ウェブサイト用に使っているエックスサーバーの余った領域をGitのリポジトリにすることを思いついたが、
残念ながらエックスサーバーではWebDAVは標準では使えなかったので、
PHP製のWebDAVサーバのSabreDAVを使って構築してみた。
環境
- エックスサーバーのX10プラン
- SSHでログインできるように設定済み
- 標準のSSL機能でHTTPSでアクセスするように設定
- GitとPHP7は標準でインストール済み
SabreDAVの導入
サーバにSSHでログインし、最新の安定版(3.2.2)をダウンロードして展開。
$ wget https://github.com/sabre-io/dav/releases/download/3.2.2/sabredav-3.2.2.zip

$ unzip sabredav-3.2.2.zip

$ mv -r SabreDAV/* ./
必要なディレクトリを作成してパーミッションを設定。
$ mkdir data public
$ chmod a+rxw data public
次にBASIC認証用のファイルを作成。
エックスサーバーの場合、public_htmlと同じ階層にhtpasswdディレクトリがあるので、そこに置く。
なお、Digest認証だと、ユーザ名とパスワードの自動入力ができなかった。
$ htpasswd -c -b -m .htpasswd username password
AuthUserFile ".htpasswd"
AuthName "input your id and passwd"
AuthType Basic
require valid-user
以下の内容のserver.phpを作成する。
<?php

use
    Sabre\DAV;

// The autoloader
require 'vendor/autoload.php';

// Now we're creating a whole bunch of objects
$rootDirectory = new DAV\FS\Directory('public');

// The server object is responsible for making sense out of the WebDAV protocol
$server = new DAV\Server($rootDirectory);

// If your server is not on your webroot, make sure the following line has the
// correct information
$server->setBaseUri('/server.php');

// The lock manager is reponsible for making sure users don't overwrite
// each others changes.
$lockBackend = new DAV\Locks\Backend\File('data/locks');
$lockPlugin = new DAV\Locks\Plugin($lockBackend);
$server->addPlugin($lockPlugin);

// This ensures that we get a pretty index in the browser, but it is
// optional.
$server->addPlugin(new DAV\Browser\Plugin());

// All we need to do now, is to fire up the server
$server->exec();
setBaseUri('/server.php');の部分は、ウェブサーバにアクセスしたときのパス部分(https://git.example.com/server.phpなら/server.php)を指定。
以上ができたら、ブラウザからserver.phpにアクセスして確認。
下のような画面が出ればOK。
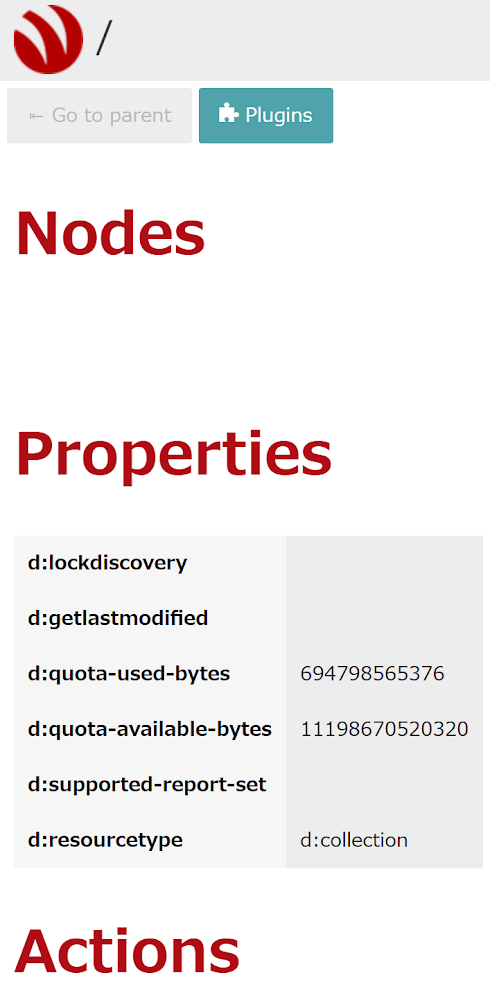
一応、ブラウザからフォルダの作成とファイルのアップロードは可能。削除はできない。
リポジトリの作成
publicディレクトリ以下にリポジトリを作成
サーバ側で下記を実行。
$ cd public/
$ mkdir test.git
$ cd test.git/
$ git init --bare
git update-server-infoを実行。
$ git update-server-info
ローカルのリポジトリからpushできるようにする
以下はローカルで実行。
ユーザ名とパスワードが平文で書かれてしまうので、毎回入力しても構わない場合はusername:password@の部分を抜く。
(セキュリティをしっかりやりたい場合はWebDAVではなく、SSHでGitサーバを構築しよう)
# remote追加
$ git remote add origin https://username:password@git.example.com/server.php/test.git
pushしてみる。
$ git push origin master
Fetching remote heads...
  refs/
  refs/heads/
  refs/tags/
updating 'refs/heads/master'
  from 0000000000000000000000000000000000000000
  to   e516d655aa07fd1ec0cd90b2457af5e054089c5d
    sending 3 objects
    done
Updating remote server info
To https://git.example.com/server.php/test.git
 * [new branch]      master -> master
できた。
必要であれば、サーバ側でgit update-server-infoを実行するように設定する。
$ mv hoge/hooks/post-update.sample hoge/hooks/post-update
ただ、私がテストした限りでは、このフックは設定しなくても問題なくpushやpullができたので、不要かも。