あらまし
Django + MySQL で開発したアプリケーションの本稼働用の環境を、Ansible を使って Amazon EC2 上に構成しました。
前回の投稿では Nginx と Gunicorn を UNIX ドメインソケットで接続していましたが、これを HTTP 接続に変更しました。
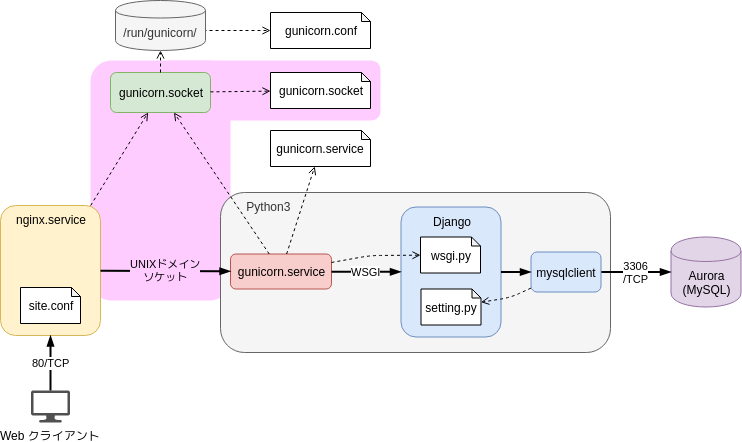
UNIX ドメインソケット接続
これが変更前の構成です。
なぜソケットで接続したのか
本来のソケットのメリットは通信が高速であることです。以下のリンクで学習しました。
● Unixドメインソケット - Goならわかるシステムプログラミング ― 第9回
● 調べなきゃ寝れない!と調べたら余計に寝れなくなったソケットの話
しかしソケット接続を選んだ最大の理由は、単純に Gunicorn の公式ドキュメントと Udemy のコース内容に倣ったためでした。
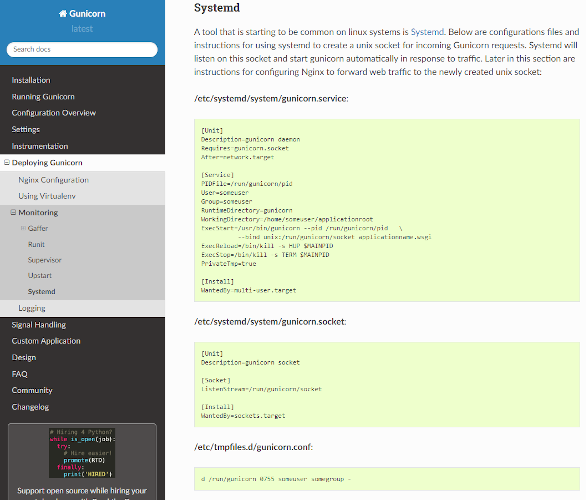
(1) Gunicorn の公式ドキュメント
参考: Deploying Gunicorn (Systemd): http://docs.gunicorn.org/en/latest/deploy.html#systemd
(2) Udemy のコース
このコースを購入して学習しました。
「【徹底的に解説!】Djangoの基礎をマスターして、3つのアプリを作ろう!」
HTTP接続
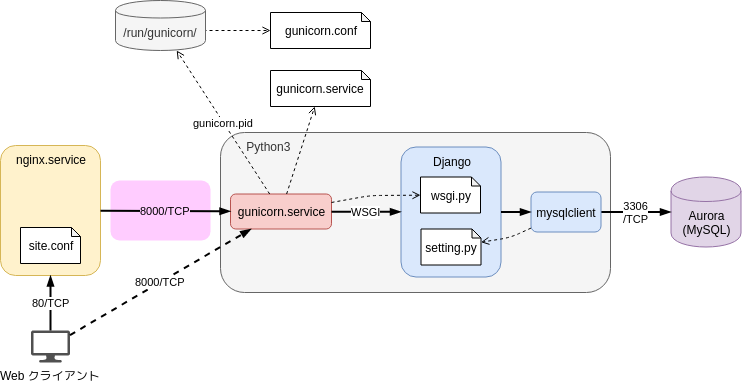
しかしその後、ソケットを削除して下図の構成に変更しました。
(左上の /run/gunicorn ディレクトリは PID ファイルの保存用なので、接続方式とは無関係です)
なぜHTTP接続に変更したのか
(1) 構成変更の自由度
- Nginx と Gunicorn を別インスタンスに配置することが可能になります(ソケットは同一インスタンス内接続のみ)
- Nginx と Gunicorn の関係を 1対多にすることが可能になります
- Nginx を ELB(Elastic Load Balancing)などと交換することが可能になります
(2) トラブルシューティングのしやすさ
図のようにクライアントから直接 Gunicorn に接続できるので、問題発生時に原因箇所の切り分けをしやすくなります。また gunicorn.socket への依存がなくなるので、問題の要因自体が減ります。
Ansible Playbookの変更
前回作成した Playbook の Djangoロール から ソケットのユニットファイルをテンプレートから生成するタスク を丸ごと削除して、残った部分を以下のように変更しました。
varsファイル
前回: varsファイル
以下の変数を追加しました。
-
gunicorn_allow_ipaddrは Gunicorn から見た Nginx の IPアドレスで、127.0.0.1 は同一インスタンス内からの接続のみを許可する設定です。0.0.0.0 にすればどこからでも接続できるようになります。 -
gunicorn_listen_ipaddrは Nginx から見た Gunicorn の IPアドレスです。 -
gunicorn_listen_portは Nginx から見た Gunicorn のポートです。
gunicorn_allowed_ipaddr: '127.0.0.1'  # 開発中は 0.0.0.0 でOK
gunicorn_listen_ipaddr: '127.0.0.1'
gunicorn_listen_port: 8000
Gunicornサービスのユニットファイル
前回: Gunicornサービスのユニットファイルをテンプレートから生成して起動するタスク
ユニットファイルのテンプレートを以下のように変更しました。
- ソケットへの依存がなくなったので、
Requires=gunicorn.socketを削除しました。 -
ExecStartの--bindの値をソケットから IPアドレス:ポートに変更し、--bind 127.0.0.1:8000としました。
[Unit]
Description=gunicorn daemon
After=network.target

[Service]
PIDFile={{ gunicorn_run_dir }}/pid
User={{ service_user }}
Group={{ service_group }}
WorkingDirectory={{ django_project_base_dir }}
ExecStart=/usr/local/bin/gunicorn --pid {{ gunicorn_run_dir }}/pid   \
          --bind {{ gunicorn_allowed_ipaddr }}:{{ gunicorn_listen_port }} \
          {{ django_project_name }}.wsgi
ExecReload=/bin/kill -s HUP $MAINPID
ExecStop=/bin/kill -s TERM $MAINPID
PrivateTmp=true

[Install]
WantedBy=multi-user.target
Nginxの仮想ホスト設定ファイル
前回:Nginxの仮想ホスト設定ファイルをテンプレートから生成するタスク
proxy_passで指定する転送先をソケットから HTTP の IPアドレス:ポートに変更し、proxy_pass http://127.0.0.1:8000;としました。
server {
    listen       80;
    server_name  {{ ansible_host }};
    server_tokens off;

    location / {
        proxy_pass http://{{ gunicorn_listen_ipaddr }}:{{ gunicorn_listen_port }};  # ソケットから変更
        proxy_set_header Host               $host;
        proxy_set_header X-Forwarded-For    $proxy_add_x_forwarded_for;
        proxy_set_header X-Forwarded-Host   $host;
        proxy_set_header X-Forwarded-Server $host;
        proxy_set_header X-Real-IP          $remote_addr;
    }

    location /static {
        alias {{ django_project_base_dir }}/static;
    }
}
以上で Nginx と Gunicorn の接続をソケットからHTTPに変更することができました。
参考
- Gunicorn Docs » Deploying Gunicorn (Systemd)
- Unixドメインソケット - Goならわかるシステムプログラミング ― 第9回
- 調べなきゃ寝れない!と調べたら余計に寝れなくなったソケットの話
記事一覧
- 1/4: DjangoをAmazon Linux 2にAnsibleで構成する、Aurora (MySQL) をCloudFormationでUTF-8に構成する、そして接続するまでが地味に大変だったこと
- 2/4: Nginx + Gunicorn + Django + Aurora (MySQL) の構成を図で説明してみる
- 3/4: Nginx + Gunicorn + Django + Aurora (MySQL) の本番環境をAnsible Playbookで構成する
- 4/4: NginxとGunicornの接続をソケットからHTTPに変更した


