はじめに
ここではMathf.DeltaAngleでホーミング弾を作る方法を紹介します。
ホーミング弾とは、移動を「角度」と「速度」にもとづいて行い、目標となる方向を一定の旋回速度で向こうとしながら動きます。例えば現在向いている方向が30度だとして、180度方向に目標物があるとしたら、少しずつ左回りしながら移動します。
サンプル
と言葉で説明したものの、まずはサンプルを見るとどんなものか分かりやすいと思います。
http://2dgames.jp/unity/horming/
これはマウスカーソルを追いかけるようにして、にんじんミサイルがホーミングするサンプルとなります。こちらのページにはプロジェクトファイルのリンクもあります。
実装方法
実装方法は簡単です。Mathf.DeltaAngle関数に現在の移動している角度と、目標となる角度を指定すれば、その角度差が返却されます。それがプラスであれば左回りをして、マイナスであれば右回りをすれば旋回をすることができます。
float direction; // 現在の角度
float targetAngle; // 目標となる角度
float deltaAngle = Mathf.DeltaAngle(direction, targetAngle);
if(deltaAngle > 0) {
	// プラスであれば左回り
	direction += 5;
}
else {
	// マイナスであれば右回り
	direction -= 5;
}
これは旋回速度を「5度」とした場合の処理となります。ただし、これだけだと角度差が±5度の範囲内の場合にガクブルしてしまいます(右回り・左回りを交互に繰り返してガクガクした挙動となる)。
そこで、角度差が一定の角度以下であれば回転しないようにすることで、このガクブルを発生しないようにすることができます。
if(Mathf.Abs(deltaAngle) < 5) {
	// ±5度より小さければ回転しない
}
else if(deltaAngle > 0) {
	// プラスであれば左回り
	direction += 5;
}
else {
	// マイナスであれば右回り
	direction -= 5;
}
サンプルコード
以下は、マウスカーソルの位置に向かってホーミング移動するサンプルコードです。
using UnityEngine;
using System.Collections;

public class Missile : MonoBehaviour {

	/// 旋回速度
	float _rotSpeed = 3.0f;
	/// 移動速度
	float _speed = 3.0f;

	/// 移動角度
	float Direction {
		get { return Mathf.Atan2(rigidbody2D.velocity.y, rigidbody2D.velocity.x) * Mathf.Rad2Deg; }
	}

	/// 角度と速度から移動速度を設定する
	void SetVelocity(float direction, float speed) {
		var vx = Mathf.Cos(Mathf.Deg2Rad * direction) * speed;
		var vy = Mathf.Sin(Mathf.Deg2Rad * direction) * speed;

		rigidbody2D.velocity = new Vector2(vx, vy);
	}

	/// 更新
	void Update () {

		// 画像の角度を移動方向に向ける
		var renderer = GetComponent<SpriteRenderer>();
		renderer.transform.localRotation = Quaternion.Euler(new Vector3(0, 0, Direction));

		// ターゲット座標を取得(マウスの座標に向かって移動する)
		var mousePosition = Input.mousePosition;
		Vector3 next = Camera.main.ScreenToWorldPoint(mousePosition);
		Vector3 now = transform.position;
		// 目的となる角度を取得する
		var d = next - now;
		var targetAngle = Mathf.Atan2(d.y, d.x) * Mathf.Rad2Deg;
		// 角度差を求める
		var deltaAngle = Mathf.DeltaAngle(Direction, targetAngle);
		var newAngle = Direction;
		if(Mathf.Abs(deltaAngle) < _rotSpeed) {
			// 旋回速度を下回る角度差なので何もしない
		}
		else if(deltaAngle > 0) {
			// 左回り
			newAngle += _rotSpeed;
		}
		else {
			// 右回り
			newAngle -= _rotSpeed;
		}

		// 新しい速度を設定する
		SetVelocity(newAngle, _speed);
	}
}
特に難しいところはなく、コメントのとおりとなります。
移動速度に対応する角度(Directionプロパティ)と、方向と速さから速度を設定できる関数(SetVelocity関数)を用意しているのがポイントとなります。また2Dなので、Physics2D > Rigidbody 2Dを使用する前提のコードとなっています。
あと、Update関数なので、本来であれば旋回速度にTime.deltaTimeを乗算したほうがいいですね。
おまけ
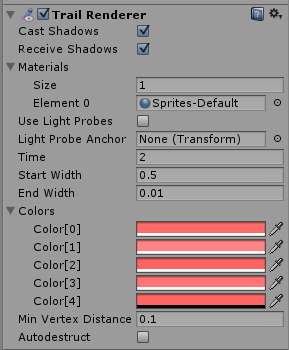
オブジェクトにはEffects > Trail Rendererをつけて軌道を表示するとそれっぽく見えてよいですね。
今回の例ではこのような設定としました。にんじんミサイルの画像サイズが128x128と大きめなので、もっと小さい場合はそれにあわせて小さくするとよいかもしれません。

