概要
この記事では、Godot Engineでの2Dモーションブラーの実装方法を紹介します。
モーションブラーとは特定の方向への移動が高速であるかのように見せる映像演出となります。
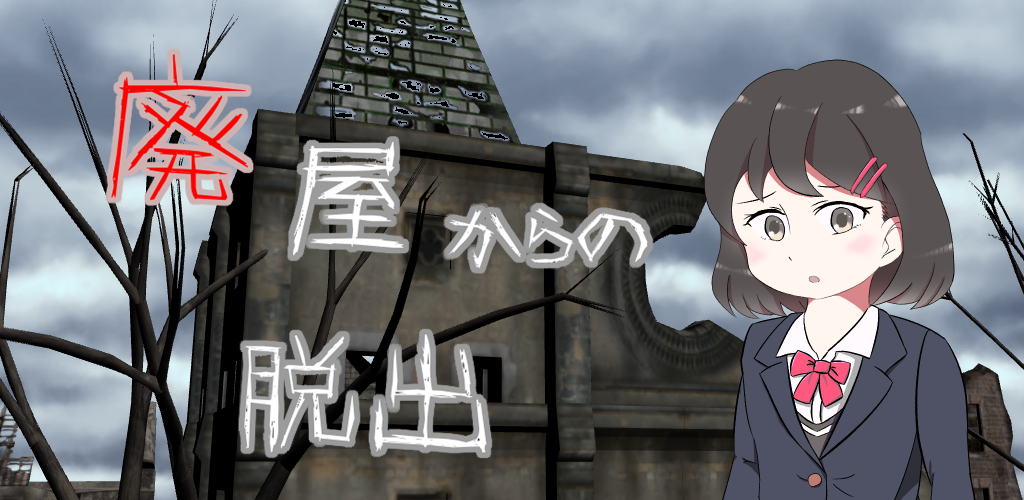
カメラがブレるような動きなので、この画像のような動きであれば、画面揺れの演出として使うこともできます。
今回の記事は以下の動画を参考(というかほぼそのまま)にしました。
モーションブラーの実装
画像素材
モーションブラーを適用する画像として以下の素材を使用します。名前を "bg.png" として保存します。
ノイズテクスチャのダウンロード
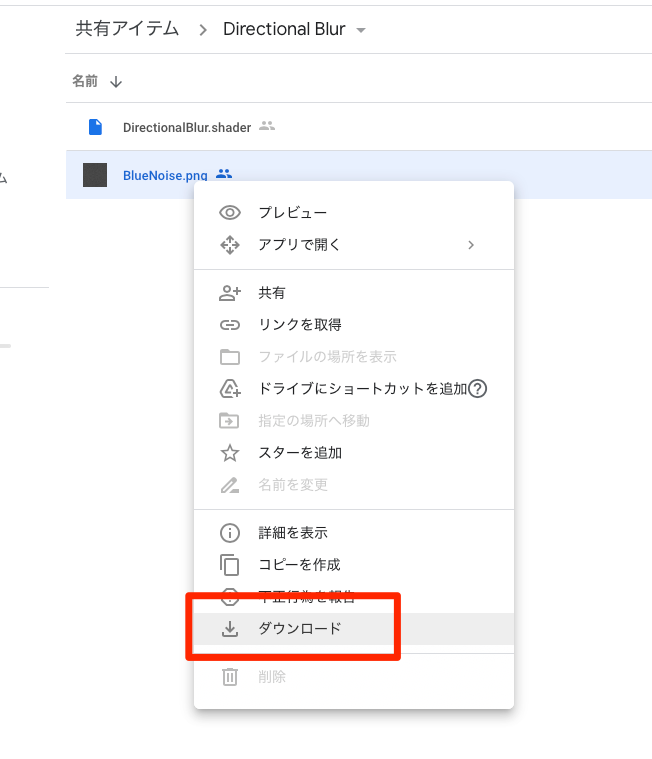
下記URLからノイズテクスチャをダウンロードします。
https://drive.google.com/drive/folders/1uMfCOLoPEyH5St06pWmOReYPSb7-hP72
"BlurNoise.png" を右クリックして「ダウンロード」でダウンロードできます。
画像を登録
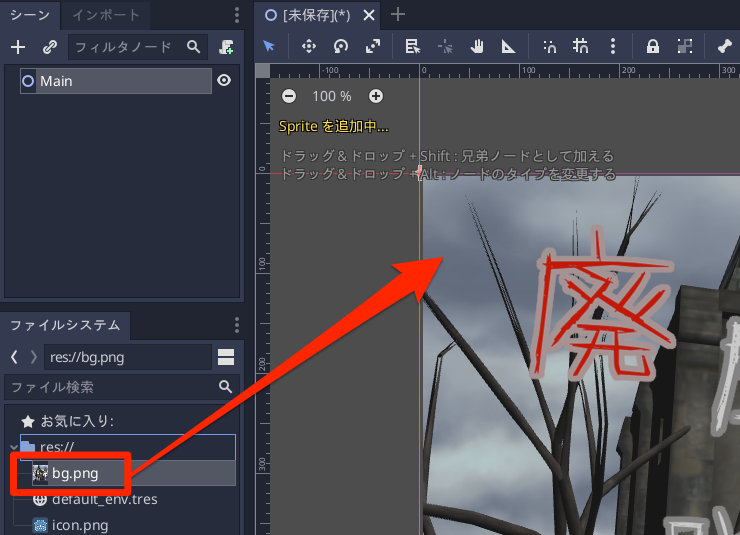
プロジェクトを作成し、"bg.png" と "BlurNoise.png" をプロジェクトに追加します。
そして、"bg.png" をドラッグ&ドロップで配置します。
シェーダーの作成
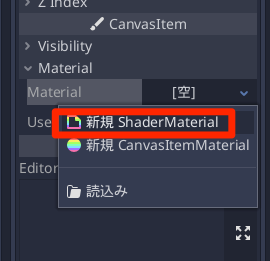
bgノード (Sprite) のインスペクタから、CanvasItem > Material > Material > [空] をクリックして、「新規 Shader Material」を選びます。
作成した Shader Materialをクリックして、Shader > [空] をクリック、「新規 Shader」を選びます。
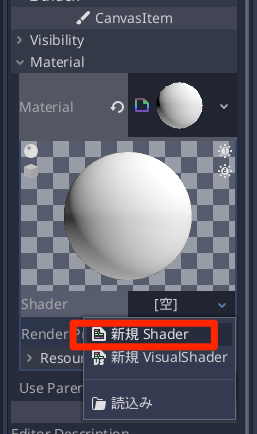
作成した Shaderをクリックすると、シェーダーエディタが表示されます。

シェーダーコードの記述
シェーダーコードは以下のように記述します。
shader_type canvas_item;

render_mode blend_mix;

uniform float     angle_degrees : hint_range(0.0, 360.0)       = 0.0; // ブラーの方向(角度)
uniform float     strength      : hint_range(0.0, 1.0, 0.0001) = 0.0; // ブラーの強さ
uniform int       samples       : hint_range(2, 32, 2)         = 8;   // サンプル数。2の倍数でないとダメ //MUST BE A MULTIPLE OF 2
uniform sampler2D noise; // ノイズテクスチャ

// Directional Blur Shader
// Adapted from https://www.shadertoy.com/view/ldBXWG
vec4 DirectionalBlur(in vec2 uv, in vec2 MotionVector, in sampler2D Texture) {
	// 黒色で初期化
	vec4 Color = vec4(0.0);
	float Noise = texture(noise,uv * 20.0).x - 0.485;

	for (int i = 0; i < samples / 2; i++) {
		// 両側に書き込む
		// 右側
		Color += texture(Texture,uv + (float(i+1) * MotionVector ) /float(samples/2) * Noise * 2.0);
		// 左側
		Color += texture(Texture,uv - (float(i+1) * MotionVector ) /float(samples/2) * Noise * 2.0);
	}

	// サンプルの数だけ色を薄くする
	return Color / (float(samples));
}

void fragment() {
	// 方向を計算
	vec2 blur_vector = vec2(cos(radians(angle_degrees)), sin(radians(angle_degrees))) * strength;

	// ブラーの色を計算
	COLOR = DirectionalBlur(UV, blur_vector * strength, TEXTURE);
}
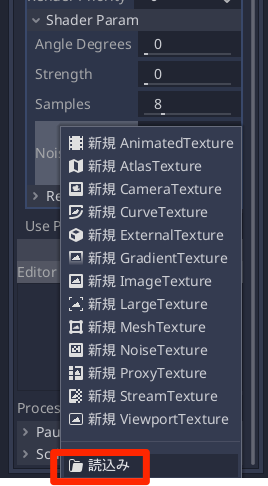
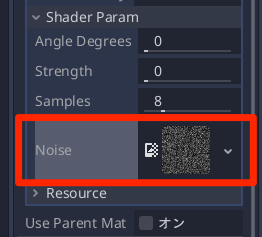
次にこのシェーダにノイズテクスチャを適用します。
CanvasItem > Shader > Shader Param > Noise > [空] をクリックして、「読込み」を選びます。
"BlurNoise.png" を選んで「開く」をクリックします。
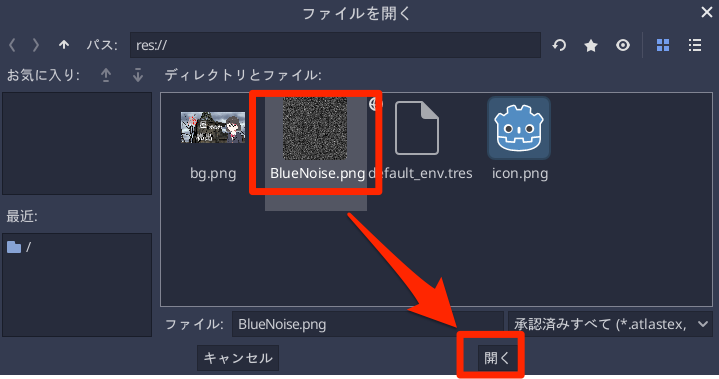
すると Noise にノイズテクスチャが設定されました。
動作確認
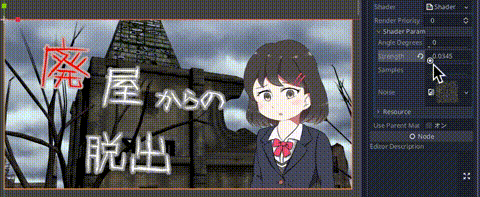
Shader Param > Strength の値を変化させてモーションブラーの効果を確認します。
ぼかしの品質を上げる
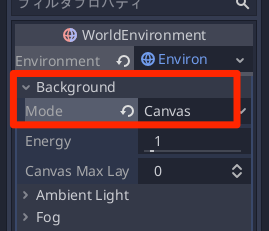
ノイズテクスチャによるぼかしは処理が高速なぶん、あまりキレイなぼかしではないので、もう少し品質を上げたい場合は、WorldEnvironment を使用します。
そして、Environmentを新規作成して、Environment > Background > Mode を「Canvas」に設定し……
Dof Near Blur > Enabled をオンにすると品質の良いぼかし処理が適用されます。(強さは「Amount」で調整)
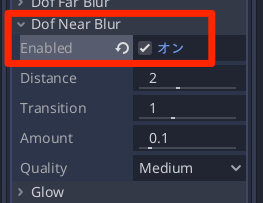
ただ、おそらくこちらの方が重たい処理であるので適切に使う必要があるのと、モーションブラーの強さのパラメータに合わせてこちらの「Amount」の値も調整する、などの処理が必要となります。
プロジェクトファイル
今回作成したプロジェクトファイルは以下からダウンロードできます。
http://syun777.sakura.ne.jp/tmp/godot/TestMotionBlur.zip