高機能なレベルエディタ「Tiled Map Editor」で作成したデータを読み込む方法を紹介したいと思います。
1. Tiled Map Editor の出力設定
まずは出力設定を変更します。
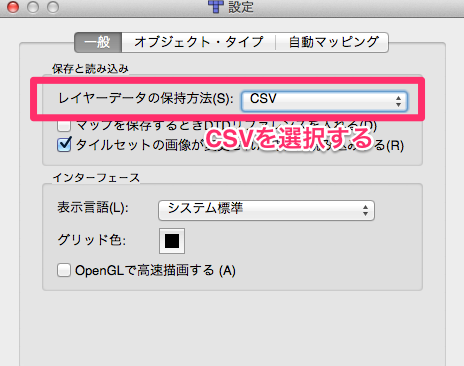
メニューから「Preferences ...」を選択して、設定画面を開きます。

そして、レイヤーデータの保持方法を「CSV」に変更します。こうすると読み込み処理が簡単になるためです。
2. 拡張子を変更する
Tiled Map Editorで作成したデータは拡張子が「.tmx」となりますが、それを「.xml」に変更します。理由はUnityのテキストアセットは拡張子で判定をしているため、「.tmx」がテキストアセットと認識されません。そのためこの変更が必要となります。
※2014/1/14追記
AssetPostProcessorを使用して自動コピーを行うと、拡張時を*.tmxのまま運用することが可能です。詳細は「6. アセットの自動コピー」で説明しています。
3. プロジェクトへの登録

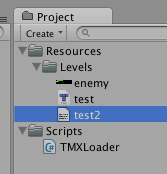
Projectビューに XMLファイル(Tiled Map Editorで作成したデータ)を登録します。Resources.Load()を使って読み込むので、「Resources」フォルダの下に配置する必要があります。ただここでは「Resources/Levels/test2」として配置しました。
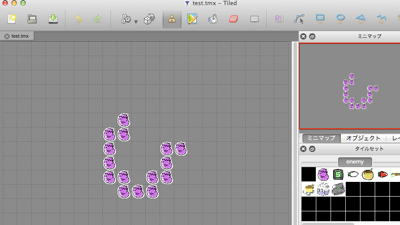
なお読み込むレベルデータは以下のものとなります。
<?xml version="1.0" encoding="UTF-8"?>
<map version="1.0" orientation="orthogonal" width="20" height="15" tilewidth="32" tileheight="32">
 <tileset firstgid="1" name="enemy" tilewidth="32" tileheight="32">
  <image source="enemy.bmp" trans="00ff00" width="512" height="128"/>
 </tileset>
 <layer name="タイル・レイヤー1" width="20" height="15">
  <data encoding="csv">
0,0,0,0,0,0,0,0,0,0,0,0,0,0,0,0,0,0,0,0,
0,0,0,0,0,0,0,0,0,0,0,0,0,0,0,0,0,0,0,0,
0,0,0,0,0,0,0,0,0,0,0,0,0,0,0,0,0,0,0,0,
0,0,0,0,0,0,0,0,0,0,0,0,0,0,0,0,0,0,0,0,
0,0,0,0,0,0,0,0,0,0,0,0,0,0,0,0,0,0,0,0,
0,0,0,0,0,0,0,0,2,0,0,0,0,0,0,0,0,0,0,0,
0,0,0,0,0,0,0,2,2,0,0,0,0,0,0,0,0,0,0,0,
0,0,0,0,0,0,0,2,0,0,0,2,2,0,0,0,0,0,0,0,
0,0,0,0,0,0,0,2,0,0,0,2,0,0,0,0,0,0,0,0,
0,0,0,0,0,0,0,2,2,0,2,2,0,0,0,0,0,0,0,0,
0,0,0,0,0,0,0,0,2,2,2,0,0,0,0,0,0,0,0,0,
0,0,0,0,0,0,0,0,0,0,0,0,0,0,0,0,0,0,0,0,
0,0,0,0,0,0,0,0,0,0,0,0,0,0,0,0,0,0,0,0,
0,0,0,0,0,0,0,0,0,0,0,0,0,0,0,0,0,0,0,0,
0,0,0,0,0,0,0,0,0,0,0,0,0,0,0,0,0,0,0,0
</data>
 </layer>
</map>
4. 読み込み処理
以下のスクリプトでレベルデータを読み込むことができます。
using UnityEngine;
using System.Collections;
using System.Text;
using System.Xml;
using System.IO;

public class TMXLoader : MonoBehaviour {

	// レイヤー格納
	public class Layer2D {
		public int width; // 幅
		public int height; // 高さ
		private int[] _vals = null; // マップデータ

		// 作成
		public void Create(int width, int height) {
			this.width = width;
			this.height = height;
			_vals = new int[width * height];
		}

		// 値の取得
		// @param x X座標
		// @param y Y座標
		// @return 指定の座標の値 (領域外を指定したら-1)
		public int Get(int x, int y) {
			if(x < 0 || x >= width) { return -1; }
			if(y < 0 || y >= height) { return -1; }
			return _vals[y * width + x];
		}

		// 値の設定
		// @param x X座標
		// @param y Y座標
		// @param val 設定する値
		public void Set(int x, int y, int val) {
			if(x < 0 || x >= width) { return; }
			if(y < 0 || y >= height) { return; }
			_vals[y * width + x] = val;
		}

		// デバッグ出力
		public void Dump() {
			print ("[Layer2D] (w,h)=("+width+","+height+")");
			for(int y = 0; y < height; y++) {
				string s = "";
				for(int x = 0; x < width; x++) {
					s += Get (x, y) + ",";
				}
				print (s);
			}
		}
	}

	// レベルデータを読み込む
	void Start () {
		// レイヤー生成
		Layer2D layer = new Layer2D();
		// レベルデータ取得
		TextAsset tmx = Resources.Load ("Levels/test2") as TextAsset;

		// XML解析開始
		XmlDocument xmlDoc = new XmlDocument();
		xmlDoc.LoadXml (tmx.text);
		XmlNodeList mapList = xmlDoc.GetElementsByTagName("map");
		foreach(XmlNode map in mapList) {
			XmlNodeList childList = map.ChildNodes;
			foreach(XmlNode child in childList) {
				if(child.Name != "layer") { continue; } // layerノード以外は見ない

				// マップ属性を取得
				XmlAttributeCollection attrs = child.Attributes;
				int w = int.Parse(attrs.GetNamedItem("width").Value); // 幅を取得
				int h = int.Parse(attrs.GetNamedItem("height").Value); // 高さを取得
				// レイヤー生成
				layer.Create(w, h);
				XmlNode node = child.FirstChild; // 子ノードは<data>のみ
				XmlNode n = node.FirstChild; // テキストノードを取得
				string val = n.Value; // テキストを取得
				// CSV(マップデータ)を解析
				int y = 0;
				foreach(string line in val.Split('\n')) {
					int x = 0;
					foreach(string s in line.Split(',')) {
						int v = 0;
						// ","で終わるのでチェックが必要
						if(int.TryParse(s, out v) == false) { continue; }
						// 値を設定
						layer.Set (x, y, v);
						x++;
					}
					y++;
				}
			}
		}

		// デバッグ出力
		layer.Dump();

	}
}
上記例では、Layer2Dをローカル変数にしていますが、これをメンバ変数にすることで外部からレベルデータを取得できるようになると思います。
結果のログ
読み込んだ結果、以下のログが出ているのでちゃんと読めていますね。
[Layer2D] (w,h)=(20,15)
0,0,0,0,0,0,0,0,0,0,0,0,0,0,0,0,0,0,0,0,
0,0,0,0,0,0,0,0,0,0,0,0,0,0,0,0,0,0,0,0,
0,0,0,0,0,0,0,0,0,0,0,0,0,0,0,0,0,0,0,0,
0,0,0,0,0,0,0,0,0,0,0,0,0,0,0,0,0,0,0,0,
0,0,0,0,0,0,0,0,0,0,0,0,0,0,0,0,0,0,0,0,
0,0,0,0,0,0,0,0,0,0,0,0,0,0,0,0,0,0,0,0,
0,0,0,0,0,0,0,0,2,0,0,0,0,0,0,0,0,0,0,0,
0,0,0,0,0,0,0,2,2,0,0,0,0,0,0,0,0,0,0,0,
0,0,0,0,0,0,0,2,0,0,0,2,2,0,0,0,0,0,0,0,
0,0,0,0,0,0,0,2,0,0,0,2,0,0,0,0,0,0,0,0,
0,0,0,0,0,0,0,2,2,0,2,2,0,0,0,0,0,0,0,0,
0,0,0,0,0,0,0,0,2,2,2,0,0,0,0,0,0,0,0,0,
0,0,0,0,0,0,0,0,0,0,0,0,0,0,0,0,0,0,0,0,
0,0,0,0,0,0,0,0,0,0,0,0,0,0,0,0,0,0,0,0,
0,0,0,0,0,0,0,0,0,0,0,0,0,0,0,0,0,0,0,0,
5. 課題
とりあえず敵の配置ができればいいかな、と思って作ったのでTiled Map Editorのすべての情報を取得していません。大きなところでは、
- マップチップのサイズを取得していない
- 複数レイヤーの読み込みに対応していない
- オブジェクトレイヤーの読み込みに対応していない
ですね。
6. アセットの自動コピー (2015/1/14追記)
AssetPostProcessorを使うとアセットに変更があった際、自動で更新を行うことができます。これを利用して、.tmxに変更があった場合に、.xmlへコピーすることができます。例えば以下のようにコードを記述します。
# if UNITY_EDITOR // Unityエディタ上のみ有効

using UnityEditor;
using UnityEngine;

public class MyAssetPostprocessor : AssetPostprocessor
{
    /// <summary>
    /// すべてのアセットのインポートが終了した際に呼び出されます
    /// </summary>
    /// <param name="importedAssets">インポートされたアセットのパス</param>
    /// <param name="deletedAssets">削除されたアセットのパス</param>
    /// <param name="movedAssets">移動したアセットの移動後のパス</param>
    /// <param name="movedFromPath">移動したアセットの移動前のパス</param>
    private static void OnPostprocessAllAssets(
        string[] importedAssets,
        string[] deletedAssets,
        string[] movedAssets,
        string[] movedFromPath)
    {
        foreach (var importedAsset in importedAssets)
        {
            if(IsTmxFile(importedAsset))
            {
                // TMXファイルなので拡張子を*.xmlにしてコピー
                var newAsset = importedAsset.Replace(".tmx", ".xml");
                // 古いXMLは削除
                AssetDatabase.DeleteAsset(newAsset);
                if(AssetDatabase.CopyAsset(importedAsset, newAsset))
                {
                    // コピー実行
                    Debug.Log ("Copy: " + importedAsset + " -> " + newAsset);
                }
            }
        }
    }

    /// TMXファイルかどうか調べる
    static bool IsTmxFile(string str)
    {
        return str.IndexOf(".tmx") > 0;
    }

}

# endif
このコードを任意のフォルダに配置することで、自動コピーをするようになるので、拡張子を*.tmxファイルのままで運用することが可能となります。
