【はじめに】
先日ntagatewayを使用してプライベートサブネットに属するEC2がアウトバウンド通信のみ接続可能になるというものを構築しました。
しかし、個人的にntagatewayは
①無料枠がなく放置しているだけでも料金が発生する(存在しているだけで課金対象)
②サービスを停止する方法がnatgateway自体を削除する以外方法がない
という点が個人利用するうえで敷居が高いと思いました。
そこで、今回はnatgatewayが無くてもプライベートサブネットに属するEC2が外部接続出来る方法を紹介します。
※技術ブログ初投稿になるので、至らない点が多数あるかと思いますがご了承ください、、、
【構成図】
・ルートテーブル
→両サブネットともにlocal、パブリックサブネットのみインターネットゲートウェイを許可
・セキュリティグループ
→両サブネットともにSSHを許可、パブリックサブネットのみ3128番ポートをプライベートサブネットからの通信のみ許可。
3128番ポートは後述するsquidのデフォルトのリッスンポートです。
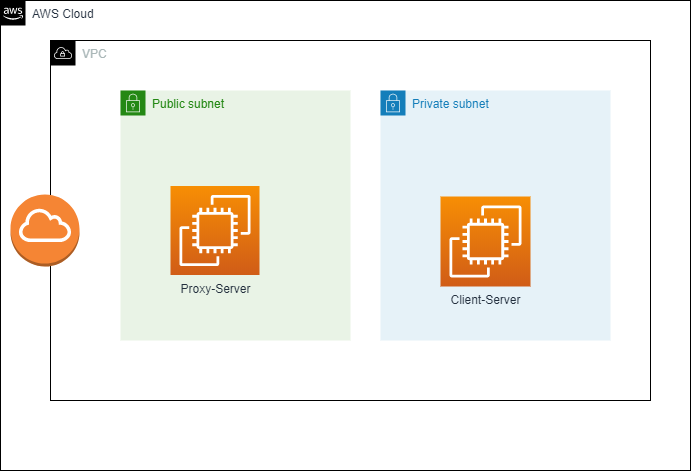
Amazon Linux2のEC2をパブリックサブネット、プライベートサブネットにそれぞれ1台ずつ配置します。
以降、パブリックサブネットに属するEC2をProxy、プライベートサブネットに属するEC2をClientと呼ぶことにします。
Proxyに先ほど登場したsquidをインストールします。squidとはプロキシサーバ等で用いられるOSSです。
プロキシとは代理という意味の言葉です。今回でいうとClientの代わりにProxyが
http通信を行ってくれるようになるというイメージです。
詳細は下記を参照してください。
https://cybersecurity-jp.com/security-measures/32171
設定終了後はClientでyumコマンドとcurlコマンドでhttp通信が出来るのかを確認します。
【構築】
まずはProxy側の設定を行っていく。
Proxyにログイン
$ whoami
ec2-user
$

ルートへスイッチ
$sudo su -
# whoami
root
#
squidをインストール
# yum -y install squid

中略

Complete!
#
squidのバージョン確認
# squid -v | head -n1
Squid Cache: Version 3.5.20
#
squidの起動と起動確認
# systemctl start squid
#
# systemctl enable squid
#
# ps -ef | grep squid | grep -v grep
root      3463     1  0 10:50 ?        00:00:00 /usr/sbin/squid -f /etc/squid/squid.conf
squid     3465  3463  0 10:50 ?        00:00:00 (squid-1) -f /etc/squid/squid.conf
squid     3466  3465  0 10:50 ?        00:00:00 (logfile-daemon) /var/log/squid/access.log
#
# lsof -i:3128
COMMAND  PID  USER   FD   TYPE DEVICE SIZE/OFF NODE NAME
squid   3465 squid   11u  IPv6  22306      0t0  TCP *:squid (LISTEN)
#
問題なく起動しており、想定通り3128番ポートもリッスンしている。
squidのconfファイルを編集する
# cd /etc/squid/
#
# pwd
/etc/squid
#

バックアップの取得
# cp -p squid.conf squid.conf`date '+%Y%m%d'`
#
# ll squid.conf*
-rw-r----- 1 root squid 2315 Oct 15 21:06 squid.conf
-rw-r----- 1 root squid 2315 Oct 15 21:06 squid.conf20210127
-rw-r--r-- 1 root root  2315 Oct 15 21:06 squid.conf.default
#

confファイルの編集
# vi squid.conf
# 追加: プライベートサブネット用の変数を作成
acl private-subnet src [プライベートサブネットのCIDR]
# 追加: プライベートサブネットからのアクセス許可
http_access allow private-subnet
squidの再起動と起動確認
# systemctl restart squid
#
# systemctl status squid
● squid.service - Squid caching proxy
   Loaded: loaded (/usr/lib/systemd/system/squid.service; enabled; vendor preset: disabled)
   Active: active (running) since Wed 2021-01-27 11:41:36 UTC; 3s ago
  Process: 730 ExecStop=/usr/sbin/squid -k shutdown -f $SQUID_CONF (code=exited, status=0/SUCCESS)
  Process: 525 ExecReload=/usr/sbin/squid $SQUID_OPTS -k reconfigure -f $SQUID_CONF (code=exited, status=1/FAILURE)
  Process: 738 ExecStart=/usr/sbin/squid $SQUID_OPTS -f $SQUID_CONF (code=exited, status=0/SUCCESS)
  Process: 733 ExecStartPre=/usr/libexec/squid/cache_swap.sh (code=exited, status=0/SUCCESS)
 Main PID: 741 (squid)
   CGroup: /system.slice/squid.service
           tq741 /usr/sbin/squid -f /etc/squid/squid.conf
           tq743 (squid-1) -f /etc/squid/squid.conf
           mq744 (logfile-daemon) /var/log/squid/access.log

Jan 27 11:41:36 ip-10-0-0-87.ap-northeast-1.compute.internal systemd[1]: Starting Squid caching proxy...
Jan 27 11:41:36 ip-10-0-0-87.ap-northeast-1.compute.internal systemd[1]: Started Squid caching proxy.
Jan 27 11:41:36 ip-10-0-0-87.ap-northeast-1.compute.internal squid[741]: Squid Parent: will start 1 kids
Jan 27 11:41:36 ip-10-0-0-87.ap-northeast-1.compute.internal squid[741]: Squid Parent: (squid-1) process 743 started
#
問題なく再起動できている。
続いてClient側の設定を行う。
Clientサーバにログイン
$ sudo su -
今現在yumとcurlが使えるか確認する。
# yum -y update
Loaded plugins: extras_suggestions, langpacks, priorities, update-motd
Could not retrieve mirrorlist http://amazonlinux.ap-northeast-1.amazonaws.com/2/core/latest/x86_64/mirror.list error was
12: Timeout on http://amazonlinux.ap-northeast-1.amazonaws.com/2/core/latest/x86_64/mirror.list: (28, 'Connection timed out after 5000 milliseconds')

中略
Cannot find a valid baseurl for repo: amzn2-core/2/x86_64
#

# curl -m 5 https://www.yahoo.co.jp/
curl: (28) Connection timed out after 5000 milliseconds
#
client側にproxyの設定を何もしていないので当然繋がらない。
下記の2つのファイルを編集してプロキシを使えるようにする。
# vi /etc/yum.conf
proxy=http://プロキシサーバーのプライベートIPアドレス:3128

# vi ~/.curlrc
proxy=http://プロキシサーバーのプライベートIPアドレス:3128

3128はプロキシサーバーのsquidのリッスンポート
.curlrcはデフォルトでは存在しないファイルの場合もあるのでその場合は新規作成
設定が完了したのでyumとcurlが使用できるか確認する。
試しにApacheをインストールしてみる
# yum -y install httpd

中略

Complete!
#
# rpm -qa | grep httpd
httpd-filesystem-2.4.46-1.amzn2.noarch
httpd-tools-2.4.46-1.amzn2.x86_64
generic-logos-httpd-18.0.0-4.amzn2.noarch
httpd-2.4.46-1.amzn2.x86_64
#
インストール成功!
yahooにアクセスしてみる
デフォルトのcurlだと情報量が多いのでレスポンスコードのみを返すコマンドにした。
#  curl  https://www.yahoo.co.jp/ -o /dev/null -w '%{http_code}\n' -s
200

#
レスポンスコード200なので接続成功!
参考資料
https://dev.classmethod.jp/articles/squid-proxy-setup/
https://qiita.com/Kento75/items/a135ff505fd3a33d4495
https://saikeblog.com/2020/01/05/curl%E3%81%A7%E3%83%AC%E3%82%B9%E3%83%9D%E3%83%B3%E3%82%B9%E3%81%AEhttp%E3%82%B9%E3%83%86%E3%83%BC%E3%82%BF%E3%82%B9%E3%82%B3%E3%83%BC%E3%83%89%E3%82%92%E5%8F%96%E5%BE%97%E3%81%99%E3%82%8B%E6%96%B9/
ちなみに必要な時だけnatgatewayを作成する方法もあるみたいなので今度はそちら方面も学習していければと思います。