今日やること
1. apiのUserモデルの'first_name', 'last_name'をフロントエンド側で編集できるようにする。
2.Vuexの使い方
1ではまずapi上で情報が編集できるようにしてからフロントエンド側でも編集できるように変える。
api上でUserモデルを編集する
Userモデルにpermissionを与える
まず、Userを編集するためにはpermissionを得る必要があるが、現在設定されているものはsettings.pyで確認できる。
REST_FRAMEWORK = {
    # Use Django's standard `django.contrib.auth` permissions,
    # or allow read-only access for unauthenticated users.
    'DEFAULT_PERMISSION_CLASSES': [
        'rest_framework.permissions.DjangoModelPermissionsOrAnonReadOnly'
    ],
    'DEFAULT_AUTHENTICATION_CLASSES': [
        'rest_framework.authentication.TokenAuthentication'
    ]
}
どうやら標準のパーミッションの設定が追加されているようだ。このrest_framework.permissions.DjangoModelPermissionsOrAnonReadOnlyの意味は「もし、ログインしていない状態ではreadonly」ということだ。つまり、編集するためにはトークンを指定してログインする必要がある。だが、request headersにトークンを指定してもまだ編集することができない、、、
これはUserViewsetにpermissionクラスが設定されていないためである。なのでviewsets.pyに追加しよう。
class UserViewSet(viewsets.ModelViewSet):
    queryset = User.objects.all()
    serializer_class = UserSerializer
+    permission_classes = [permissions.IsAuthenticated]
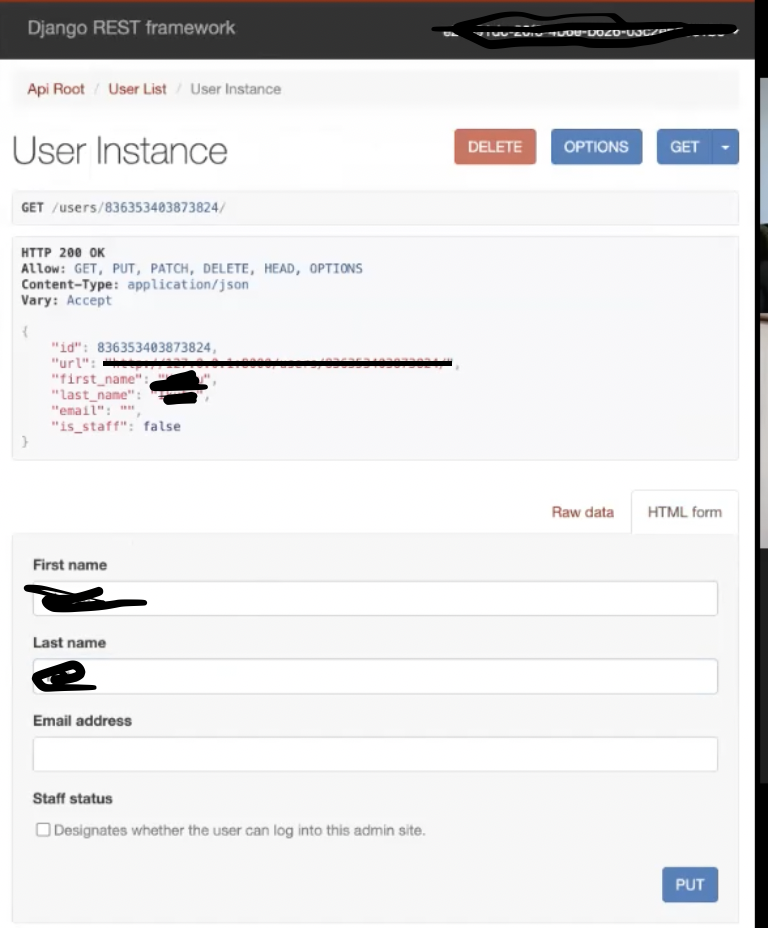
するとこのような画面になる。
無事にapi上での編集を許可することができた。
フロントエンド側で編集した内容をapiへ送る
次にフロントエンド側で変更した内容をaxiosを使ってdjangoのapiに送信していこう。
axiosのPATCHメソッドを利用して、データの更新方法を確認します。PATCHでは既存のデータの上書きを行うので、更新したい項目と値の組を指定する必要があります。また更新するユーザを識別するIDも必須となります。
patchの使い方は以下のようになる。
axios.patch('/user/id',{
   firstName: 'Jone',
   lastName : 'Dow'
  })
  .then(function (response) {
    // handle success
    console.log(response);
  })
今回はProfile.pyでユーザーが['first_name']['last_name']を変更した際に情報を渡したいので次のようになる。
            <form class="form">
                <div class="form-row">
                    <div class="form-group col-md-6">
                        <label>First Name:</label>
                        <input type="text" class="form-control" v-model="account['user']['first_name']">
                    </div>
                    <div class="form-group col-md-6">
                        <label>Last Name: </label>
                        <input type="text" class="form-control" v-model="account['user']['last_name']">
                    </div>
                    <v-btn @click="updateProfile">Update</v-btn>
                </div>
            </form>
     methods: {
         updateProfile(){
             axios

                .patch('/users/' + this.account.user.id + '/',{
                 first_name: this.account['user']['first_name'],
                 last_name: this.account['user']['last_name']
             }

             )
             .then(resp => {
                 console.log(resp.data)
                 this.account.user = resp.data
                 this.$store.commit('setAccount', this.account)
             })
         }
ここで .patch('/users/' + this.account.user.id + '/'があるが、これはアカウントのUserIdを指定している。
また、first_nameとlast_nameの編集内容はv-modelの内容からとってくる。
v-modelとは?
Vue.jsのディレクティブの1種。
dataオブジェクトのプロパティの値とinputタブの入力値や選択値のデータを連動することができる。
簡単に言うと、画面上でボックスに入力した内容が、jsファイルのデータに反映できる便利な機能。
jsファイル側のデータを更新した場合も、画面上の入力値に連動させることができるため、双方向データバインディング(データ結合)と呼ぶ。
▼使い方
タグの属性に記述する。
v-model="プロパティ名"
┗ プロパティ名:dataオブジェクトの中の連動させてい値をもつプロパティ名を記述。
Vuexを使う
Vuexとは?
VuexとはVue.jsのためのデータ保存ツールです。
すべてのコンポーネントからアクセスでき、さらに意図しないデータの変更を防げます。
例えば、ログイン中のユーザーに関するデータはどのコンポーネントからも参照できたほうが便利ですよね。
Vuexはデータを1箇所に集中させて管理を容易にします。
今回の場合であればaccountの情報を管理します。
Vuexのインストール方法
では、実際にインストールをしてみましょう。 以下のコマンドでvueにインストールできます。
vue add vuex
Vuexの使い方
では、実際にVuexを使ってみましょう。
ストアの作成
ストアとは、データを保持しておく場所です。今回は、store.jsという名前のファイルを作成します。
import Vue from ‘vue’
import Vuex from ‘vuex’

Vue.use(Vuex)

export default new Vuex.Store({
  state: {
+    account: null
  },
  mutations: {
+   setAccount(state, account) {
+    state.account = account
    }
  },
  actions: {
  },
  modules: {
  }
})
stateを使うことで”account”というデータはどこからでも参照できるようになりました。(グローバルにする)
次にstateで定義したaccountは直接書き込むことはできないのでmutationsにaccountの値を設定して、、、
ん〜〜、なんだか難しい
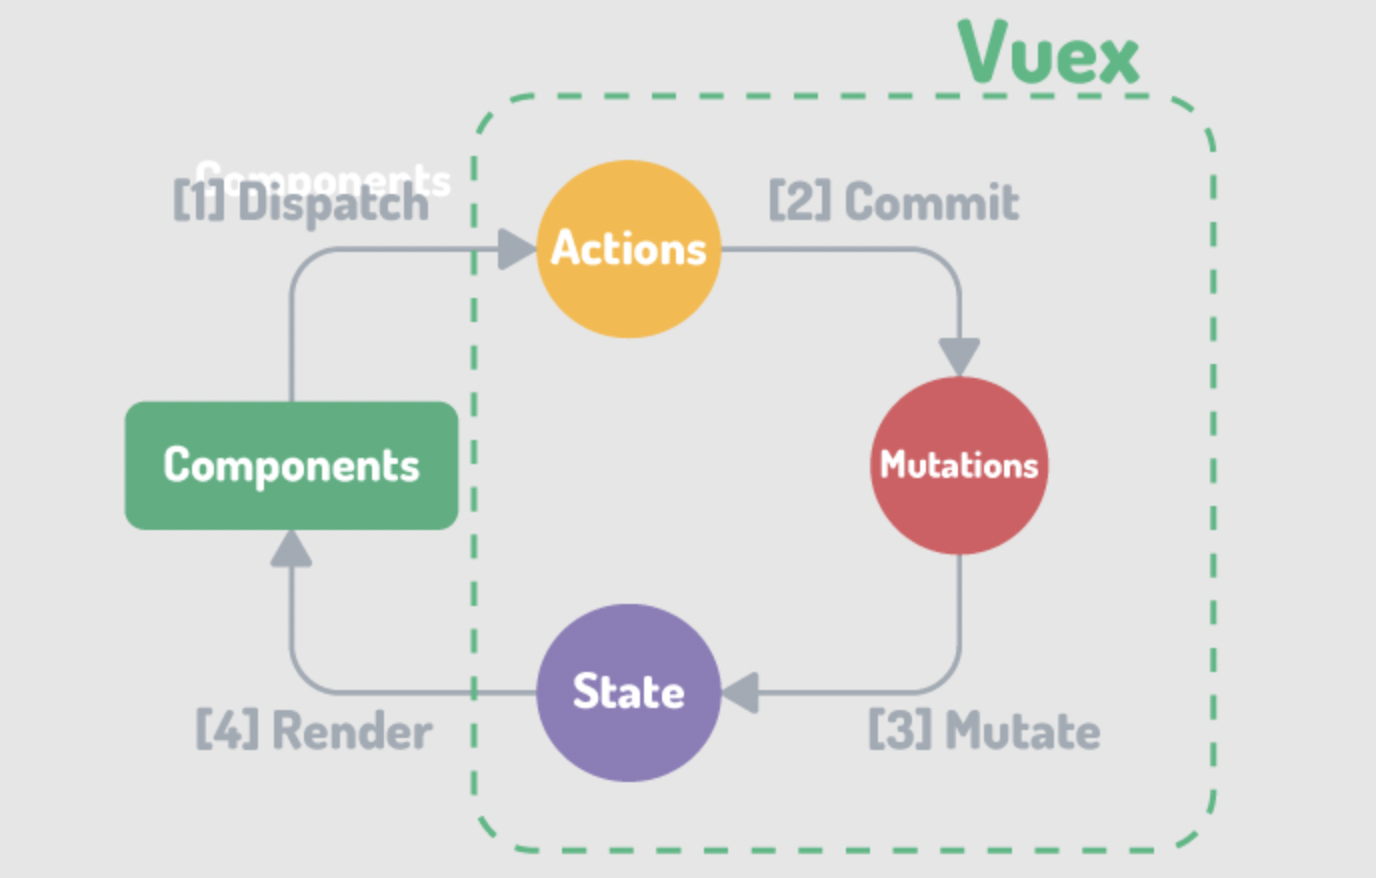
Vue.js + Vuexでデータが循環する全体像
一度、vuexについてしっかりと学ぶ必要がありそうなのでここでまとめておく。
vuexの図解
- アプリ1つに対してStoreも1つ
これはvuexをインストールした際に自動生成されるフォルダーである。(store/index.js)
-
データの変更は必ずmutationを経由
mutationsに登録した関数を呼ぶために使うのが「$store.commit()」です。
storeのmutationsに登録した関数以外の場所でstateを変更してはいけません。 -
storeに保存したデータはstateから読み取る
あらゆるコンポーネントが$storeにアクセスできます。
データの読み取りは$store.stateで。
②で説明した通り、読み取ったstateを直接書き換えてはいけません。
Vuexの使い方(改めて)
ここまで理解した時点で改めて実際のコードを確認しよう
import Vue from ‘vue’
import Vuex from ‘vuex’

Vue.use(Vuex)

export default new Vuex.Store({
  state: {
+    account: null
  },
  mutations: {
+   setAccount(state, account) {
+    state.account = account
    }
  },
  actions: {
  },
  modules: {
  }
})
        ul.navbar-nav
          li.nav-item(v-if="!account")
            a(href="/login/") Login
          li.nav-item(v-if="account")
            a(href="/" @click="logout") Sign Out
<script>
export default {
  name: 'Navbar',
  data(){
    return {
    }
  },computed: {
    account() {
      return this.$store.state.account
    }
  },
  methods:{
    logout(){
      alert("are you sure?")
      localStorage.removeItem("account")
      this.$store.commit('setAccount', null)
      this.$router.push('/')
    }
  }
}
</script>
ストアに保存されているデータを変更するときは、毎回コミットして保存します。 流れは以下の通りです。
変更ボタンを押すとmethodsの”logout”ファンクションが実行される
第1引数のsetAccuntが実行され、store.jsのmutationsのAccountの第2引数に’null’が渡される
state.accountがnullになる。
これでデータの変更が完了しました。
今日の課題
・ vuetifyを使ってUI部分を整える
・ Web Scrapingを自分で学習しインスタの投稿写真のリンクURLをpython上で取得する(ヒント:beautifulライブラリーを使う)

