環境
- Windows 10
- Raspberry Pi Zero W(
つなげるのが面倒だったのでキーボードマウスモニタレス) -
Raspbian
Raspbian Buster
Version:September 2019
Release date:2019-09-26
Kernel version:4.19 - ブレッドボード
- I2Cディスプレイ
OLEDモジュールSSD1306 - タクトスイッチ
千石に売ってたちょっと大きいヤツ - 10kΩ抵抗
- 配線もろもろ
- Zabbixサーバ → ConoHaでZabbix!
- Zabbix-Sender
Raspberry Piの設定
SSHでログインできるところまで設定
パッケージ更新
日本のサーバ(JAIST)に切り替えて利用すると少しは速かったです
# deb http://raspbian.raspberrypi.org/raspbian/ buster main contrib non-free rpi
deb http://ftp.jaist.ac.jp/raspbian buster main contrib non-free rpi
listを書き換えてから
$ sudo apt-get update
$ sudo apt-get -y upgrade
色々更新されているはずなので再起動
$ sudo reboot
I2Cディスプレイのセットアップ
Raspberry Piの設定
I2Cを利用できるように設定します。
$ sudo raspi-config
- 5 Interfacing Options
- P5 I2C
- Yes
- Finish
$ sudo reboot
確認
i2c-dev
設定
最終行に追加
dtparam=i2c_baudrate=50000
接続
| ピン | 端子 | 機能 |
|---|---|---|
| 1 | VCC | I2C ボタン共用 |
| 3 | SDA | I2C |
| 5 | SCL | I2C |
| 9 | GND | I2C ボタン共用 |
| 11 | GPIO17 | ボタン |
ボタンはプルアップ型で繋ぎます
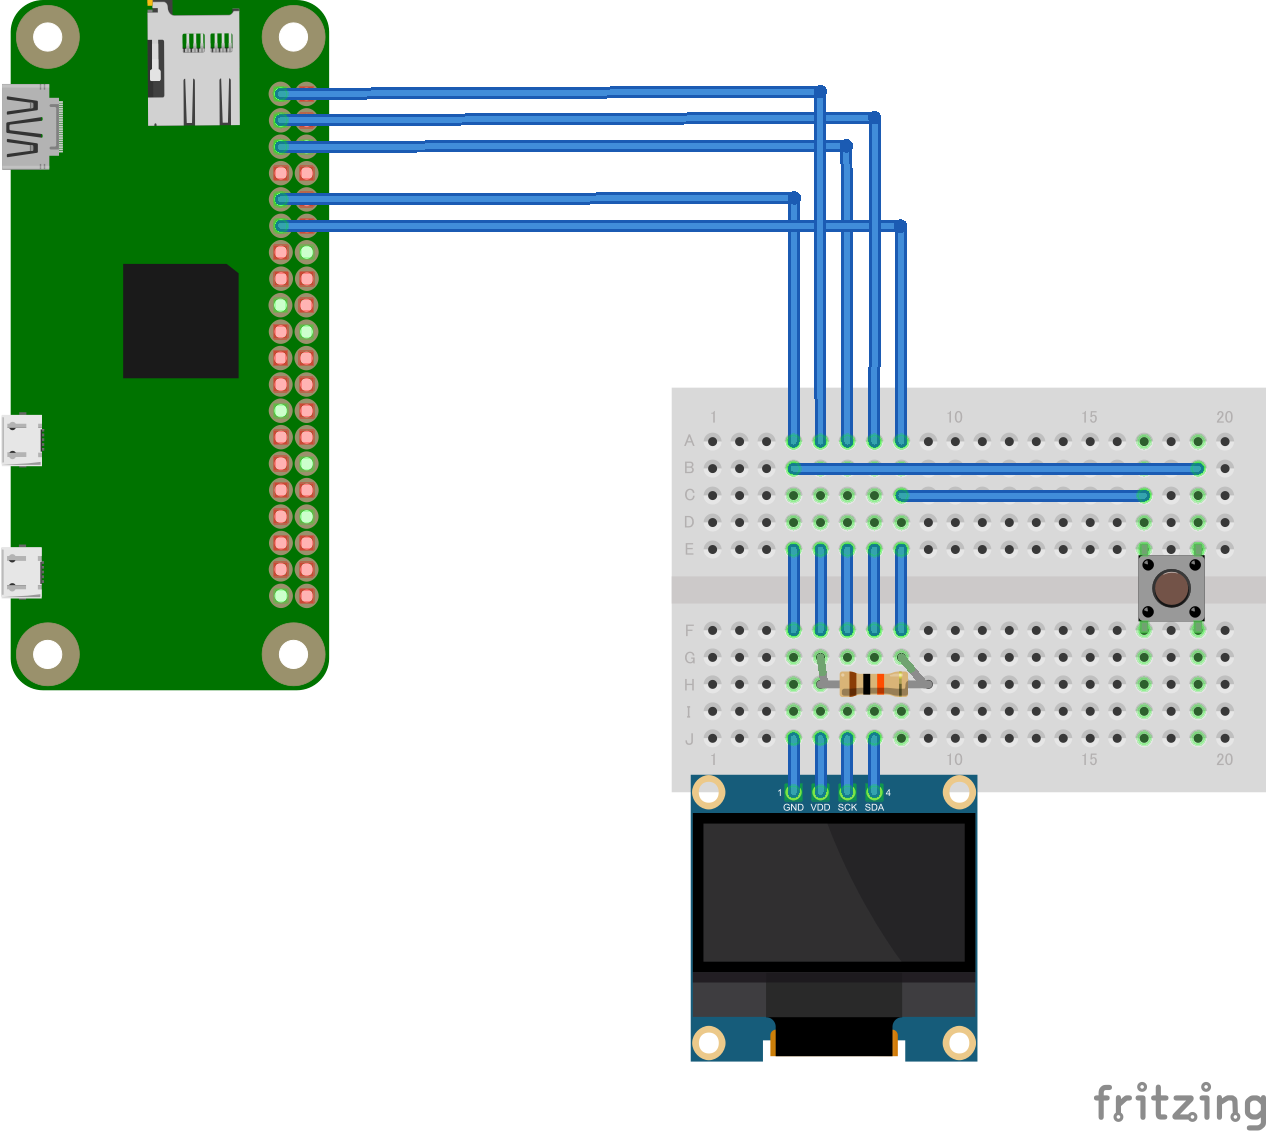
あとRaspberry Piのヘッダピンは雌型を取り付けています。
node.jsの更新とか準備
node.jsを一旦削除し、
nvmによるバージョン管理から指定のバージョンを用意します
# nodejs 全消し!
$ sudo apt-get autoremove nodejs
# nvmインストール
$ curl -o- https://raw.githubusercontent.com/nvm-sh/nvm/v0.35.1/install.sh | bash
$ export NVM_DIR="$([ -z "${XDG_CONFIG_HOME-}" ] && printf %s "${HOME}/.nvm" || printf %s "${XDG_CONFIG_HOME}/nvm")"
$ [ -s "$NVM_DIR/nvm.sh" ] && \. "$NVM_DIR/nvm.sh"
$ nvm --version
0.35.1
$ nvm ls-remote
        v0.1.14
        v0.1.15
        v0.1.16
        v0.1.17
   :
   :
   :
       v12.12.0
       v12.13.0   (LTS: Erbium)
       v12.13.1   (Latest LTS: Erbium)
        v13.0.0
        v13.0.1
        v13.1.0
        v13.2.0
        v13.3.0
# バージョンが大量に表示されます
# 今回はライブラリの関係で8系が使いたいので
$ nvm install v8.16.2
# インストール完了後バージョンチェック
$ node -v
$ npm -v
# しかしrootからはnodeが見れない
$ sudo node -v
# なので
$  n=$(which node); n=${n%/bin/node}; chmod -R 755 $n/bin/*; sudo cp -r $n/{bin,lib,share} /usr/local
# 見れる場所にコピーが必要
# これで見れる
$ sudo node -v
一応node.jsインストール完了
$ mkdir node
$ cd node
# 適当に初期設定
$ npm init
$ npm install raspi-io johnny-five oled-js oled-font-5x7
$ sudo ln -s /usr/local/lib/libpigpio*.so /usr/lib/
$ sudo reboot
# 再起動後
$ cd node
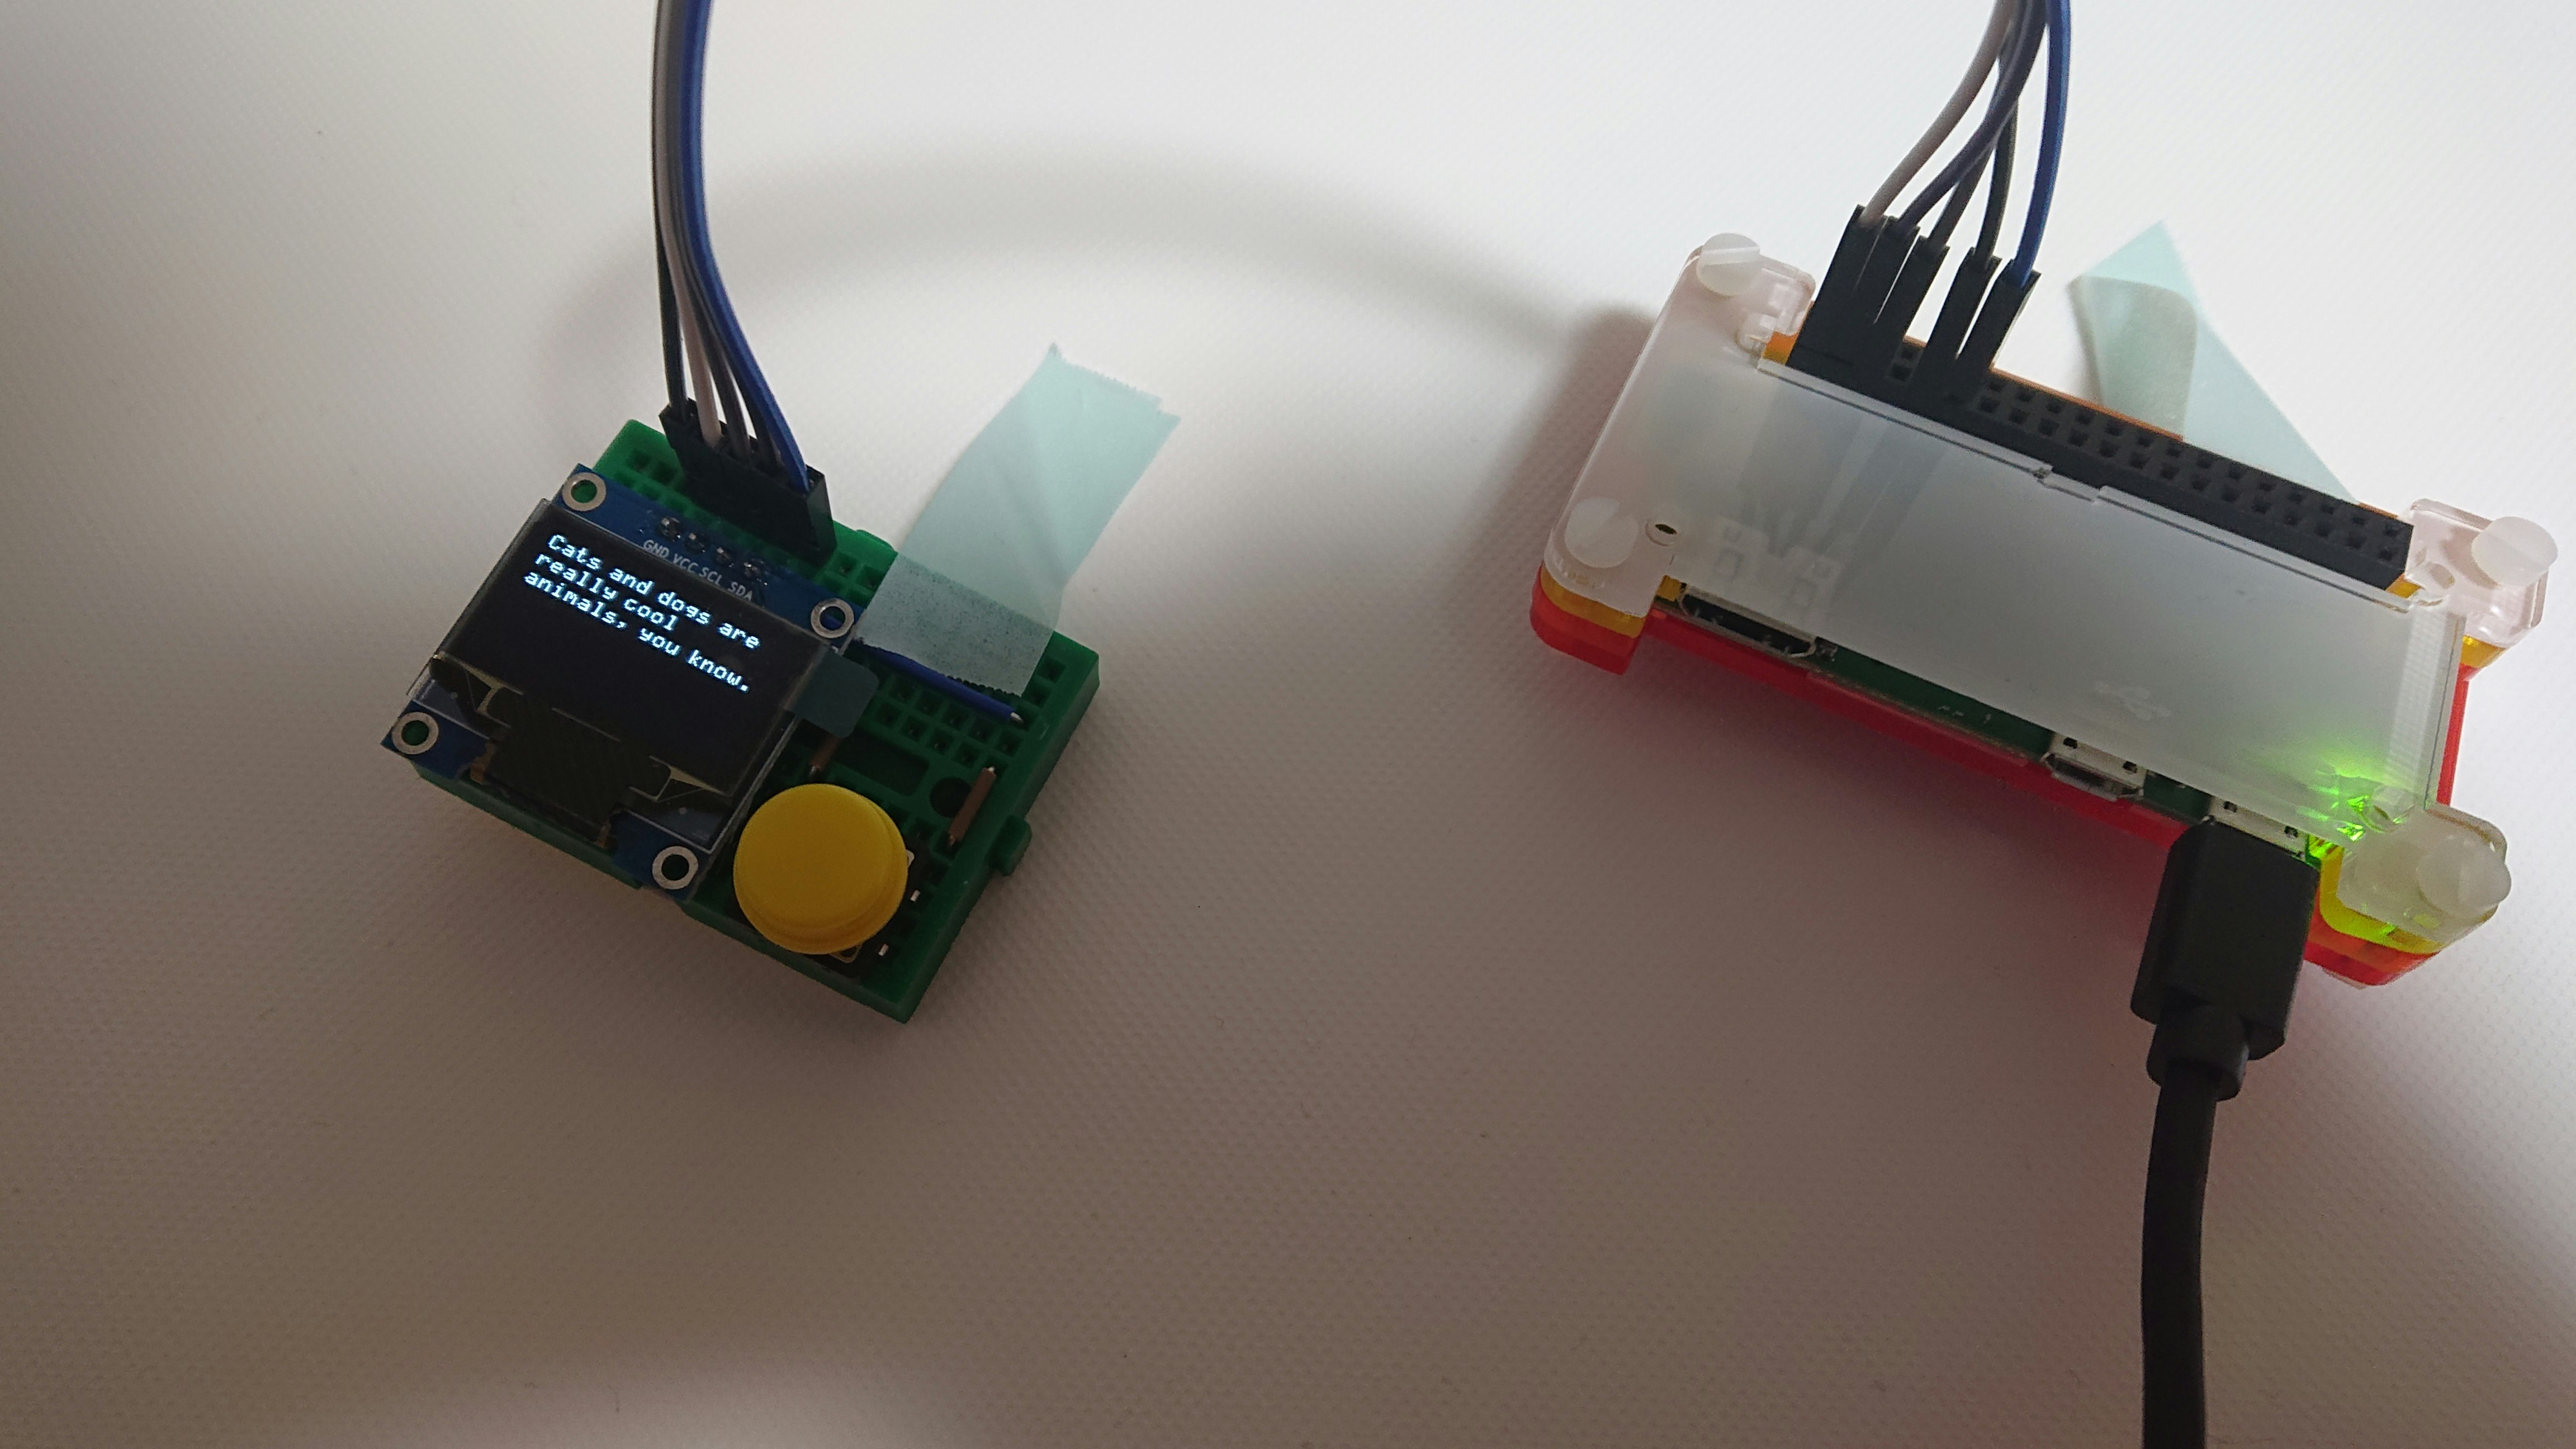
# OLEDにメッセージを出してみましょう
$ vi app.js
const five = require('johnny-five');
const font = require('oled-font-5x7');
const Oled = require('oled-js');
const Raspi = require('raspi-io').RaspiIO;
const board = new five.Board({io: new Raspi});
board.on('ready', () => {
  console.log('Connected to Raspberry, ready.');
  const opts = {
    width: 128,
    height: 64,
    address: 0x3c
  };
  const oled = new Oled(board, five, opts);
  oled.clearDisplay();
  oled.setCursor(1, 1);
  oled.writeString(font, 1,
    'Cats and dogs are really cool animals, you know.',
  1, true, 2);
  oled.update();
});
実行してみる。
sudo node app.js
ヤッター
Bluetooth対応体重計の検索
Raspberry Piから検索するのも手でしたが
今回はAndroidスマホから検索してみます。
GATT検索ができるアプリであればなんだっていいのですが
ちょうどいいアプリがあったのでこいつを利用
BLE Scanner: Read,Write,Notify
アプリのスキャナ画面を表示し
Bluetooth体重計をBLE待受状態にします。
※ 今回の体重計は乗ったタイミングでONになるようです
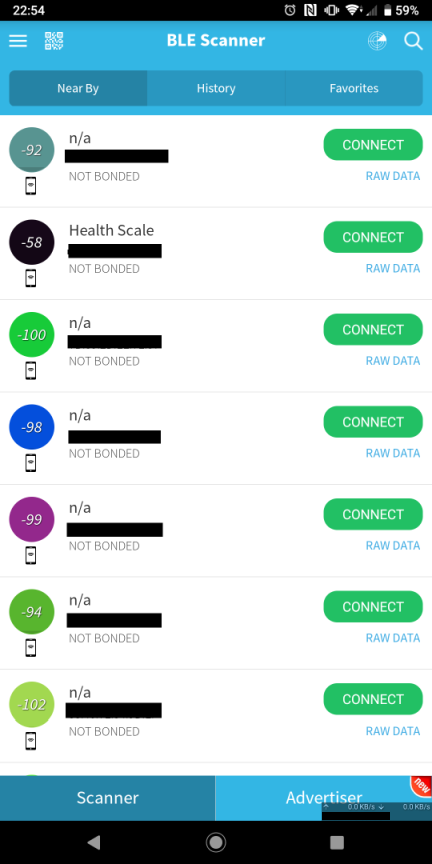
それらしい名前が出てきました。
Health Scale
らしいです
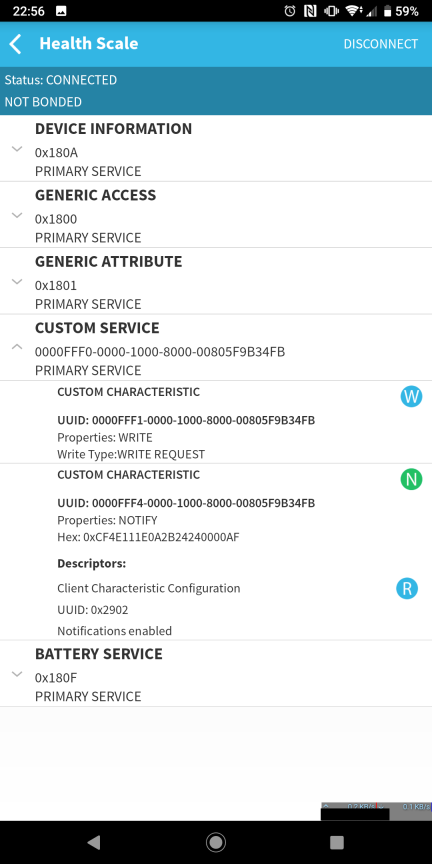
GATTサービスを表示してみます。
カスタムサービス辺りのNotifyに値がまとまっているらしいのでそいつを展開し、
Notifyをsubscribeしてみます。

この状態で体重計の上で動いてみます。
何やら3,4バイト目(頭が0バイト目)と最後の値が揺れています
この時26.0Kgを表示しているので
3,4バイト目のエンディアンをそれとなく計算すると
2600という値が取得でき
100で除算すると表記と同じ値となりました。
値が確定したタイミングで最後のデータとして全件データが入ったNotifyが飛んできた後切断されるみたいでその時の値が
その確定したタイミングでの3,4バイト目が1E 0A
値を0x0A1Eとし、計算すると2590となります。
この時体重計は25.9Kgで確定しているのでこの値が体重でよいでしょう。
というわけで
node.jsのnobleでデータを取得してみます。
Bluetoothのなにがしをインストール
sudo apt-get install bluetooth bluez libbluetooth-dev libudev-dev
デバイスを見つけてみましょうか
$ bluetoothctl
[bluetooth]# scan on
[NEW] Device xx:xx:xx:xx:xx:xx Health Scale
見つかりますね
blutoothctlを終わりましょう
[bluetooth]# scan off
[bluetooth]# exit
npmのなにがしもインストール
(こいつがバージョン指定が必要でnodeの8か9系でしか動いてくれないっぽい)
$ npm install noble
ソースを書いていくが先駆者を参考にさせて頂く。
体重計名をHealth Scaleとして確認…
:
:
:
(fff4):
Buffer [ 207, 0, 0, 148, 7, 0, 0, 0, 0, 1, 93 ]
(fff4):
Buffer [ 207, 0, 0, 148, 7, 0, 0, 0, 0, 1, 93 ]
(fff4):
Buffer [ 207, 98, 17, 148, 7, 70, 68, 150, 0, 0, 187 ]
(fff4):
Buffer [ 207, 98, 17, 148, 7, 70, 68, 150, 0, 0, 187 ]
計測完了のタイミングで通信が切れるのでその寸前で体重以外の情報を送信している様です。
しかし内容については調査が必要…
今回は体重を利用したいので3,4バイト目を利用し、
計測終了のフラグを9バイト目を利用します。
ボタン利用
Bluetoothを常時検索するのも無駄なのでボタンをトリガーとして検出を行いたいと思い実装。
無くても検出し続けたらそれはそれで動くと思う。
今回はrpi-gpio-buttonsでボタンの動作を検出します
このモジュールはプルアップ回路のボタンを検出するらしいです
GPIO pins with buttons must have a pull up resistor or be configured in the device tree overlay to use internal pull up.
ではパッケージのインストール
$ npm install rpi-gpio-buttons
var buttons = require('rpi-gpio-buttons')([11]);
// 長押し検出を1秒設定
buttons.setTiming({ pressed: 1000 });

buttons.on('pressed', function (pin) {
  console.log("pressed");
});
buttons.on('clicked', function (pin) {
  console.log("clicked");
});
buttons.on('clicked_pressed', function (pin) {
  console.log("clicked_pressed");
});
buttons.on('double_clicked', function (pin) {
  console.log("double_clicked");
});
buttons.on('released', function (pin) {
  console.log("released");
});
buttons.on('button_changed', function (pin) {
  console.log("button_changed");
});
buttons.on('button_press', function (pin) {
  console.log("button_press");
});
buttons.on('button_release', function (pin) {
  console.log("button_release");
});
 $ node button.js
button_changed
button_press
button_changed
button_release
clicked
button_changed
button_press
button_changed
button_release
clicked
押したタイミングでbutton_changed、button_press
話したタイミングでbutton_changed、button_release
その後clickedが飛んで来ました
var buttons = require('rpi-gpio-buttons')([11]);
// 長押し検出を1秒設定
buttons.setTiming({ pressed: 1000 });

buttons.on('clicked', function (pin) {
  console.log("clicked");
});
これでボタンの対応を行います
zabbix-senderをインストール
マニュアルを見てインストール
今回は4.2です
OSはbusterを見て参考に…
$ cd
$ mkdir zabbix
$ cd zabbix
$ wget https://repo.zabbix.com/zabbix/4.2/raspbian/pool/main/z/zabbix-release/zabbix-release_4.2-2+buster_all.deb
$ sudo dpkg -i zabbix-release_4.2-2+buster_all.deb
$ sudo apt update
$ sudo apt install zabbix-sender
$ sudo chmod +x /usr/bin/zabbix_sender
インストール完了
$ zabbix_sender -z xxx.xxx.xxx.xxx -s ConoHa -k Weight -o 34.1
Zabbixサーバーにデータを送信してみます

受信できたようです
これで整いました
ソース仕上げ
const noble = require('noble');
const FAT_SCALE = 'Health Scale';
const ZABBIXSERVER = 'xxx.xxx.xxx.xxx'
const ZABBIXHOST = 'ConoHa'
const {exec} = require("child_process")
var buttons = require('rpi-gpio-buttons')([11]);
buttons.setTiming({ pressed: 1000 });
const five = require('johnny-five');
const font = require('oled-font-5x7');
const Oled = require('oled-js');
const Raspi = require('raspi-io').RaspiIO;
// 画面用意
const board = new five.Board({ io: new Raspi });
const opts = {
width: 128,
height: 64,
address: 0x3c
};
const oled = new Oled(board, five, opts);
board.on('ready', () => {
console.log('Connected to Raspberry, ready.');
oled.clearDisplay();
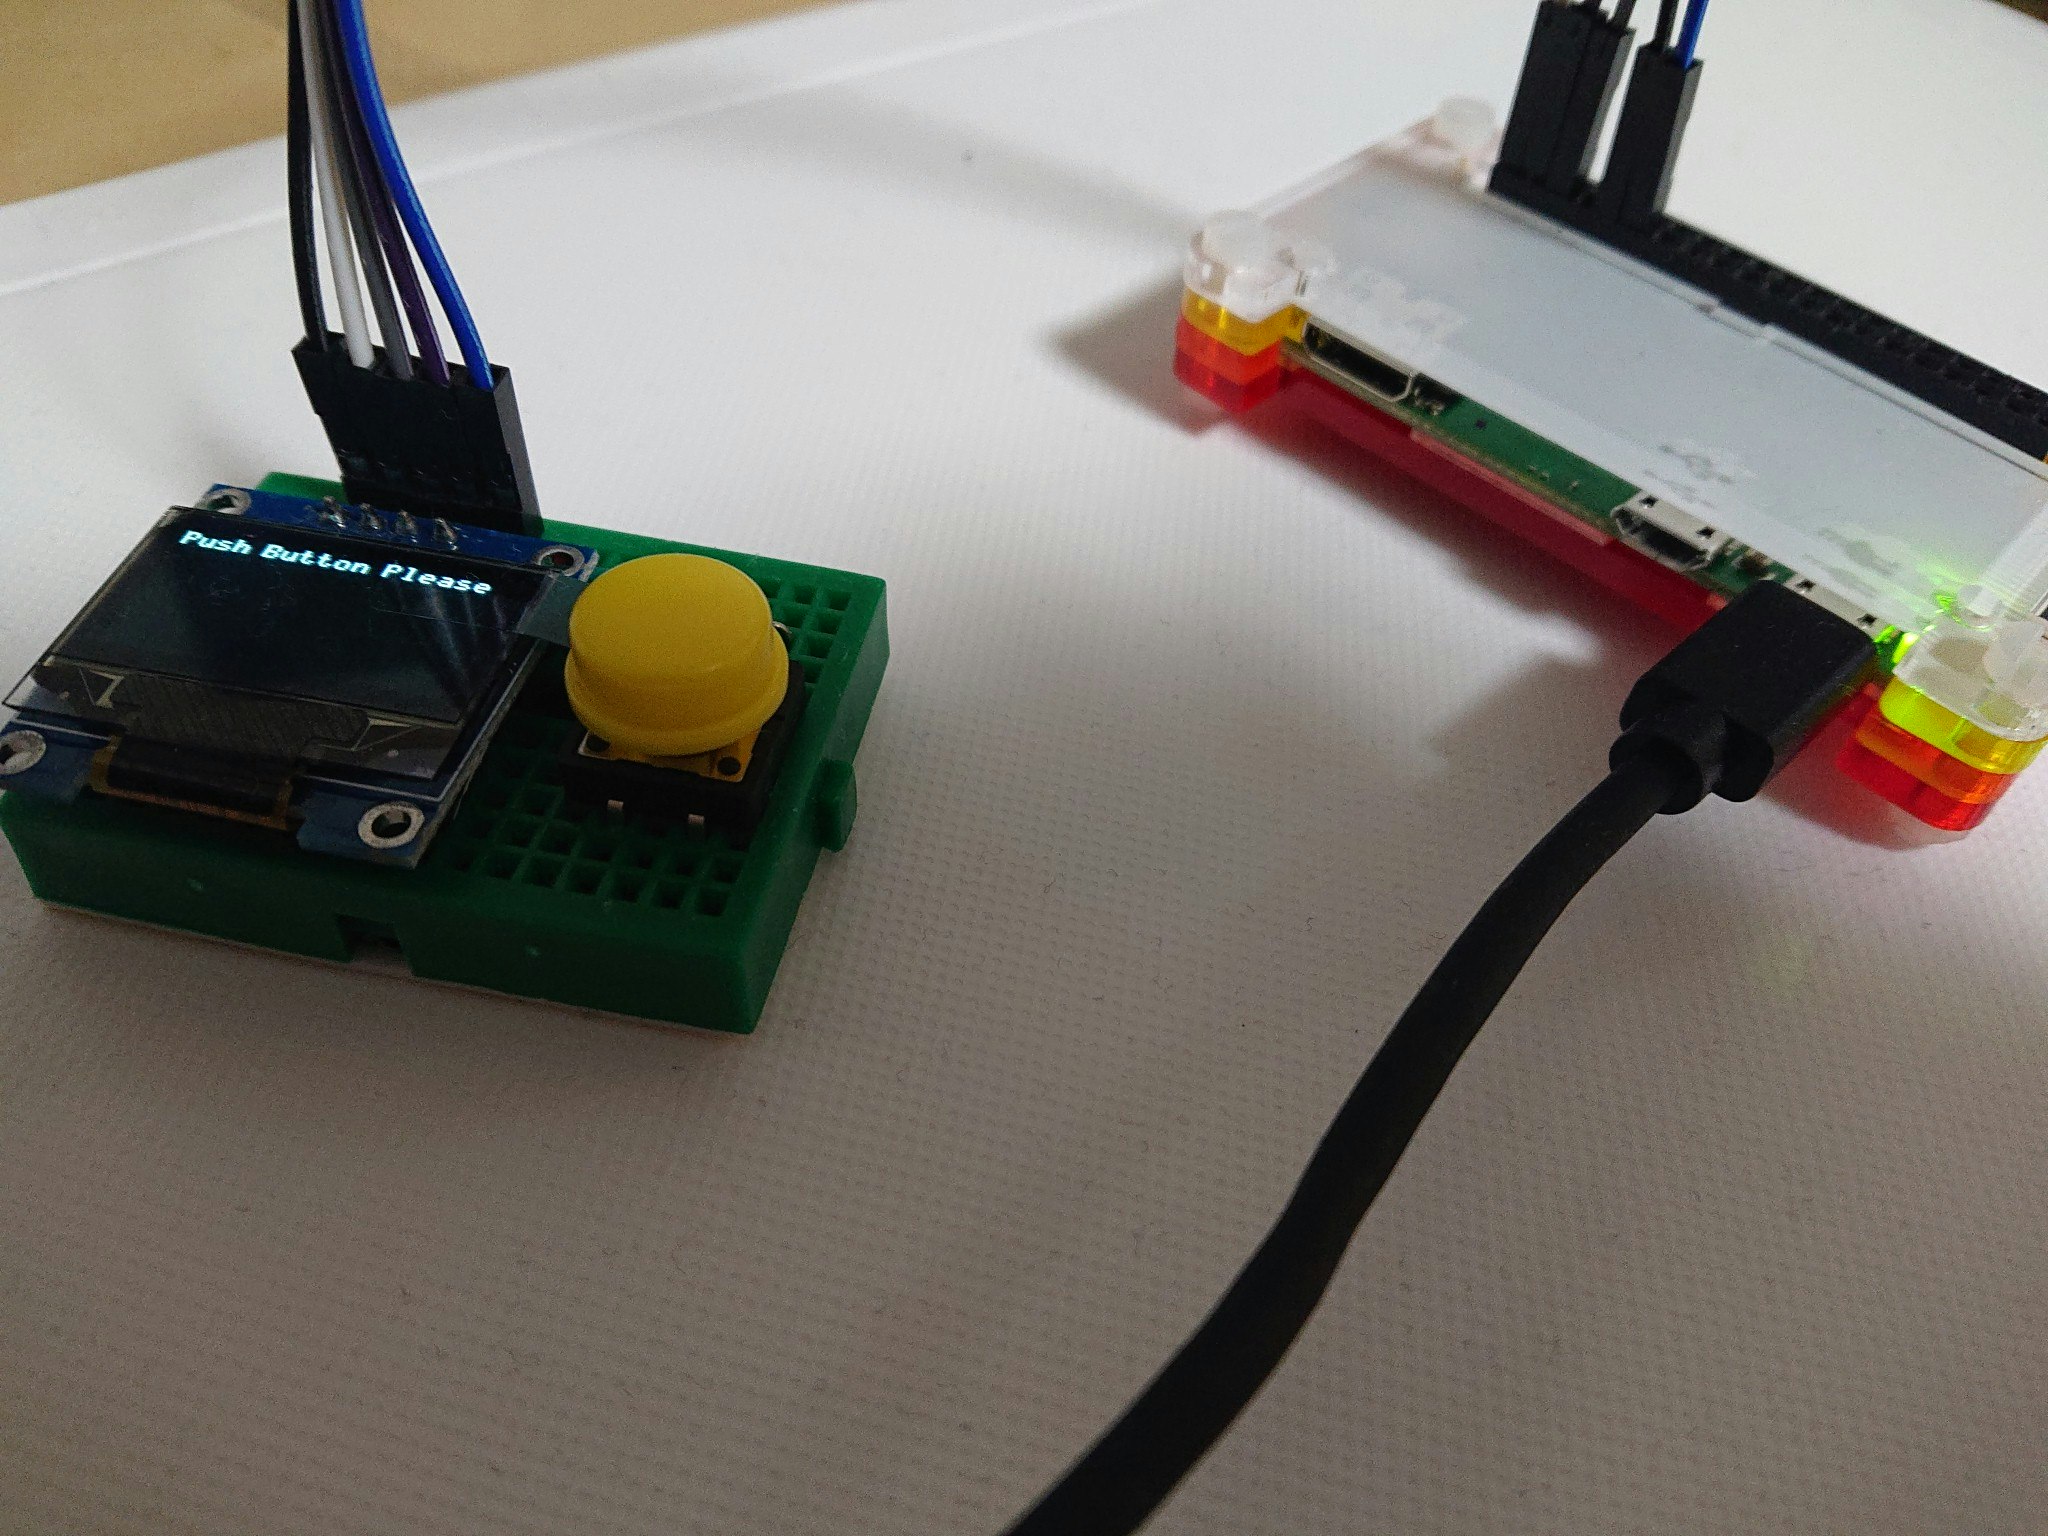
oled.setCursor(1, 1);
oled.writeString(font, 1, `Push Button Please`, 1, true, 2);
oled.update();
});
// Bluetooth のステータスを監視
noble.on('stateChange', (state) => {
console.log(`\nstateChange: ${state}\n`);
})
buttoncheck = false;
buttons.on('clicked', function (pin) {
if(!buttoncheck){
// ボタン検出のブロック
buttoncheck = true;
console.log("clicked");
oled.clearDisplay();
oled.setCursor(1, 1);
oled.writeString(font, 1, `BT Start Scan`, 1, true, 2);
oled.update();
noble.startScanning();
}
});
// 周辺機器が見つかったら、接続後サービスを探査
noble.on('discover', (peripheral) => {
const localName = peripheral.advertisement.localName
if (localName === FAT_SCALE) {
console.log(`discover peripheral: ${FAT_SCALE}\n`)
// スキャンを停止
noble.stopScanning();
// 接続後サービス(0xfff0)を探査
peripheral.once('connect', () => {
peripheral.discoverServices(['fff0'])
})
// 切断イベントを検出
peripheral.once('disconnect', onDisconnect);
// 探査されたサービスを出力
peripheral.once('servicesDiscover', onServiceDiscover)
// 見つかった Health Scale に接続
peripheral.connect()
}
})
// 探査されたサービスの特性を探査
function onServiceDiscover(services) {
services
.forEach((service) => {
console.log('Discover Service: Device Information\n')
service.once('characteristicsDiscover', onCharacteristicsDiscover)
service.discoverCharacteristics()
})
}
function onCharacteristicsDiscover(characteristics) {
console.log('Discover Characteristics:\n')
oled.setCursor(1, 9);
oled.writeString(font, 1, `Discover`, 1, true, 2);
oled.update();
scaleEnd = false;
characteristics
.forEach(characteristic => {
// notify が許可されている場合
if (characteristic.properties.includes('notify')) {
characteristic.on('data', (data) => {
weight = (data[4] * 0x0100 + data[3]) / 100
console.dir(data)
if (!scaleEnd && data[9] == 0) {
// 0が2回送信されるため1回のみ利用する
scaleEnd = true;
if (weight > 0) {
oled.clearDisplay();
oled.setCursor(1, 1);
oled.writeString(font, 1, `Weight : ${(`00` + weight.toFixed(1)).slice(-4)}Kg`, 1, true, 2);
oled.update();
// ここで外部へ情報を記録する処理をおく
exec(`zabbix_sender -z ${ZABBIXSERVER} -s ${ZABBIXHOST} -k Weight -o ${weight}`)
}
}
})
// 通知を購読
characteristic.subscribe((err) => {
if (err) throw err
console.log(`(${characteristic.uuid}): start subscribe`)
})
}
})
}
function onDisconnect() {
// Bluetooth切断で終了
process.exit();
}
計測後体重計からBT切断されると
終了するようになっているため
シェルから永久ループで再起動するようにします
while :
do
    sudo node bt.js
done
$ chmod +x Scale.sh
これで
起動したままでボタンを押せばBT接続状態になり
体重計に乗ってZabbixへ記録が飛ぶと言った物ができます。