設定など
データベース作成
Mysqlにて適宜DBを作成してください
テーブル作成
CREATE TABLE `user` (
  `id` int NOT NULL AUTO_INCREMENT,
  `first_name` varchar(45) NOT NULL,
  `last_name` varchar(45) NOT NULL,
  PRIMARY KEY (`id`),
  UNIQUE KEY `id_UNIQUE` (`id`)
) ENGINE=InnoDB AUTO_INCREMENT=14 DEFAULT CHARSET=utf8mb4 COLLATE=utf8mb4_0900_ai_ci
接続情報を指定
demo\src\main\resources\hibernate.cfg.xml
<?xml version="1.0" encoding="UTF-8"?>
<!DOCTYPE hibernate-configuration PUBLIC "-//Hibernate/Hibernate Configuration DTD 3.0//EN"
                                         "http://www.hibernate.org/dtd/hibernate-configuration-3.0.dtd">
<hibernate-configuration>
 <session-factory name="">
  <property name="hibernate.connection.driver_class">com.mysql.cj.jdbc.Driver</property>
  <property name="hibernate.connection.url">jdbc:mysql://localhost/{データベース名}?serverTimezone=JST</property>
  <property name="hibernate.connection.username">{ユーザ名}</property>
  <property name="hibernate.connection.password">{パスワード}</property>
  <property name="hibernate.dialect">org.hibernate.dialect.MySQLDialect</property>
  <mapping class="com.example.demo.models.User"/>
 </session-factory>
</hibernate-configuration>
demo\src\main\resources\User.hbm.xml
<?xml version="1.0"?>
<!DOCTYPE hibernate-mapping
    PUBLIC "-//Hibernate/Hibernate Mapping DTD//EN"
    "http://hibernate.sourceforge.net/hibernate-mapping-3.0.dtd">
<hibernate-mapping>

<code class="dif1">
    <class name="com.example.demo.models.User" table="user">
        <id name="id" type="Integer" unsaved-value="null" >
        <generator class="assigned"/>
        </id>
        <property name="last_name" />
        <property name="first_name" />
    </class>
</code>

</hibernate-mapping>
demo\src\main\resources\application.properties
spring.datasource.url=jdbc:mysql://localhost/{データベース名}?serverTimezone=JST
spring.datasource.username={ユーザ名}
spring.datasource.password={パスワード}
spring.datasource.driver-class-name=com.mysql.cj.jdbc.Driver
テーブルに合わせたクラスを定義
demo\src\main\java\com\example\demo\models\User.java
package com.example.demo.models;

import java.io.Serializable;

import javax.persistence.Column;
import javax.persistence.Entity;
import javax.persistence.GeneratedValue;
import javax.persistence.GenerationType;
import javax.persistence.Id;
import javax.persistence.Table;

@Entity
@Table(name="user")
public class User implements Serializable{
    private static final long serialVersionUID = 1L;

    @Id
    @GeneratedValue(strategy=GenerationType.IDENTITY)
    @Column(name = "id")
    public Integer id;

    @Column(name = "last_name")
    public String lastName;

    @Column(name = "first_name")
    public String firstName;

    public Integer getId() {
        return id;
    }

    public void setId(Integer id) {
        this.id = id;
    }

    public String getLastName() {
        return lastName;
    }

    public void setLastName(String lastName) {
        this.lastName = lastName;
    }

    public String getFirstName() {
        return firstName;
    }

    public void setFirstName(String firstName) {
        this.firstName = firstName;
    }
}
登録、更新、削除、データ取得の処理を書いてみる
「user/curd?action={index OR insert OR update OR delete}&id={処理対象のid}」のURLにアクセスした場合の処理を実装しています。
※GETパラメータactionについて、
・indexの場合は。データ取得
・insertの場合は。登録
・updateの場合は。更新
・deleteの場合は。削除
をおこないます。
※GETパラメータidについて、更新、削除対象のIDを指定します。
demo\src\main\java\com\example\demo\UserApplication.java
package com.example.demo;

import java.util.List;

import org.hibernate.Session;
import org.hibernate.SessionFactory;
import org.hibernate.Transaction;
import org.hibernate.cfg.Configuration;
import org.springframework.stereotype.Controller;
import org.springframework.ui.Model;
import org.springframework.web.bind.annotation.RequestMapping;
import org.springframework.web.bind.annotation.RequestMethod;
import org.springframework.web.bind.annotation.RequestParam;

import com.example.demo.models.User;

@Controller
@RequestMapping("user")
public class UserApplication {
    protected SessionFactory sessionFactory = null;
    protected Session session               = null;

    /**
     * CURD確認用アクション
     *
     * @param action 処理内容(index:処理なし、insert:登録、update:更新、delete:削除)
     * @param id id(処理対象)
     * @param model
     * @return
     * @throws Exception
     */
    @RequestMapping(value = "/curd", method = RequestMethod.GET)
    public Model curd(@RequestParam String action, @RequestParam(required=false) Integer id, Model model) throws Exception {
        this.sessionFactory = new Configuration().configure().buildSessionFactory();
        this.session = sessionFactory.openSession();

        switch (action) {
            case "index":
                break;
            case "insert":
                insert();
                break;
            case "update":
                update(id);
                break;
            case "delete":
                delete(id);
                break;
        }

        // ユーザ一覧情報をviewに渡す
        List<User> users = findAll();
        model.addAttribute("users", users);

        sessionFactory.close();
        session.close();

        return model;
    }

    /**
     * データを登録
     *
     * @throws Exception
     */
    protected void insert() throws Exception {
        Transaction t = session.getTransaction();
        t.begin();
        try {
            User u = new User();
            u.lastName = "テスト";
            u.firstName = "太郎";

            session.save(u);

            t.commit();
        } catch (Exception e) {
            t.rollback();
            throw e;
        }
    }

    /**
     * 指定idに対応するデータを更新
     *
     * @param id
     * @throws Exception
     */
    protected void update(Integer id) throws Exception {
        User u = findById(id);
        if (u == null) return; // 対象データがない場合は何もしない

        u.setLastName(u.getLastName() + "修正");

        Transaction t = session.getTransaction();
        t.begin();
        try {
            session.save(u);

            t.commit();
        } catch (Exception e) {
            t.rollback();
            throw e;
        }
    }

    /**
     * 指定idに対応するデータを削除
     *
     * @param id id(削除対象)
     * @throws Exception
     */
    protected void delete(Integer id) throws Exception {
        User u = findById(id);
        if (u == null) return; // 対象データがない場合は何もしない

        Transaction t = session.getTransaction();
        t.begin();
        try {
            session.delete(u);

            t.commit();
        } catch (Exception e) {
            t.rollback();
            throw e;
        }
    }

    /**
     * 指定idに対応するデータを取得
     *
     * @param id
     * @return idに対応するユーザデータ
     */
    protected User findById(Integer id) {
        User u = session.createQuery(""
            + "FROM User "
            + "WHERE id = " + id
            , User.class).list().get(0);

        return u;
    }

    /**
     * 全データを取得
     *
     * @return 全ユーザデータ
     */
    protected List<User> findAll() {
        List<User> users = session.createQuery(""
            + "FROM User "
            + "ORDER BY id"
            , User.class).list();

        return users;
    }
}
画面作成
上記「登録、更新、削除、データ取得の処理を書いてみる」用の画面を作成します。
この画面は、ユーザ情報(ID,姓、名)の一覧を表示する画面です。
demo\src\main\resources\templates\user\curd.html
<html xmlns:th="http://www.thymeleaf.org">
<body>

<table>
    <thead>
        <tr>
            <th>ID</th>
            <th>lastName</th>
            <th>firstName</th>
        </tr>
    </thead>
    <tbody>
        <tr th:each="user , stat : ${users}">
            <td th:text="${user.id}"></td>
            <td th:text="${user.lastName}"></td>
            <td th:text="${user.firstName}"></td>
        </tr>
    </tbody>
</table>
</body>
動作確認
まず、アプリケーションを起動してください。
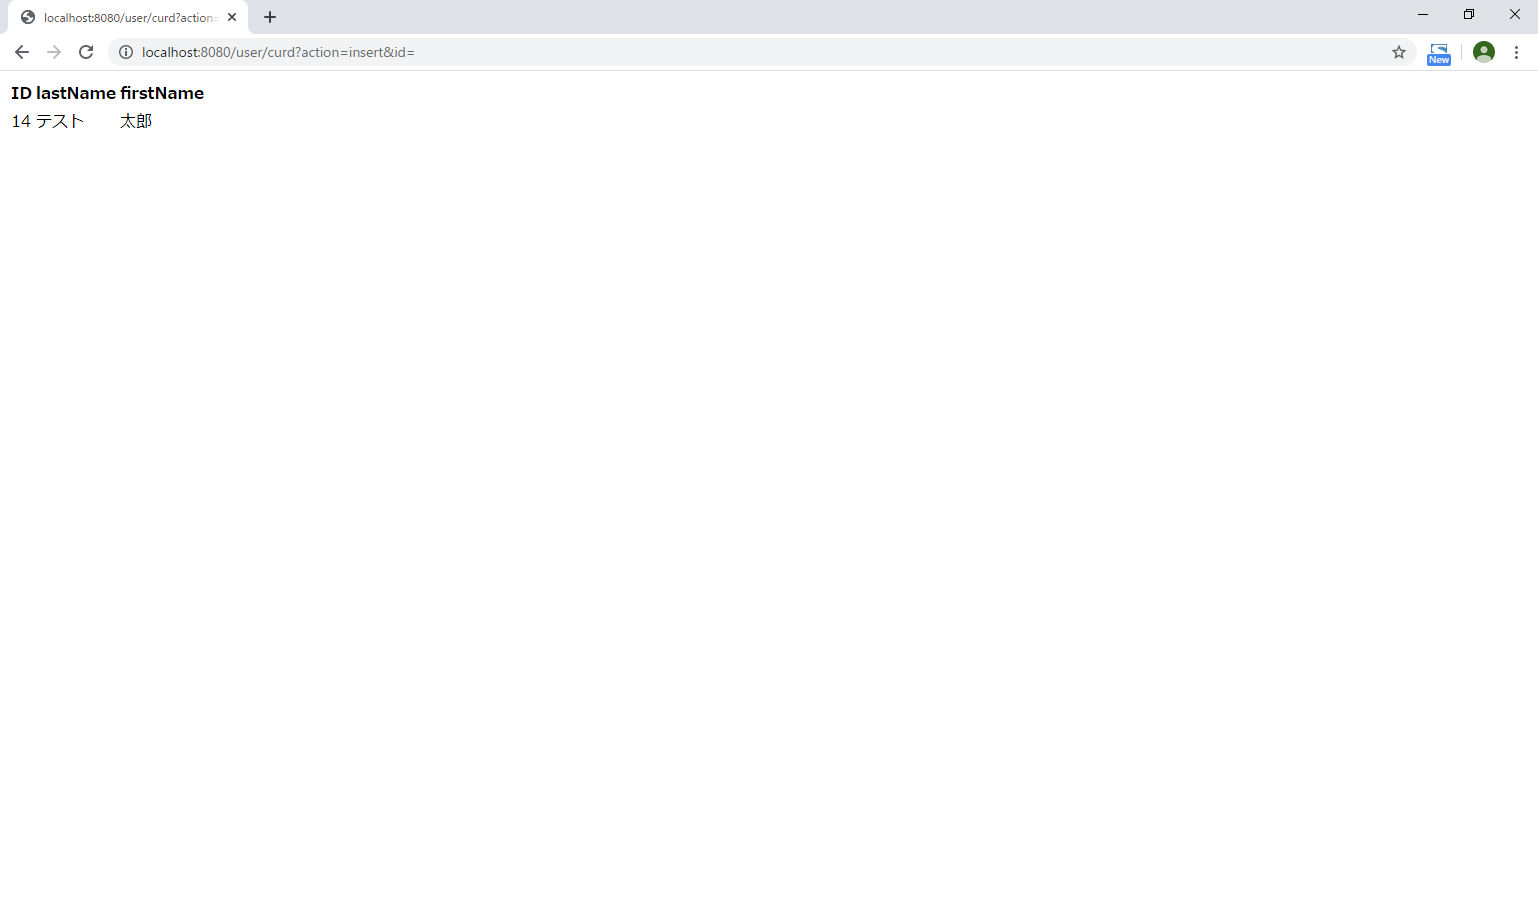
その後、登録の確認をするため下記のURLにアクセスしてみましょう。
http://localhost:8080/user/curd?action=insert
すると、「テスト太郎」さんが登録されたため、画面上に表示されます。
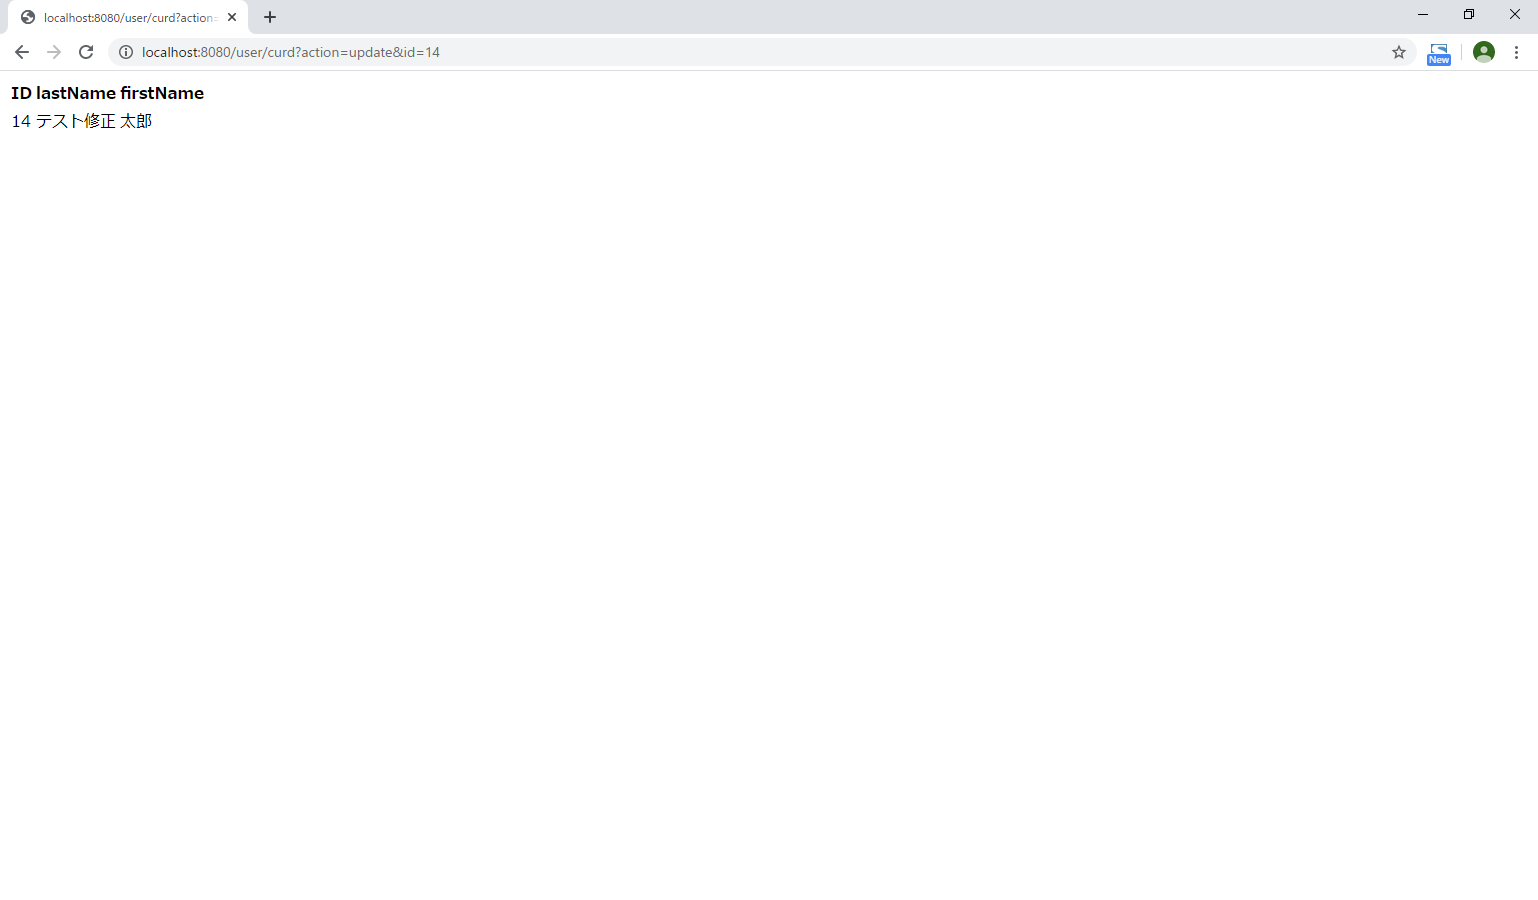
続いて更新の確認です。
http://localhost:8080/user/curd?action=update&id=14
※「14」については、登録の確認時に画面に表示されている「ID」を指定してください
「テスト太郎」が「テスト修正太郎」に更新されたため。「テスト修正太郎」と表示されます。
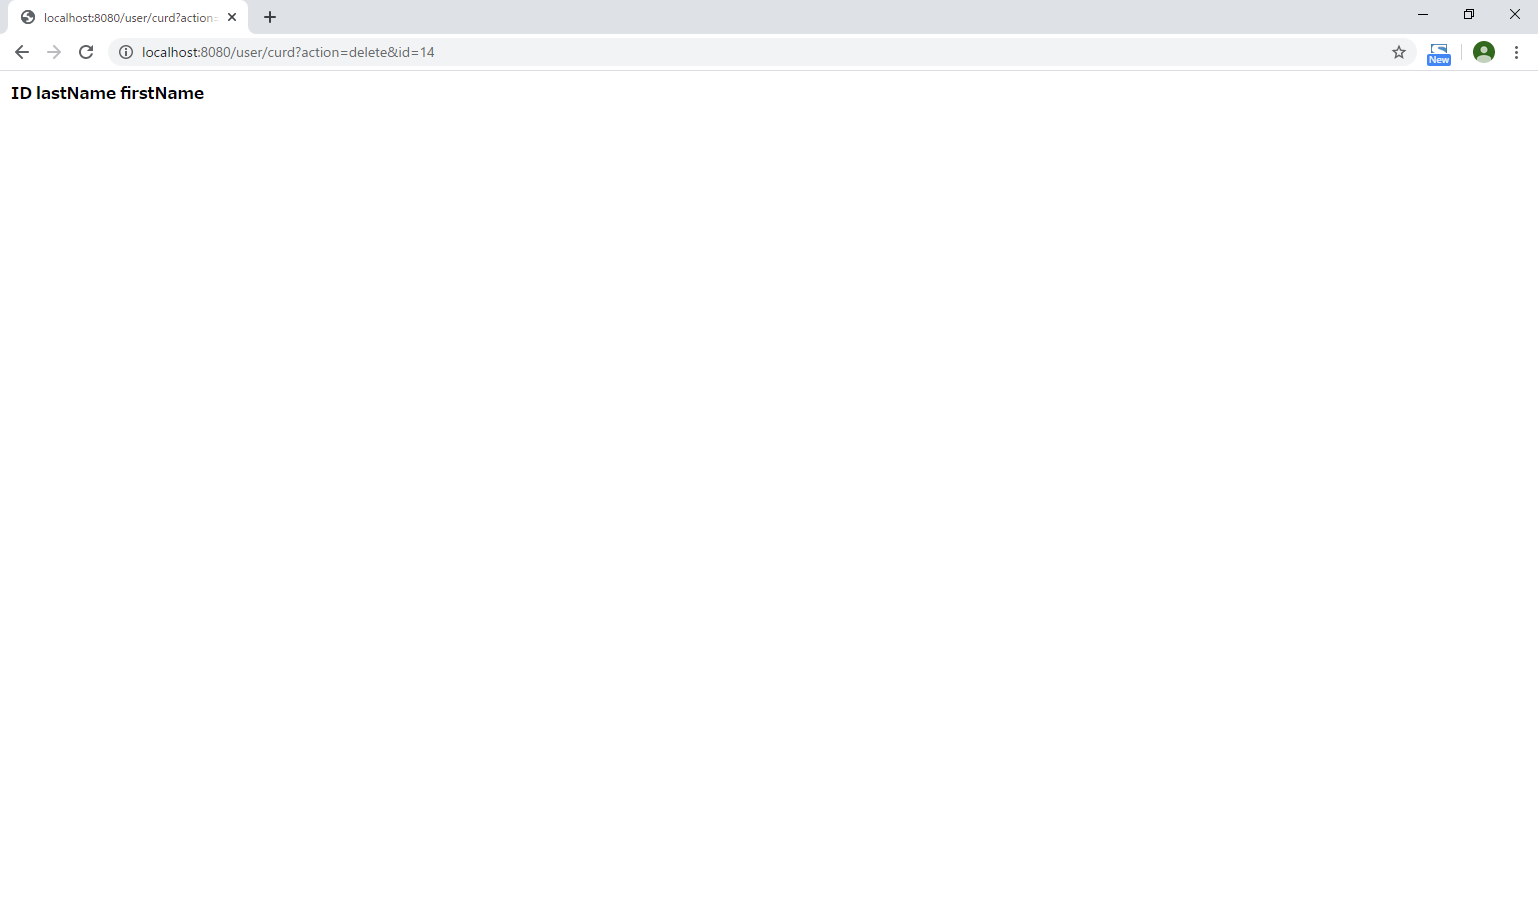
最後に削除の確認です。
http://localhost:8080/user/curd?action=delete&id=14
※「14」については、登録の確認時に画面に表示されている「ID」を指定してください
登録されていたデータ「テスト修正太郎」が削除されたため、何も表示されなくなります。