はじめに
以下に HAProxy を使った冗長化の記事がありますが、本記事では、冗長化されたロードバランサーに Nginx を使ったケースを紹介します。
本記事の構成
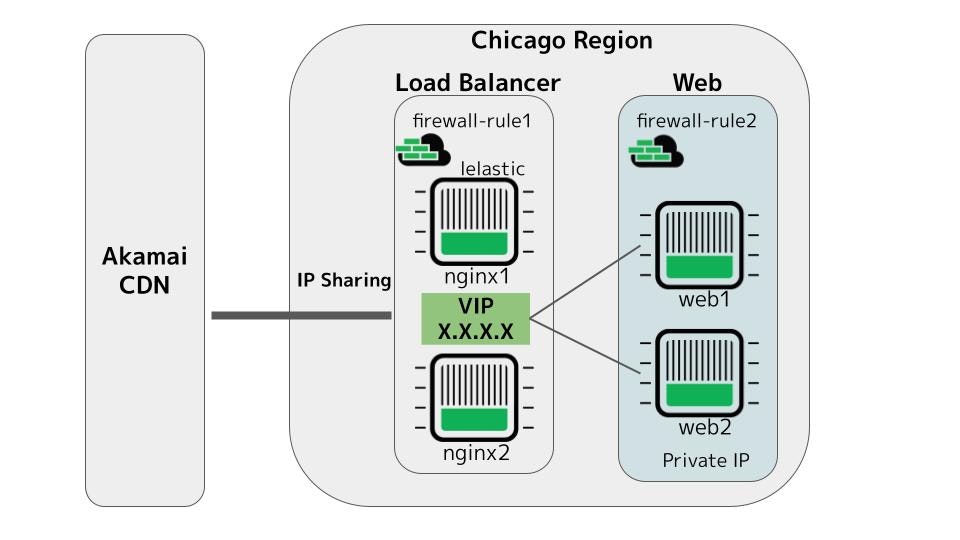
- IP Sharing がサポートされている Chicago Region を利用
- Linode インスタンスの Distribution は Ubuntu 22.04 LTS で構成
- Nginx が動くロードバランサー層と Web サーバが動く Web 層を構成
- Nginx をロードバランサーとして構成
- 2 台の Nginx サーバーの Public IP をIP Sharingにて Active/Standby 構成
- Web 層は 2 台構成。Web 層も Nginx で構成。
- ロードバランサー層と Web 層は Private IP で接続
- Nginx サーバーは証明書を取得し、TLS にてクライアントから通信を処理
- 負荷分散方式はラウンドロビン、および Nginx の
ip_hash機能でバランシング (stickyは未使用) - それぞれの Linode インスタンスに Cloud Firewall を適用
- IP Sharing は
lelasticで構成 - (オプション)AkamaiのWeb Secuirty/CDNサービス(Akamai Connected Cloud)を適用の際、Cloud Firewall へ Site Shield の IP アドレスリストを適用
/etc/hosts
XXX.XXX.XXX.1  ord-nginx1 # Loadbalancer 1
XXX.XXX.XXX.2  ord-nginx2 # Loadbalancer 2
XXX.XXX.XXX.119  ord-nginx # Shared IP for Loadbalancer 1/2
192.XXX.XXX.101	ord-web1  # Web 1 Private IP
192.XXX.XXX.102	ord-web2  # Web 2 Private IP
IP Sharing
IP Sharing は Akamai が提供するクラウドで IP フェールオーバーを実現するための重要な機能です。詳細については以下の記事を参照してください。
簡単にいうと、Public IP に対してのフェールオーバーは二通りあって、執筆時点で Tokyo は旧方式である ARP 方式をサポートし、他の多くのサイトでは新方式である BGP 方式をサポートしています。Tokyo は Network がアップグレードされる予定で、いずれ BGP 方式になります。それぞれのデータセンターの対応状況については下記のページを参照してください。
本記事では、BGP に対応しているデータセンターを使ってフェールオーバーの方法を説明します。
Web1 の作成
最初に基本となるインスタンスを作成します。後ほど Private IP を使いますので、作成時に Private IP を作成します。
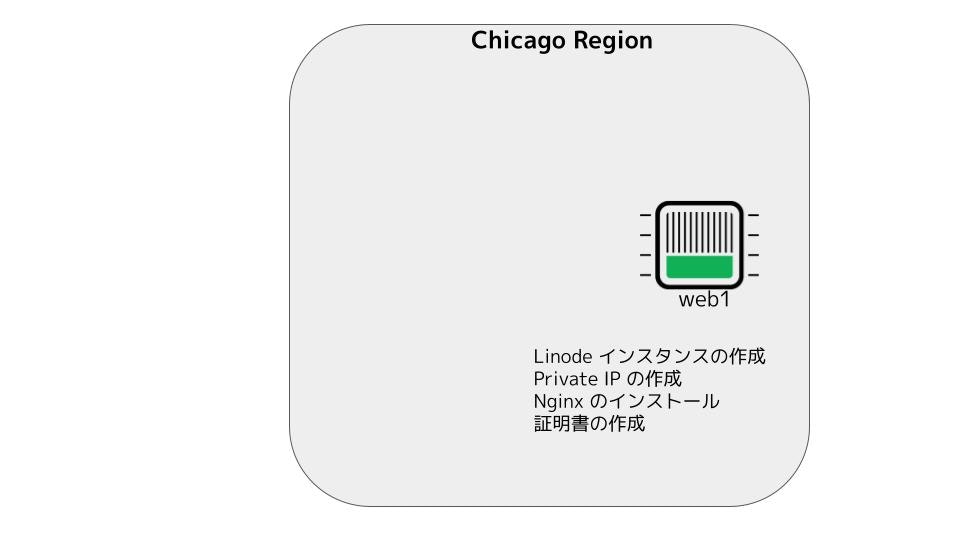
Private IP は後からでも追加できます。
以下のページを参照しながらベーシックな構成を作成します。
バイナリについては、一番容易な A pre-built binary from your Linux distribution’s repositories を使います。
apt install nginx
セッションスティッキーのstickey を使う場合、ソースからコンパイルしてください。
ord-nginx1:~# nginx -v
nginx version: nginx/1.18.0 (Ubuntu)
動作確認をします。
ord-nginx1 # curl -I 127.0.0.1
HTTP/1.1 200 OK
Server: nginx/1.18.0 (Ubuntu)
Date: Fri, 21 Jul 2023 09:18:32 GMT
Content-Type: text/html
Content-Length: 612
Last-Modified: Fri, 21 Jul 2023 05:22:40 GMT
Connection: keep-alive
ETag: "64ba1620-264"
Accept-Ranges: bytes

コンフィグファイル は /etc/nginx/nginx.conf、Document Root は /var/www/html/ になります。
TLS の設定
以下のページに TLS の設定方法が書かれています。
今回は、以下のページの手順で certbot を使って作成します。
Linux 内で UFW を導入
後に Cloud Firewall を使ってより詳細に制御しますが、Linux インスタンス内でも設定します。。
sudo apt update
sudo apt install ufw
sudo ufw allow ssh
sudo ufw allow http
sudo ufw allow https
sudo ufw enable
snapd のインストール
パッケージマネージャーの snap をインストールします。この後導入する certbot は snap でパッケージ化されています。
apt install snapd
snap install core
snap refresh core
Certbot のインストール
sudo apt remove certbot
sudo snap install --classic certbot
sudo ln -s /snap/bin/certbot /usr/bin/certbot
Certbot を使って TLS/SSL Certificate 証明書を作成
以下のコマンドを使うと Nginx のコンフィグも自動的に設定してくれるので便利です。
certbot --nginx
いくつか入力が必要になります。以下は入力例になります。
ord-nginx1# certbot --nginx
Saving debug log to /var/log/letsencrypt/letsencrypt.log
Enter email address (used for urgent renewal and security notices)
 (Enter 'c' to cancel): {my_account}@foo.com

- - - - - - - - - - - - - - - - - - - - - - - - - - - - - - - - - - - - - - - -
Please read the Terms of Service at
https://letsencrypt.org/documents/LE-SA-v1.3-September-21-2022.pdf. You must
agree in order to register with the ACME server. Do you agree?
- - - - - - - - - - - - - - - - - - - - - - - - - - - - - - - - - - - - - - - -
(Y)es/(N)o: Y

- - - - - - - - - - - - - - - - - - - - - - - - - - - - - - - - - - - - - - - -
Would you be willing, once your first certificate is successfully issued, to
share your email address with the Electronic Frontier Foundation, a founding
partner of the Let's Encrypt project and the non-profit organization that
develops Certbot? We'd like to send you email about our work encrypting the web,
EFF news, campaigns, and ways to support digital freedom.
- - - - - - - - - - - - - - - - - - - - - - - - - - - - - - - - - - - - - - - -
(Y)es/(N)o: Y
Account registered.
Please enter the domain name(s) you would like on your certificate (comma and/or
space separated) (Enter 'c' to cancel): nginx-ha.{mydoman_name}
Requesting a certificate for nginx-ha.{mydomain_name}

Successfully received certificate.
Certificate is saved at: /etc/letsencrypt/live/nginx-ha.{mydomain_name}/fullchain.pem
Key is saved at:         /etc/letsencrypt/live/nginx-ha.{mydomain_name}/privkey.pem
This certificate expires on 2023-10-19.
These files will be updated when the certificate renews.
Certbot has set up a scheduled task to automatically renew this certificate in the background.

Deploying certificate
Successfully deployed certificate for nginx-ha.{mydomain_name} to /etc/nginx/sites-enabled/default
Congratulations! You have successfully enabled HTTPS on https://nginx-ha.{mydoman_name}

- - - - - - - - - - - - - - - - - - - - - - - - - - - - - - - - - - - - - - - -
If you like Certbot, please consider supporting our work by:
 * Donating to ISRG / Let's Encrypt:   https://letsencrypt.org/donate
 * Donating to EFF:                    https://eff.org/donate-le
- - - - - - - - - - - - - - - - - - - - - - - - - - - - - - - - - - - - - -
Let's Encrypt の証明書がどのように作成されたか確認します。
ord-nginx1# cat /etc/letsencrypt/live/README
This directory contains your keys and certificates.

`[cert name]/privkey.pem`  : the private key for your certificate.
`[cert name]/fullchain.pem`: the certificate file used in most server software.
`[cert name]/chain.pem`    : used for OCSP stapling in Nginx >=1.3.7.
`[cert name]/cert.pem`     : will break many server configurations, and should not be used
                 without reading further documentation (see link below).

WARNING: DO NOT MOVE OR RENAME THESE FILES!
         Certbot expects these files to remain in this location in order
         to function properly!

We recommend not moving these files. For more information, see the Certbot
User Guide at https://certbot.eff.org/docs/using.html#where-are-my-certificates.
ブラウザでアクセスすると証明書のエラーはなくなっています。

Web2 の作成

Web1 を Linode の Clone 機能で作成します。作成後、ホスト名を変更します。他に実施することはありません。
hostnamectl set-hostname ord-web2
Nginx1 (LoadBalancer) の作成

Web1 で作成した証明書情報をそのまま使うことを想定し、Web1 を Linode の Clone 機能で作成します。ホスト名を変更します。
インスタンスのサイズが異なるときは、クローン時に選択します。
hostnamectl set-hostname ord-nginx1
ord-nginx1# cat /etc/nginx/nginx.conf
user www-data;
worker_processes auto;
pid /run/nginx.pid;
include /etc/nginx/modules-enabled/*.conf;

events {
	worker_connections 768;
	# multi_accept on;
}

http {
	upstream sample_app {
        ip_hash;                # Forwarding based on an IP address
		server 192.XXX.XXX.101 max_fails=2 fail_timeout=10s;# ord-web1 Private
		server 192.XXX.XXX.102 max_fails=2 fail_timeout=10s; # ord-web2 Private
	}
	server {
		server_name nginx-ha.{mydomain_name};
		listen 443;
		ssl_certificate	/etc/letsencrypt/live/nginx-ha.{mydomain_name}/fullchain.pem;
		ssl_certificate_key /etc/letsencrypt/live/nginx-ha.{mydomain_name}/privkey.pem;
		location / {
			if_modified_since off;
			expires off;
			proxy_pass http://sample_app;
		}
	}

	##
	# Basic Settings
	##

	sendfile on;
	tcp_nopush on;
	types_hash_max_size 2048;
	# server_tokens off;

	# server_names_hash_bucket_size 64;
	# server_name_in_redirect off;

	include /etc/nginx/mime.types;
	default_type application/octet-stream;

	##
	# SSL Settings
	##

	ssl_protocols TLSv1 TLSv1.1 TLSv1.2 TLSv1.3; # Dropping SSLv3, ref: POODLE
	ssl_prefer_server_ciphers on;

	##
	# Logging Settings
	##

	access_log /var/log/nginx/access.log;
	error_log /var/log/nginx/error.log;

	##
	# Gzip Settings
	##

	gzip on;

	# gzip_vary on;
	# gzip_proxied any;
	# gzip_comp_level 6;
	# gzip_buffers 16 8k;
	# gzip_http_version 1.1;
	# gzip_types text/plain text/css application/json application/javascript text/xml application/xml application/xml+rss text/javascript;

	##
	# Virtual Host Configs
	##

	include /etc/nginx/conf.d/*.conf;
	include /etc/nginx/sites-enabled/*;
}
Nginx2 (LoadBalancer) の作成

Nginx1 をクローンして Nginx2 を作成し、ホスト名を変更します。
hostnamectl set-hostname ord-nginx2
Nginx1/Nginx2 の設定

nginx.conf が上記のように動作するかを確認します。
upstream と server の紐づけが正しいことが重要です。upstream のシンプルな設定は次のようになります。2つのフォワード先に均等にロードバランシングします。Public IP は使わずに Private IP を使うようにしています。
	upstream sample_app {
		server 192.XXX.XXX.101
		server 192.XXX.XXX.102
	}
server では proxy_pass で指定する sample_app の文字列が upstream の文字列と設定とリンクすることが重要です。if_modified_since off;と expires off; はテスト目的でいれており、ブラウザがキャッシュしないようにしています。
server {
		server_name nginx-ha.{mydomain_name};
		listen 443;
		ssl_certificate	/etc/letsencrypt/live/nginx-ha.{mydomain_name}/fullchain.pem;
		ssl_certificate_key /etc/letsencrypt/live/nginx-ha.{mydomain_name}/privkey.pem;
		location / {
			if_modified_since off;
			expires off;
            proxy_connect_timeout 10;
			proxy_pass http://sample_app;
		}
	}
インデックスファイルの変更
どちらの Web サーバーに誘導されたかを確認しやすくするために、ドキュメントルートのインデックスファイルを変更します。
Web1
/var/www/html/ 以下のインデックスファイルを編集します。

Web2
Web2 側も同様に変更します。

IP Sharing の設定

以下の記事を参考にして、IP Sharing を設定します。
lo デバイスの事前確認
IP Sharing は lo デバイスに共通の IP アドレスを設定します。設定前の状態を確認します。ループバックアドレスのみが登録されています。
Nginx1
ord-nginx1 # ip -4 a show dev lo
1: lo: <LOOPBACK,UP,LOWER_UP> mtu 65536 qdisc noqueue state UNKNOWN group default qlen 1000
    inet 127.0.0.1/8 scope host lo
       valid_lft forever preferred_lft forever
Nginx2
ord-nginx2 # ip -4 a show dev lo
1: lo: <LOOPBACK,UP,LOWER_UP> mtu 65536 qdisc noqueue state UNKNOWN group default qlen 1000
    inet 127.0.0.1/8 scope host lo
       valid_lft forever preferred_lft forever
netplan のコンフィグで lo に Shared IP を割り当て
# This file describes the network interfaces available on your system
# For more information, see netplan(5).
network:
  version: 2
  renderer: networkd
  ethernets:
    eth0:
      dhcp4: yes
    lo:  # ここから追加します。
      match:
        name: lo
      addresses:
        - XXX.XXX.XXX.119/32 # /32 を設定します。
ord-nginx1 # netplan apply
ord-nginx2 # netplan apply
lo デバイスの設定再確認
Nginx1
ord-nginx1 # ip -4 a show dev lo
1: lo: <LOOPBACK,UP,LOWER_UP> mtu 65536 qdisc noqueue state UNKNOWN group default qlen 1000
    inet 127.0.0.1/8 scope host lo
       valid_lft forever preferred_lft forever
    inet XXX.XXX.XXX.119/32 scope global lo
       valid_lft forever preferred_lft forever
Nginx2
ord-nginx2 # ip -4 a show dev lo
1: lo: <LOOPBACK,UP,LOWER_UP> mtu 65536 qdisc noqueue state UNKNOWN group default qlen 1000
    inet 127.0.0.1/8 scope host lo
       valid_lft forever preferred_lft forever
    inet XXX.XXX.XXX.119/32 scope global lo
       valid_lft forever preferred_lft forever
Lelastic の導入
Lelastic のインストール
version=v0.0.6
curl -LO https://github.com/linode/lelastic/releases/download/$version/lelastic.gz
gunzip lelastic.gz
chmod 755 lelastic
sudo mv lelastic /usr/local/bin/
/etc/systemd/system/lelastic.service
Nginx1 (primary として動作)
[Unit]
Description= Lelastic
After=network-online.target
Wants=network-online.target

[Service]
Type=simple
ExecStart=/usr/local/bin/lelastic -dcid 18 -primary &
ExecReload=/bin/kill -s HUP $MAINPID

[Install]
WantedBy=multi-user.target
Chicago のデータセンターを使っているので 18 を設定しています。
Nginx2 (secondary として動作)
[Unit]
Description= Lelastic
After=network-online.target
Wants=network-online.target

[Service]
Type=simple
ExecStart=/usr/local/bin/lelastic -dcid 18 -secondary &
ExecReload=/bin/kill -s HUP $MAINPID

[Install]
WantedBy=multi-user.target
共通設定
sudo chmod 644 /etc/systemd/system/lelastic.service
sudo systemctl start lelastic
sudo systemctl enable lelastic
Nginx1/2 のネットワーク
Public IP に加えて Private IP が登録されていることを確認します。
/etc/systemd/network/05-eth0.network
[Match]
Name=eth0

[Network]
DHCP=no
DNS=172.232.0.15 172.232.0.16 172.232.0.19

Domains=members.linode.com
IPv6PrivacyExtensions=false

Gateway=XXX.XXX.XXX.1
Address=XXX.XXX.XXX.11/24 # Public IP address
Address=192.YYY.YYY.11/17 # Private IP address
DNS サーバーで CNAME 先を変更
証明書を Web 層のサーバーで取得したので、最終的にはロードバランシング層で設定した Shared IP に誘導します。
before
nginx-ha.{mydomain_name}.	300	IN	CNAME	XXX-XXX-XXX-1.ip.linodeusercontent.com.
XXX-XXX-XXX-1.ip.linodeusercontent.com. 85996 IN A XXX.XXX.XXX.1
After
nginx-ha.{mydomain_name}.	300	IN	CNAME	XXX-XXX-XXX-10.ip.linodeusercontent.com.
XXX-XXX-XXX-10.ip.linodeusercontent.com.	21600 IN A XXX.XXX.XXX.10
Aレコードで直接 IP を指定しても構いません。
Cloud Firewall の設定
ロードバランサー側の設定

Public Internet から必要なポートのみを公開し、それ以外はデフォルトでドロップさせます。
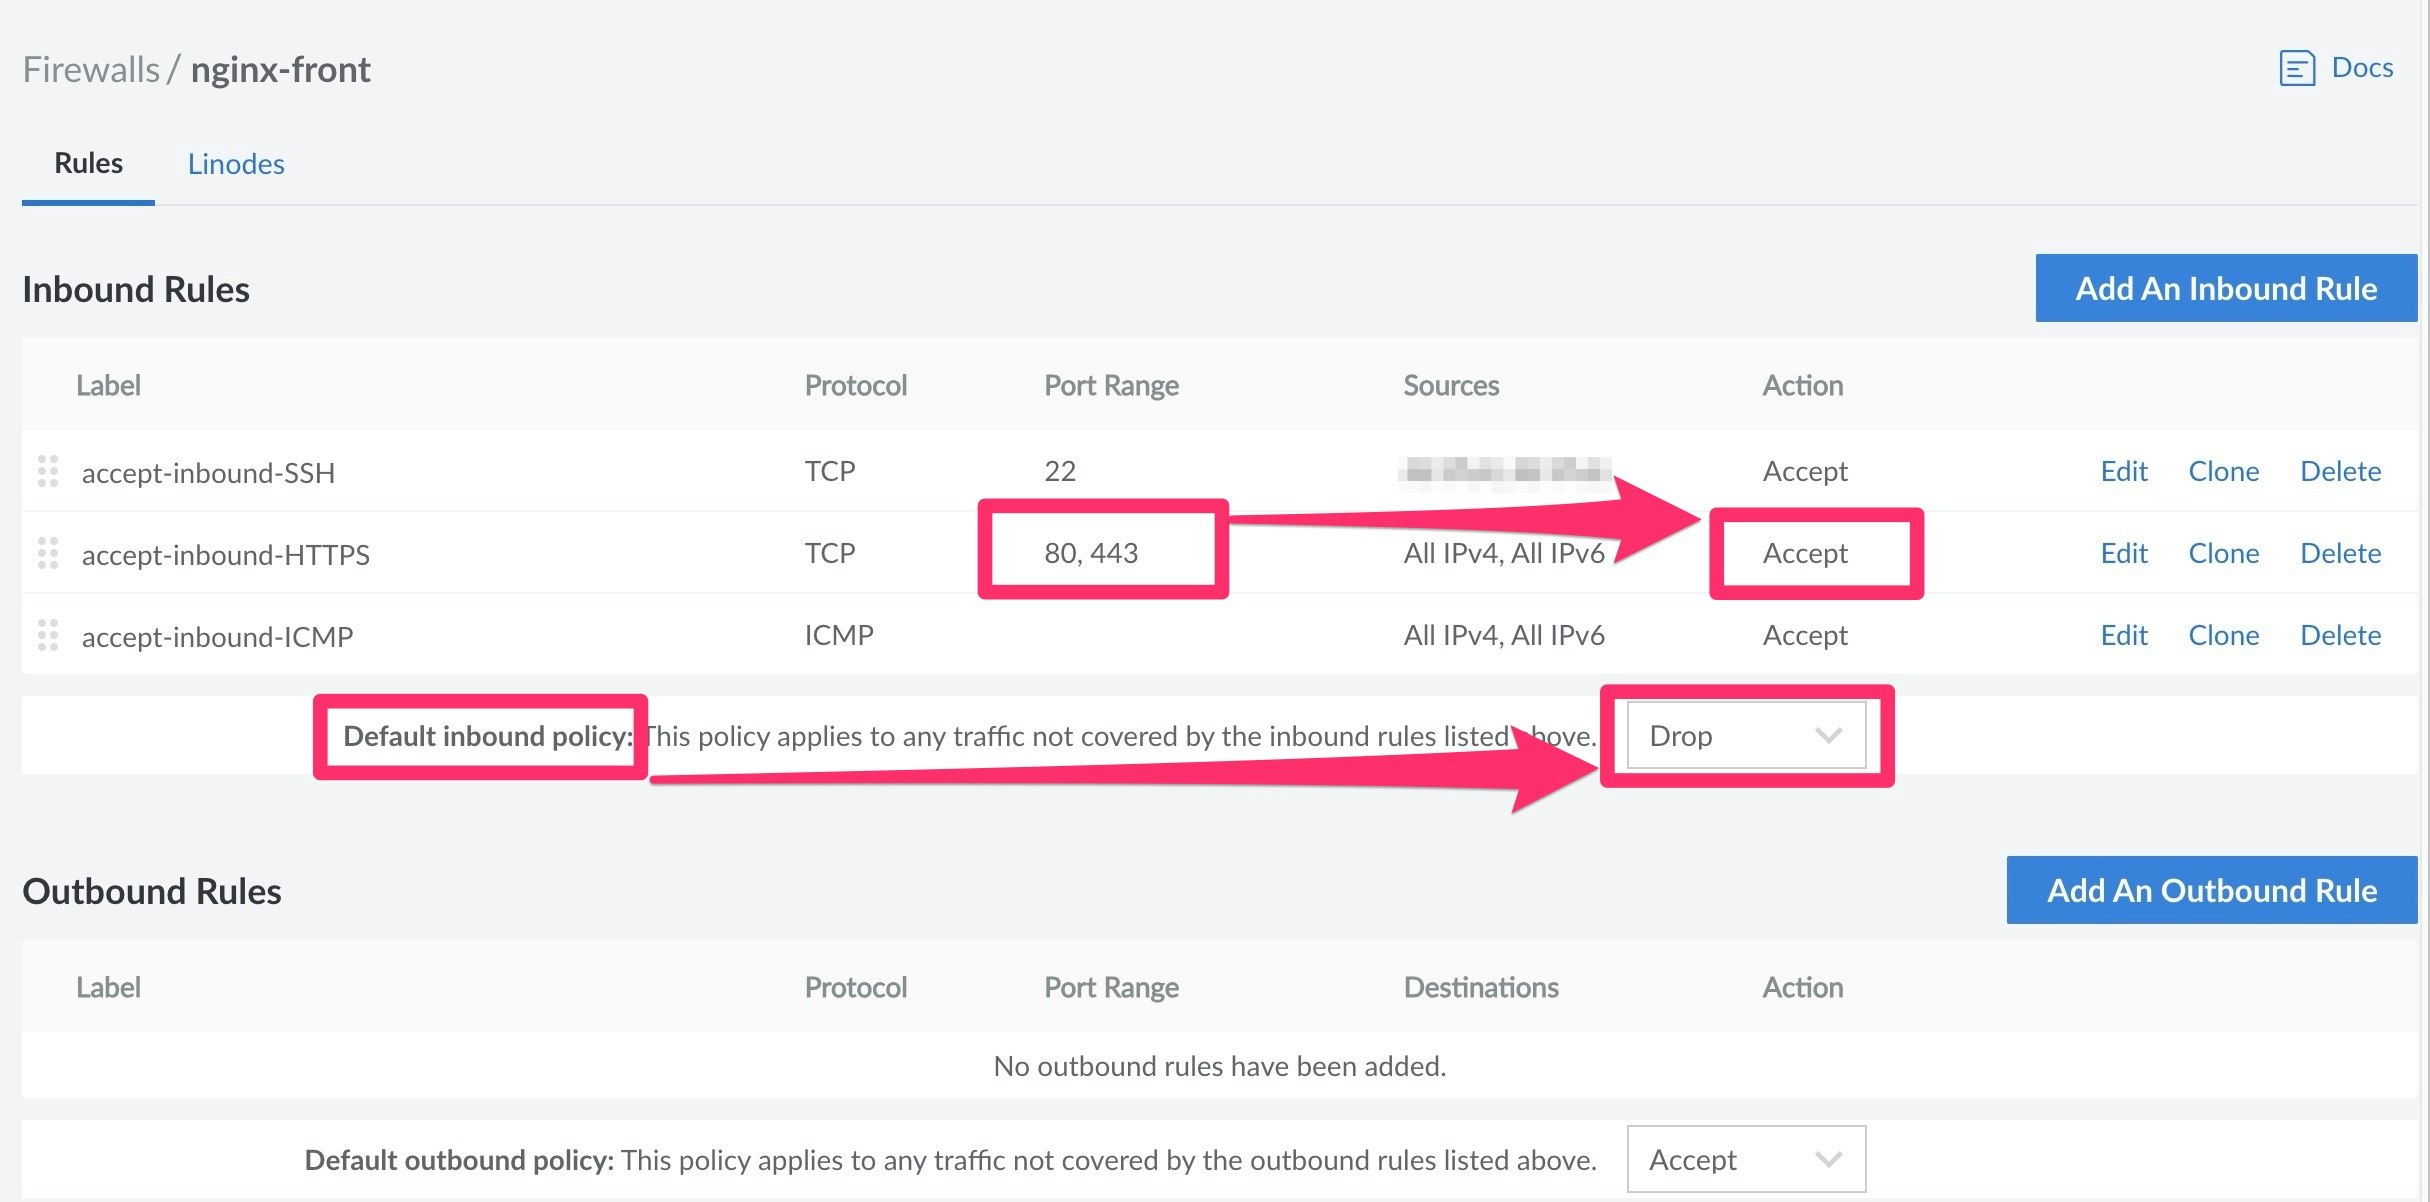
設定を Linode のインスタンスに割り当てます。ロードバランサー層の2つのインスタンスを登録します。

Web 層側の設定

本例では 2 つのロードバランサーの Private IP のみを通す設定をします。ロードバランサーの Public IP は明示的にドロップするようにしています。

設定内容を Linode のインスタンスに割り当てます。Web 層の2つのインスタンスを割り当てています。

Site Shield の設定 (オプション)
ロードバランサー側の設定になります。

Akamai セキュリティ製品を導入している場合、今回紹介した構成を Akamai CDN のオリジンとしてみなすことができます。そのときのオリジンの IP はここまでで設定した Shared IP となります。Site Shiled と、Cloud Firewallを使えば、アカマイのネットワークをソースIPとする通信以外の通信を遮断し、オリジンへの直接攻撃を防止できます。Site Shield の IP を取得した後、ロードバランサー側の Cloud Firewall 設定で制御することになります。
テスト
Web1 の Nginx を停止

ord-web1# systemctl stop nginx
Chrome ブラウザは Web2 に誘導されています。

Chrome ブラウザの Developer Tool で確認すると、ブラウザは Nginx(ロードバランサー)の Shared IP に接続しています。Web1 の Nginx を止めても Primary として動作しているロードバランサー経由で Web2 に接続しています。

Web1 の Nginx を再開します。
ord-web1# systemctl start nginx
Chrome ブラウザは Web1 に接続します。Web1 が動いている限りでは、Web1 に接続されています。これは nginx.conf の ip_hash; の設定により、クライアントの IP によってロードバランシングされているからです。この設定を無効にすれば、毎回ラウンドロビンで Web1/Web2 のインデックスが交互に表示されます。
次に Web1 のサーバーを Power off します。proxy_connect_timeout 10; の設定が有効になって 10 秒タイムアウトしたあと、Web2 に誘導されます。proxy_connect_timeout のデフォルト値は 60 sec なので、設定がないと 1 分間待たされます。
Web1 のサーバーを立ち上げます。
Web1/Web2 でアクセスログを表示します。
tail -f /var/log/nginx/access.log
ログでは Nginx1 のプライベート IP からアクセスがありました。
192.XXX.XXX.101 - - [24/Jul/2023:12:34:41 +0000] "GET / HTTP/1.0" 200 629 "-" "Mozilla/5.0 (iPhone; CPU iPhone OS 13_2_3 like Mac OS X) AppleWebKit/605.1.15 (KHTML, like Gecko) Version/13.0.3 Mobile/15E148 Safari/604.1"
Nginx1 の停止

この状態で、ロードバランサーの Nginx1 を Power Off します。
ダウンしたことを確認した後、再度 Chrome ブラウザでアクセスします。ログでは Nginx2 のプライベート IP からアクセスがありました。
192.XXX.XXX.102 - - [24/Jul/2023:12:35:36 +0000] "GET / HTTP/1.0" 200 629 "-" "Mozilla/5.0 (iPhone; CPU iPhone OS 13_2_3 like Mac OS X) AppleWebKit/605.1.15 (KHTML, like Gecko) Version/13.0.3 Mobile/15E148 Safari/604.1"
Nginx をブートして、正しく動作していればテストは終了です。
まとめ
Linode インスタンスの前に Nginx をロードバランサーとして配置し、IP Sharing を使って冗長化できることを説明しました。また、Akamai セキュリティ製品を導入している場合を想定した Cloud Firewall の設定例も紹介しました。