いろいろ実験するためのリモートサーバーを作りたくなったので、Terraform by HashiCorp を使って DigitalOcean にサーバー (droplet) をサクッと作りました。
以下、そのチュートリアルです。
実行環境
- Ubuntu 14.04 64bit (on Vagrant)
- ※最初は Bash on Windows で試していましたが、どうしても terraform コマンドが失敗して動きませんでした…
- Terraform 0.8.6
Terraform のインストール
Download Terraform - Terraform by HashiCorp
上記URLから、自分のプラットフォームに合ったバージョンの Terraform をダウンロードします。今回は Ubuntu 14.04 (64bit) を使っているので、 "Linux 64-bit" を選びました。
$ wget https://releases.hashicorp.com/terraform/0.8.6/terraform_0.8.6_linux_amd64.zip
$ mkdir -p ~/opt/terraform
$ unzip terraform_0.8.6_linux_amd64.zip -d ~/opt/terraform/
$ echo "export PATH=$PATH:~/opt/terraform" >> ~/.bashrc
$ source ~/.bashrc

$ terraform version
# => "Terraform v0.8.6" と表示されればOK
ついでに、DigitalOcean からのレスポンス (JSON) を見やすくするため、jq をインストールしておきます。
$ sudo curl -o /usr/local/bin/jq -L https://github.com/stedolan/jq/releases/download/jq-1.5/jq-linux64 && sudo chmod +x /usr/local/bin/jq
Digital Ocean 側セットアップ
Digital Ocean に SSH 公開鍵を登録する
DigitalOcean の API を利用するために、Terraform を実行するマシンの公開鍵を予め DigitalOcean に登録しておく必要があります。
まずは公開鍵を作成し、コピーしましょう。
$ ssh-keygen -t rsa
# 対話プロンプトで聞かれる答えは全てそのままで Enter

$ cat ~/.ssh/id_rsa.pub
# 出力結果をコピーする
続いて公開鍵を DigitalOcean に登録します。手順は以下の通り。
- DigitalOcean 管理画面右上のアバターから "Settings" をクリック
- "Security" をクリック
- "Add SSH Key" をクリック
- 先ほどコピーした公開鍵に適当な名前を付けて保存

Digital Ocean API トークンを作る
続いて、API トークンを発行します。
- メニューの "API" をクリック
- "Generate New Token" をクリックし、適当な名前を入れてトークンを作成
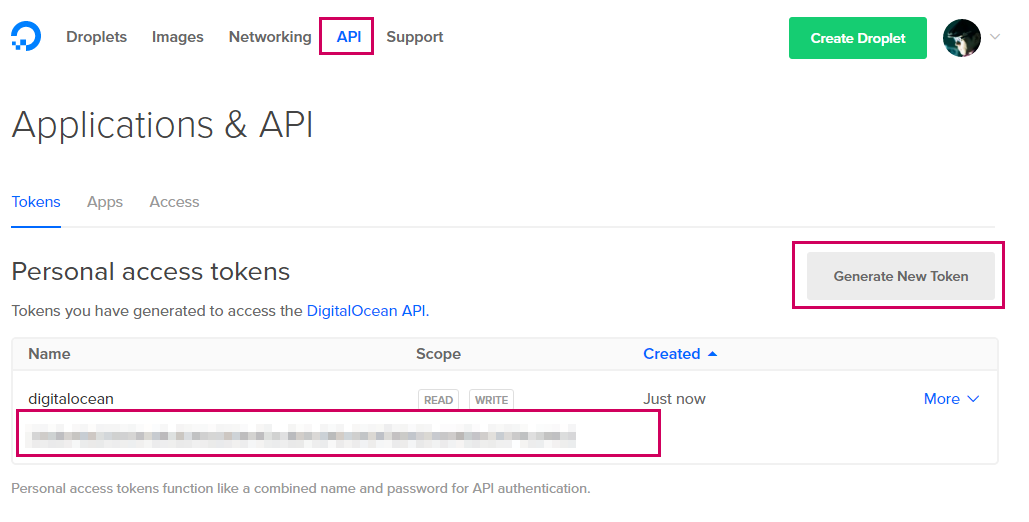
このトークンをコピーしておいてください。後で tf ファイルに書きます。
SSH公開鍵に対応する ID を取得する
次に、この公開鍵に対応する DigitalOcean 側の ID を取得します。そのために、まずは公開鍵のSSHフィンガープリントを確認します。
$ ssh-keygen -lf ~/.ssh/id_rsa.pub | awk '{print $2}'
1a:7c:d5:6c:bf:d6:cf:93:49:39:66:cc:dc:ed:c5:04
これに対応するDigitalOcean側の ID を取得します。
$ curl -X GET -H "Content-Type: application/json" -H "Authorization: Bearer <上で発行したAPIトークン>" "https://api.digitalocean.com/v2/account/keys" | jq .

{
  "ssh_keys": [
    {
      "id": 1685442,   // <- この値をメモしておく
      "fingerprint": "1a:7c:d5:6c:bf:d6:cf:93:49:39:66:cc:dc:ed:c5:04",
      "public_key": "...",
      "name": "mojamoja"
    },
    ...
  ]
}
これも後ほど使うので、コピーしておいてください。
Terraform のセットアップと実行
Terraform テンプレートを作る
main.tf というファイルを以下の内容で作ります。
# Configure the DigitalOcean Provider
provider "digitalocean" {
  token = "<上で発行したAPIトークン>"
}

resource "digitalocean_droplet" "web" {
  image = "ubuntu-14-04-x64"
  name = "web-1"
  region = "sfo1"
  size = "512mb"
  ssh_keys = [1685442]   # <- 公開鍵に対応するID
}
terraform plan で作成予定のサーバーを確認する
いきなりサーバー (droplet) を作るのは怖いので、最初に実験しましょう。
$ terraform plan
以下のように、作成される予定のサーバーの情報が返ってくれば、設定は成功です。
+ digitalocean_droplet.web
    disk:                 "<computed>"
    image:                "ubuntu-14-04-x64"
    ipv4_address:         "<computed>"
    ipv4_address_private: "<computed>"
    ipv6_address:         "<computed>"
    ipv6_address_private: "<computed>"
    locked:               "<computed>"
    name:                 "web-1"
    region:               "sfo1"
    resize_disk:          "true"
    size:                 "512mb"
    ssh_keys.#:           "1"
    ssh_keys.0:           "6362450"
    status:               "<computed>"
    vcpus:                "<computed>"


Plan: 1 to add, 0 to change, 0 to destroy.
terraform apply で作成する
時は満ちました。サーバーを作成してみましょう。
$ terraform apply
しばらく作成に時間がかかります。最終的に以下のように出力されれば成功です。
digitalocean_droplet.web: Creating...
  disk:                 "" => "<computed>"
  image:                "" => "ubuntu-14-04-x64"
  ipv4_address:         "" => "<computed>"
  ipv4_address_private: "" => "<computed>"
  ipv6_address:         "" => "<computed>"
  ipv6_address_private: "" => "<computed>"
  locked:               "" => "<computed>"
  name:                 "" => "web-1"
  region:               "" => "sfo1"
  resize_disk:          "" => "true"
  size:                 "" => "512mb"
  ssh_keys.#:           "" => "1"
  ssh_keys.0:           "" => "6362450"
  status:               "" => "<computed>"
  vcpus:                "" => "<computed>"
digitalocean_droplet.web: Still creating... (10s elapsed)
digitalocean_droplet.web: Still creating... (20s elapsed)
digitalocean_droplet.web: Still creating... (30s elapsed)
digitalocean_droplet.web: Creation complete

Apply complete! Resources: 1 added, 0 changed, 0 destroyed.

The state of your infrastructure has been saved to the path
below. This state is required to modify and destroy your
infrastructure, so keep it safe. To inspect the complete state
use the `terraform show` command.

State path: terraform.tfstate
管理画面でも無事に作成できていることが確認できます。
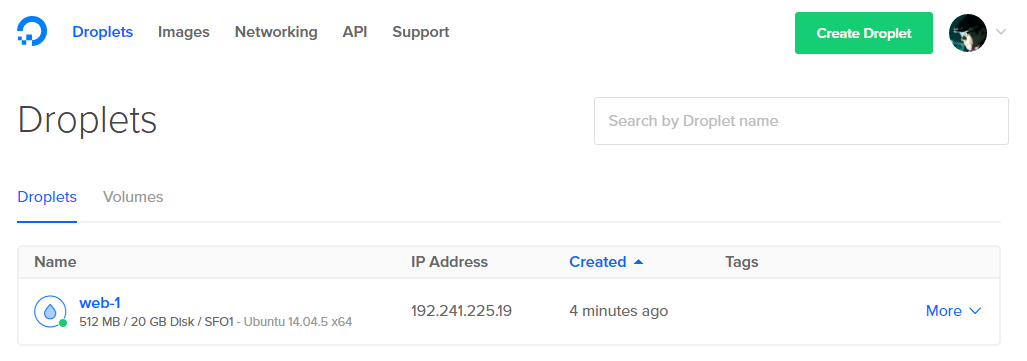
なお、公開鍵を使って作成したサーバーには、以下のように公開鍵を使ってログインできます。というかパスワードが発行されないので、ID/PW ではログインできません。
$ ssh -i ~/.ssh/id_rsa root@192.241.225.19
terraform show でサーバー情報を確認する
terraform show コマンドで、作成したサーバーの情報を確認できます。
$ terraform show

digitalocean_droplet.web:
  id = 39676265
  disk = 20
  image = ubuntu-14-04-x64
  ipv4_address = 192.241.225.19
  locked = false
  name = web-1
  region = sfo1
  resize_disk = true
  size = 512mb
  ssh_keys.# = 1
  ssh_keys.0 = 6362450
  status = active
  tags.# = 0
  vcpus = 1
terraform destroy でサーバーを削除する
実験は完了しました。サーバー費用が勿体無いので、削除しておきましょう。
なお、 terraform plan -destroy を叩くと、どのサーバーが削除されるか事前に確認できます。
$ terraform plan -destroy

...
digitalocean_droplet.web: Refreshing state... (ID: 39676265)
...

- digitalocean_droplet.web
実際に削除する時は terraform destroy で。今回は -force オプションを付けて、確認なしで強制削除します。
$ terraform destroy -force

digitalocean_droplet.web: Refreshing state... (ID: 39676265)
digitalocean_droplet.web: Destroying...
digitalocean_droplet.web: Still destroying... (10s elapsed)
digitalocean_droplet.web: Destruction complete

Destroy complete! Resources: 1 destroyed.
以上で完了です!
使用権ください
この記事がお役に立てたら、ぜひ https://m.do.co/c/30c30cfa4783 から DigitalOcean に登録してください。私に $25、あなたに $10 の使用権がもらえます ![]()