本記事の目的
本記事では、IBM Cloud上で提供される Cloud Pak for Data as a Service を対象に、
Watson Studio および Machine learning サービスを使用した Federated Learning 機能をAPIから利用する方法をご紹介します。
1. Federated Learning とは
さまざまな場所に存在するデータを直接共有することなく、共同でモデルをトレーニングするための手法です。
一般に、モデルの汎化性能を高めるために、十分な質と量のデータを確保することが重要です。
しかし、個々の組織だけでは、限られた質・量のデータしか保有していないユースケースがあります。
1つの解決策として、複数の組織が協業し、保有するデータを集め、1つのモデルをトレーニングする方法が考えらえます。
一方で、対象データの機密性が高い場合、複数の組織間でのデータそのものを移動したり共有したりすることは困難です。
このような場面で、Federated Learning が有用な可能性があります。
Federated Learningでは、データそのものではなく、データから学習した結果を集め、1つのモデルに統合します。
各組織は自環境で、保有データを使ってモデルをトレーニングし、結果のみを統合機能へ送信します。
統合機能は 集められた各組織のトレーニング結果を使用し、1つのモデルへ統合します。
このように、データそのものを共有することなく、共同でモデルを開発することができます。
2. CP4DaaS の Federated Learning 概要
Cloud Pak for Data as a Serviceでは、Federated Learningの機能を提供しています。
2021年11月に 一般提供が開始されており、Production用途での利用が可能です。
学習の仕組み
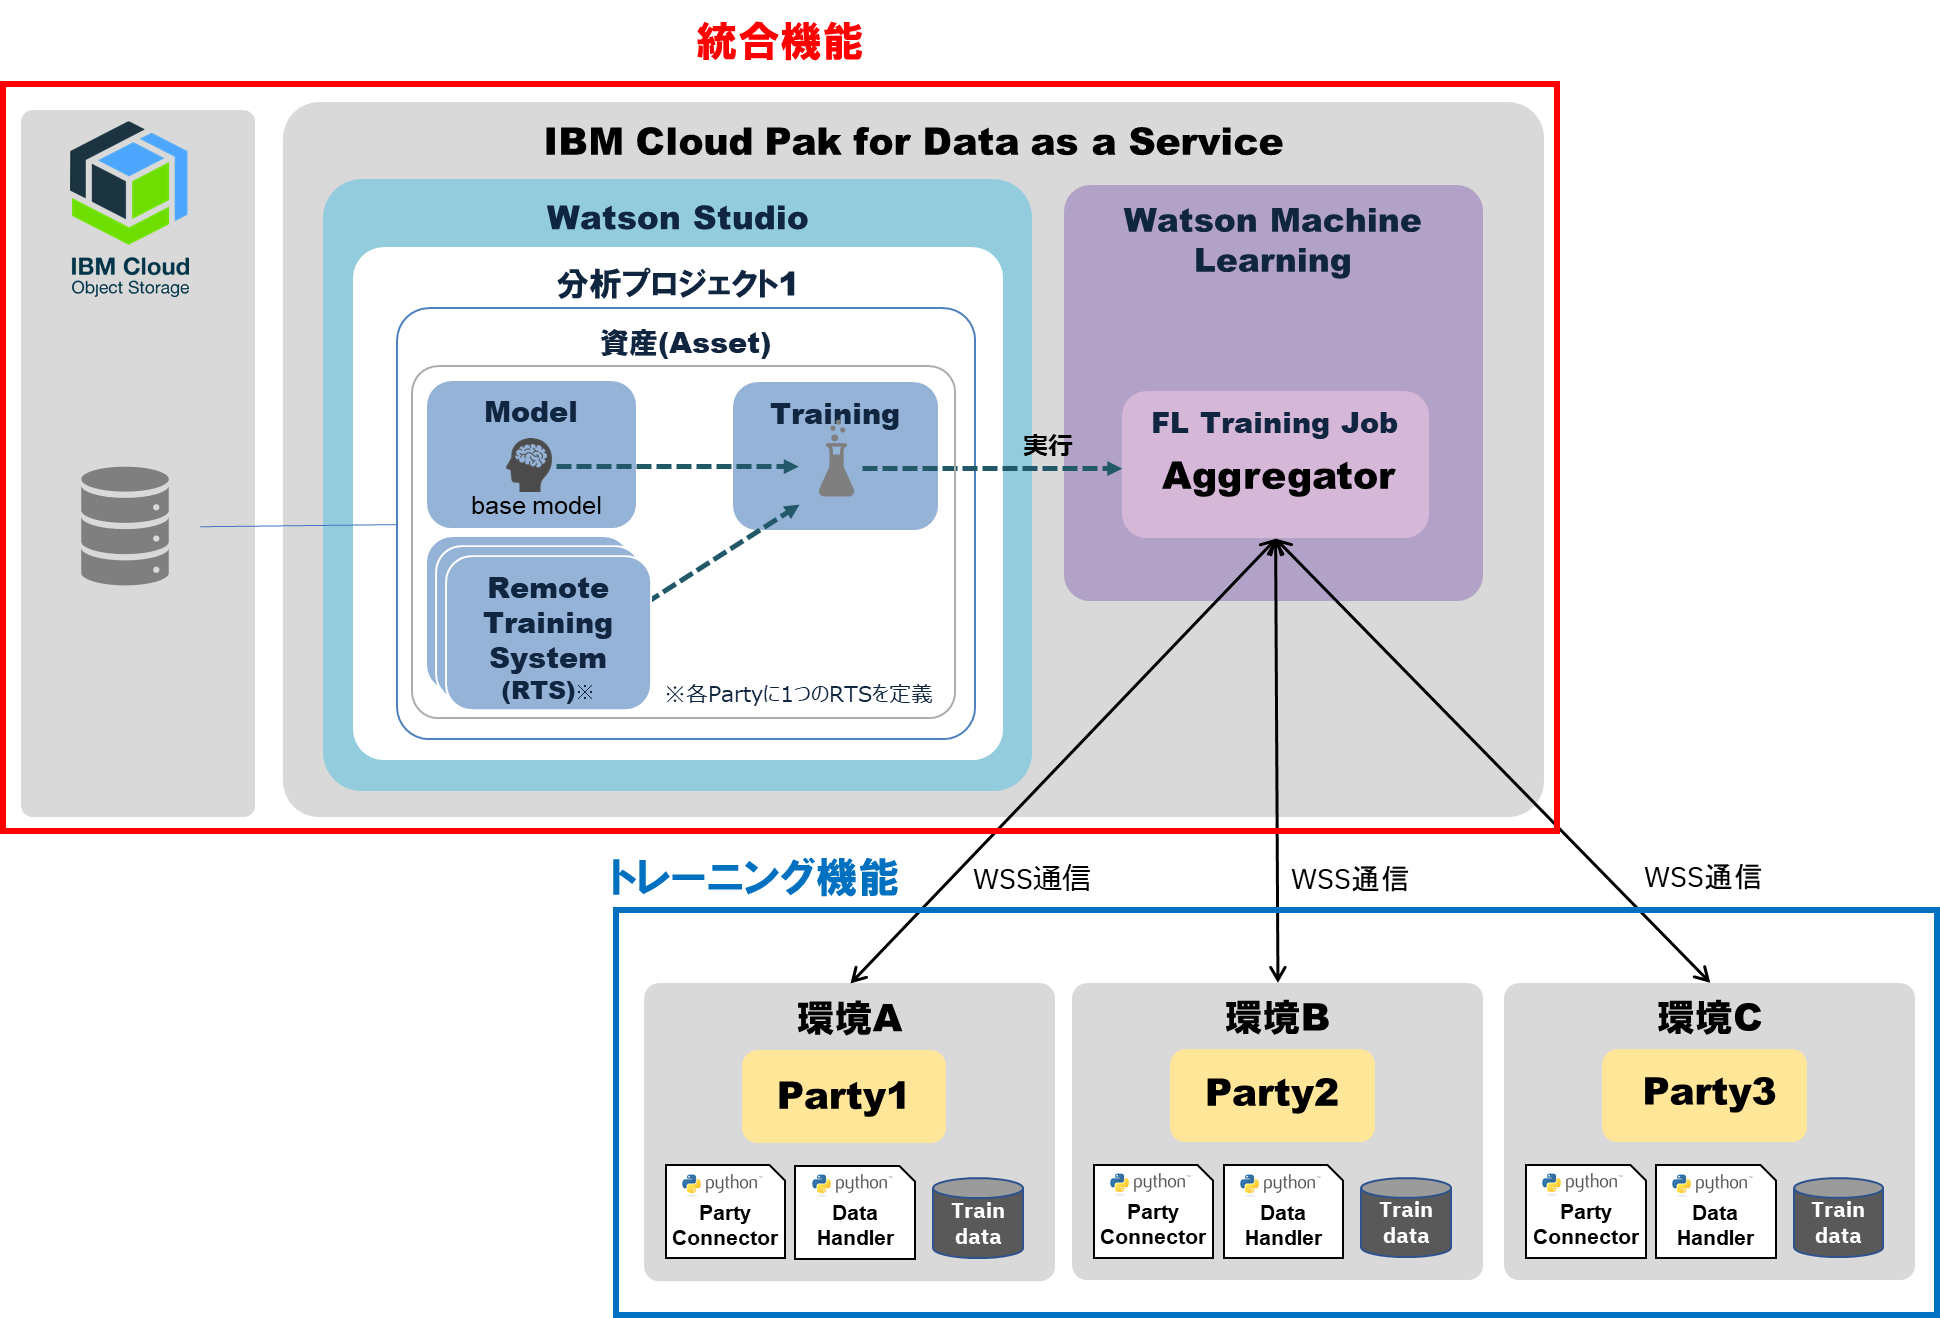
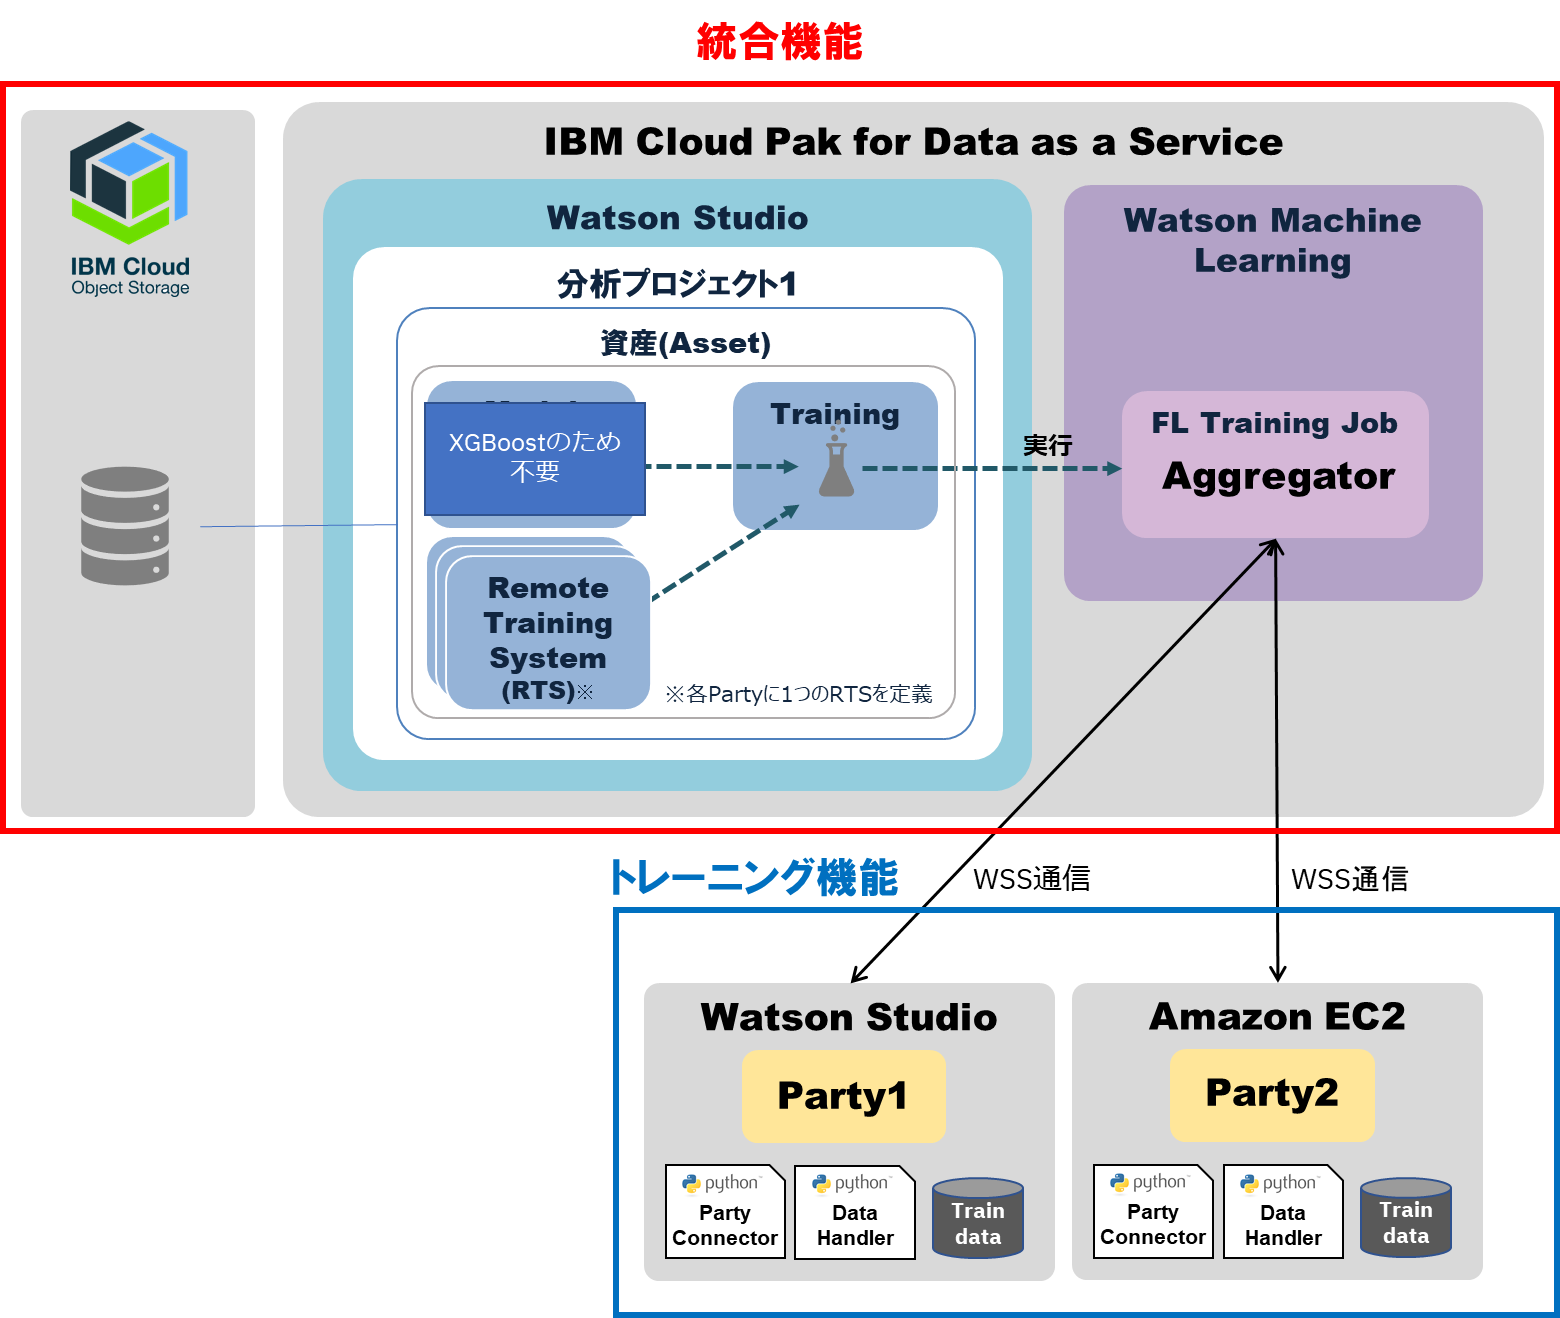
大きく「統合機能」 と「トレーニング機能」 の2つに分かれており、両者はWSSプロトコルを使用して通信します。
下記に概要を示します。
| 機能 | CP4DaaSにおける名称 | 実行環境 | 説明 |
|---|---|---|---|
| 統合機能 | Aggregator | Watson Machine Learning | Partyから集められたローカル・モデルを基に、共通モデルへの統合を実施 |
| トレーニング機能 | Party | 任意※ | トレーニング参加者が保有するデータを使ってモデルをトレーニングし、結果をaggregatorへ送信 |
※トレーニング機能を実行する環境は、指定バージョンのPython および Pythonライブラリ ibm-watson-machine-learning を導入済みで かつ aggregator と通信可能であれば、任意の環境を使用可能です。
IaaS環境、SaaS の Jupyter Notebook環境、PC等、いずれの環境でも動作します。
「統合機能(aggregator)」 と 「トレーニング機能(Party)」は、具体的には、複数のコンポーネントによって構成されます。
| 機能 | コンポーネント | 説明 | 作成方法 |
|---|---|---|---|
| Aggregator | Training | モデルのトレーニング情報を定義 | Watson Machine Learningに登録 |
| Remote Training System(RTS) | モデルのトレーニング参加者を定義。Trainingから参照する形で使用。 | Watson Machine Learningに登録 | |
| Base Model | 未トレーニングのモデル定義。XGBoost以外のフレームワークで必要。 | Watson Machine Learningに登録 | |
| Party | Party Connector | Aggregatorと通信し、自環境でモデルのトレーニングを実行するための処理を定義したファイル。トレーニング参加者はこのファイルを実行する。 | Pythonファイル |
| Data Handler | モデルのトレーニングに使用する学習用データの処理方法を定義したPythonのクラス。Party Connectorから参照する形で使用。 | Pythonファイル | |
| 学習用データ | モデルのトレーニングに使用するデータ。Data Handlerから参照する形で使用。データの保有者が自環境へ準備。 | csvファイルや画像ファイル等 |
サポートされるフレームワーク
2022年4月時点では、下記のフレームワークおよび手法サポートされています。
最新情報につきましては、製品資料をご確認ください。
| 手法 | フレームワーク |
|---|---|
| 回帰 | Scikit-Learn Regression, XGBoost Regression, Tensorflow2, Pytorch |
| 分類 | Scikit-Learn Crassification, XGBoost Crassification, Tensorflow2, Pytorch |
| クラスタリング | Scikit-Learn K-Means |
製品資料:Choosing your framework, fusion method, and hyperparameters
3. CP4DaaS の Federated Learning を動かす
製品資料のチュートリアル一覧には UI版とAPI版のシナリオがあります。
本記事では、XGBoost の API版チュートリアルに沿ってFederated Learning を動かします。
Federated Learning XGBoost samples
https://dataplatform.cloud.ibm.com/docs/content/wsj/analyze-data/fl-xg-samples.html?audience=wdp&locale=en
チュートリアル・シナリオにおいて、統合機能の設定を行う人を管理者、データの保有者であり自環境でトレーニングを実行する人をトレーニング参加者とします。
管理者とトレーニング参加者は兼任可能です。
API版のチュートリアルでは、管理者がAPIを使って 統合機能(aggregator)を作成します。
トレーニング参加者は、自環境からPartyを実行し、トレーニングに参加します。
本記事ではトレーニング実行環境として、下記の2パターンを使用します。
| 実行環境 | 詳細 |
|---|---|
| SaaS の Jupyter Notebook | Watson Studio の Notebook |
| IaaS | Amazon EC2 へ Pythonを導入 |
管理者の作業
開始の前に
-
もし持っていない場合、IBM Cloudアカウントを作成します。
無料のIBM Cloudアカウントを作成
https://www.ibm.com/jp-ja/cloud/free -
Federated Learningに使用するサービスを作成します。
3サービス全て、無料で機能を試せるLiteプランに対応しています。
本記事では、ダラス(us-south)へ作成したものを使用します。- Watson Machine learning
- Watson Studio
- IBM Cloud Object Storage
-
IBM Cloudアカウントへ、Federated Learning用のユーザーを追加します。
オリジナルのチュートリアルでは、1ユーザーで管理者とトレーニング参加者を兼務する手順となっていますが、本記事では、複数のトレーニング参加者でFederated Learningを動かすため、下記の2ユーザーを使用します。
役割 ユーザー名 管理者 兼 トレーニング参加者 FL管理者1 トレーニング参加者 テストユーザー1 -
管理者ユーザーにて、Watson Studioへログインします。
-
既存のプロジェクトを使用するか、新しいプロジェクトを作成します。
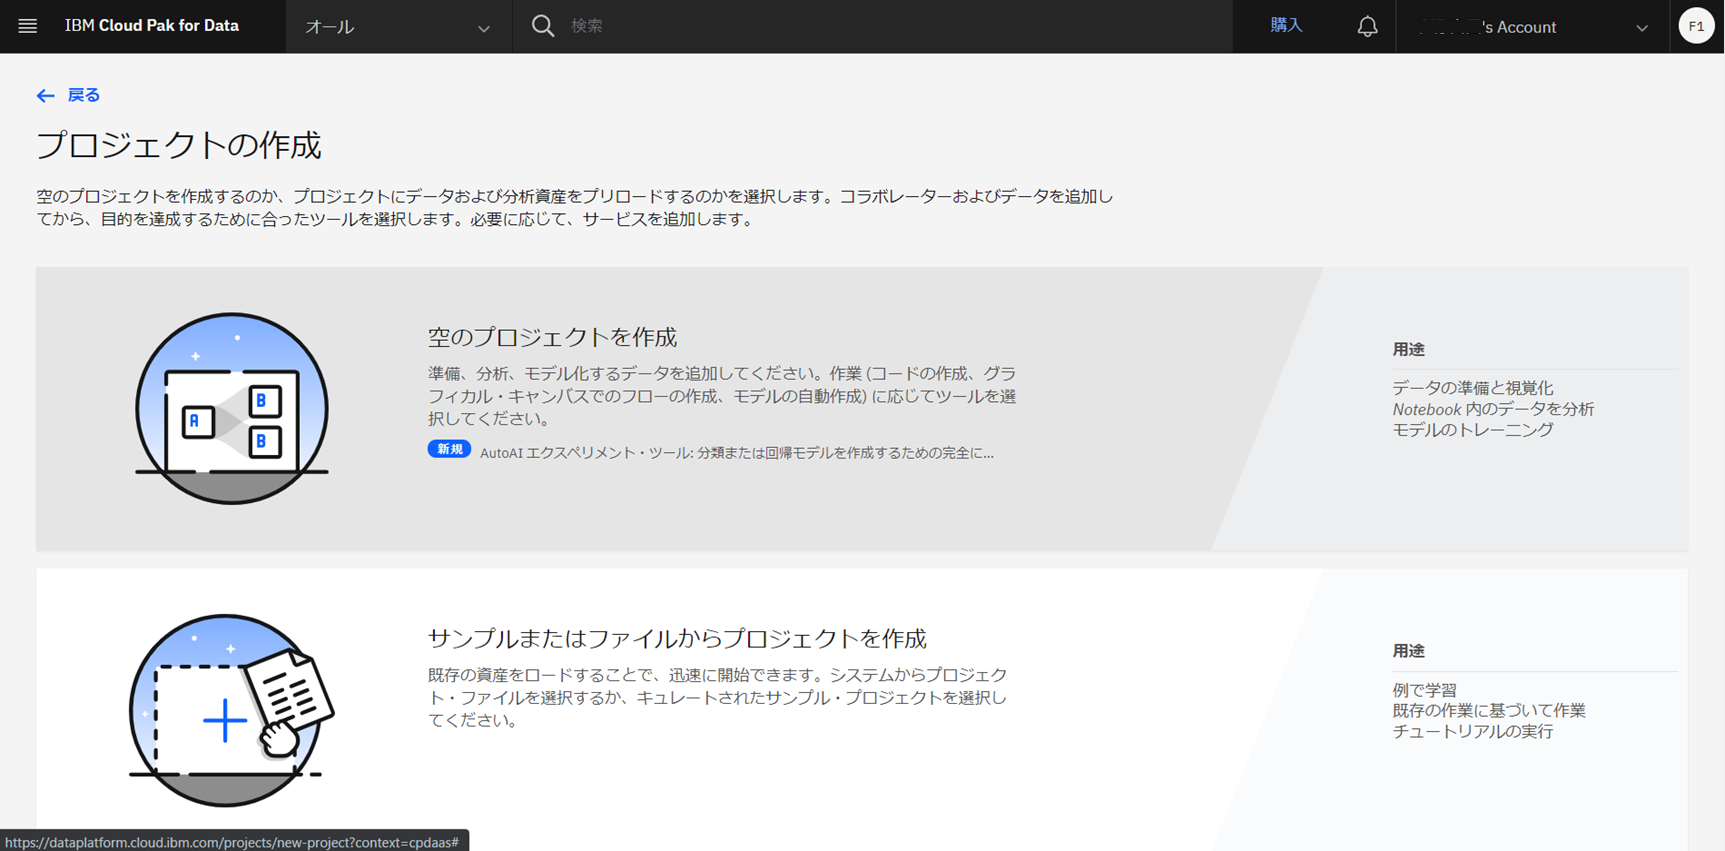
本記事では、新しいプロジェクトを作成します。「空のプロジェクトを作成」を選択し、任意の名前でプロジェクトを作成します。

-
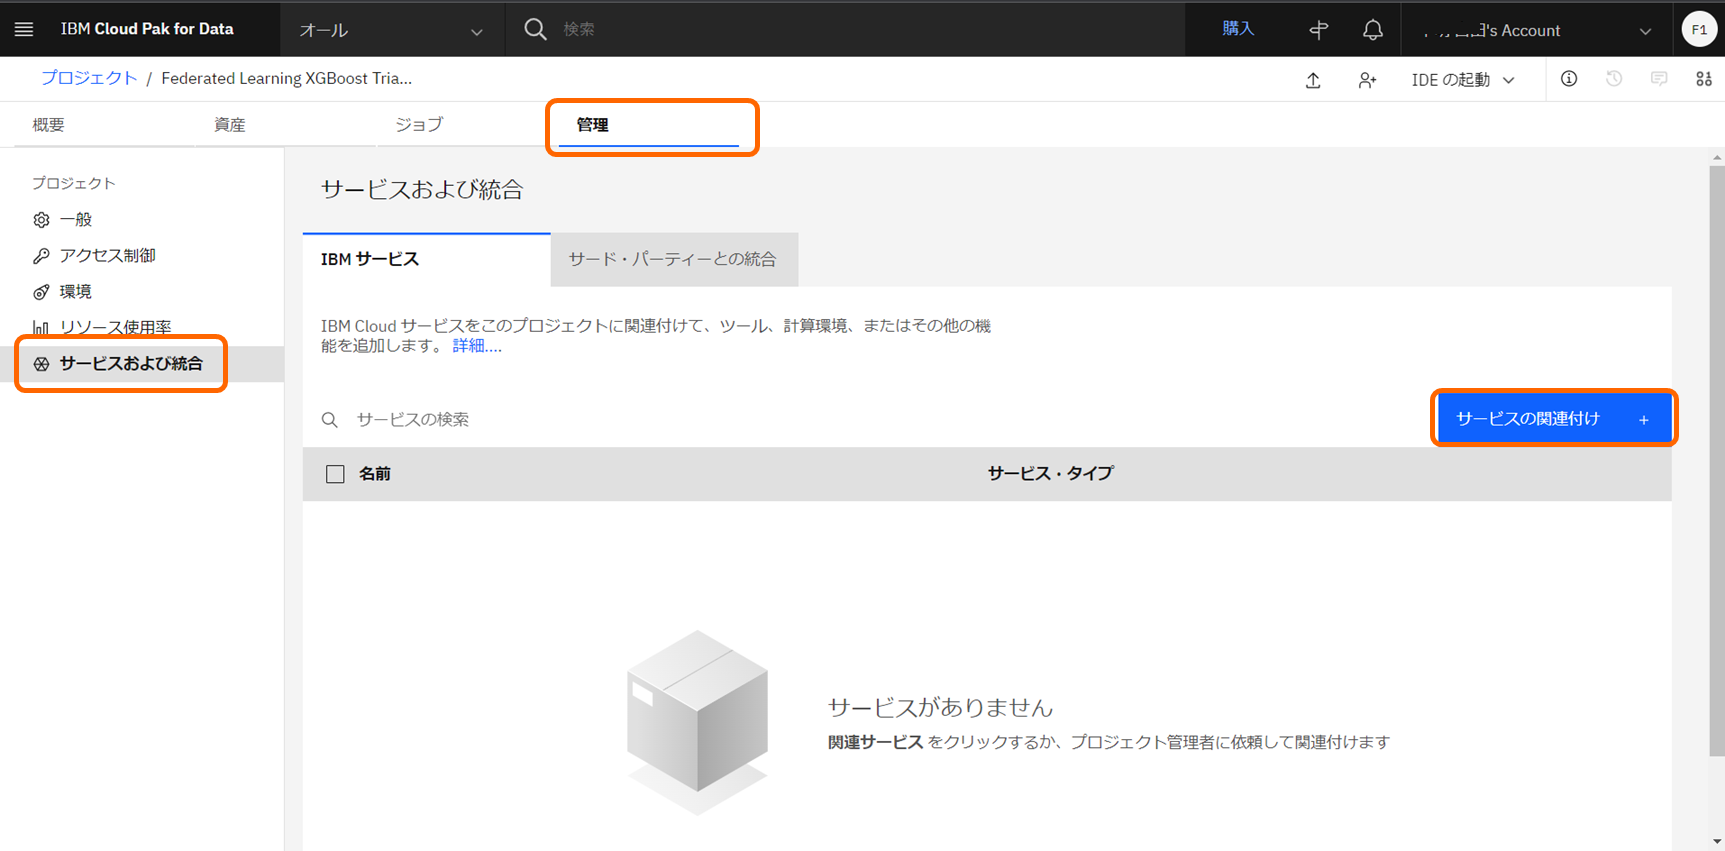
プロジェクトの「管理」ページより、「サービスおよび統合」>「サービスの関連付け」より、作成済みのWatson Machine Learningサービスを関連付けます。
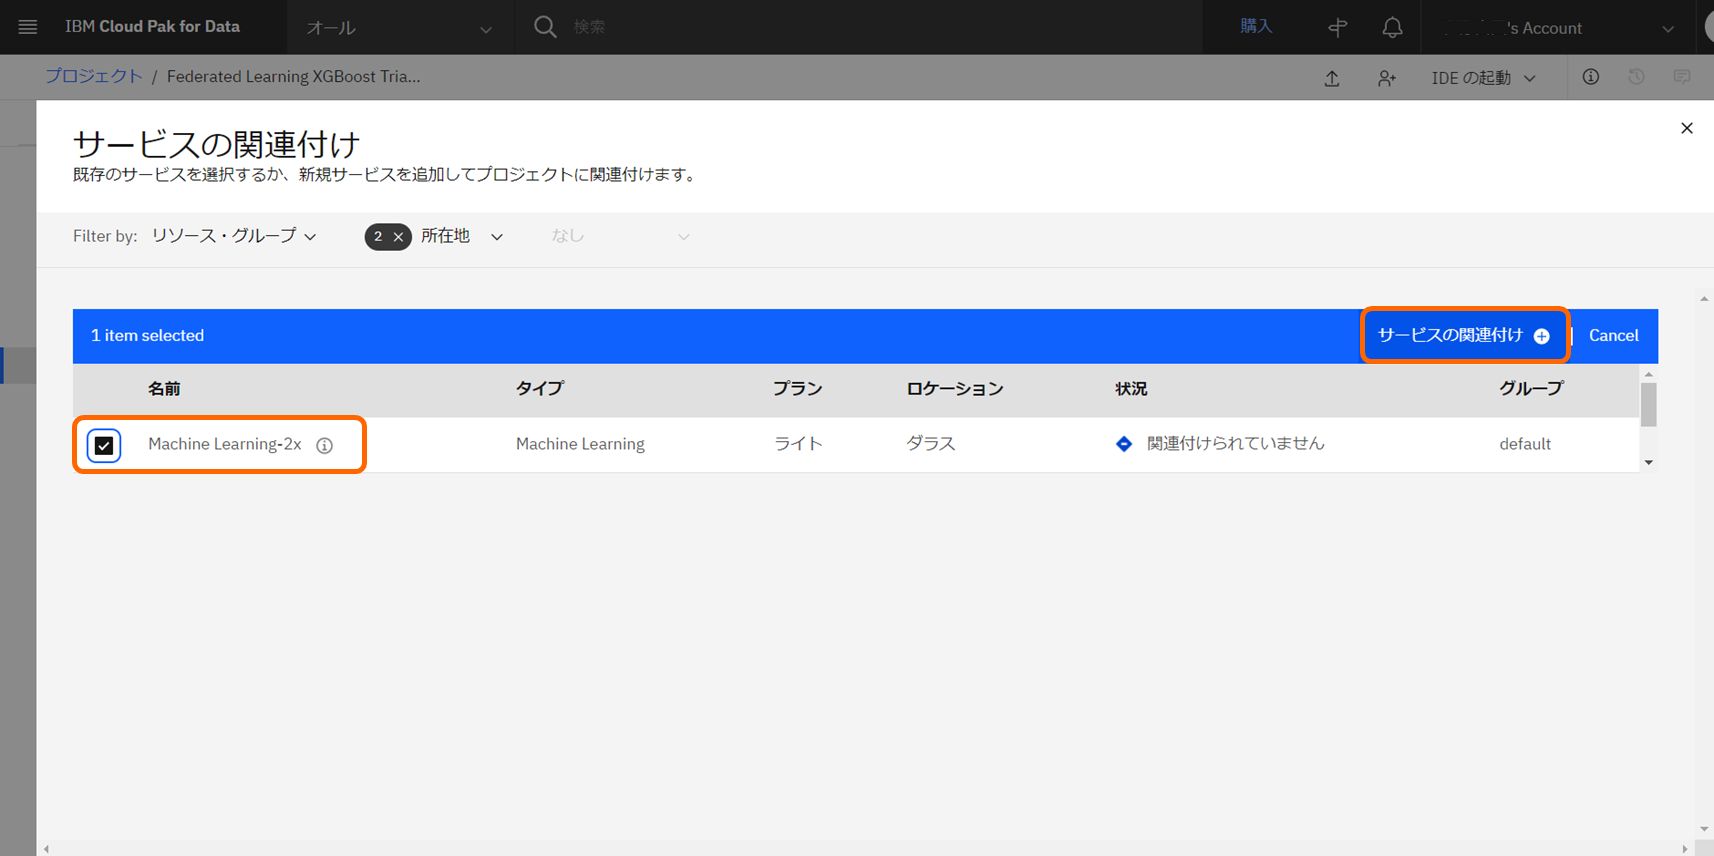
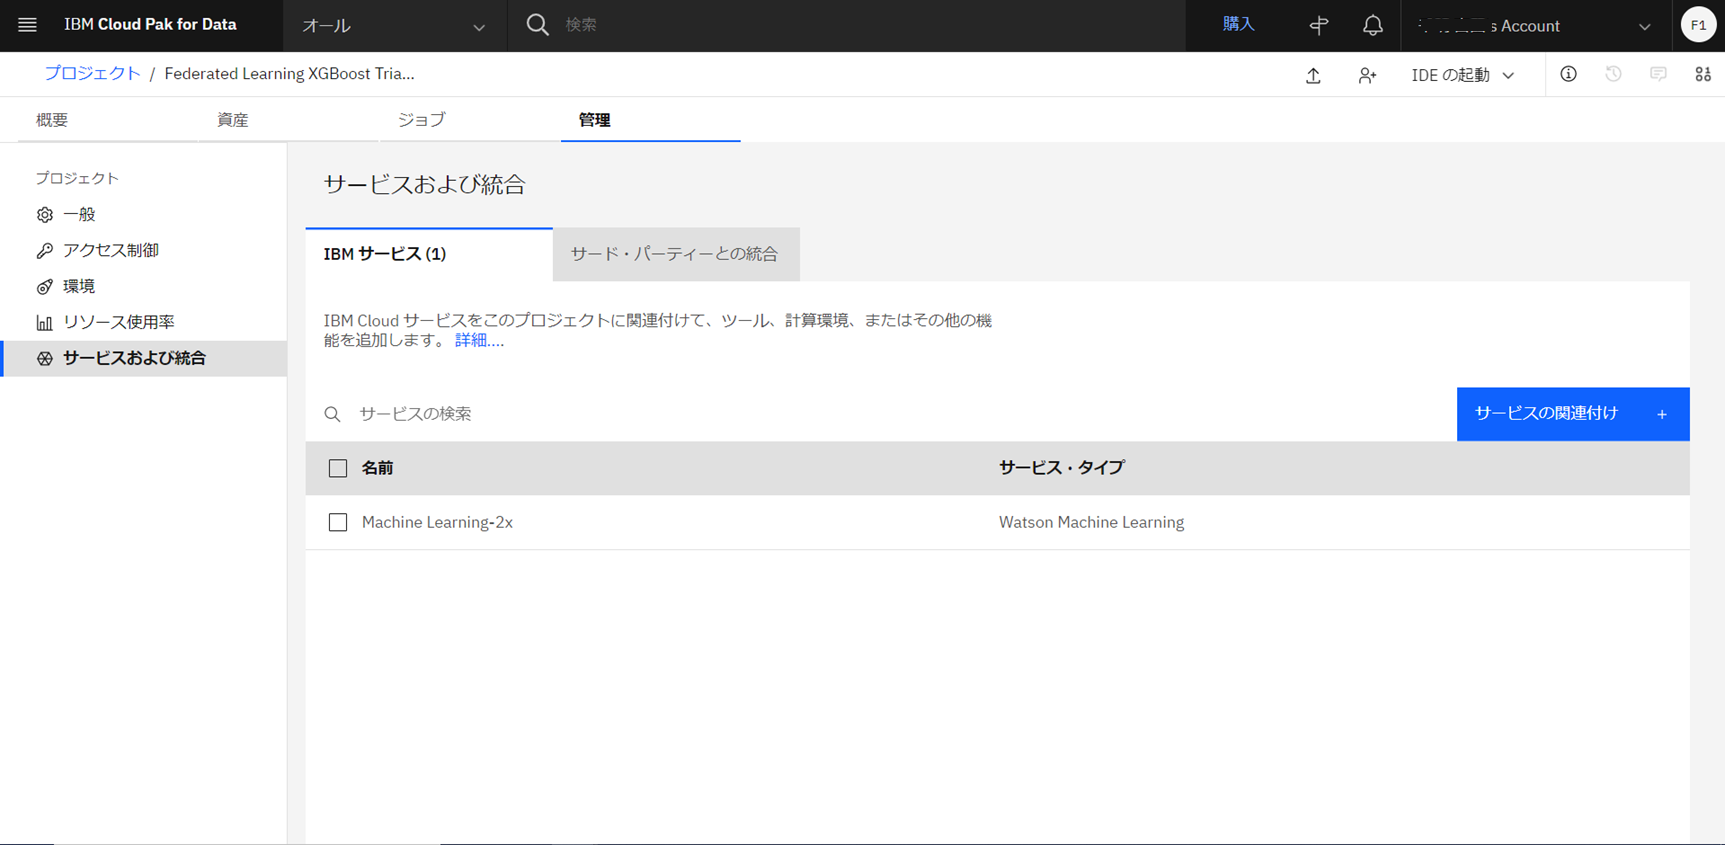
-
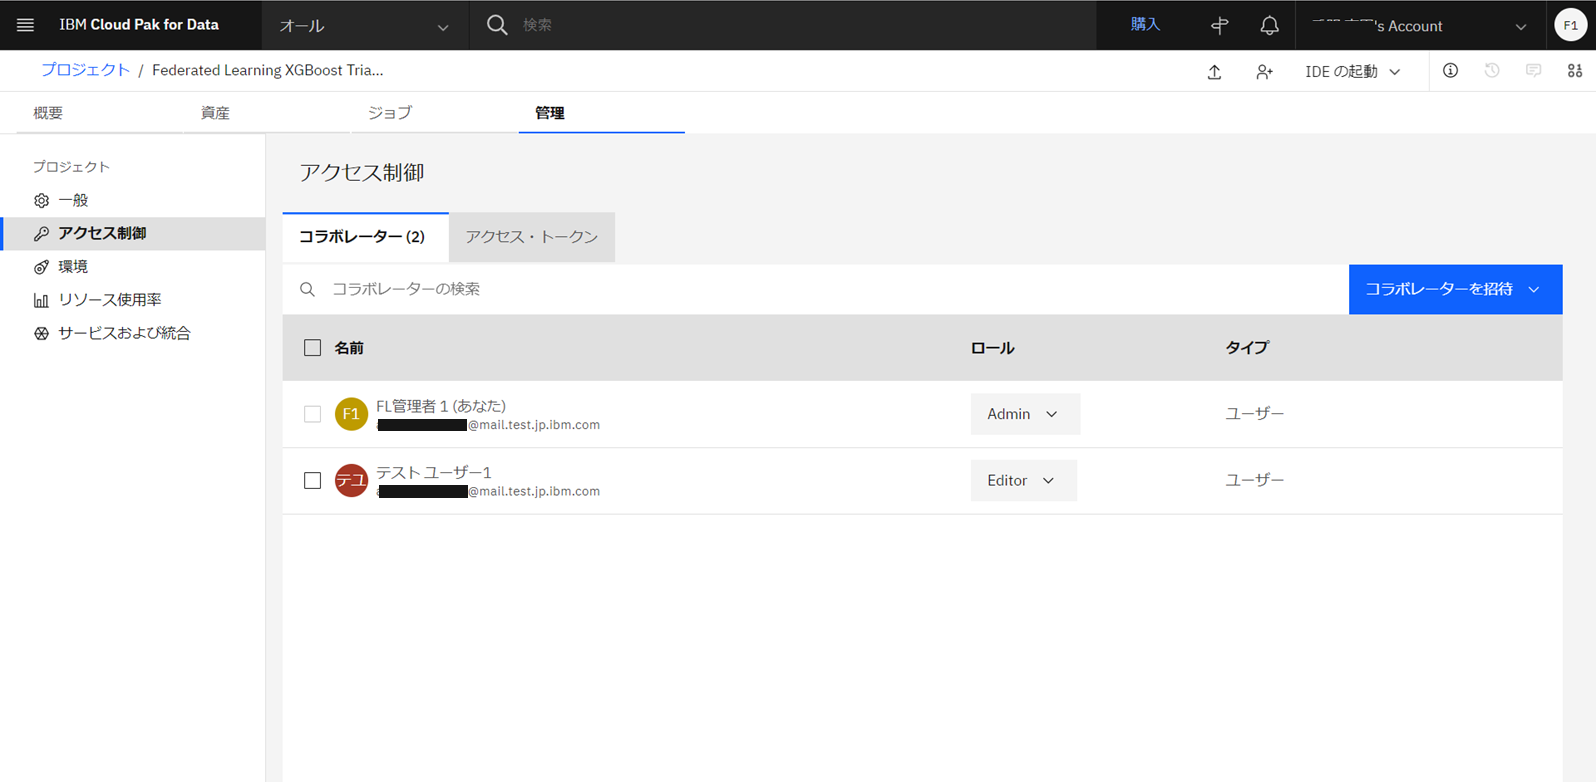
プロジェクトのコラボレータとして、トレーニング参加者を追加し、編集者ロールを付与します。
Federated Learningのトレーニング参加者は、プロジェクトでエディター権限が必要です。
「アクセス制御」>「コラボレータの招待」>「ユーザーの招待」と進み、テストユーザー1をエディター権限を付与し、追加します。
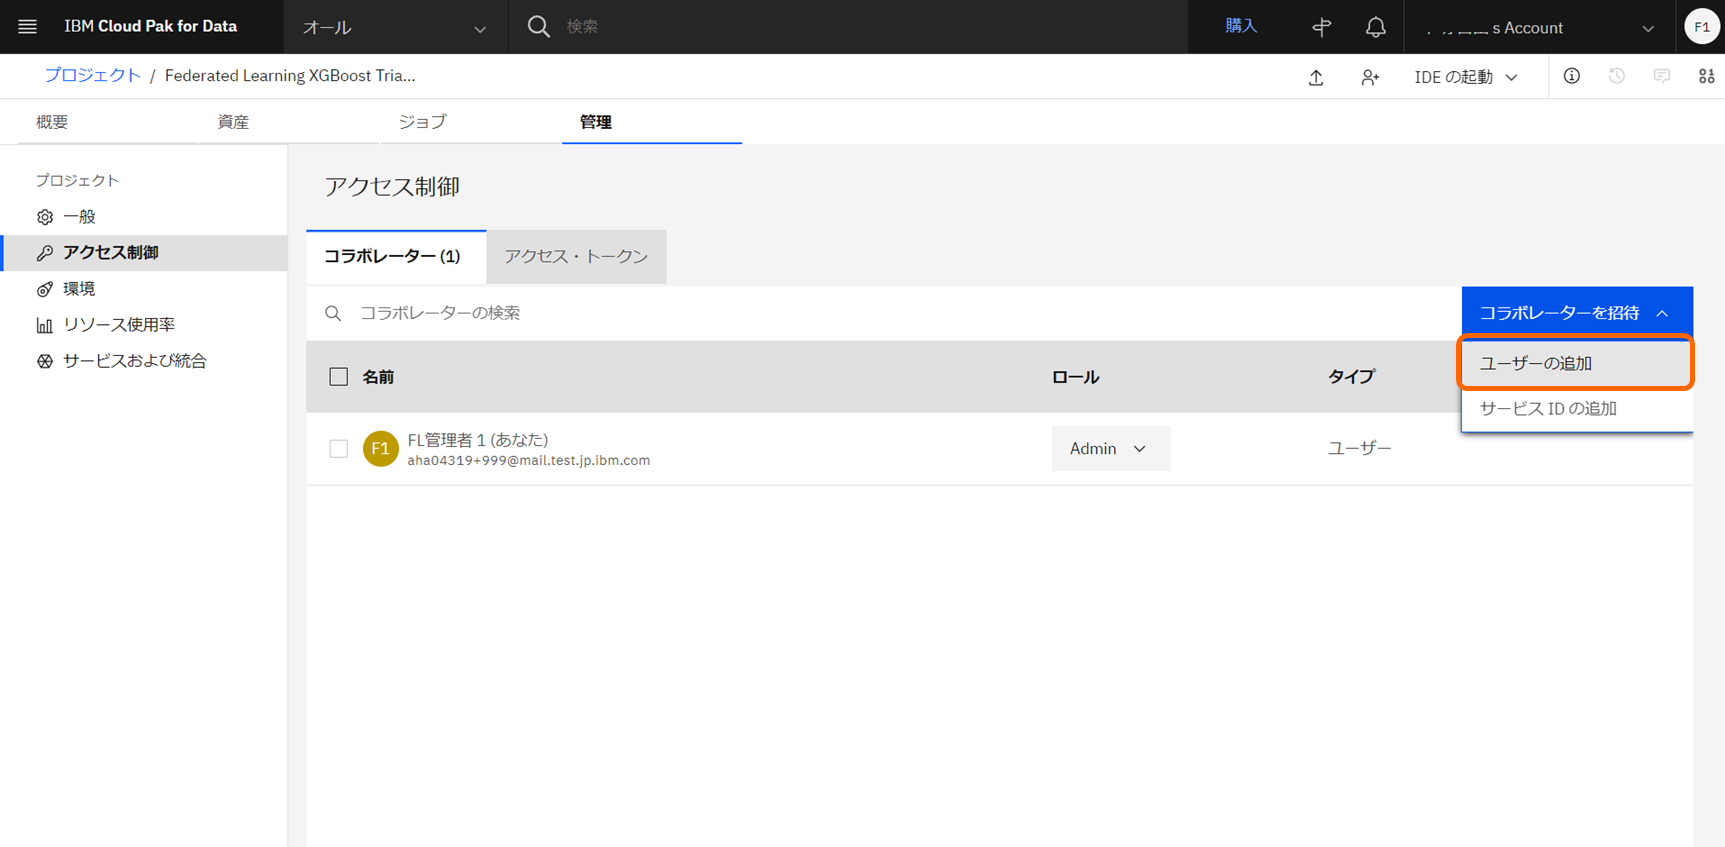
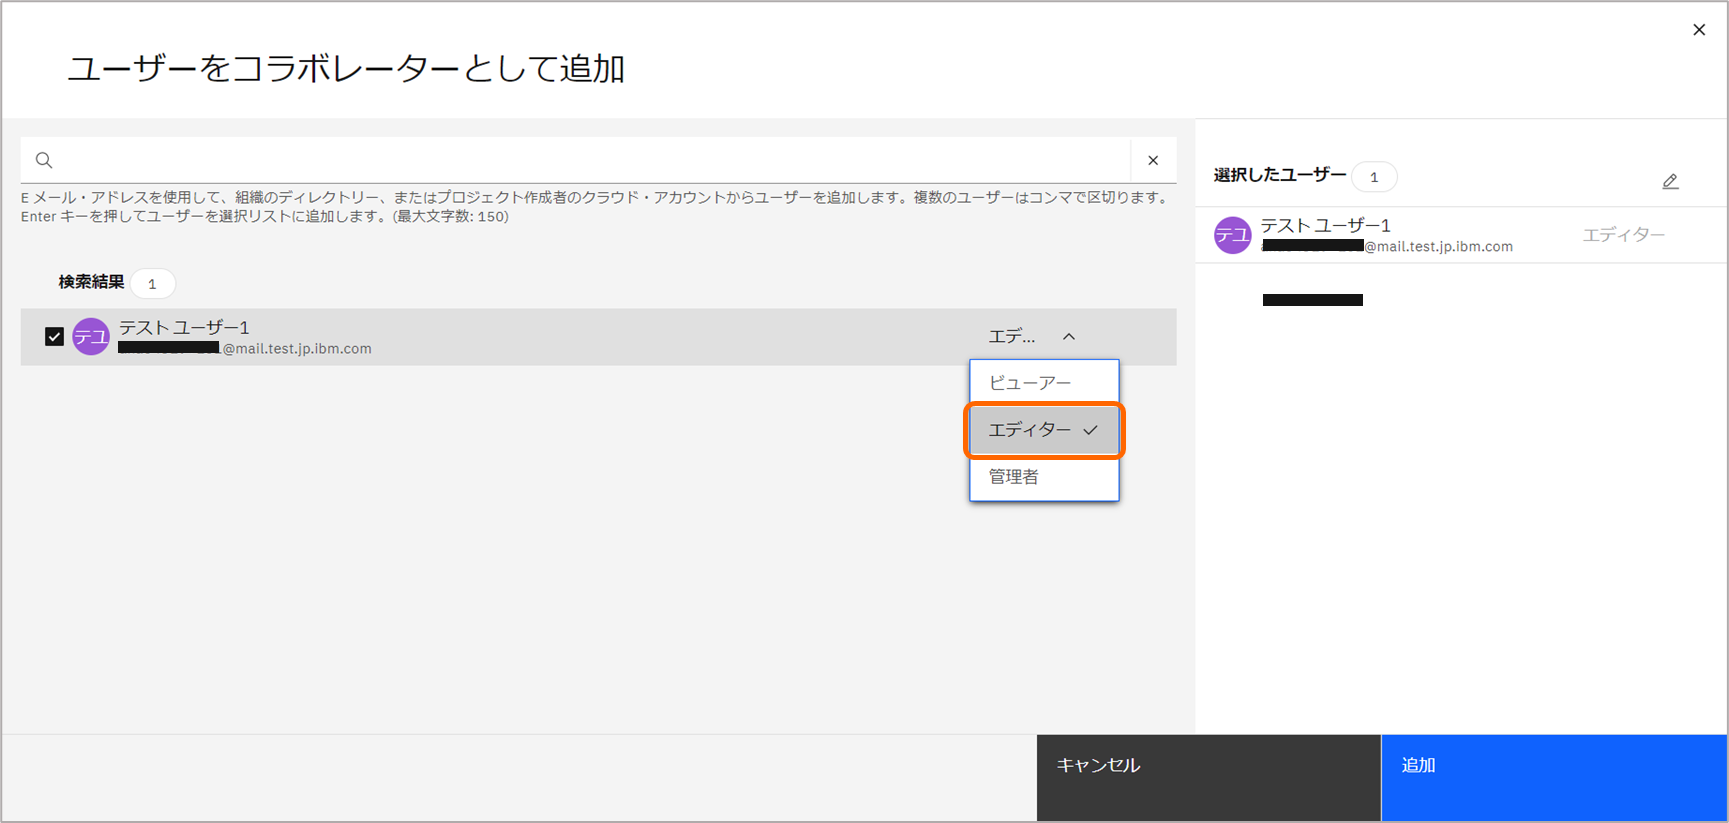
追加が完了した状態です。
Aggregatorのセットアップ
管理者用のNotebook の手順に沿って作業を実施します。
Federated Learning XGBoost Demo Part 1 - for Admin
https://dataplatform.cloud.ibm.com/exchange/public/entry/view/c95a130a2efdddc0a4b38c319a011fed?audience=wdp&locale=en
1. Prequisites: 前提作業
-
Notebookの作成
-
IAM API Keyの作成
- 管理者ユーザーのAPIキーを作成します。
- APIキーの作成方法は、@nishikyonさんの下記記事を参照ください。
IBM Cloud APIKEYの作成(取得)方法
- APIキーの作成方法は、@nishikyonさんの下記記事を参照ください。
- 管理者ユーザーのAPIキーを作成します。
-
IBM Cloud IAMユーザーID の確認
-
プロジェクトのURLより、
projectid=xxxxxxxx-xxxx-xxxx-xxxx-xxxxxxxxxxxxを確認し、プロジェクトIDを控えます
以降、Notebookの説明に従い、各セルを実行します。
1.1 Define variables (変数の定義)
控えておいた管理者ユーザーの情報をセットします。
API_VERSION = "2021-10-01"

WML_SERVICES_HOST = "us-south.ml.cloud.ibm.com" # or "eu-de.ml.cloud.ibm.com"

WML_SERVICES_URL = "https://" + WML_SERVICES_HOST
IAM_TOKEN_URL = "https://iam.cloud.ibm.com/oidc/token"

IAM_APIKEY = "XXXXXXXXXXX"

CLOUD_USERID = "IBMid-XXXXXXXXXX" # Get this from Manage < IAM < Users, and check the URL. Your user ID should be in the format IBMid-<xxx>.

PROJECT_ID = "xxxxxxxx-xxxx-xxxx-xxxx-xxxxxxxxxxxx" # Get this by going into your WS project and checking the URL.
1.2 Define tags (タグの定義)
このチュートリアルで作成したコンポーネントを区別しやすいよう、タグを付与します。ここでは、タグ用の文字列を定義します。
RTS_TAG = "wmlflxgbsamplerts"
TRAINING_TAG = "wmlflxgbsampletraining"
1.3 Import libraries (ライブラリのインポート)
APIの実行に必要なライブラリをインポートします。
import urllib3
import requests
import json
from string import Template

urllib3.disable_warnings()
2. Obtain Cloud authentication token: クラウド認証用のトークンの取得
以下のコードを実行し、管理者ユーザー用のIAMアクセス・トークンを取得します。
Watson Machine Learning の REST APIを実行する際に使用します。
アクセス・トークンは、遅くとも 1 時間後には有効期限が切れる一時的な資格情報です。
製品資料: API キーを使用した IBM Cloud IAM トークンの生成
payload = "grant_type=urn:ibm:params:oauth:grant-type:apikey&apikey=" + IAM_APIKEY
token_resp = requests.post(IAM_TOKEN_URL ,
                        headers={"Content-Type": "application/x-www-form-urlencoded"},
                        data = payload,
                        verify=True)

print(token_resp)

token = "Bearer " + json.loads(token_resp.content.decode("utf-8"))["access_token"]
print("WS token: %s " % token)
3. Create Remote Training System Asset: リモート・トレーニングシステムの作成
リモート・トレーニングシステムは、モデルのトレーニング参加者を定義するコンポーネントです。
リモート・トレーニングシステムの許可ユーザIDallowed_identitiesには、プロジェクトのコラボレータとしてエディター権限を付与済みのIDを使用します。
トレーニング参加者ごとに、1つRTSが必要です。ユーザー数に応じ、繰り返しRTSを作成します。
-
FL管理者1ユーザーは、管理者 兼 トレーニング参加者です。FL管理者1ユーザー用の管理者のリモート・トレーニングシステムを作成します。- RTSの定義における
allowed_identitiesへFL管理者1ユーザーのIDをセットします。 -
wml_remote_training_system_one_asset_uidにRTSのIDがセットされます。
FL管理者1ユーザー用のRTS作成wml_remote_training_system_asset_one_def = Template(""" { "name": "Remote Party 1", "project_id": "$projectId", "description": "Sample Remote Training System", "tags": [ "$tag" ], "organization": { "name": "IBM", "region": "US" }, "allowed_identities": [ { "id": "$userID", "type": "user" } ], "remote_admin": { "id": "$userID", "type": "user" } } """).substitute(userID = CLOUD_USERID, projectId = PROJECT_ID, tag = RTS_TAG) wml_remote_training_system_one_resp = requests.post(WML_SERVICES_URL + "/ml/v4/remote_training_systems", headers={"Content-Type": "application/json", "Authorization": token}, params={"version": API_VERSION, "project_id": PROJECT_ID}, data=wml_remote_training_system_asset_one_def, verify=False) print(wml_remote_training_system_one_resp) status_json = json.loads(wml_remote_training_system_one_resp.content.decode("utf-8")) print("Create remote training system response : "+ json.dumps(status_json, indent=4)) wml_remote_training_system_one_asset_uid = json.loads(wml_remote_training_system_one_resp.content.decode("utf-8"))["metadata"]["id"] print("Remote Training System id: %s" % wml_remote_training_system_one_asset_uid) - RTSの定義における
チュートリアル用のNotebookに含まれていない手順です。
-
1つ下にセルを追加し、トレーニング参加者である
テストユーザー1用のRTSを作成します。- RTSの定義における
allowed_identitiesへテストユーザー1のIDをセットします。 -
wml_remote_training_system_two_asset_uidにRTSのIDがセットされます。
テストユーザー1用のRTS作成PARTY_CLOUD_USERID = "控えておいたテストユーザー1のIBMid" wml_remote_training_system_asset_two_def = Template(""" { "name": "Remote Party 2", "project_id": "$projectId", "description": "Sample Remote Training System", "tags": [ "$tag" ], "organization": { "name": "IBM", "region": "US" }, "allowed_identities": [ { "id": "$userID", "type": "user" } ], "remote_admin": { "id": "$userID", "type": "user" } } """).substitute(userID = PARTY_CLOUD_USERID, projectId = PROJECT_ID, tag = RTS_TAG) wml_remote_training_system_two_resp = requests.post(WML_SERVICES_URL + "/ml/v4/remote_training_systems", headers={"Content-Type": "application/json", "Authorization": token}, params={"version": API_VERSION, "project_id": PROJECT_ID}, data=wml_remote_training_system_asset_two_def, verify=False) print(wml_remote_training_system_two_resp) status_json = json.loads(wml_remote_training_system_two_resp.content.decode("utf-8")) print("Create remote training system response : "+ json.dumps(status_json, indent=4)) wml_remote_training_system_two_asset_uid = json.loads(wml_remote_training_system_two_resp.content.decode("utf-8"))["metadata"]["id"] print("Remote Training System id: %s" % wml_remote_training_system_two_asset_uid) - RTSの定義における
4. Create FL Training: Job FLトレーニングの作成
モデルのトレーニング情報を定義します。
- まず、全体の構造および設定項目について説明します。
federated_learningのセクションへ、モデルの学習方法を定義します。
| 項目名 | 説明 |
|---|---|
| fusion_type | フレームワークおよび手法。今回は XGBoost分類のためxgb_classifierを使用 |
| learning_rate | fusion_typeで指定したフレームワークXGBoostで必要なハイパーパラメータ。学習率。今回は0.1を使用 |
| loss | fusion_typeに応じた損失関数。autoとした場合、fusion_typeに応じて自動で判断した関数を使用 |
| max_bins | fusion_typeで指定したフレームワークXGBoostで必要なハイパーパラメータ。ビンの最大数。今回は255を使用 |
| rounds | トレーニングのイテレーション回数。今回は動作確認のため、短時間で完了するように3回をセット |
| num_classes | 目的変数のクラス数。今回は2値分類のため 2を使用 |
| metrics | 今回はlossを使用 |
| software_spec | 実行環境。今回は2022年4月時点で最新のruntime-22.1-py3.9を使用 |
| remote_training, quorum | Party全体のうち、何割がAggregatorに接続した時点でトレーニングを開始するかを指定。今回は1.0(=全員がAggregatorへ接続)を使用 |
| remote_training, remote_training_systems | トーレニングに参加する各Party用のRTSのID。リストの要素として辞書形式で登録。今回は、ひとつ前の手順で作成したリモート・トレーニングシステムを使用。required=Trueの場合、該当RTSのIDを使用したPartyのトレーニング参加が必須となる。 |
| hardware_spec | 実行環境のHWリソース。今回はXSを使用 |
製品資料:Choosing your framework, fusion method, and hyperparameters
results_referenceへ、統合したモデルの出力先を指定します。デフォルトは、containerで、Watson Studio プロジェクトに関連付けられたIBM Cloud Object Storageのバケットに出力します。
-
トレーニングの定義を作成します。Notebookに記載されている内容より、remote_training_systemsに関連する2箇所の内容を変更します。
- remote_training_systemsの配列へ、テストユーザー1用のRTSを追加します。
- substituteへ、テストユーザー1用のRTS_IDがセットされた変数
wml_remote_training_system_two_asset_uidを追加します。
Trainingの作成training_payload = Template(""" { "name": "FL Aggregator", "tags": [ "$tag" ], "federated_learning": { "fusion_type": "xgb_classifier", "learning_rate": 0.1, "loss": "binary_crossentropy", "max_bins": 255, "rounds": 3, "num_classes": 2, "metrics": "loss", "remote_training" : { "quorum": 1.0, "remote_training_systems": [ { "id" : "$rts_one", "required" : true }, { "id" : "$rts_two", "required" : true } ] }, "software_spec": { "name": "runtime-22.1-py3.9" }, "hardware_spec": { "name": "XS" } }, "training_data_references": [], "results_reference": { "type": "container", "name": "outputData", "connection": {}, "location": { "path": "." } }, "project_id": "$projectId" } """).substitute(projectId = PROJECT_ID, rts_one = wml_remote_training_system_one_asset_uid, rts_two = wml_remote_training_system_two_asset_uid, tag = TRAINING_TAG) create_training_resp = requests.post(WML_SERVICES_URL + "/ml/v4/trainings", params={"version": API_VERSION}, headers={"Content-Type": "application/json", "Authorization": token}, data=training_payload, verify=False) print(create_training_resp) status_json = json.loads(create_training_resp.content.decode("utf-8")) print("Create training response : "+ json.dumps(status_json, indent=4)) training_id = json.loads(create_training_resp.content.decode("utf-8"))["metadata"]["id"] print("Training id: %s" % training_id)出力例Training id: 3b009f5f-0505-4708-815d-8df94a11633e
4.1 Get Training Job Status (トレーニングのステータスの確認)
このコードを実行する前に、プロジェクトへWatson Machine Learningサービスの関連付けされていることを確認します。
関連付けされていない場合、トレーニングの起動に失敗し、unknown_job_execution_errorエラーとなります。
確認手順は、本記事の開始の前にを参照してください。
get_training_resp = requests.get(WML_SERVICES_URL + "/ml/v4/trainings/" + training_id,
                                headers={"Content-Type": "application/json",
                                        "Authorization": token},
                                params={"version": API_VERSION,
                                        "project_id": PROJECT_ID},
                                verify=False)

print(get_training_resp)
status_json = json.loads(get_training_resp.content.decode("utf-8"))
print("Get training response : "+ json.dumps(status_json, indent=4))
トレーニングの情報が出力されます。
statusより、aggregatorの状態を確認可能です。トレーニング作成直後はpendingステータスとなります。
しばらくすると、accepting_partiesステータスに変わり、トレーニング参加者の通信を受け入れ可能な状態となります。
Get training response : {
    "metadata": {
        "created_at": "2022-04-14T14:07:47.509Z",
        "id": "08731379-fe85-4875-a052-204857ff951c",
        "name": "FL Aggregator",
        "project_id": "xxxxxxxx-xxxx-xxxx-xxxx-xxxxxxxxxxxx",
        "tags": [
            "wmlflxgbsampletraining"
        ]
    },
    "entity": {
        "federated_learning": {
            "fusion_type": "xgb_classifier",
            "hardware_spec": {
                "name": "XS"
            },
            "learning_rate": 0.1,
            "loss": "binary_crossentropy",
            "max_bins": 255,
            "metrics": "loss",
            "num_classes": 2,
            "remote_training": {
                "quorum": 1.0,
                "remote_training_systems": [
                    {
                        "id": "845ef95d-4588-4b0d-ac04-8d9ec07ed56b",
                        "required": true
                    },
                    {
                        "id": "c9eb2d77-7cae-48e0-80e7-34e3193eecb1",
                        "required": true
                    }
                ]
            },
            "rounds": 3,
            "software_spec": {
                "name": "runtime-22.1-py3.9"
            }
        },
        "name": "FL Aggregator",
        "project_id": "xxxxxxxx-xxxx-xxxx-xxxx-xxxxxxxxxxxx",
        "results_reference": {
            "connection": {},
            "location": {
                "path": ".",
                "notebooks_path": "08731379-fe85-4875-a052-204857ff951c/notebooks",
                "training": "08731379-fe85-4875-a052-204857ff951c",
                "training_status": "08731379-fe85-4875-a052-204857ff951c/training-status.json",
                "assets_path": "08731379-fe85-4875-a052-204857ff951c/assets"
            },
            "type": "container"
        },
        "status": {
            "state": "pending"
        },
        "tags": [
            "wmlflxgbsampletraining"
        ],
        "training_data_references": []
    }
}
チュートリアル用のNotebookに含まれていない手順です。
-
1つ下にセルを追加し、status が
accepting_partiesステータスになるまで、30秒おきにステータスをチェックします。-
accepting_partiesステータスになったことを確認し、後続の手順へ進みます。
ステータス確認# トレーニングのステータスを確認 import time while True: get_training_resp = requests.get(WML_SERVICES_URL + "/ml/v4/trainings/" + training_id, headers={"Content-Type": "application/json", "Authorization": token}, params={"version": API_VERSION, "project_id": PROJECT_ID}, verify=False) status_json = json.loads(get_training_resp.content.decode("utf-8")) state = status_json["entity"]["status"]["state"] print(state) if state != "pending": break time.sleep(30)ステータスの遷移pending pending accepting_parties -
accepting_partiesステータスに遷移後、Watson Machine Learning はアクティブな状態となり、CUHを消費します。CUHの消費に基づき、課金が行われます。
全てのトレーニング参加者がトレーニングに参加し、トレーニングが完了するか、または、トレーニングのタイムアウトに達するまで、「リモート・システムの待機中」ステータスが維持されます。
5. Get Variables And Paste Into Party Notebook: Party実行用の変数の表示
-
FL管理者1ユーザー用に、Partyによるトレーニング実行に必要な情報を控えます。
print("WML_SERVICES_HOST = '%s'" % WML_SERVICES_HOST) print("PROJECT_ID = '%s'" % PROJECT_ID) print("IAM_APIKEY = '%s'" % IAM_APIKEY) print("RTS_ID = '%s'" % wml_remote_training_system_one_asset_uid) print("TRAINING_ID = '%s'" % (training_id))出力例WML_SERVICES_HOST = 'us-south.ml.cloud.ibm.com' PROJECT_ID = 'xxxxxxxx-xxxx-xxxx-xxxx-xxxxxxxxxxxx' IAM_APIKEY = 'XXXXXXXXXXX' RTS_ID = '845ef95d-4588-4b0d-ac04-8d9ec07ed56b' TRAINING_ID = '3b009f5f-0505-4708-815d-8df94a11633e'
チュートリアル用のNotebookに含まれていない手順です。
-
1つ下にセルを追加します。トレーニング参加者である
テストユーザー1用に、Partyによるトレーニング実行で必要な情報を出力し、内容を控えます。- FL管理者1ユーザーと、IAM_APIKEY および RTS_IDが異なります。
- テストユーザー1用の IAM_APIKEYは、後続の手順で作成するため、ここではダミーとして
<api_key>をセットしています。
- テストユーザー1用の IAM_APIKEYは、後続の手順で作成するため、ここではダミーとして
print("WML_SERVICES_HOST = '%s'" % WML_SERVICES_HOST) print("PROJECT_ID = '%s'" % PROJECT_ID) print("IAM_APIKEY = '%s'" % "<api_key>") print("RTS_ID = '%s'" % wml_remote_training_system_two_asset_uid) print("TRAINING_ID = '%s'" % (training_id))出力例WML_SERVICES_HOST = 'us-south.ml.cloud.ibm.com' PROJECT_ID = 'xxxxxxxx-xxxx-xxxx-xxxx-xxxxxxxxxxxx' IAM_APIKEY = '<api_key>' RTS_ID = 'c9eb2d77-7cae-48e0-80e7-34e3193eecb1' TRAINING_ID = '3b009f5f-0505-4708-815d-8df94a11633e' - FL管理者1ユーザーと、IAM_APIKEY および RTS_IDが異なります。
「6. Save Trained Model To Project」以降のセクションは、トレーニング完了後に実施する手順です。
先にトレーニング参加者の作業へ進みます。
トレーニング参加者の作業
本記事では、複数のトレーニング参加者でFederated Learningを動かすため、2ユーザーを使用します。
各ユーザーのトレーニング実行環境は以下となります。
| ユーザー | 実行環境 | 詳細 |
|---|---|---|
| FL管理者1 | SaaS の Jupyter Notebook | Watson Studio の Notebook |
| テストユーザー1 | IaaS | Amazon EC2 へ Pythonを導入 |
トレーニングの実行
Party用のNotebook の手順に沿って作業を実施します。
Federated Learning XGBoost Demo Part 2 - for Party
https://dataplatform.cloud.ibm.com/exchange/public/entry/view/155a5e78ca72a013e45d54ae87012306?audience=wdp&locale=en
-
管理者へaggregatorで設定したPythonのバージョンを確認し、自環境へ同じバージョンのPythonを導入します。本記事では、
Python 3.9です。-
FL管理者1
- Watson Studioプロジェクトへ、Party用のNotebookを追加します。

- ランタイムとして、
IBM Runtime 22.1 on Python 3.9 XSを選択し、Notebookを作成します。

本記事のため、追加した手順です。
- Watson Studioプロジェクトへ、Party用のNotebookを追加します。
-
テストユーザー1
- Amazon EC2 へ、conda仮想環境を作成し、Python 3.9 および jupyterlab を導入済です。
- 環境の作成方法はこちらを参照してください。
Last login: Sun Apr 10 15:00:41 2022 from xxx.xxx.xx.xxx __| __|_ ) _| ( / Amazon Linux 2 AMI ___|\___|___| https://aws.amazon.com/amazon-linux-2/ (base) [ec2-user@ip-10-0-1-11]~% (base) [ec2-user@ip-10-0-1-11]~% conda activate fl_env (fl_env) [ec2-user@ip-10-0-1-11]~% python -V Python 3.9.7- Amazon EC2 へ、Party用のNotebookをSCP等で転送します。
- Amazon EC2 へ、conda仮想環境を作成し、Python 3.9 および jupyterlab を導入済です。
-
以降、Notebookの説明に従い、各セルを実行します。
1. Input variables (変数のペースト)
トレーニングの最後で控えたトレーニング実行に必要な情報をペーストします。
-
FL管理者1
- IAM_APIKEYを含む、全ての変数に値がセットされています。セルを実行し、後続の手順に進みます。
FL管理者1の値をペーストWML_SERVICES_HOST = 'us-south.ml.cloud.ibm.com' PROJECT_ID = 'xxxxxxxx-xxxx-xxxx-xxxx-xxxxxxxxxxxx' IAM_APIKEY = 'XXXXXXXXXXX' RTS_ID = '845ef95d-4588-4b0d-ac04-8d9ec07ed56b' TRAINING_ID = '3b009f5f-0505-4708-815d-8df94a11633e' -
テストユーザー1
-
テストユーザー1のAPIキーを作成します。
- APIキーの作成方法は、@nishikyonさんの下記記事を参照ください。
IBM Cloud APIKEYの作成(取得)方法
- APIキーの作成方法は、@nishikyonさんの下記記事を参照ください。
-
IAM_APIKEYの値を、ダミーの値から作成したAPIキーに置き換えます。セルを実行し、後続の手順に進みます。
テストユーザー1の値をペーストWML_SERVICES_HOST = 'us-south.ml.cloud.ibm.com' PROJECT_ID = 'xxxxxxxx-xxxx-xxxx-xxxx-xxxxxxxxxxxx' IAM_APIKEY = 'YYYYYYYYYYY' RTS_ID = 'c9eb2d77-7cae-48e0-80e7-34e3193eecb1' TRAINING_ID = '3b009f5f-0505-4708-815d-8df94a11633e' -
2. Download Adult Income dataset (チュートリアル用のデータセットのダウンロード)
チュートリアル用のデータセットadult.csvをダウンロードします。
import requests

dataset_resp = requests.get("https://api.dataplatform.cloud.ibm.com/v2/gallery-assets/entries/5fcc01b02d8f0e50af8972dc8963f98e/data",
                            allow_redirects=True)

f = open('adult.csv', 'wb')
f.write(dataset_resp.content)
f.close()

!ls -lh
3. Install Federated Learning libraries (Watson Machine Learningライブラリのセットアップ)
-
3.1 Install the IBM WML SDK with FL
- Watson Machine Learningのライブラリを導入します。
import sys !{sys.executable} -m pip install --upgrade 'ibm-watson-machine-learning[fl-rt22.1]' -
3.2 Import the IBM Watson Machine Learning client
- Watson Machine Learningをインポートし、クライアントインスタンスを作成します。
from ibm_watson_machine_learning import APIClient

wml_credentials = {
    "apikey": IAM_APIKEY,
    "url": "https://" + WML_SERVICES_HOST
}

wml_client = APIClient(wml_credentials)
wml_client.set.default_project(PROJECT_ID)
4. Define a Data Handler (Data Handlerの定義)
チュートリアル用のData Handleradult_sklearn_data_handler.pyをダウンロードして使用します。
datahandler_resp = requests.get("https://raw.githubusercontent.com/IBMDataScience/sample-notebooks/master/Files/adult_sklearn_data_handler.py",
                                allow_redirects=True)

f = open('adult_sklearn_data_handler.py', 'wb')
f.write(datahandler_resp.content)
f.close()

!ls -lh
5. Configure the party (Partyの構成)
Party Connectorを定義します。
Notebook環境のため、セルに定義します。
- party_configのセクションは以下の内容がセットされています。
-
info: Data Handlerのinit関数内で定義された変数名と対応する値をkeyValue形式で記載。チュートリアルでは、keyとしてtxt_fileという変数名、valueとして学習用データのパス./adult.csvをセット。 -
name: Data Handlerのクラス名。チュートリアル用にダウンロ―ドしたadult_sklearn_data_handler.pyで定義されたクラス名、AdultSklearnDataHandlerをセット。 -
path: Data Handlerのファイル・パス。./adult_sklearn_data_handler.pyをセット。
-
import json

from pathlib import Path
working_dir = !pwd
pwd = working_dir[0]

party_config = {
    wml_client.remote_training_systems.ConfigurationMetaNames.DATA_HANDLER: {
    "info": {
            "txt_file": "./adult.csv"
    },
    "name": "AdultSklearnDataHandler",
    "path": "./adult_sklearn_data_handler.py"
  }
}

print(json.dumps(party_config, indent=4))
6. Connect and train with Federated Learnin (Aggregatorへの接続とPartyによるトレーニングの実行)
-
6.1 Create the party
- partyのインスタンスを作成り、ログ出力を有効化します。
party = wml_client.remote_training_systems.create_party(RTS_ID, party_config) party.monitor_logs() -
6.2 Connect to the aggregator and start training
- partyを実行します。
party.run(aggregator_id=TRAINING_ID, asynchronous=False)実行直後の出力Loading py39-tf27-pt110-sk10 environment.. 2022-04-14T14:24:03.148Z | 1.0.204 | INFO | ibmfl.util.config | No model config provided for this setup. 2022-04-14T14:24:03.183Z | 1.0.204 | INFO | ibmfl.util.config | No metrics config provided for this setup. 2022-04-14T14:24:03.184Z | 1.0.204 | INFO | ibmfl.util.config | No evidencia recordeer config provided for this setup. (略) 2022-04-13T13:03:48.335Z | 1.0.204 | INFO | ibmfl.party.party | Party initialization successful 2022-04-13T13:03:48.335Z | 1.0.204 | INFO | ibmfl.party.party | Party not registered yet. 2022-04-13T13:03:48.335Z | 1.0.204 | INFO | ibmfl.party.party | Registering party... 2022-04-13T13:03:49.495Z | 1.0.204 | INFO | ibmfl.connection.websockets_connection | Received Heartbeat from aggregator -
すべてのトレーニング参加者がパーティー・コネクター・スクリプトを実行し、aggregatorへの接続が完了すると、各環境でトレーニングが開始します。ローカルモデルのトレーニングが完了すると、結果がaggregator側で統合されます。aggregatorのハイパーパラメーターで指定した回数、トレーニングが繰り返し実行されます。
- partyの出力
1回のトレーニングが完了すると、下記のように精度が表示されます。
精度2022-04-13T13:05:10.259Z | 1.0.204 | INFO | ibmfl.party.training.local_training_handler | {'acc': 0.7587901120835252, 'f1': 0.0, 'precision': 0.0, 'recall': 0.0, 'average precision': 0.24, 'roc auc': 0.5, 'negative log loss': 8.33}party出力(略) 2022-04-13T13:05:08.211Z | 1.0.204 | INFO | ibmfl.model.xgb_fl_model | No models have been trained yet. 2022-04-13T13:05:08.211Z | 1.0.204 | INFO | ibmfl.party.training.local_training_handler | {} 2022-04-13T13:05:08.211Z | 1.0.204 | INFO | ibmfl.party.party_protocol_handler | successfully finished async request 2022-04-13T13:05:09.206Z | 1.0.204 | INFO | ibmfl.party.party_protocol_handler | Received request from aggregator 2022-04-13T13:05:09.206Z | 1.0.204 | INFO | ibmfl.party.party_protocol_handler | Received request in with message_type: 12 2022-04-13T13:05:09.207Z | 1.0.204 | INFO | ibmfl.party.party_protocol_handler | Received request in PH 12 2022-04-13T13:05:10.207Z | 1.0.204 | INFO | ibmfl.party.party_protocol_handler | received a async request 2022-04-13T13:05:10.207Z | 1.0.204 | INFO | ibmfl.party.party_protocol_handler | finished async request 2022-04-13T13:05:10.208Z | 1.0.204 | INFO | ibmfl.party.party_protocol_handler | Handling async request in a separate thread 2022-04-13T13:05:10.208Z | 1.0.204 | INFO | ibmfl.party.party_protocol_handler | Received request from aggregator 2022-04-13T13:05:10.208Z | 1.0.204 | INFO | ibmfl.party.party_protocol_handler | Received request in with message_type: 7 2022-04-13T13:05:10.208Z | 1.0.204 | INFO | ibmfl.party.party_protocol_handler | Received request in PH 7 2022-04-13T13:05:10.213Z | 1.0.204 | INFO | ibmfl.model.xgb_fl_model | Performing Model Inference Process 2022-04-13T13:05:10.259Z | 1.0.204 | INFO | ibmfl.party.training.local_training_handler | {'acc': 0.7587901120835252, 'f1': 0.0, 'precision': 0.0, 'recall': 0.0, 'average precision': 0.24, 'roc auc': 0.5, 'negative log loss': 8.33} 2022-04-13T13:05:10.259Z | 1.0.204 | INFO | ibmfl.party.party_protocol_handler | successfully finished async request 2022-04-13T13:05:11.210Z | 1.0.204 | INFO | ibmfl.party.party_protocol_handler | received a async request 2022-04-13T13:05:11.210Z | 1.0.204 | INFO | ibmfl.party.party_protocol_handler | finished async request 2022-04-13T13:05:11.211Z | 1.0.204 | INFO | ibmfl.party.party_protocol_handler | Handling async request in a separate thread 2022-04-13T13:05:11.211Z | 1.0.204 | INFO | ibmfl.party.party_protocol_handler | Received request from aggregator (略) -
指定した回数のトレーニングが完了すると、party は STOP の要求を受信し、停止します。
party出力2022-04-13T13:08:31.383Z | 1.0.204 | INFO | ibmfl.party.party_protocol_handler | received a STOP request -
すべてのトレーニングが完了し、統合済みのモデルが使用可能になりました。モデルの実体はpickle形式で保存されており、Watson Machine Learning上にデプロイメントを作成したり、モデルをダウンロ―ドして任意の環境で実行することができます。
管理者の作業(続き)
再び、管理者のNotebookに戻ります。
6. Save Trained Model To Project (プロジェクトへのトレーニング済みモデルの保存)
モデルの実体は、プロジェクトに関連付けられたIBM Cloud Objecto Storagepickle形式で保存されています。
Watson Studio のUIから確認できるよう、モデルをプロジェクトの資産へ登録します。
6.1 Connection to COS (IBM Cloud Object Storageへの接続)
6.2 Connection to COS (IBM Cloud Object Storageへの接続)
6.3 Save model to project
7. Clean Up Project (チュートリアルで作成したオブジェクトの削除)
チュートリアルで作成した資産を削除します。
7.1 List all training jobs in project
7.2 Delete all training jobs in this project created by this notebook
7.3 List all remote training systems in project
7.4 Delete all remote training systems in this project created by this notebook
4. 関連資料
CP4DaaSのFederated Learningに関連する資料です。
製品資料:IBM Federated Learning
https://dataplatform.cloud.ibm.com/docs/content/wsj/analyze-data/fed-lea.html?audience=wdp&locale=en
APIドキュメント:Watson Machine Learning
https://cloud.ibm.com/apidocs/machine-learning-cp
Pythonライブラリ:ibm-watson-machine-learning
https://pypi.org/project/ibm-watson-machine-learning/
