iOS9になってSegueの設定はかなり簡単になった模様。
- 結構読まれているようですので、Storyboardのキャプチャ画像を追加しました。
- unwind:forSegue: towardsViewControllerを作成sるのは「戻り先のViewController」であることに注意
##設定する遷移例
ViewAとViewBの2つのViewがある場合を例として説明します。
ViewAには「進む」ボタン、ViewBには「戻る」ボタンがあり、ViewAで「進む」ボタンを押すとViewBが現れ、ViewBで作業がおわると「戻る」ボタンでViewBの作業結果をViewAに反映してから、ViewBを消去するとします。
ViewAで(進むボタン)-->ViewBを表示
ViewAを表示<---------ViewBで(戻るボタン)
手順
###準備(ViewControler A,Bの作成)
####プロジェクトを作成


####コントローラ名をViewControler_Aに変更

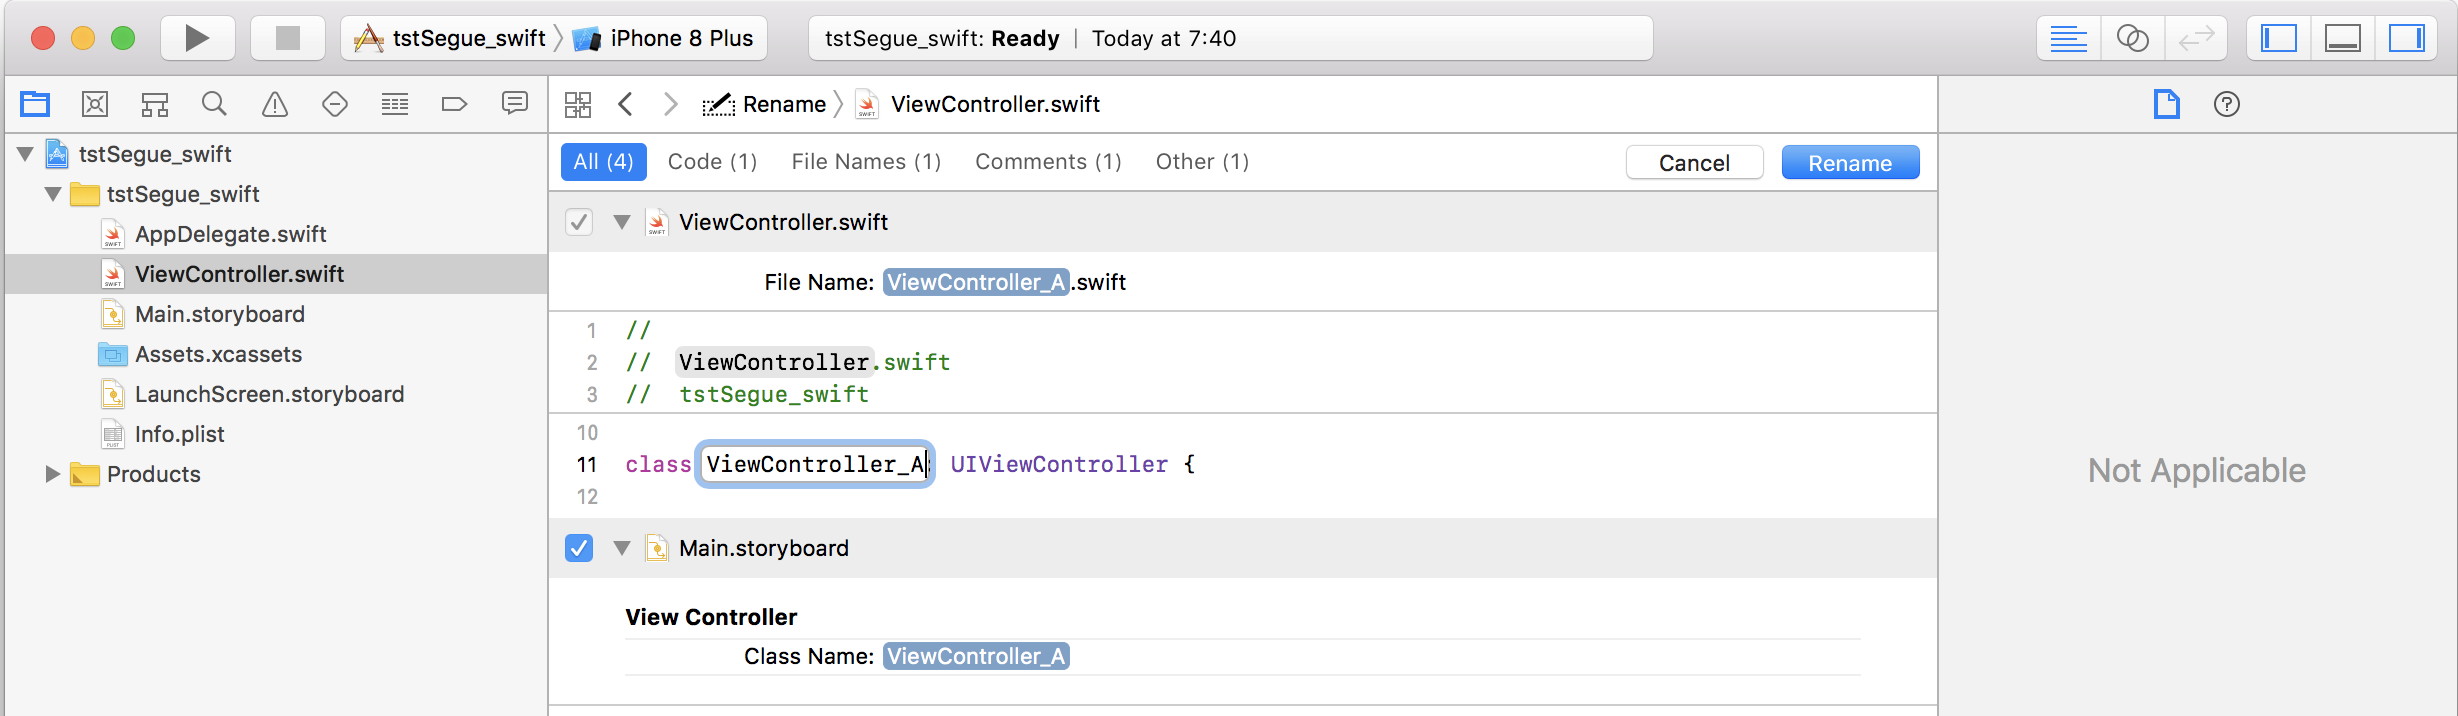
####コントローラViewControler_Bクラスを作成
 !
!

####StoryboardにViewControllerを追加

####追加したViewControllerにViewControler_Bクラスをひもづけ

###画面遷移(進む)の設定手順
F1.StoryboardのViewAに「進むボタン」を設置
F2.Segueの作成
「進む」ボタンをCtrl+クリックして、遷移先のView(この例ではViewB)の上までドラッグし離す。すると、メニューが現れるのでSegueのActionを選択する。


F3.(option)矢印に名前(segue identifier)をつける。
viewAからViewBに画面遷移するときに、パラメータを渡したり、画面設定を行おうとするのであれば、ここで、このSegueに名前をつけておく。

そして、ViewAの準備処理(prepareForSegue)にて、行き先を判別するために、segueのidを使用する。
具体的なコードは、下記の戻る処理でのViewBのprepareForSegueを参考に。
###画面遷移(戻る)の設定手順
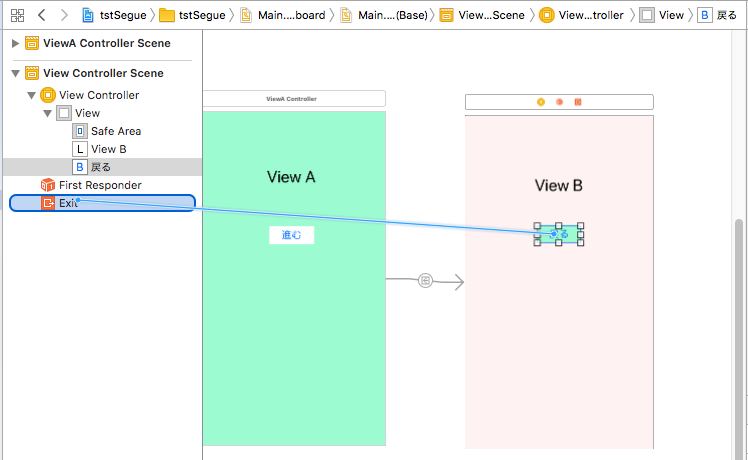
B1.StoryboardのViewBに「戻るボタン」を設置
B2.ViewAに対応するViewControllerに
B2.ViewA(戻り先)に対応するViewControllerに
unwindForSegue:towardsViewController:を定義する。(名前は変えること)
//ViewAのコントローラ
-(IBAction)myUnwindAction:(UIStoryboardSegue *)unwindSegue towardsViewController:(UIViewController *)subsequentVC{
}//あればよい
//ViewAのコントローラ
//  2020.11.02 bug fix
//          vvvvvvvv 不要
//@IBAction override func myUnwindAction
@IBAction func myUnwindAction(for unwindSegue: UIStoryboardSegue, towardsViewController subsequentVC: UIViewController) {
}
B3.ViewBの戻るボタンをCtrl+ドラッグして矢印を出し、ViewBのExitで離す。すると、先ほど定義したunwindForSegue:towardsViewController:が現れるので、これを選択する。
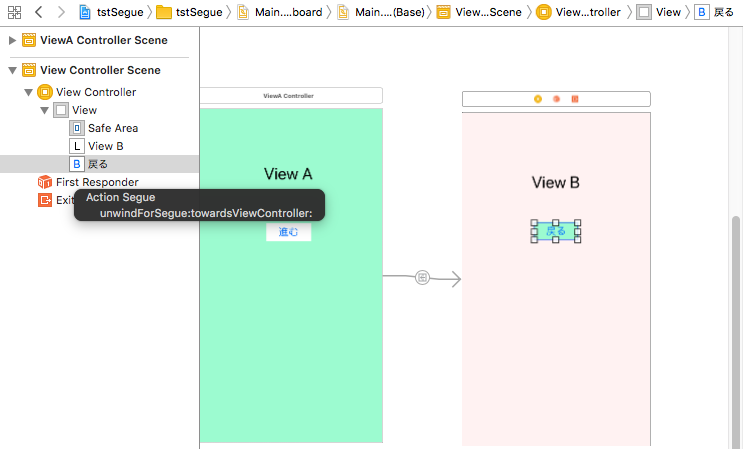
B4.(opt)矢印に名前(segue identifier)をつける
storyboardのシーンからunwind segueを選択し、attribute inspectorを選ぶと、Storyborad Unwind SegueにIdentifierの項があらわるので、ここにsegueのidentifierをセットする。例)myRewindSegue
viewBからの画面遷移準備処理(prepareForSegue)にて、行き先を判別するためにsegueのidを利用する(サンプルプログラム参照)。

B5.(opt)prepareForSegue:senderでViewAを設定する。
##処理例(Objective-C)
例えば、ViewAがアプリケーションのViewで、アプリケーションの設定編集を行うViewBで行い、編集完了後ViewAに編集を反映させることを想定する。
viewBで戻るボタンがおされると、viewBのprepareForSegueが呼ばれる。引数のsegueのidentifilerをB4で設定したsegue identifierと一致するか調べ、一致すればviewAの設定値変更と、viewAで設定更新処理を行う。
#import <UIKit/UIKit.h>

@interface ViewAController : UIViewController
@property NSInteger iParam;
-(void)setupMethod;
@end
#import "ViewAController.h"

@interface ViewAController ()

@end

@implementation ViewAController
...中略...
-(IBAction)myUnwindAction:(UIStoryboardSegue *)unwindSegue towardsViewController:(UIViewController *)subsequentVC{
}
*/
@end
#import "ViewAController.h"
#import "ViewBController.h"

@interface ViewBController ()

@end

@implementation ViewBController
...中略...
//パラメータのセット(option)
-(void)prepareForSegue:(UIStoryboardSegue *)segue sender:(id)sender{
    //    if ([segue.identifier isEqualToString:@"myRewindSegue"]) {//ここでB4でつけた名前を用いる。
    ViewAController *vcA=(ViewAController*)segue.destinationViewController;
    vcA.iParam=123;//viewAの変数に値をセット
    [vcA setupMethod];//viewAの更新処理を呼び出す
}
@end
###処理例 (Swift)
import UIKit

class ViewController_A: UIViewController {
    var iParam:  NSInteger = 0

    override func viewDidLoad() {
        super.viewDidLoad()
    }

    override func didReceiveMemoryWarning() {
        super.didReceiveMemoryWarning()
    }

    func setupMethod(){}
    @IBAction func myUnwindAction(unwindSegue: UIStoryboardSegue){
   if(unwindSegue.identifier=="myRewindSegue"){
        }
    }
}
import UIKit

class ViewController_B: UIViewController {

    override func viewDidLoad() {
        super.viewDidLoad()
    }

    override func didReceiveMemoryWarning() {
        super.didReceiveMemoryWarning()
    }
    override func prepare(for segue: UIStoryboardSegue, sender: Any?) {
        if (segue.identifier=="myRewindSegue") {//ここでB4でつけた名前を用いる。
            let vcA = segue.destination as! ViewController_A;// destinationViewController;
            vcA.iParam=123;//viewAの変数に値をセット
            vcA.setupMethod();//viewAの更新処理を呼び出す
        }
    }
}
##参考iOS8
画面遷移(進む)の設定手順
同じ
###画面遷移(戻る)(ボタン)の設定手順
1.StoryboardのViewBに「戻るボタン」を設置
2.ViewAに戻り先のメソッドを定義
- (IBAction)xxxReturnAction:(UIStoryboardSegue *)segue{}
3. ViewBの戻るボタンをCtrl+ドラッグして矢印を出し、ViewBのExitで離す。
さきほどのメソッドを選択
###画面遷移(戻る)(コマンド)の設定手順
1.ViewAに戻り先のメソッドを定義
- (IBAction)xxxReturnAction:(UIStoryboardSegue *)segue{}
2.ViewBから"Exit"を選択し、UtilitiesペインのConnections inspector(→)を表示
3.[xxxReturnActionが現れる]
xxx_segueの右の(+)をドラッグし、ViewAの[ビューコントローラ]に接続
4.[manualが現れる]
Inspector(=v=)を表示。
identifierにsegueの名前をつける(yyySegue)
5.ボタンアクションなどに遷移アクションを記述
[self performSegueWithIdentifier:@“yyyySegue" sender:self];
##参考2 パラメータを渡す
次の順序で実行されるのでその中に記載する
1.遷移元ビュー(現在表示中のビュー)のViewControllerのcanPerformUnwindSegueAction:fromViewController:withSender:メソッドの呼び出し
2.遷移元ビューのViewControllerのprepareForSegue:sender:メソッドの呼び出し
3.Unwind Segueで設定された遷移先ビューのアクションメソッドの呼び出し
4.セグエ実行
//canPerformUnwindSegueAction:fromViewController:withSender:

- (void)prepareForSegue:(UIStoryboardSegue *)segue sender:(id)sender{
//ここでパラメータをセット
}
//iOS8
- (IBAction)xxxReturnAction:(UIStoryboardSegue *)segue{
//ここでパラメータを受け取る
}
編集履歴
2020.11.02 swift 参考コードに誤り(override 不要)
画面遷移(戻る)の設定手順 unwindForSegue:towardsViewController:を定義する