編集履歴
2020年12月
プラグインを使用
Firebaseの更新に合わせてコードを変更
事前準備
Firebase とTwitter Developer でTwitterログインができるように準備をしてください。
Twitterログインには申請が必要です。申請がまだの方は先に申請をお願いします。
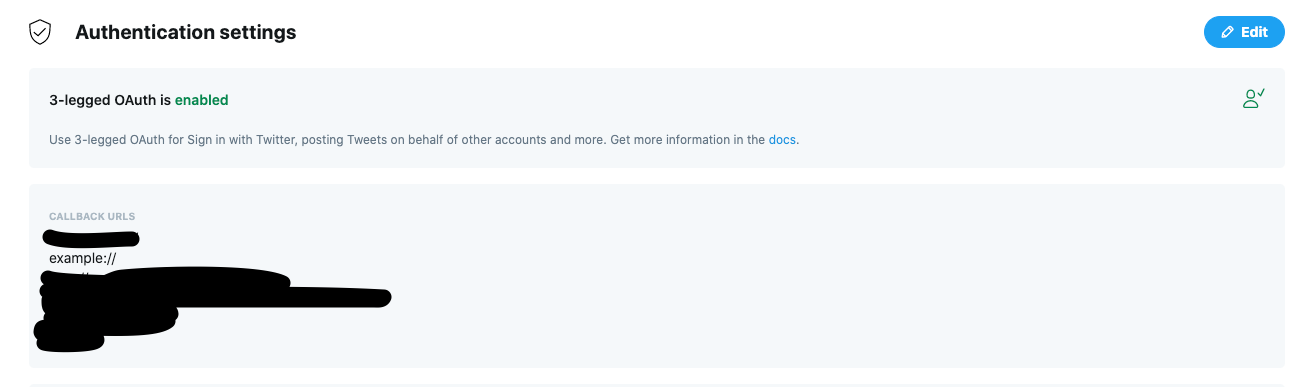
Twitter Developer の設定
Twitter Developer を開きAuthentication settings にCallback URLs を設定します。
今回は例としてexample:// を追加しました。
TwitterSDK を使用しないのでtwittersdk:// の追加が必要ありません。
Twitterログインプラグインの追加
今回使用するプラグインは twitter_login を使用します。
2020年12月24日 現在 最新バージョン 2.1.1
dependencies:
  twitter_login: ^2.1.1
iOSの設定
Twitter Developer に追加したコールバックURLをInfo.plist に追加します。
<key>CFBundleURLTypes</key>
<array>
  <dict>
    <key>CFBundleTypeRole</key>
    <string>Editor</string>
    <key>CFBundleURLName</key>
    <string>example</string>
    <key>CFBundleURLSchemes</key>
    <array>
      <string>app</string>
    </array>
  </dict>
</array>
Androidの設定
Twitter Developer に追加したコールバックURLをAndroidManifest.xml に追加します。
<intent-filter>
  <action android:name="android.intent.action.VIEW" />
  <category android:name="android.intent.category.DEFAULT" />
  <category android:name="android.intent.category.BROWSABLE" />
  <!-- Accepts URIs that begin with "example://gizmos” -->
  <!-- Registered Callback URLs in TwitterApp -->
  <data android:scheme="example"
        android:host="gizmos" /> <!-- host is option -->
</intent-filter>
Flutter側の処理
apiKey, apiSecretKey はTwitterDeveloper の値を貼り付けてください。
import 'package:flutter/material.dart';
import 'package:twitter_login/twitter_login.dart';

void main() {
  runApp(MyApp());
}

class MyApp extends StatefulWidget {
  @override
  _MyAppState createState() => _MyAppState();
}

class _MyAppState extends State<MyApp> {
  @override
  Widget build(BuildContext context) {
    return MaterialApp(
      home: Scaffold(
        appBar: AppBar(
          title: const Text('Twitter Login App'),
        ),
        body: Center(
          child: FlatButton(
            child: Text('Login With Twitter'),
            onPressed: () async {
              final twitterLogin = TwitterLogin(
                apiKey: 'fsaf7893nkva0df',
                apiSecretKey: 'l0n7zqrgerg93sd0f9723lg90u734',
                redirectURI: 'example://',
              );
              final authResult = twitterLogin.login();
              switch (authResult.status) {
                case TwitterLoginStatus.loggedIn:
                  // success
                  print('====login success====');
                  final credential = TwitterAuthProvider.credential(
                    accessToken: authResult.authToken,
                    secret: authResult.authTokenSecret,
                  );
                  await FirebaseAuth.instance.signInWithCredential(credential);
                  break;
                case TwitterLoginStatus.cancelledByUser:
                  // cancel
                  print('====login cancel====');
                  break;
                case TwitterLoginStatus.error:
                  // error
                  print('====login error====');
                  break;
              }
            },
          ),
        ),
      ),
    );
  }
}
あとがき
以上でTwitterのログインができます。
2019年の記事を刷新しただけで特に目新しいものは無いですが、Google検索で上位に出てきていたので、記事をブラッシュアップしようと思い書き直しました。
またFirebaseの更新があったりした際には変更していこうと思います。
今回使用したプラグイン
twitter_login
Twitterもやってます
良ければフォローお願いします
Twitter: 0maru_dev
弊社ではFlutter エンジニアを募集しています。
気になった方は下記のリンクから会社の詳細など確認してみてください。
オンラインで面談等もできるようなので詳しく聞きたい方はお問い合わせください。
株式会社TORICO - RECRUIT