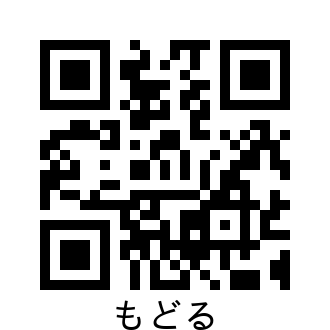
出来上がるもの
準備
colab上で動作させるために必要なものをインストールします。
必要なライブラリのインストール
pip install qrcode pillow
用意したサンプルで日本語の文字列を画像に書き込むためフォントをインストール
!apt-get -y install fonts-ipafont-gothic
スクリプト実部
import qrcode
import PIL.Image
import PIL.ImageDraw
import PIL.ImageFont

imgpath  = "qr.png" # 画像の保存場所とファイル名
text     = "もどる" # QRコードに組み込みたい情報
# 今回は日本語の表記を追加したいので日本語フォントを用意
fontname = "/usr/share/fonts/opentype/ipafont-gothic/ipag.ttf"
# 表記する文字のサイズ
fontsize = 36

# 表記する文字サイズを取得する関数
def getTextSize(_text="test", _fontname="", _fontsize=36):
  canvasSize    = (1, 1)
  backgroundRGB = (255, 255, 255)
  img  = PIL.Image.new("RGB", canvasSize, backgroundRGB)
  draw = PIL.ImageDraw.Draw(img)
  font = PIL.ImageFont.truetype(_fontname, _fontsize)
  textWidth, textHeight = draw.textsize(_text, font=font)
  return textWidth, textHeight

# QRコードを作成し、文字表記を下部中央に追記する
def makeQRimg(_imgpath, _text, _fontname="", _fontsize=36):
  # 誤り訂正レベルを最大に、余白は仕様上の最小幅
  qr = qrcode.QRCode(
      error_correction=qrcode.constants.ERROR_CORRECT_H,
      border=4,
  )
  qr.add_data(_text)
  qr.make()
  img = qr.make_image().convert("RGB")

  textSize    = getTextSize(_text, _fontname, _fontsize)
  textTopLeft = (img.size[0]/2 - textSize[0]/2, img.size[1] - textSize[1])
  draw = PIL.ImageDraw.Draw(img)
  font = PIL.ImageFont.truetype(_fontname, _fontsize)
  draw.text(xy=textTopLeft, text=_text, fill=(0, 0, 0), font=font)

  # QRコードを保存
  img.save(_imgpath)

# 実行
makeQRimg(imgpath, text, fontname, fontsize)
# 作成したQRコードをIPython上で表示
from IPython.display import Image, display_png
display_png(Image(imgpath))