はじめに
学校の課題で簡易的な仕様書に沿ってDjangoを用いた天気予報アプリケーションを作ることになりました。
以前、天気予報をLINEにプッシュ通知するシステムを作るという課題があったので、比較的スムーズに進められそうだな〜と感じていました。
仕様
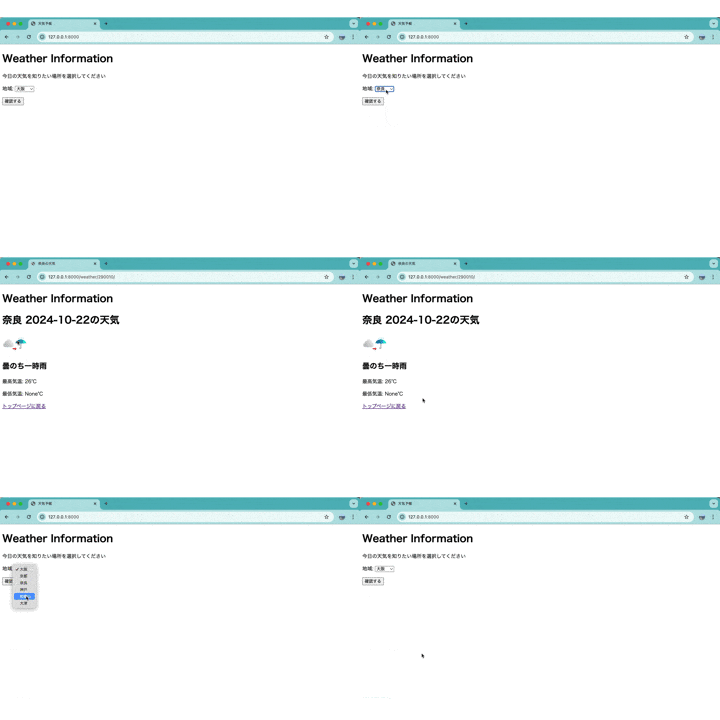
1、 Djangoでトップページを開くと、近畿地方の地名を選択して送信できるフォームが表示されること
2、「確認する」ボタンを押すと、選択した地域の今日の天気が表示されること 今日の天気には以下の内容が含まれる
- 選択した地名
- 今日の日付
- 天気の画像
- 1日の天気の移り変わり
- 最高気温
- 最低気温
3、今日の天気が表示されるページに、トップページへ戻るリンクがあること
(今回の課題は、装飾が評価の対象外)
1.環境構築
python3 -m venv django_env
source django_env/bin/activate
pip install django
仮想環境を作成,有効化し,Djangoをインストールします
2.Djangoプロジェクトとアプリのセットアップ
2.1 Django プロジェクトを作成
django-admin startproject weather_app
cd weather_app
2.2 Django アプリを作成
python manage.py startapp weather
2.3 settings.py にアプリを登録
INSTALLED_APPS = [
    'weather',
    # その他のアプリ
]
3.フォームとURLの作成
3.0 以下の天気予報APIを使用します
https://weather.tsukumijima.net/
3.1 近畿地方の地名を選択するフォームを定義する
from django import forms

class WeatherForm(forms.Form):
    KINKI_CHOICES = [
        ('270000', '大阪'),
        ('260010', '京都'),
        ('290010', '奈良'),
        ('280010', '神戸'),
        ('300010', '和歌山県'),
        ('250000', '大津'),
    ]
    location = forms.ChoiceField(choices=KINKI_CHOICES, label='地域')
3.2 URLパターンの設定
from django.urls import path
from . import views

app_name = 'weather'

urlpatterns = [
    path('', views.home, name='home'),  # トップページのルート
    path('weather/<str:city_id>/', views.weather_info, name='weather_info'),  # 天気情報ページのルート
]
from django.contrib import admin
from django.urls import path, include

urlpatterns = [
    path('admin/', admin.site.urls),
    path('', include('weather.urls')),
]
4.API呼び出しとビューの作成
4.1 天気APIと通信するロジックの作成
import requests

API_URL = 'https://weather.tsukumijima.net/api/forecast'

def get_weather_data(city_id):
    url = f"{API_URL}/city/{city_id}"
    response = requests.get(url)
    data = response.json()

    weather_info = {
        'location': data['location']['city'],
        'date': data['forecasts'][0]['date'],
        'description': data['forecasts'][0]['detail']['weather'],
        'icon': data['forecasts'][0]['image']['url'],
        'temp_max': data['forecasts'][0]['temperature']['max']['celsius'],
        'temp_min': data['forecasts'][0]['temperature']['min']['celsius'],
    }

    return weather_info
4.2 ビューの作成
トップページと天気情報ページのビューをviews.pyに作成します。
from django.shortcuts import render, redirect
from .forms import WeatherForm
from .services import get_weather_data

def home(request):
    if request.method == 'POST':
        form = WeatherForm(request.POST)
        if form.is_valid():
            city_id = form.cleaned_data['location']
            return redirect('weather:weather_info', city_id=city_id)
    else:
        form = WeatherForm()
    return render(request, 'weather/home.html', {'form': form})

def weather_info(request, city_id):
    weather_data = get_weather_data(city_id)  # APIから天気データを取得
    return render(request, 'weather/weather_info.html', {'weather': weather_data})
5.テンプレートの作成
5.1地域選択フォームを表示するテンプレートを作成
<!DOCTYPE html>
<html lang="ja">
<head>
    <meta charset="UTF-8">
    <title>天気予報</title>
</head>
<body>
    <h1>Weather Information</h1>
    <p>今日の天気を知りたい場所を選択してください</p>
    <form method="post">
        {% csrf_token %}
        {{ form.as_p }}
        <button type="submit">確認する</button>
    </form>
</body>
</html>
5.2選択した地域の天気情報を表示するテンプレートを作成
<!DOCTYPE html>
<html lang="ja">
<head>
    <meta charset="UTF-8">
    <title>{{ weather.location }}の天気</title>
</head>
<body>
    <h1>Weather Information</h1>
    <h1>{{ weather.location }} {{ weather.date }}の天気</h1>
    <img src="{{ weather.icon }}" alt="天気のアイコン">
    <h2>{{ weather.description }}</h2>
    <p>最高気温: {{ weather.temp_max }}°C</p>
    <p>最低気温: {{ weather.temp_min }}°C</p>

    <a href="{% url 'weather:home' %}">トップページに戻る</a>
</body>
</html>
6.サーバーの起動と動作確認
最後にDjangoサーバーを起動し、ブラウザでアクセスします。
python manage.py runserver
フォルダ構造
weather_app/
├── weather_app/
│   ├── __init__.py
│   ├── settings.py
│   ├── urls.py
│   ├── wsgi.py
│   ├── asgi.py
├── weather/
│   ├── __init__.py
│   ├── admin.py
│   ├── apps.py
│   ├── forms.py
│   ├── models.py
│   ├── services.py
│   ├── views.py
│   ├── urls.py
│   └── templates/
│       └── weather/
│           ├── home.html
│           └── weather_info.html
├── manage.py
その他
記事作成後に,三重県のことを忘れていたことに気づきました。
