5
7

Delete article

Deleted articles cannot be recovered.

Draft of this article would be also deleted.

Are you sure you want to delete this article?

More than 5 years have passed since last update.

Custom Vision ServiceのObject Detectionを使ってみた

Last updated at Posted at 2018-09-28

以前、Custom Vision Serviceを使ってみたという記事を書きました。そのCustom Vision ServiceがUpdateされて写真のタグ付けだけでなく、写真の中のObject Detection(物体検出)もできるようになったのでまたまた使ってみました。
注:Object Detectionは2018/09/28時点でプレビュー

#Custom Vision Serviceとは
Custom Vision Serviceの概要については以下の記事に書いています。
Custom Vision Serviceを使ってみた

#実際にやってみる
前回は写真に写っている犬の犬種を当てるというようなモデルを作成したので、今回も同じテーマでモデルを作って見たいと思います。
[NEW PROJECT]から新しいプロジェクトを作成します。
Custom Vision - Projects 2018-09-27 17-44-11.png
必要な情報を入れて[Project Types]は[Object Detection]を選択します。
Custom Vision - Projects 2018-09-27 17-45-45.png
空のプロジェクトができるのでトレーニング用の写真を登録します。[Add images]を選択します。
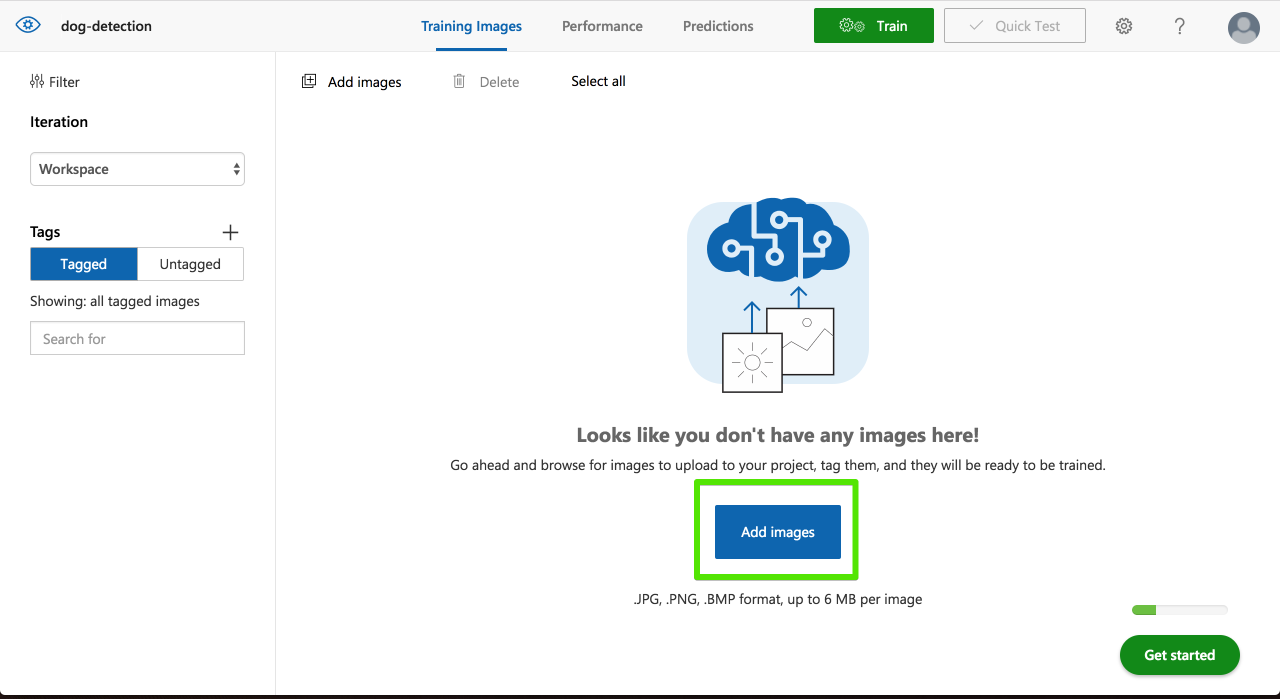
Custom Vision: dog-detection - Training Images 2018-09-27 17-46-29.png
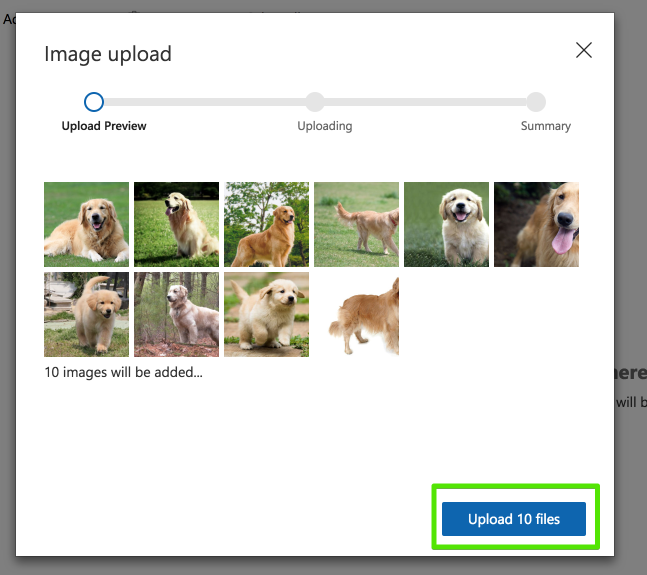
訓練データを選択して[Upload XX files]を選択。
Custom Vision: dog-detection - Training Images 2018-09-27 17-48-00.png
アップロードが完了したら[Done]
Custom Vision: dog-detection - Training Images 2018-09-27 17-48-13.png
左ペインの[Tags]の[Untagged]の中にアップロードした画像は入ります。
表示されている画像のどれかを選択します。
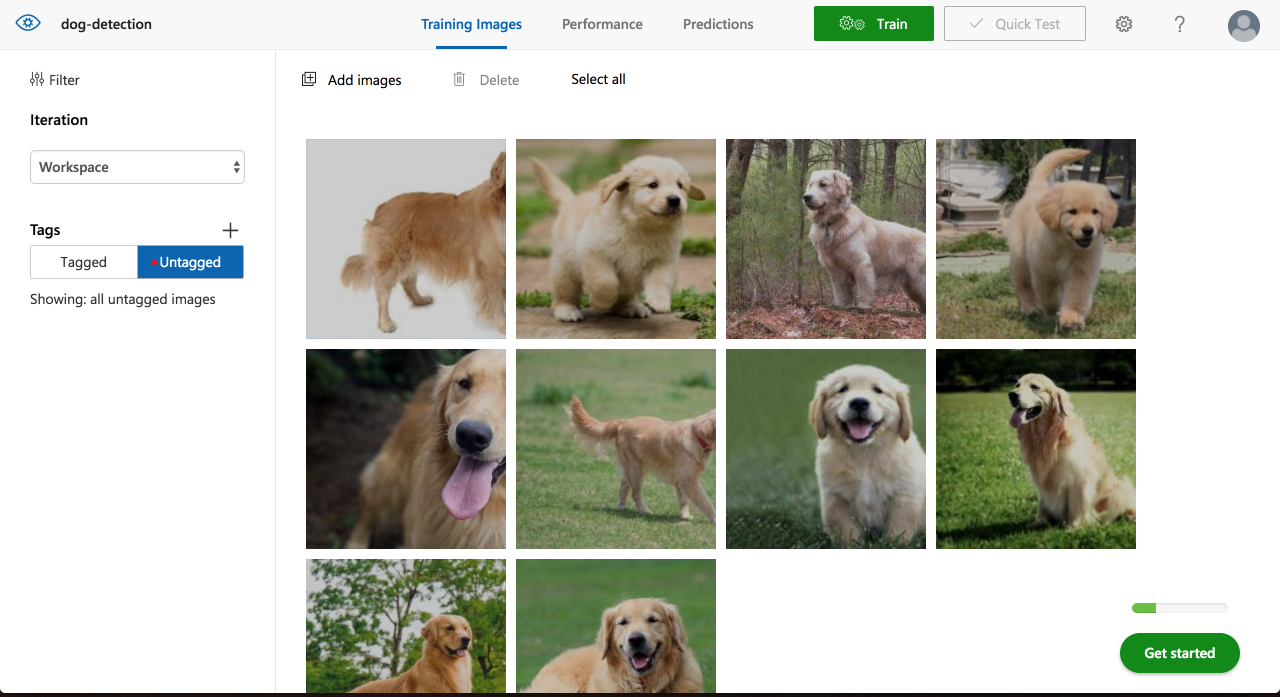
Custom Vision: dog-detection - Training Images 2018-09-27 17-48-32.png
写真をタグで分けるのであればまとめてタグ付けなどができるのですが、Object Detectionは画像内での物体の位置の情報が必要になるのでここからは1枚1枚の操作になります。
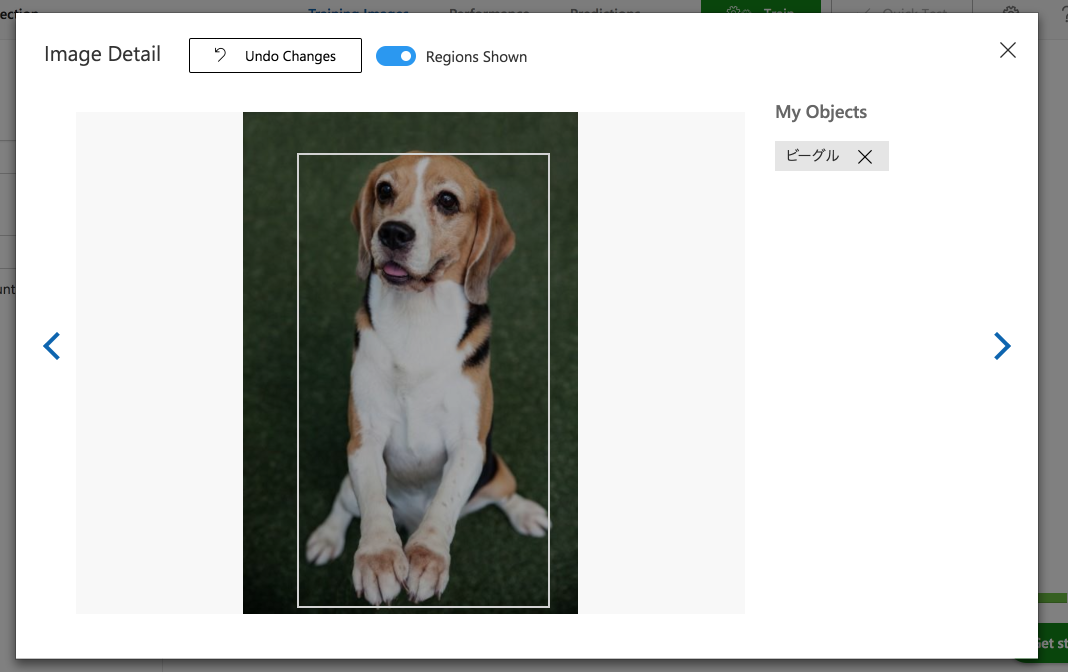
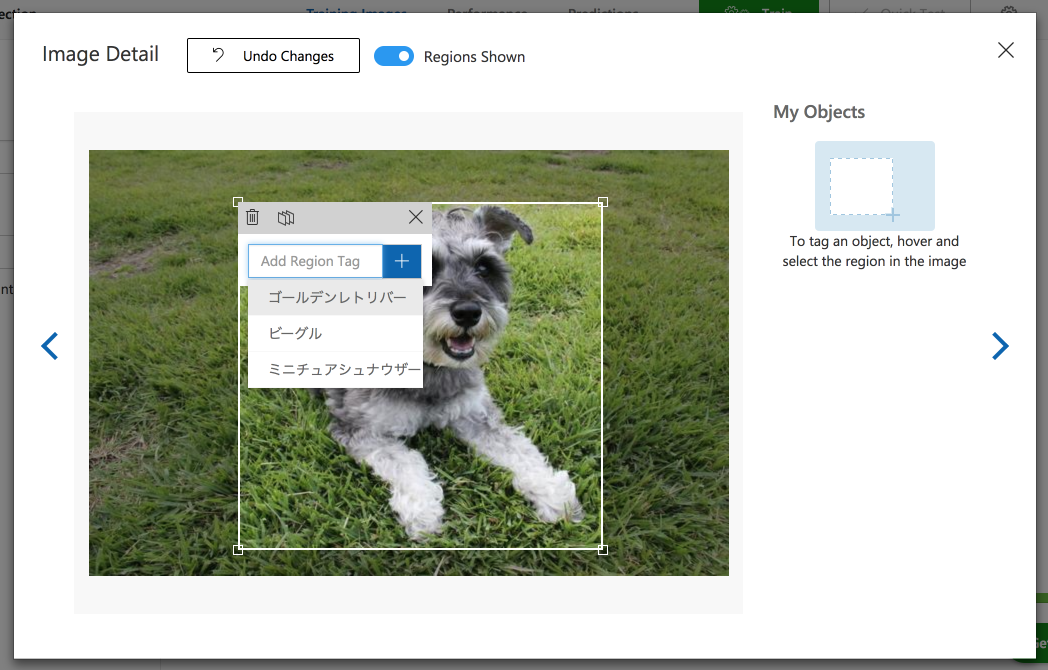
画像を選択するとプレビューが表示されるので、対象が写っているエリアをマウスドラッグで選択しタグを入力します。
Custom Vision: dog-detection - Training Images 2018-09-27 17-49-05.png
アップロードした写真に対してどんどん同じ操作をします。
画面右にある[>]を選択することで次の訓練データを表示することができます。
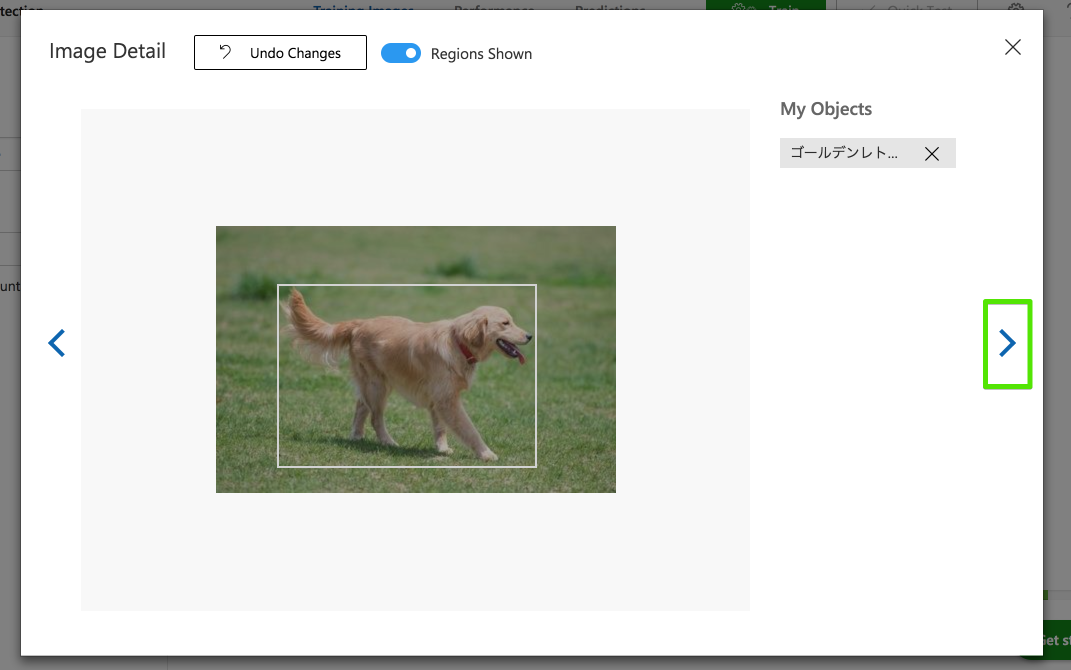
Custom Vision: dog-detection - Training Images 2018-09-27 17-50-14.png
同じようにビーグルもタグ付け
Custom Vision: dog-detection - Training Images 2018-09-27 17-52-27.png
ミニチュアシュナウザーもタグ付け
Custom Vision: dog-detection - Training Images 2018-09-27 17-55-30.png
2頭写っている写真もそれぞれタグ付けします。
Custom Vision: dog-detection - Training Images 2018-09-27 18-03-03.png

全てのデータのラベリングをしたら先ほどの左ペインの[Tags]の[Tagged]の中に全ての訓練データが入ります。
ここではまだ学習は終了していません。画面右上の[Train]を選択して学習を開始します。
Custom Vision: dog-detection - Training Images 2018-09-27 17-56-28.png
【備考】タグあたりの写真の枚数が15枚未満だと学習を行うことができません。
公式ドキュメントの前提条件には

A series of images to train your classifier (with a minimum of 30 images per tag).

とあるのですが、なぜここに差があるのかは不明です。
Custom Vision: dog-detection - Training Images 2018-09-27 17-57-22.png

正常に学習が完了すると以下のような画面に遷移します。
とりあえずモデルをテストしたいので画面右の[Quick Test]を選択します。
Custom Vision: dog-detection - Performance 2018-09-27 18-07-54.png
評価データは画像のURLまたはローカルから選択することができます。
Custom Vision: dog-detection - Performance 2018-09-27 18-09-15.png
まずはビーグル1頭の写真を評価してみます。
ビーグル.jpg
結果は98.6%の確率で赤枠の部分がビーグルであると判定されました。
Custom Vision: dog-detection - Performance 2018-09-27 18-10-37.png
では次にビーグルとミニチュアシュナウザーそれぞれ1頭ずつの画像ではどうでしょうか。
1.jpg

Well done!!
それぞれの位置がとタグ付けがほぼ完璧にできていますね。
しかも複数の犬種が混ざった写真は学習させていないのに1枚の写真に写った複数の犬種を検出することができました。
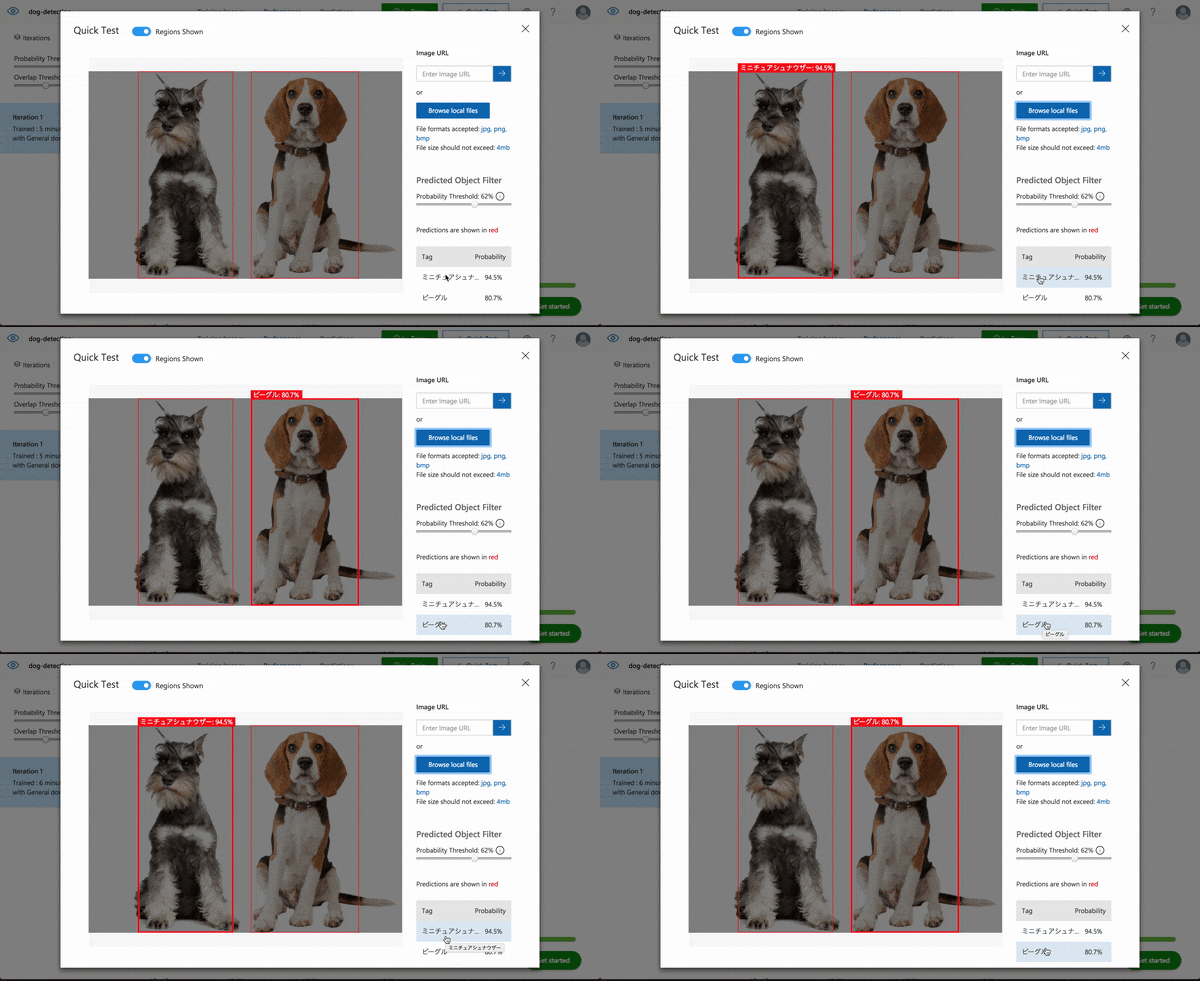
ezgif.com-video-to-gif.gif

作成したモデルは今までのCustom Vision Serviceと同じようにWeb API経由で使用することができます。
[Performance]から[Prediction URL]を選択して接続情報を入手できます。
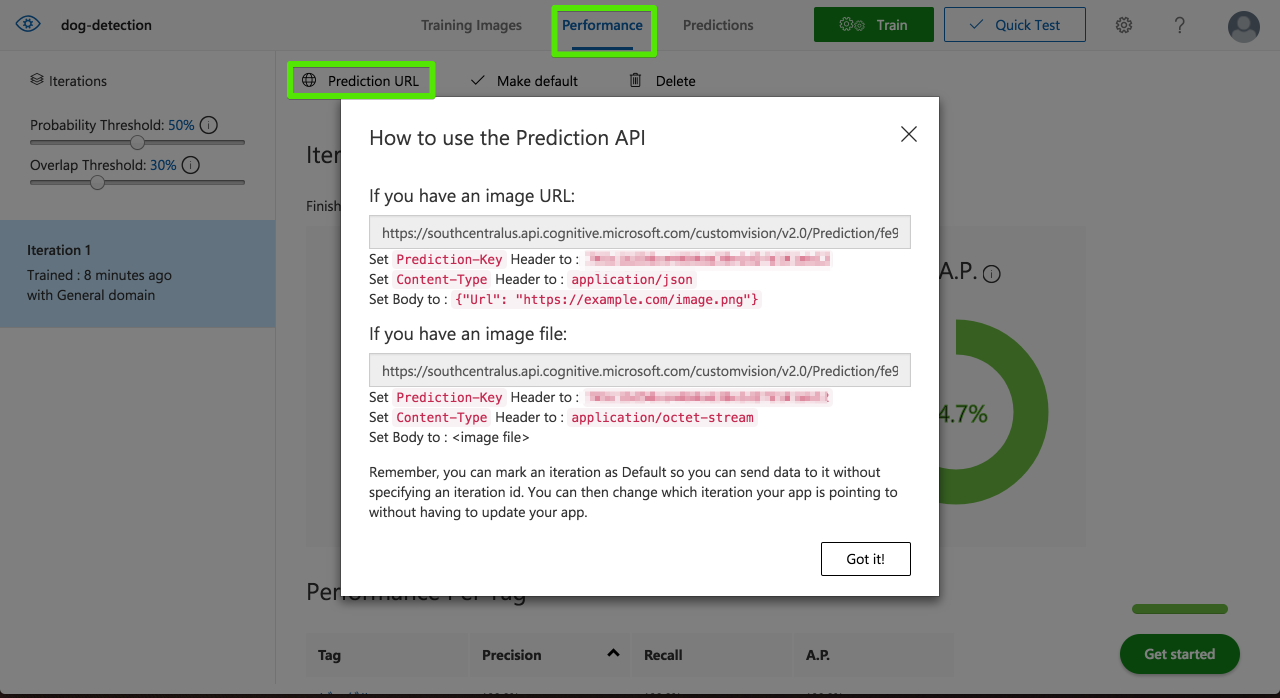
Custom Vision: dog-detection - Performance 2018-09-27 18-15-23.png

#モデルのExportはまだできない
Classificationのプロジェクトタイプで可能なTensor Flow, CoreML, ONNXファイルへのExport機能は2018/09/28時点ではまだ使用できないようです。

#さいごに
この機能のリリースが2017年後半だったと記憶しているのでだいぶ時間が経ってしまいましたがCustom Vision Serviceの進化を実感しました!

5
7
0

Register as a new user and use Qiita more conveniently

  1. You get articles that match your needs
  2. You can efficiently read back useful information
  3. You can use dark theme
What you can do with signing up
5
7

Delete article

Deleted articles cannot be recovered.

Draft of this article would be also deleted.

Are you sure you want to delete this article?