会社ではgitlabを使っているのですが、
個人の開発中のプログラムなどの管理は、Bitbucketで管理しています。
非公開のリポジトリ管理が無料できる利点があります。
今回は認証鍵の設定をまとめます。
アカウントを作成
下記でアカウントを作成する。
※今回は、端折ります。
SSH認証鍵の設定
公開鍵と秘密鍵を作成
$ ssh-keygen -t rsa -C *********@*****.*** //ご自身のメールアドレス
Generating public/private rsa key pair.
次に鍵の格納先を指定。
特に指定がなければ、そのまま、Enter
※今回は複数の鍵を管理しているので、格納先を指定する。
(Enter file in which to save the key (/Users/*********/.ssh/id_rsa):の後に、格納先を指定。)
Enter file in which to save the key (/Users/*********/.ssh/id_rsa): /Users/*********/.ssh/bitbucket/id_rsa
Enter passphrase (empty for no passphrase): #Enterを押下
Enter same passphrase again: #Enterを押下
Your identification has been saved in /Users/*********/.ssh/bitbucket/id_rsa.
Your public key has been saved in /Users/*********/.ssh/bitbucket/id_rsa.pub.
The key fingerprint is:
**:**:**:**:**:**:**:**:**:**:**:**:**:**:**:** *********@*****.***
The key's randomart image is:
+--[ RSA 2048]----+
|          *=++o  |
|         .o=Eo . |
|         oo+..o .|
|         oo. . = |
|        S . . +  |
|           . o   |
|            .    |
|                 |
|                 |
+-----------------+
鍵のパーミッションを変更する。
$ cd *********/.ssh/bitbucket/
$ chmod 600 id_rsa
.ssh/configの設定
Host bitbucket.org
    User git
    Port 22
    HostName bitbucket.org
    identityFile ~/.ssh/bitbucket/id_rsa
    TCPKeepAlive yes
    IdentitiesOnly yes
.ssh/configの設定方法はこちらで確認ください。
.ssh/configファイルでSSH接続を管理する
BitBucketへ公開鍵を設定
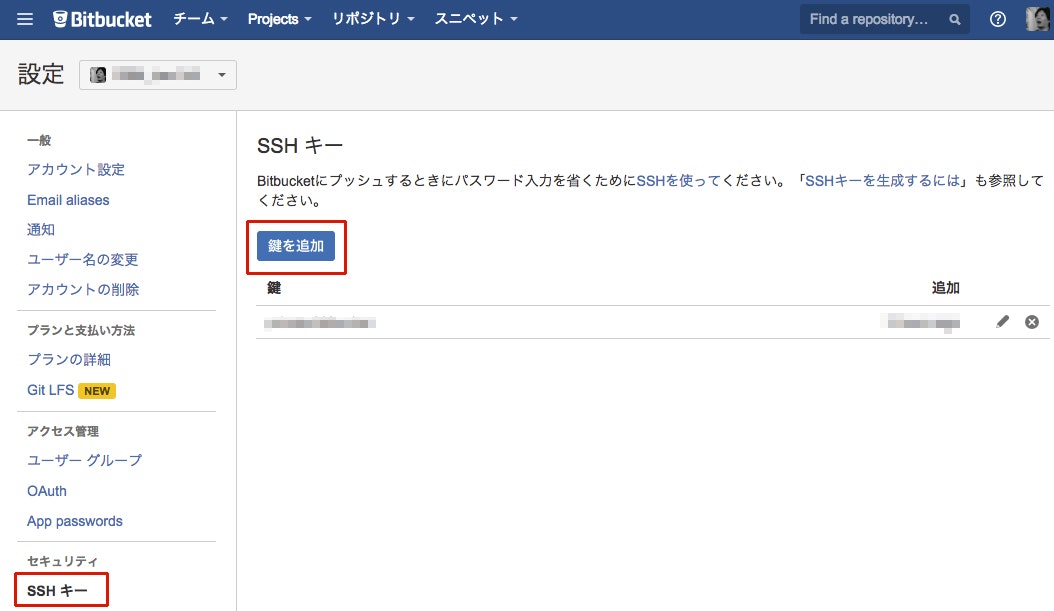
ログイン後、アイコンをクリックし、[アカウントの管理]をクリック。
左カラムのセキュリティ欄の[SSHキー]をクリックし、[鍵を追加]ボタンをクリック。
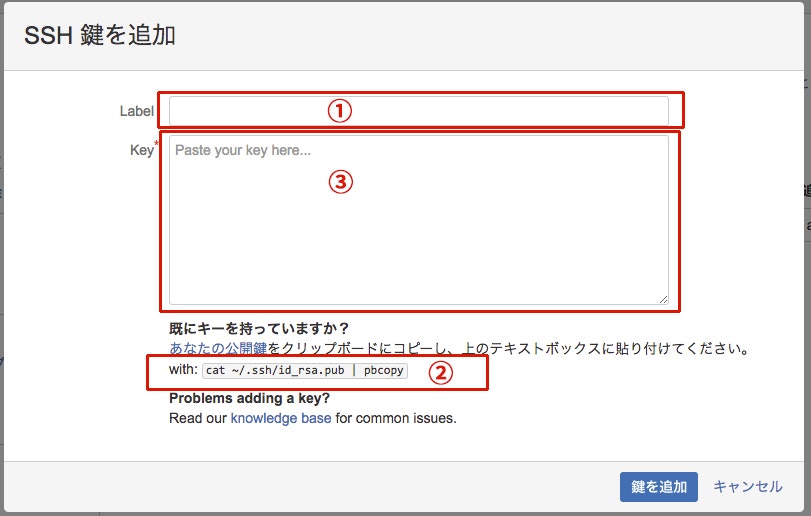
① 任意の名前
② 格納されている公開鍵をコピーする。(ターミナルで実行)
$ cat ~/.ssh/bitbucket/id_rsa.pub | pbcopy
③ コピーした公開鍵をペーストする。
接続できるか確認
$ ssh -T git@bitbucket.org
logged in as *********(アカウント名).

You can use git or hg to connect to Bitbucket. Shell access is disabled.
エラーが出なければ接続が成功。
git clone
リモートのリポジトリをcloneする。
$ git clone git@bitbucket.org:*********/test.git
終わりに
5ユーザーまで無料なので、小規模のチームや、個人で開発しているなどには良いのかなと思います。
gitの検証やgitの練習などにもいかがでしょうか。


