AWSにRailsアプリをイチから上げるシリーズ 項目表
| No | タイトル |
|---|---|
| その1 | ネットワーク、データベース設定編 |
| その2 | EC2設定編 |
| その3 | サーバー設定、Railsアプリ配置編 |
| その4 | Railsアプリの公開編 |
| その5 | ドメイン設定編 |
| その6 | http→httpsへSSL化編 |
【 第4章 】サーバー環境の構築
EC2にログインできたらいよいよRubyやNginx、MySQLなどをインストールしていきます。
1.Nginxの設定
1.サーバーをアップデート
$ sudo yum update
(パスワードや確認を求められます。確認はYESの'y'を入力)
2.Nginxのインストール
$ sudo amazon-linux-extras install nginx1.12 -y
3.Nginxの起動とインスタンス起動時自動起動の設定
$ sudo systemctl start nginx
$ sudo systemctl enable nginx
$ systemctl status nginx
2.必要なプラグインのインストール
1.各種プラグインのインストール
$ sudo yum install git make gcc-c++ patch openssl-devel libyaml-devel libffi-devel libicu-devel libxml2 libxslt libxml2-devel libxslt-devel zlib-devel readline-devel ImageMagick ImageMagick-devel epel-release
2.MySQL 5.7 をインストール
$ sudo rpm -ivh http://dev.mysql.com/get/mysql57-community-release-el7-11.noarch.rpm
$ sudo yum install mysql-devel mysql57 mysql57-server
$ sudo yum install mysql mysql-devel mysql-server mysql-utilities
3.Node.js 6x をインストール
$ curl -sL https://rpm.nodesource.com/setup_6.x | sudo bash -
$ sudo yum -y install nodejs
$ yum install nodejs --enablerepo=epel
4.rbenv をインストール
$ git clone https://github.com/sstephenson/rbenv.git ~/.rbenv
$ echo 'export PATH="$HOME/.rbenv/bin:$PATH"' >> ~/.bash_profile
$ echo 'eval "$(rbenv init -)"' >> ~/.bash_profile
$ source ~/.bash_profile
5.ruby-build をインストール
$ git clone https://github.com/sstephenson/ruby-build.git ~/.rbenv/plugins/ruby-build
$ rbenv rehash
6.Rubyをインストール
ローカル環境にて制作したアプリをどのバージョンのRubyで制作したか確認してください。
アプリのディレクトリ内でruby -vでバージョン確認です。
(著者はruby 2.6.0で制作)
$ rbenv install -v 2.6.0
$ rbenv global 2.6.0
$ rbenv rehash
$ ruby -v
3.MySQLをセットアップする
1.RDSの「インスタンス」から「エンドポイント」を確認し、メモしておく
RDSの画面左の「データベース」を選択して、
作成した「アプリ名-mysql」を選択してください。
画面下部の「接続とセキュリティ」内に記載されている
「エンドポイント」をコピーしておく。
(著者のエンドポイント:greeting-mysql.c6guqbdzgjmx.ap-northeast-1.rds.amazonaws.com)

2.セキュリティグループの設定
EC2の画面左の「セキュリティグループ」を選択。
作成した「アプリ名-SecurityGroup」の「グループID」をコピーしてください。

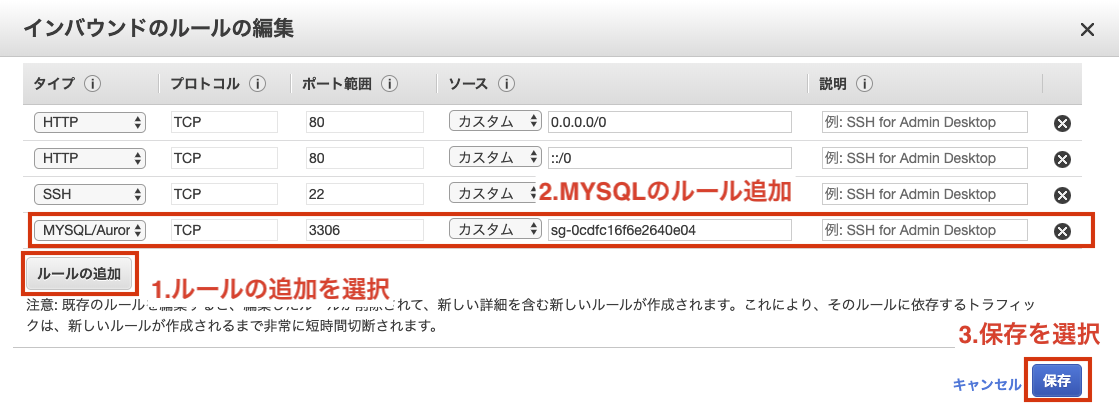
「アプリ名-SecurityGroup」を選択した状態で、画面下部の「インバウンド」を選択して、「編集」ボタンを選択します。
「ルールの追加」ボタンを選択します。
以下の通り項目に記載
1 . タイプ:「MYSQL/Aurora」
2 . プロトコル:「TCP」※自動選択
3 . ポート範囲:「3306」※自動選択
4 . ソース:「カスタム」「コピーしたグループID」
5 . 説明:「任意」(空白でもOKです)
「ルールの保存」を選択します。
3.MySQLへログイン
再びサーバーを操作しているターミナルでの作業となります。
先ほどメモしておいたエンドポイント値を利用してMySQLへログインします。
$ mysql -h エンドポイント -P 3306 -u root -p
(著者の場合:$ mysql -h greeting-mysql.c6guqbdzgjmx.ap-northeast-1.rds.amazonaws.com -P 3306 -u root -p)
パスワードを確認されたらRDSのパスワードを入力
[mysql]という表示に変わればログイン成功
4.データベースの確認
以下のコマンドで、現在のデータベースの確認をしておきましょう。
mysql> show databases;
# データベース一覧が表示され、アプリ名_production が存在していればOK
mysql> exit;
【 第5章 】Railsアプリを配置する
サーバーのrubyの実行環境が整いました!
これから、ご自身で作成されたアプリをgitからクローンして、
EC2インスタンス内に配置していきましょう。
ここが最大の鬼門です!少し手順が多いですが頑張りましょう!!
1.GitHubとの連携の為の公開鍵作成
初めにgitに関する設定ファイルを生成します。
.gitconfigファイルを新たに生成
生成したconfigファイルに情報を記述する
$ cd ~
$ vi .gitconfig
--------------------------------
#以下を記述
[user]
  name = your_name #gitに登録した自分の名前
  email = hoge@hoge.com #git登録時の自分のメアド

[alias] #これはお好きに
  a = add
  b = branch
  ch = checkout
  st = status

[color] #色付け
  ui = true

# githubの場合
[url "github:"] #pull、pushのための設定
    InsteadOf = https://github.com/
    InsteadOf = git@github.com:
# bitbucketの場合
[url "bitbucket:"]
    InsteadOf = https://ユーザ名@bitbucket.org/
    InsteadOf = git@bitbucket.org:
--------------------------------
:wq で保存&編集完了
次にアプリを配置するディレクトリを作成していきます。
$ cd /
$ sudo mkdir var/www
$ sudo mkdir var/www/rails
$ sudo chown ユーザ名 var
$ cd var/
$ sudo chown -R ユーザ名 www
gitとの接続に必要な鍵を格納するディレクトリに移動
$ cd ~
$ chmod 700 .ssh
$ cd .ssh
gitとの接続に必要な鍵を生成していきます。
$ ssh-keygen -t rsa
--------------------------------
以下のメッセージが表示されるので、「aws_git_rsa」と入力
Enter file in which to save the key ():aws_git_rsa

何もせずにそのままエンター
Enter passphrase (empty for no passphrase):

何もせずにそのままエンター
Enter same passphrase again:
--------------------------------
「aws_key_rsa」と「aws_key_rsa.pub」が生成されたことを確認
$ ls
configファイルの生成
$ vi config
-----------------------------
# githubの場合以下を追記
Host github github.com
  Hostname github.com
  User git
  IdentityFile ~/.ssh/aws_git_rsa
# bitbucketの場合以下を追記
Host bitbucket
  Hostname bitbucket.org
  User git
  IdentityFIle ~/.ssh/aws_git_rsa
-----------------------------
:wq で保存&編集完了
公開鍵の中身を表示する
$ cat aws_git_rsa.pub
-----------------------------
ssh-rsa~~~
-----------------------------
一度インスタンスとの接続で行った鍵の作成の流れなので、問題ないかと思います。
そしてcatで表示させた公開鍵をgithubにアクセスして登録していきます。
2.公開鍵をGitHubにアップする
以下のページでGitHubで公開鍵の設定が可能です。
(GitHubに登録していることが前提条件です)
https://github.com/settings/ssh
GitHubのページへ遷移した後、「New SSH Key」ボタンを選択します。

以下の通り項目に記載
1 . Title:「aws_git_rsa.pub」 #公開鍵名
2 . Key:「ssh-rsa~~~」 #catで確認した公開鍵の中身
「Add SSH Key」ボタンを選択する。

GitHub側の設定が終われば、ターミナルから接続が可能か確認してみます。
ターミナルへ戻り設定ファイルの権限を変更
$ chmod 600 config

GitHubへの接続確認。途中の質問にはYesで。GitHubのユーザ名が出てくれば成功。
$ ssh -T git@github.com
3.GitHubからアプリをクローン
登録が済んだら、いよいよクローンです。
$ cd ~
$ cd /var/www/rails
$ git clone git@github.com:~~~~~~
git cloneの後に続くURLはGitHubの下記の手順より取得してください。
1 . デプロイしたいアプリのリモートレポジトリへ移動
2 . 「clone or download」を選択
3 . 「Use SSH」を選択して、「Clone with SSH」へ変更する
4 . 表示されているURLをコピーする

下記コマンドを実行し、ご自身のアプリ名が記載されたディレクトリが存在すれば、見事クローン成功です。
ファイルやディレクトリの情報を表示
$ ls
クローンしたアプリに移動し、必要なGemをインストールしましょう。
$ cd アプリ名
$ bundle install
(補足1)pgエラー、sqliteエラーの対応
データベースでpostgereやSQLiteを使用されており、エラーが出た場合は以下のコマンドを試してみてください。
・pgでエラー
$ sudo yum install postgresql-devel
$ gem install pg -v '1.1.4' --source 'https://rubygems.org/'
・sqliteでエラー
$ sudo yum install sqlite-devel
$ gem install sqlite3 -v '1.4.1' --source 'https://rubygems.org/'
(補足2)JavaScriptエラーの対応
ここで、下記のJavaScript関連のエラーが発生した方は、以下の手順を実行してください。
ExecJS::RuntimeUnavailable: Could not find a JavaScript runtime.
従来は「therubyracer」というGemを追加すれば良かったのですが、
近年はこのGemだとサーバーにアップした後にエラーが発生する為、
「mini_racer」というGemを追加する
Gemfileに以下を記述(vi Gemfile)
gem 'mini_racer'

インストール
$ bundle install
(補足3)その他コマンドメモ
その他、著者が自身のアプリのデプロイ時に必要となったコマンドを記載しておきます。
お役に立てば幸いです。
Railsのインストール
$ gem install rails
$ rbenv rehash
$ rails -v
LinuxでのHomebrewのインストール
以下の公式サイトからコードをコピー
https://docs.brew.sh/Homebrew-on-Linux
bundlerが無いというエラー
以下のコードを参考にしてください。
$ gem install bundler:2.0.2
$ bundle install
4.アプリのシークレットの設定
クローンが成功したら、シークレットを生成し設定していきます。
Rails5.2から新規アプリを作成した時にconfig/secrets.ymlが生成されず、
代わりにconfig/credentials.yml.encが生成されるようになりました。
今回は「credentials.yml.enc」の編集を行っていきます。
まずconfigディレクトリに格納されているファイルを確認します。
$ ls config
これから、「credentials.yml.enc」の中身を編集していきます。
1.マスターキーの作成
「credentials.yml.enc」を編集する為には
「master.key」が必要となります。
ローカル環境の同ディレクトリには格納されていると思いますが、
サーバー環境の同ディレクトリには格納されていません。
「master.key」はGit管理せぬよう指定されており、
本番サーバー上でプロジェクトのリポジトリをクローンしても、このファイルはついてこない様になっております。
そこで手動で「master.key」を生成します。
ローカル環境のクローン元のアプリディレクトリにて、以下の手順を実行してください。
$ vi config/master.key
表示された英数字をメモしてください。
次にサーバー環境で以下の手順を実行してください。
$ cd config
$ vi master.key
-----------------------------
# ローカル環境のmaster.keyの値を入力
08deg424~~~~~
-----------------------------
:wq で保存&編集完了
これで「credentials.yml.enc」を編集する準備ができました。
2.credentials.yml.encの編集
初めにローカル環境にてシークレットを生成します。
ローカル環境にて以下の手順を実行してください。
$ bundle exec rake secret
-----------------------------
d8e62101561e66cd4cfd855785087f4737c4e16787782c01b0b635eafa091e711e9f59ea021e2ee2237f18eae2ccbb1f86975979b3fdc2c7892764b326f11f9a
-----------------------------
表示されたシークレットキーをコピーしてください。
次にローカルで生成したシークレットキーを
「credentials.yml.enc」に記載していきます。
サーバー環境にクローンしたアプリのディレクトリの最上階層(configの一つ上)で以下の手順を実行してください。
$ EDITOR=vim bin/rails credentials:edit
-----------------------------
# aws:
#   access_key_id: 123
#   secret_access_key: 345

# Used as the base secret for all MessageVerifiers in Rails, including the one protecting cookies.
secret_key_base: d8e62101561e66cd4cfd855785087f4737c4e16787782c01b0b635eafa091e711e9f59ea021e2ee2237f18eae2ccbb1f86975979b3fdc2c7892764b326f11f9a #生成したシークレットキー
-----------------------------
:wq で保存&編集完了
これでアプリのシークレットの設定は完了です
5.Nginxの設定
最初にインストールを行ったNginx(エンジンエックス)の設定ファイルを修正します。
以下の手順を実行してください。
$ cd /etc/nginx/conf.d/
$ sudo vi アプリ名.conf
-----------------------------
#以下を記述:合計7箇所変更点があります
# log directory
error_log  /var/www/rails/アプリ名/log/nginx.error.log; #自分のアプリケーション名に変更
access_log /var/www/rails/アプリ名/log/nginx.access.log; #自分のアプリケーション名に変更

upstream unicorn_server {
    server unix:/var/www/rails/アプリ名/tmp/sockets/.unicorn.sock fail_timeout=0; #自分のアプリケーション名に変更
}

server {
    listen 80;
    client_max_body_size 4G;
    server_name ~~~.~~~.~~~.~~~; #アプリのElastic IPに変更

    keepalive_timeout 5;

    # Location of our static files
    root /var/www/rails/アプリ名/public; #自分のアプリケーション名に変更

    location ~ ^/assets/ {
        root /var/www/rails/アプリ名/public; #自分のアプリケーション名に変更
    }

    location / {
        proxy_set_header X-Forwarded-For $proxy_add_x_forwarded_for;
        proxy_set_header Host $http_host;
        proxy_redirect off;

        if (!-f $request_filename) {
            proxy_pass http://unicorn_server;
            break;
        }
    }

    error_page 500 502 503 504 /500.html;
    location = /500.html {
        root /var/www/rails/アプリ名/public; #自分のアプリケーション名に変更
    }
}
-----------------------------
:wq で保存&編集完了
権限の変更
$ cd /var/lib
$ sudo chmod -R 775 nginx
6.Unicornの設定
Unicornとはアプリケーションサーバーの一種です。
アプリ本体を格納するUnicornを設定していきましょう。
1.Unicornのインストール
GemファイルにUnicornを追記
vi Gemfile
-----------------------------
#以下を追記
group :production, :staging do
    gem 'unicorn'
end
----------------------------
:wq で保存&編集完了
Unicornのインストール
$ gem install bundler
$ bundle install
2.Unicornの設定ファイルの作成
$ vi config/unicorn.conf.rb
-----------------------------
#以下を記述:合計1箇所変更点があります
# set lets
  $worker  = 2
  $timeout = 30
  $app_dir = "/var/www/rails/アプリ名" #自分のアプリケーション名
  $listen  = File.expand_path 'tmp/sockets/.unicorn.sock', $app_dir
  $pid     = File.expand_path 'tmp/pids/unicorn.pid', $app_dir
  $std_log = File.expand_path 'log/unicorn.log', $app_dir
  # set config
  worker_processes  $worker
  working_directory $app_dir
  stderr_path $std_log
  stdout_path $std_log
  timeout $timeout
  listen  $listen
  pid $pid
  # loading booster
  preload_app true
  # before starting processes
  before_fork do |server, worker|
    defined?(ActiveRecord::Base) and ActiveRecord::Base.connection.disconnect!
    old_pid = "#{server.config[:pid]}.oldbin"
    if old_pid != server.pid
      begin
        Process.kill "QUIT", File.read(old_pid).to_i
      rescue Errno::ENOENT, Errno::ESRCH
      end
    end
  end
  # after finishing processes
  after_fork do |server, worker|
    defined?(ActiveRecord::Base) and ActiveRecord::Base.establish_connection
  end
-----------------------------
:wq で保存&編集完了
これでUnicornの設定も完了です!
7.DBの設定
続いてDBの設定を行います。
DBへアクセスする情報(ユーザー名やパスワード等)をdatabase.ymlへ直接記入すると
セキュリティ的に問題があるので、環境変数を使用して情報を受け渡していきます。
今回はdotenv-railsを使用して変数管理を行っていきます。
1.dotenv-railsの導入
Gemfileを編集する
$ vi Gemfile
Gemfileに以下を記述
# 環境変数の管理をするもの
gem 'dotenv-rails'
:wq で保存&編集完了
インストール
$ bundle install
シークレットキーを作成します。
$ bundle exec rake secret
表示されたシークレットキーはコピーしておいてください。
次にアプリケーションのルートディレクトリに.envファイルを作成し、
その中にシークレットキーの記述を記載してください。
$ touch .env
$ vim .env
#シークレットキーにコピーしたキーを貼り付けてください。
SECRET_KEY_BASE=シークレットキー
:wq で保存&編集完了
ファイルの記述ができたら結果を確認します。
$ source .env
$ echo $SECRET_KEY_BASE
シークレットキーの値が返ってきたら設定完了です。
2.MySQLの環境変数の設定
先ほどのenvファイルに、MySQLの変数を設定していきます。
シークレットキーの下へ追記してください。
$ vim .env
DB_NAME=データベース名_production #作成したDB名
DB_USERNAME=root #RDSのユーザー名
DB_PASSWORD=********* #RDSのパスワード
DB_HOSTNAME=greeting-mysql.c6guqbdzgjmx.ap-northeast-1.rds.amazonaws.com # RDSのエンドポイント
:wq で保存&編集完了
変数の値を確認します。
$ source .env
$ echo $DB_NAME
$ echo $DB_USERNAME
$ echo $DB_PASSWORD
$ echo $DB_HOSTNAME
入力した情報が表示されればOKです。
3.database.ymlの修正
環境変数を用いて、データベースにアクセスする設定を変更していきましょう。
$ vi config/database.yml
-----------------------------
#最下部の本番環境の記述のみ変更します
production:
  <<: *default
  database: <%= ENV['DB_NAME'] %>
  username: <%= ENV['DB_USERNAME'] %>
  password: <%= ENV['DB_PASSWORD'] %>
  host: <%= ENV['DB_HOSTNAME'] %>
-----------------------------
:wq で保存&編集完了
MySQLの起動
$ sudo service mysqld start
マイグレーションを実行
$ bundle exec rake db:migrate RAILS_ENV=production
以上でサーバー環境にアプリを配置する事ができました!
もうヘトヘトだと思いますが、公開までもう少しです!
頑張りましょう!