はじめに
Webアプリ開発において、UIのテストは手動になりがちで、
専門のQAチームがいないと、なおざりになるケースが多いかと思います。
本記事では、オープンソースウェアのSelenium Webdriverを主軸に
現時点で筆者が最善だと思う 「JavaScriptで自動UIテストを行う」
方法をご紹介します。(ES6準拠)
ポイント
- ワンライナーで実行可能にする (CI向き)
- テスト修正が容易 (保守性 高)
- Windows/Mac環境に依存しない (チーム開発向き)
環境
- Windows 10 (Version 1607) / macOS Sierra 10.12.4
- Node.js v7.9.0
- npm 4.2.0
- mocha 3.2.0
- gulp 3.9.1
- Selenium-Server 3.0.1
- Chrome-driver 2.28 (x64)
- WebdriverIO 4.6.2
Node.js及びnpmの導入は、完了しているのものとして進めます。
参考:Node.js / npmをインストールする(for Windows)
Macにnode.jsをインストールする手順。
0. QuickStart
本記事のサンプルは、以下からgit cloneできます。
https://github.com/ysk-sky/sample
sample
├─node_modules
├─gulpfile.js
├─package.json
└─test
    ├─runTest.js
    └─tests
        └─sampleTest01.js
1. 必要モジュールのインストール
以下のようなpackage.jsonを用意し、npm installを行います。
{
  "name": "test",
  "version": "1.0.0",
  "description": "",
  "scripts": {
    "test": "gulp test"
  },
  "devDependencies": {
    "gulp": "3.9.1",
    "gulp-mocha": "4.1.0",
    "gulp-plumber": "1.1.0",
    "selenium-standalone": "6.1.0",
    "webdriverio": "4.6.2"
  }
}
Node.jsでのpackage管理に詳しくない方は下記が参考になります。
参考:npmでnode.jsのpackageを管理する
2. タスクの設定 (Gulp)
Gulp はJavaScriptのタスクランナーです。
Gulpを使うメリットの一つは、win/mac/linuxといった各環境で同じように動くことです。
面倒な環境設定から解放されるため、チーム開発にも適しています。
今回は、以下のようなgulpfileにすればOKです。
// dependencies
const gulp = require('gulp');
const selenium = require('selenium-standalone');
const mocha = require('gulp-mocha');
const plumber = require('gulp-plumber');

// task (Selenium init & run)
gulp.task('selenium', (done) => {
  selenium.install({
    logger(message) { }
  }, (err) => {
    if (err) return done(err);

    selenium.start((err, child) => {
      if (err) return done(err);
      selenium.child = child;
      return done();
    });
  });
});

// task (test src pipe to mocha)
gulp.task('integration', ['selenium'], () => {
  return gulp.src('test/*.js', { read: false })
    .pipe(mocha()).pipe(plumber());
});

// task (execute test and post process)
gulp.task('test', ['integration'], () => {
  selenium.child.kill();
});
上記、Seleniumの環境設定及び別プロセスでサーバー起動を行っています。
また、テストソースはtestフォルダ以下のjsファイルになるようにしています。
参考:https://github.com/vvo/selenium-standalone
https://github.com/sindresorhus/gulp-mocha
gulpに関して、理解を深めたい方は以下が参考になります。
参考:5分で導入!タスクランナーGulpでWeb制作を効率化しよう
3. テストの記述 (mocha, WebdriverIO)
JavaScriptのテストフレームワーク mocha を用いて記述します。
以下、Googleの検索ページにアクセスして、
キーワード "Selenium" で検索するサンプルです。
const webdriverio = require('webdriverio');
const fs = require('fs');

const config = {};
config.url = 'https://www.google.co.jp/';
config.outdir = 'ss';

let client;

function joinOutputPath(str) {
  return `${config.outdir}/${str}.png`;
}

// Creates output dir for screenshot if NOT exists
if (!fs.existsSync(config.outdir)) {
  fs.mkdirSync(config.outdir);
}

module.exports = function () {
  describe('Sample001', () => {
    before(function (done) {
      this.timeout(30000);
      client = webdriverio
        .remote({ desiredCapabilities: { browserName: 'chrome' } })
        .init().url(config.url).call(done);
      process.on('uncaughtException', (err) => {
        const date = new Date().toLocaleString().replace(/\s|\//g, '-').replace(/:/g, '');
        console.log(`        ScrrenShot: error${date}.png`);
        client.saveScreenshot(joinOutputPath(`error${date}`));
      });
    });
    after(function (done) {
      this.timeout(10000);
      client.end().call(done);
    });
    describe('[Sample-001] Google Top Page', () => {
      it('is OK', function (done) {
        this.timeout(10000);
        client
          .saveScreenshot(joinOutputPath('sampleSS1'))
          .call(done);
      });
    });
    describe('[Sample-002] Input Search Word', () => {
      it('is OK', function (done) {
        this.timeout(10000);
        client
          .setValue('input#lst-ib', 'Selenium')
          .saveScreenshot(joinOutputPath('sampleSS2'))
          .call(done);
      });
    });
    describe('[Sample-003] Search Result', () => {
      it('is OK', function (done) {
        this.timeout(10000);
        client
          .keys('\uE007')
          .pause(1000)
          .saveScreenshot(joinOutputPath('sampleSS3'))
          .call(done);
      });
    });
  });
};
ちなみにmochaのタイムアウトはデフォルトで2000msになっていますが、
上記のようにthis.timeoutで、テストごとに指定できます。
WebdriverIOでの書き方は、公式APIリファレンスを確認してください。
4. テストの実行
保守性の観点から、実行ファイルは別に作成しています。
const test01 = require('./tests/sampleTest01');

describe('Sample Test', () => {
  test01();
});
フォルダ構成は以下のようにしてください。
CurrentDir
├─node_modules
├─gulpfile.js
├─package.json
└─test
    ├─runTest.js
    └─tests
        └─sampleTest01.js
実行はワンライナーです。
$ npm test
1で作成したpackage.jsonにおいて、npm testで
2で作成したgulpのtestタスクが動作するよう指定してあります。
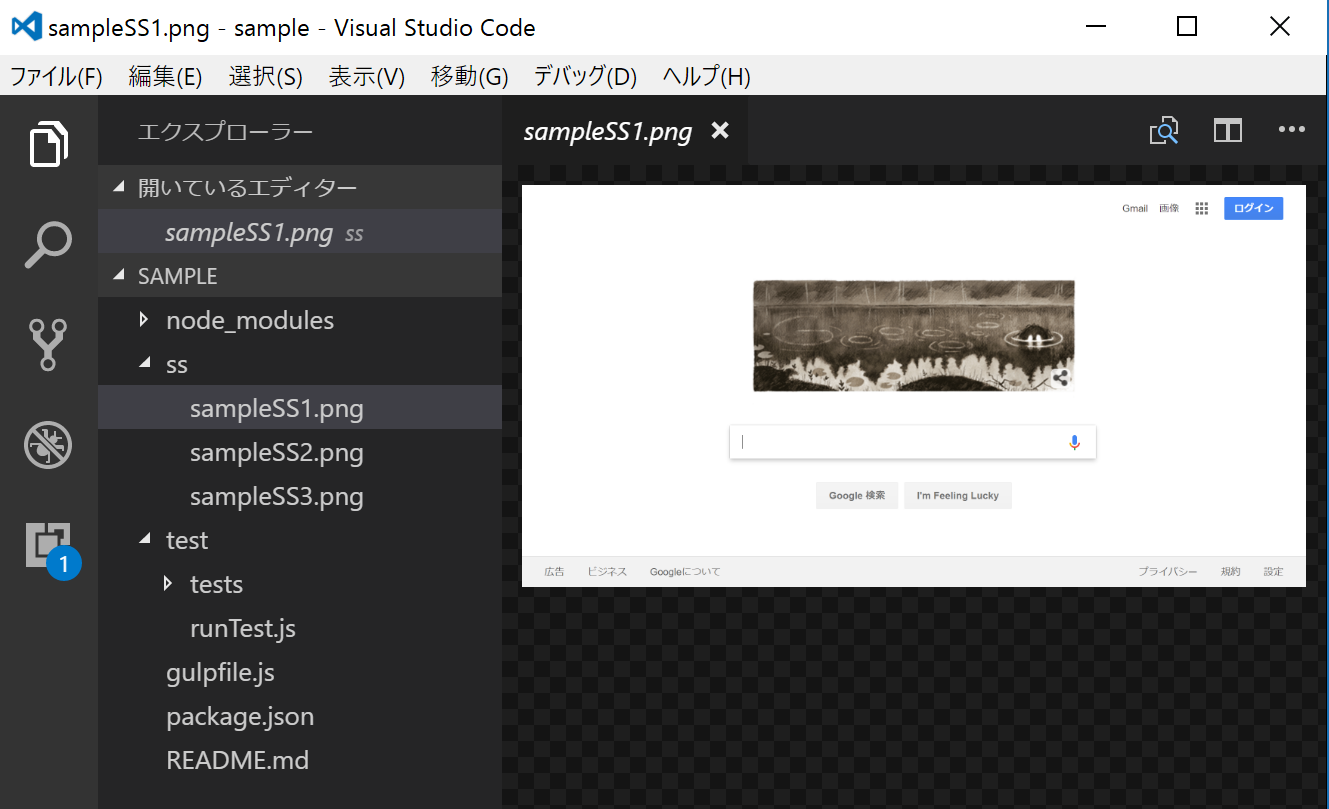
また、
3で作成したsampleTest01.jsにおいて、WebdriverIOのsaveScreenshotメソッドを使用することで、
以下のように指定したフォルダにpngが保存できるようにしています。
5. おわりに
本記事は、厳密には、ブラウザ自動操作 までです。
テストの検証部分 は、WebdriverIOのメソッドで、容易に実装できます。
(このあたりは別記事にしようかと思います。)
本記事で、Seleniumへの障壁が少しでも下がればと思います。
品質確保のためにも、是非 自動テスト に取り組んでみてください!!
参考:Mochaを使ったNode.jsでの単体テスト入門の入門
6. 参考文献
- UIテストの自動化!Node.jsとSeleniumでWebアプリのUIテスト環境構築
- Selenium WebDriver でMacとWindows共通に動く環境を作る(ChromeDriverをServerで)
- WebdriverIO と Selenium で Node.js からスクレイピングできる環境をつくる。
- WebDriver+JavaScriptでWebアプリのE2Eテスト
7. 補足
7.1. configは、別ファイルに分割した方がベター
以下、モジュール分割の一例です。
const config = {};
config.url = 'https://www.google.co.jp/';
config.outdir = 'ss';

module.exports = config;
const config = require('./config.js');

// テスト内容
7.2.予期せぬエラー時にスクリーンショットを保存
本文では触れていませんが、sampleTest01.jsでは、
予期せぬエラー発生時にスクリーンショットを保存する実装になっています。
筆者も、リグレッションテスト失敗時のエビデンスに活用しています。
      process.on('uncaughtException', (err) => {
        const date = new Date().toLocaleString().replace(/\s|\//g, '-').replace(/:/g, '');
        console.log(`        ScrrenShot: error${date}.png`);
        client.saveScreenshot(joinOutputPath(`error${date}`));
      });
7.3.ヘッドレスブラウザへの対応
参考情報までに、ヘッドレスchromeへの対応方法を記載します。
ヘッドレスブラウザで運用することで、以下のメリットがあります。
- テスト時間の高速化
- バックグラウンドで実行可能
const config = {};
config.url = 'https://www.google.co.jp/';
config.outdir = 'ss';
config.chromeOptions = {};
config.chromeOptions.args = [
	'--headless',
	'--disable-gpu',
	'--window-size=1696,1280'
];

let client;

const options = {
	desiredCapabilities: {
		browserName: 'chrome',
		chromeOptions: config.chromeOptions
	}
};

client = webdriverio
	.remote(options)
	.init().url(config.url).call(done);

// テスト内容
[2017/10/23追記]
gitにもheadlessブランチを作成しました。
ヘッドレスモードでの動作を試すことができます。
但し、以下の環境である必要があります。
- Google Chrome 60以上
- Chrome-driver 2.29以上