2016/12/07 github公開モジュールの修正(index.htmlのコピーを実装)
React+Reduxを手っ取り早く体験するために、cloud9を利用しようという試みです。
cloud9環境でReactの検証① -導入-という記事を以前書きましたが、勉強を進めるうちに古い手法だということが分かりました。。
今回Reduxにも手をつけるので、この機に環境を再構築しようと思います。webpackを使用します!
- cloud9でReact+Redux検証用のworkspaceを作成
まず、cloud9のページにアクセスし、自身のアカウントでログインする。次に「Create a new workspace」をクリックします。
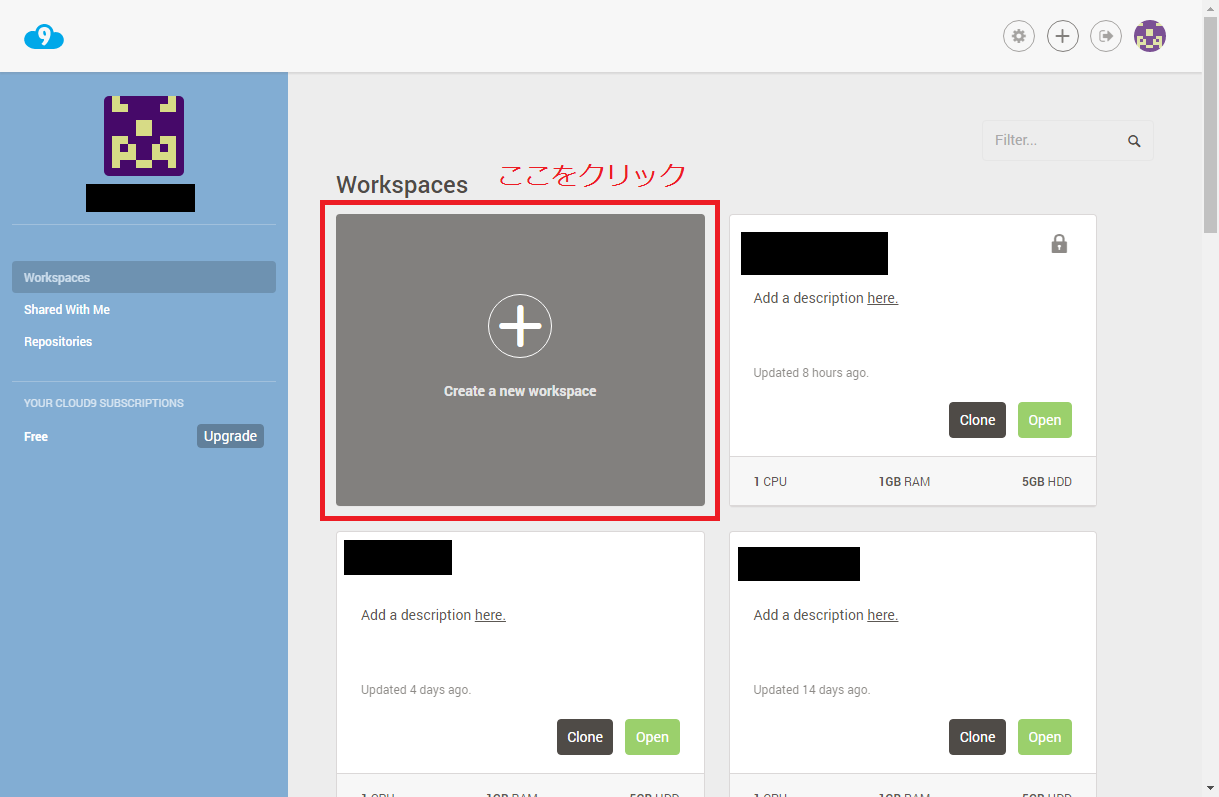
作成画面では、下記の例のように好みのWorkspace名を記載します。「Public」を選択するとインターネット上に公開されてしまいますので、公開せずに使用したい場合は「Private」を選択します。(ただし、「Private」は無料使用の場合は1アカウントにつき1つまでしか作成できません)また、React.jsはCloud9では公式サポートされていないため、自分で環境を構築します。なので、templateでは「Blank」を選択しています。
全ての入力が完了したら、「Create workspace」ボタンをクリックします。

- 下準備
bashからプロジェクト管理用のディレクトリの作成や、npmの使用準備を行います。(bashのタブが開いていない場合は、「ALT + T」で開けます)
mkdir react-redux
cd /home/ubuntu/workspace/react-redux/
npm init -y
npm init時に-yを付けることで、細かい設定がスキップ可能です。
npm initが完了すると、「react-redux」ディレクトリの配下にpackage.jsonというファイルが生成されています。
- インストール
続いて、React+Reduxでの開発に必要なパッケージをインストールしていきます。今回はTypeScriptも使用したいと思うので、TypeScriptもインストールしておきます。また、コンパイルに使用する「webpack」や、後々使用する(予定)の「Lodash」「Material-UI」も合わせてインストールしておきます。
cd /home/ubuntu/workspace/react-redux/
npm install --save react react-dom
npm install --save redux redux-thunk
npm install --save material-ui
npm install --save lodash
cd /home/ubuntu/workspace/react-redux/
npm install --save-dev typescript ts-loader
npm install --save-dev webpack webpack-init
npm install --save-dev @types/react @types/react-dom
npm install --save-dev @types/redux @types/redux-thunk
npm install --save-dev @types/lodash
上記コマンドの--saveと--save-devの違いは下記のような感じです。
--save:package.jsonのdependenciesに保存される
--save-dev:package.jsonのdevDependenciesに保存される
dependenciesにトランスパイラやテストハーネスを含んではいけないとのことだったので、前述のように分けました。
Please do not put test harnesses or transpilers in your dependencies object. See devDependencies, below.
引用 : https://docs.npmjs.com/files/package.json#dependencies
@types/はTypeScript 2.0で型定義ファイルをインストールするために必要となります。
- ディレクトリ構成
下記コマンドでディレクトリを作成しておきます。
cd /home/ubuntu/workspace/react-redux/
mkdir -m 755 -p dist/js
mkdir -m 755 -p src/js/hello
上記の「src」はコンパイル前のファイルを配置するディレクトで、「dist」はコンパイル後のファイルを吐き出すディレクトリとでも思ってください。
- configファイルの設定
下記コマンドで、各種configファイルの雛型を作成します。
cd /home/ubuntu/workspace/react-redux/
./node_modules/.bin/webpack-init
./node_modules/.bin/tsc --init
作成される「webpack.config.js」がwebpackの設定ファイルで、「tsconfig.json」がTypeScriptの設定ファイルです。
まずは、webpack.config.jsを下記のように修正してみましょう。
const path = require('path');

module.exports = {
  entry: {
    bundle: './src/js/index.tsx'
  },
  output: {
    path: path.join(__dirname, 'dist', 'js'),
    filename: '[name].js'
  },
  resolve: {
    extensions: ['', '.ts', '.tsx', '.js']
  },
  module: {
    loaders: [
      {
        test: /\.tsx?$/,
        exclude: /node_modules/,
        loader: "ts-loader"
      }
    ]
  }
};
-
entryでは、コンパイル対象のファイルパスを指定します。 -
outputでは、コンパイル後のファイルを保存する場所を指定します。pathで保存するディレクトリを指定し、filenameで保存するファイル名を指定しています。([name]はentryで設定している、bundleを指しているので、bundle.jsとなります) -
resolveではwebpackで取り扱うファイルの拡張子を設定します。 -
loadersではビルド時に使用するloaderを指定します。testは対象、excludeは除外対象です。
{
    "compilerOptions": {
        "module": "commonjs",
        "target": "es5",
        "noImplicitAny": false,
        "sourceMap": false,
        "jsx": "react"
    }
}
"jsx": "react"を足しておく必要があります。記載がないと、下記のようなエラーがでて怒られます。
Cannot use JSX unless the '--jsx' flag is provided.
- Hello World用のモジュール準備
下記コマンドで、src配下にHello world用のモジュールを作成しましょう。
ここはコマンドではなく、ディレクトリを右クリックして新規作成しても構いません。
(今回のHello WorldではReduxはまだ使用していません)
cd /home/ubuntu/workspace/react-redux/src/js
touch index.tsx
touch ./hello/Hello.tsx
次にモジュールを下記のように編集しましょう。多少書き方は変わっていますが、Reactの要素については6章までで説明したものしか使用していないため、説明は省略します。
import * as React from "react";
import * as ReactDom from "react-dom";
import HelloComponent from "./hello/Hello";

ReactDom.render(
  //HelloComponentをレンダリング。レンダリング先にはindex.htmlのid=helloを指定
  //HelloComponentにcontentを引き渡している
  <HelloComponent content={"Hello World!"}/>
  , document.getElementById("hello")
);
import * as React from "react";

export interface HelloProps {
  content: String;  //contentにはHello World!が入るので、Stringを指定
}

export default class HelloComponent extends React.Component<HelloProps, {}> {
  //コンストラクタ(特に使用していません)
  constructor(props: HelloProps) {
    super(props);
  }
  //レンダリング(受け取ったcontent内の情報を表示)
  render() {
    return <div>{this.props.content}</div>;
  }
}
また、index.htmlもdist配下に下記コマンドで作成しておきます。
cd /home/ubuntu/workspace/react-redux/dist/
touch index.html
index.htmlも下記のように修正しましょう。
<!DOCTYPE html>
<html lang="ja">
<head>
  <meta charset="UTF-8">
  <title>Hello World</title>
</head>
<body>
  <div id="hello">Loading...</div>
  <script src="js/bundle.js" charset="utf-8"></script>
</body>
</html>
これですべての準備が完了しましたので、ビルドして確認してみましょう。
- ビルド
下記コマンドでビルドできます。
cd /home/ubuntu/workspace/react-redux/
npm start
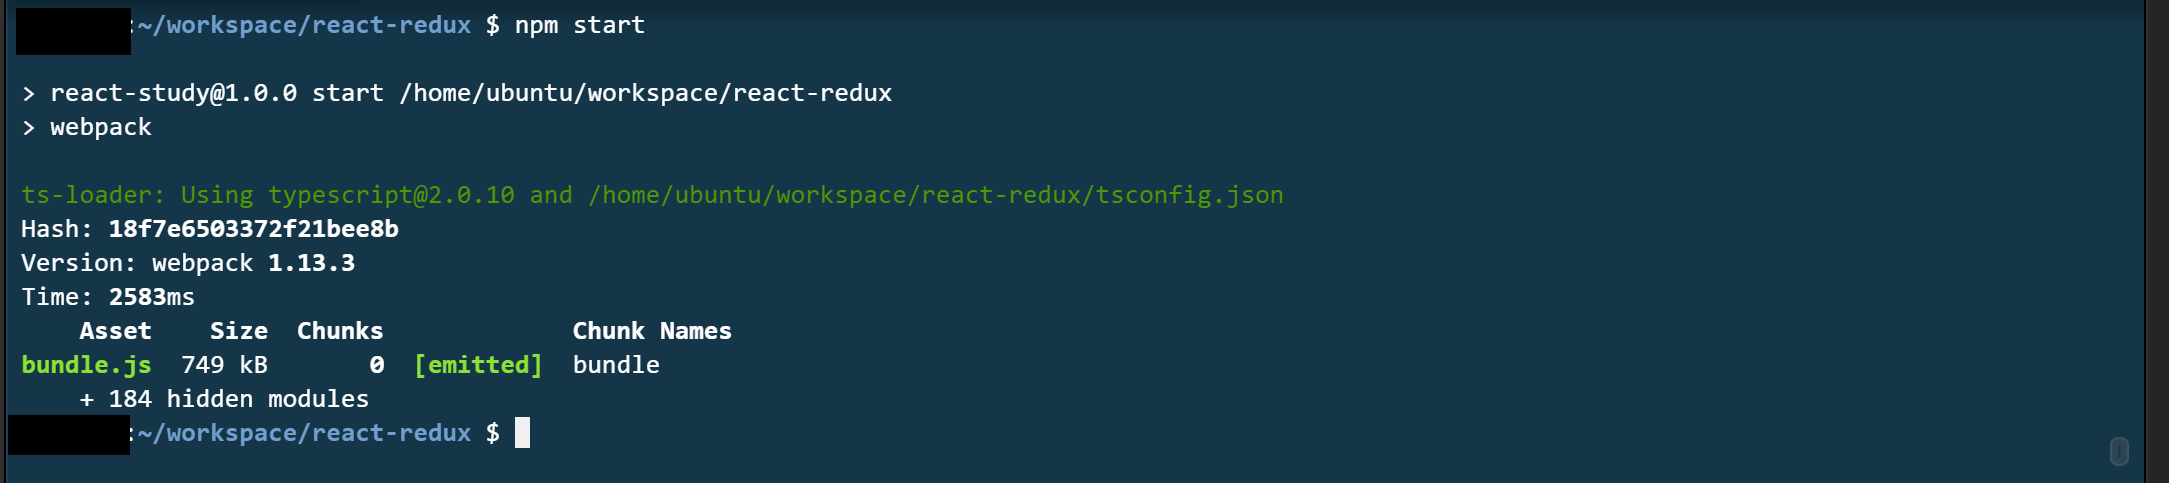
ちなみに1章で説明したwatchifyのように使用したい場合は、package.jsonもscriptを下記のように変更しましょう。
  "scripts": {
    "start": "webpack --watch",
    "build": "webpack"
  },
上記書き換えが完了したら、同じようにnpm startで使用できます。
- Hello World
dist配下の「index.html」を右クリックして、「Run」を選択することでApacheを起動させます。
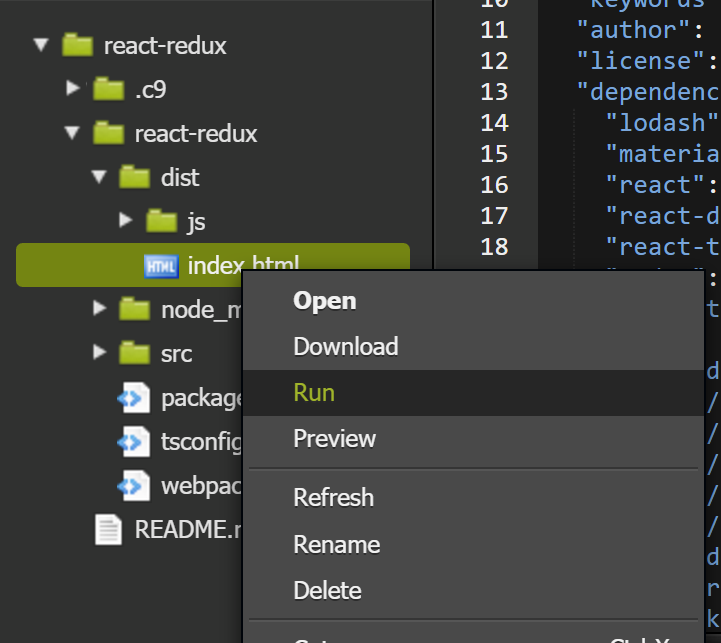
Apacheが起動すると下記のようなURLが発行されるので、アクセスしてみてください。
Hello Worldと表示されていれば成功です!

- めんどくさい人用
githubにアップしたので、Workspace作成後下記コマンドを実行してください。
index.htmlがdistに入っているため、6節に沿ってindex.htmlだけ作成してください。
(cloud9環境でReactの検証⑧を書くころには直します。。)
https://github.com/tomine3/react-redux
2016/12/07 npm run 時にindex.htmlを自動でsrcからdistへコピーするように修正
git clone https://github.com/tomine3/react-redux.git
cd react-redux/
npm install
npm start
後は、dist配下の「index.html」を右クリックして、「Run」を選択することでApacheを起動させてください。
- 参考
http://qiita.com/shundy/items/8a40d5f3bc6e22ea37f3
http://sourcechord.hatenablog.com/entry/2016/09/28/005836
https://www.npmjs.com/package/webpack-init
http://dackdive.hateblo.jp/entry/2016/04/13/123000#resolve
https://www.npmjs.com/package/copy-webpack-plugin