以前 React Redux を用いた SPA 新規サービスを運用して得た知見と実装例 と言うテーマで発表した内容に、加筆修正して記事にしてみました。2年半くらい取り組んで見ての結果や感想をシェアできればと思います。
対象読者
- SPA の開発に興味がある方
- 最近の WEB フロントエンド開発に興味がある方
- ある程度 React や Redux を触ったことがある方、触りたい方
目的
- 具体的な実装例をもとに知見を共有し、Web 開発の役に立ててほしい
- おかしな実装や、もっと良い方法があれば、教えてほしい
内容
- コードベースでの実装例の紹介
- 利用しているライブラリや開発環境、開発フローの共有
- その他 SPA サービスを運用する上での構成や知見
React Redux のおさらい
React
- Facebook が開発したUI ライブラリ
- 旧来の DOM 操作による状態管理を props や state で抽象化
- パーツをコンポーネントごとに管理するのが得意

https://reactjs.org/ から、ライブデモを試せます。
Redux
- SPAなどの複雑化する React のステート(状態)管理を、ルール(哲学)に従って書かせることで、フロントエンドの動きを追いやすくするためのライブラリ
(*個人的解釈です) - もともとは Flux と言う、データの流れを一方向に制限することで、流れを追いやすくするという、オブザーバーパターンの亜種から、さらに転じた考え方。
- Redux と言う名前は 「Reducer」 + 「Flux」 で 「Redux」だそうです。array.reduce と同じような役割を Reducer が担います。詳しく知りたい方は作者の発表をご覧ください Dan Abramov - Live React: Hot Reloading with Time Travel at react-europe 2015
(Redux で作ったスライドで発表してるところがクールです。sublime text を使っていて途中でアクシデントが起こるところがネタ的に面白いです。)
全体的なアーキテクチャとフローは以下の図で表せます。[引用元:
Redux. From twitter hype to production]
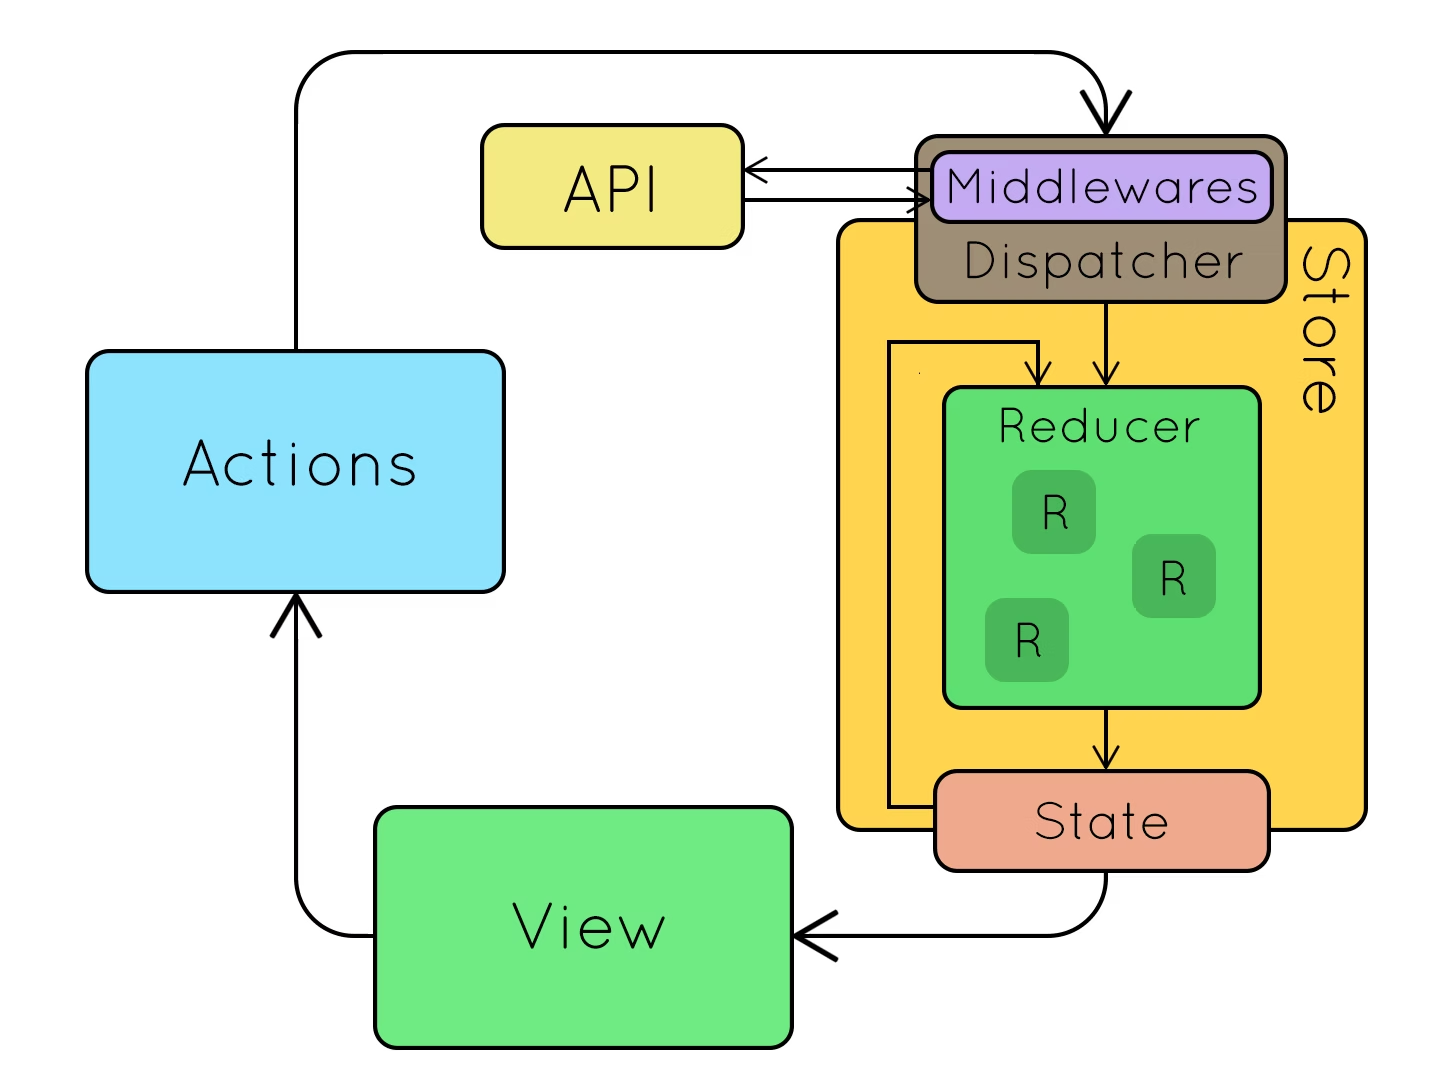
- View でユーザーがクリックするなどの動作でイベントを発行
- Actions でイベントをアクションとし受け渡す
- Actions の結果を Reducer で 元の State と合成する
- state を View に返して、View を更新する
(2.1 受け取ったアクションに応じて Middleware で API コールなど非同期のリクエストを送る)
(2.2 API のレスポンスを Middleware で受け取る)
(2.3 受け取ったレスポンスで3.を行う)
Middleware が噛まない場合もありますが、基本的には View -> Actions -> Dispatcher -> Reducer -> View でデータを更新すると言う単一の流れです。
もっと詳細な動作や概念を知りたい方は、以下の記事がとても詳しくてわかりやすいと思います。
現プロダクトのフロントで取り入れている技術
 **少し古くなってるので、参考程度**ですが、以下にリポジトリなども公開してます。
[ランサーズ流 React.js/redux アプリ開発入門@mori-dev](https://engineer.blog.lancers.jp/2016/12/%E3%83%A9%E3%83%B3%E3%82%B5%E3%83%BC%E3%82%BA%E6%B5%81-react-jsredux-%E3%82%A2%E3%83%97%E3%83%AA%E9%96%8B%E7%99%BA%E5%85%A5%E9%96%80/)
**少し古くなってるので、参考程度**ですが、以下にリポジトリなども公開してます。
[ランサーズ流 React.js/redux アプリ開発入門@mori-dev](https://engineer.blog.lancers.jp/2016/12/%E3%83%A9%E3%83%B3%E3%82%B5%E3%83%BC%E3%82%BA%E6%B5%81-react-jsredux-%E3%82%A2%E3%83%97%E3%83%AA%E9%96%8B%E7%99%BA%E5%85%A5%E9%96%80/)
静的型チェックには Flow
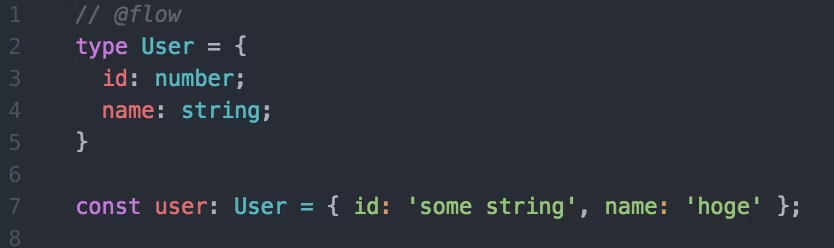
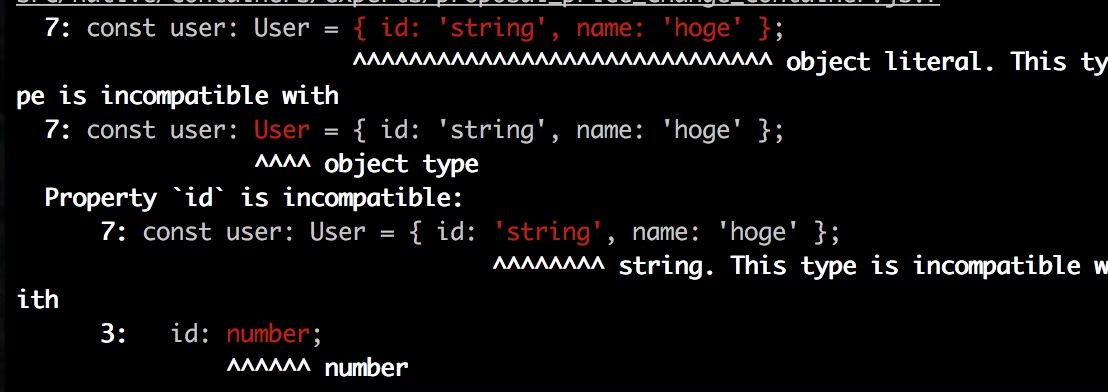
- Javascript は動的型付け言語なので、実行時に値が渡ってからでないと、エラーになるかどうかがわからない
- flow を使うと、ビルド時に type チェックを行い、間違った型が渡されるコードだとエラーを出してくれる
- 独自に User などの型を定義できるのでコードがリーダブルになる
//@flowを省略すればそのファイルは型チェックされない
atom などのエディタを使っていれば flow-ide を導入すると、補完が効いて便利です。
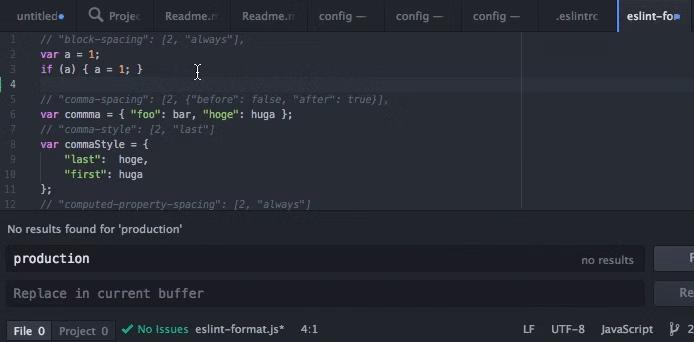
構文チェックには ESLint
- 構文バグの検証や、インデントなどの書き方を統一ができる
- コードレビューで、 ; が抜けている、インデントが揃ってないなどを指摘しなくて良くなる
- atom などに linter ツールを入れると、リアルタイムに検証してくれる
- CSS 用には stylelint というツールがある
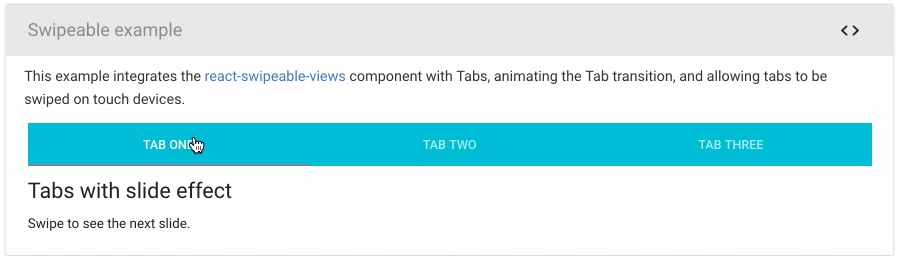
UIコンポーネントには material-ui
- Google の提唱する material-design を React.js ですぐ使えるように用意してくれているライブラリ
- レゴブロックのように、コンポーネントを組み合わせるだけで利用可能
- アプリのデモがすぐに作れるが、独自のデザインには向いていない
React で css を書くなら CSS-Modules
- css はグローバルに適応されるので、BEMなどの命名規則でスコープを縛る必要があった。BEMなどに頼らず、CSS は利用するコンポーネント内で独自の名前をプログラムが自動生成すればいいよねという発想
- 命名規則で縛らずとも、限定的な名前がかける
- 採用するかどうかは How to style React Components などを参考
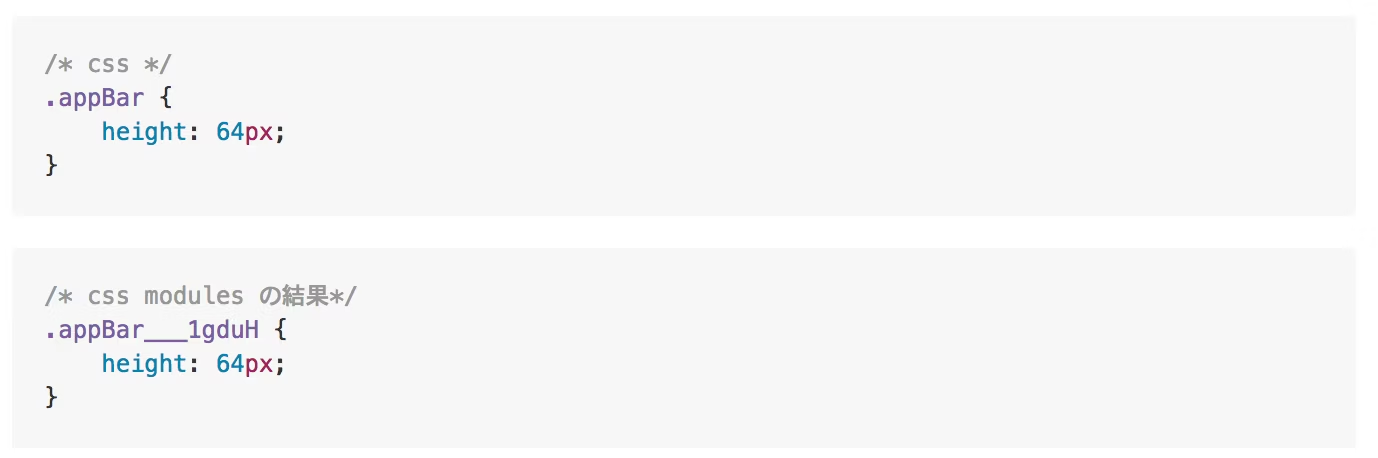 ビルドされた css には独自のサフィックスがつくため、命名がかぶることがありません。グレッパビリティの観点で、あえて BEM と共存させるのも悪くないかなと思ったりもしています。
コンポーネントのテストには Enzyme
- React のコンポーネントをテストするためのツール
- airbnb が開発
- react のコンポーネントのレンダリングをアサーションしてくれる
- 受け取ったprops によって、何がレンダリングされるべきかなどのテストが書ける
- 現プロダクトではコンポーネントのテスト以外にも、Redux の action や reducer のテストを書いている
実際のプロダクトのフォルダ構成
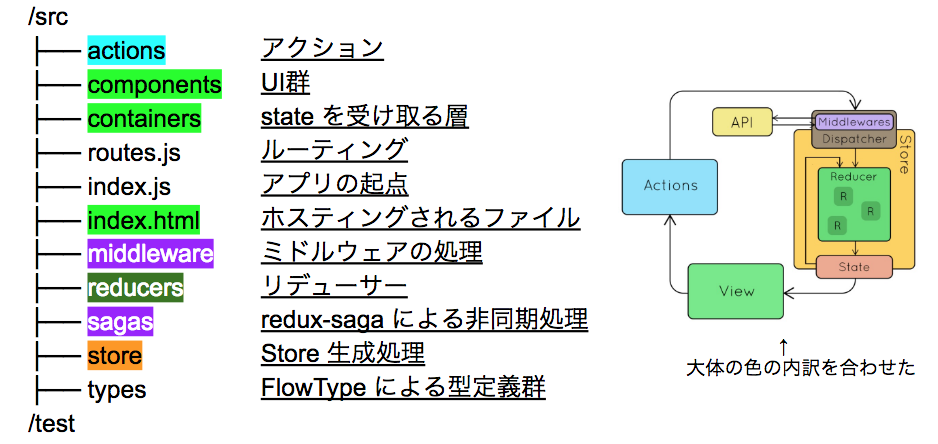
大体の色と内訳を合わせています。割とスタンダードな構成ではないかと思います。
上記のような構成以外にも、Ducks など actionType, action, reducer をまとめて書いてしまおうという構成もあります。
参考:
API を呼び出す一連の処理を例にコードを紹介
ページを開いたら API をコールし、レスポンスの内容をアプリ内に表示するサンプルです。
Actions
まずは API コールのトリガーである Actions から。
FlowType を利用しているので // @flow をファイルの先頭に書いています。
Action 名は API の呼び出しに対して一般的によく使われる SUCCESS, FAILURE だと長いので、 OK, NG にしています。 (SERVICE_LIST って DDD におけるサービス層か?みたいなツッコミはナシでお願いします。スミマセン。)
// @flow
import * as ActionTypes from './action_types';
import type { Meta, ErrorMessage } from './../types/models';
import type { GetPayload, GetOkPayload } from './../types/payload/service_list';
import type { Action } from '../types/actions';
export function get(payload: GetPayload = {}, meta: any = {}): Action{
   return {
       type: ActionTypes.GET_SERVICE_LIST_START,
       payload,
       meta,
   };
}
export function getOk(payload: GetOkPayload, meta: Meta = {}): Action {
   return {
       type: ActionTypes.GET_SERVICE_LIST_OK,
       payload,
       meta,
   };
}
export function getNg(payload: ErrorMessage, meta: Meta = {}): Action {
   return {
       type: ActionTypes.GET_SERVICE_LIST_NG,
       payload,
       meta,
   };
}
Action の引数は payload, meta で統一
- どんなアクションも引数のインターフェイスを payload, meta と命名したObjectで統一しています。これは flux-standard-action という考え方を利用しています。
payload には例えば { usreId: 1 } など Object でラップして渡し、metaには副作用的に利用する情報を渡します(statusCode や error 情報など)。
middleware などで共通の処理を書きやすくなるメリットがあります。(後述)
export function get(payload: Object = {}, meta: Object = {}): Action {
   return {
       type: ActionTypes.GET_SERVICE_LIST_START,
       payload, // 主にこのアクションで利用する Object がラップされてる
       meta, // 副作用的に利用する Object がラップされてる
   };
}
Actionの型イメージ
type Action = {
  type: string,
  payload: Object,
  meta?: Object,
}
Actions には複雑なビジネスロジックを書きません。ほとんど受け渡しするだけにしています。(複雑な処理は middleware に寄せてます。後述)
Reducer
次に、Actions を受け取って state を新しく生成するための Reducer です。
...(スプレッドシンタックス)を使って、 Object.assign をわざわざ書かないようにしています。また、スプレッドシンタックスを利用することで、 immutable.js などを積極的に使わずに済みます。
START 時 loadingFlag を true にして、リクエストが成功(_OK)すれば、state の data を上書きします。
// @flow
import { handleActions } from 'redux-actions';
import * as ActionTypes from '../actions/action_types';
import type { Action } from '../types/actions';
import type { Service } from '../types/models';
type StateType = {
   data: Array<Service>;
   loadingFlag: boolean;
}
export const initialState: StateType = {
   data: [],
   loadingFlag: false,
};
const serviceList = handleActions({
   [ActionTypes.GET_SERVICE_LIST_START]: (state: StateType) => {
       return { ...state, loadingFlag: true };
   },
   [ActionTypes.GET_SERVICE_LIST_OK]: (state: StateType, action: Action) => {
       return {
           ...state,
           data: action.payload,
           loadingFlag: false,
       };
   },
   [ActionTypes.GET_SERVICE_LIST_NG]: (state: StateType, action: Action) => {
       return { ...state, loadingFlag: false };
   },
}, initialState);
export default serviceList;
Reducer にも Actions 同様、複雑なビジネスロジックは書きません。
複雑な処理は middleware に寄せて、reducer をシンプルにしています。
また、redux-actions を使えば、case 文を省略できます。
Container
表示部分のコンテナコンポーネントです。
react-redux の connect を使って、Redux の state を
react で使えるようにしています。
loadingFlag が立っていれば、ロードアイコンが表示されるようになっています。
(_START アクション発行時に true にして、_OK or _NG で false にしている)
componentDidMount 時に API をコールして、ローディングをぐるぐる回し、
API のコールに成功して、 state が更新されると、取得した内容を表示します。
// @flow
import React, { Component } from 'react';
import { bindActionCreators, compose } from 'redux';
import { connect } from 'react-redux';
import CircularProgress from 'material-ui/CircularProgress';
import * as actions from '../../actions/service_list';

function mapStateToProps(state: Object): Object {
   return { serviceList: state.currentUsersServiceList };
}
function mapDispatchToProps(dispatch: Function): Object {
   return { actions: bindActionCreators(actions, dispatch) };
}

class ServiceListContainer extends Component {
   componentDidMount() {
       this.props.actions.get(); // マウント時に API をコール
   }

   props: {
       actions: { get: Function; };
       serviceList: {
           data: Array<Object>;
           loadingFlag: boolean;
       };
   }

   render() {
       const { data, loadingFlag } = this.props.serviceList;
       if (loadingFlag) { return <CircularProgress/> }
       return (
           <div>
               {data && data.map((service, i) => <div key={i}>{service.title}</div>})}
           </div>
       );
   }
}

export default connect(mapStateToProps, mapDispatchToProps)(ServiceListContainer);
middleware
middleware では、 API コールを非同期で行います。
redux-saga を利用しています。
GET_SERVICE_LIST_START というアクションを take で待ち受けて、API を
call し、成否によって put で _OK, _NG のアクションを発行します。
非同期処理やコールバックによる処理は、コールバック地獄になりがちですが redux-saga を利用すれば、ネストにならないので、パッと見で追いやすいです(慣れは必要)
// @flow
import { call, fork, put, take } from 'redux-saga/effects';
import { getOk, getNg } from '../actions/service_list';
import * as ActionTypes from '../actions/action_types';
import Api from '../services/api';
import type { Action } from '../types/actions';

function* getServiceList(action: Action): Generator<any, any, any> {
   try {
       const response: any = yield call(Api.getServiceList, action.payload);
       const payload = response.body;
       const meta = { statusCode: response.statusCode };
       yield put(getOk(payload, meta));
   } catch (e) {
       const payload = e.response.error.message;
       const meta = { statusCode: e.response.statusCode };
       yield put(getNg(payload, meta));
   }
}

export function* watchGetServiceList(): Generator<any, any, any> {
   while (true) {
       const action = yield take(ActionTypes.GET_SERVICE_LIST_START);
       yield fork(getServiceList, action);
   }
}
あとで store に結合するために、 rootSaga という関数にまとめて fork しておきます。
import { fork } from 'redux-saga/effects';
import { watchGetServiceList } from './service_list_saga';


export default function* rootSaga(): Generator<any, any, any> {
   yield [
       fork(watchGetServiceList),
   ];
}
redux-saga については、こちらの記事に非常にお世話になりました。 redux-sagaで非同期処理と戦う
Store
store 部分では sagaMiddleware や routing を有効にするために、
applyMiddleware を enhancer として、定義しておきます。
// @flow
import { createStore, applyMiddleware, compose } from 'redux';
import createSagaMiddleware from 'redux-saga';
import { routerMiddleware } from 'react-router-redux';
import createHistory from 'history/createHashHistory'
import rootSaga from '../sagas/index';
import rootReducer from '../reducers';
export const history = createHistory();
const routing = routerMiddleware(history);

const sagaMiddleware = createSagaMiddleware();
const enhancer = compose(
   applyMiddleware(
       routing,
       sagaMiddleware,
   ),
);

function configureStore(initialState: any) {
   const store = createStore(rootReducer, initialState, enhancer);
   sagaMiddleware.run(rootSaga);
   return store;
}

export default configureStore;
Routing
ルーティングは react-router を使って行なっています。
ドラスティックなバージョン変更などが多いライブラリなので、メンテする場合は注意が必要かもしれません。
import React, { Component } from 'react';
import { ConnectedRouter } from 'react-router-redux';
import { Route, Redirect, Switch } from 'react-router-dom';
import MainContainer from './containers/main_container';
import ServiceListContainer from './containers/service_list_container';

import { history } from '../store/configure_store';

class Routes extends Component {
   render() {
       return (
           <ConnectedRouter history={history}>
               <Switch>
                   <MainContainer>
                       <Route
path="/services"
component={SeriviceListContainer}
  />
                   </MainContainer>
               </Switch>
           </ConnectedRouter>
       );
   }
}
export default Routes;
上記の一連を実装すると、API コールを行う仕組みの完成です。
流れを整理すると以下のようになります。
- Container の componentDidMount のライフサイクルをフックに Actions を呼ぶ
- Actions で API コール用に _START を呼び出す
- Reducer で _START を受け取り、ローディングフラグを立てる
- redux-saga の take で _START のアクションをフックに、API コールを行う
- API コールの成否で、 _OK or _NG のアクションを redux-saga の put で発行
- _OK or _NG を受け取って Reducer でステートを更新
- 更新したステートを Container のビューに反映
WEB 開発でよくある実装の例
WEB 開発を行なっていると、同じような実装をパターン化したくなると思います。そういった時のテクニックや事例を紹介します。
- HOC パターンを使う
- Middleware を活用する
などが、React Redux のプロジェクトで味が出てくるところかなと思います。
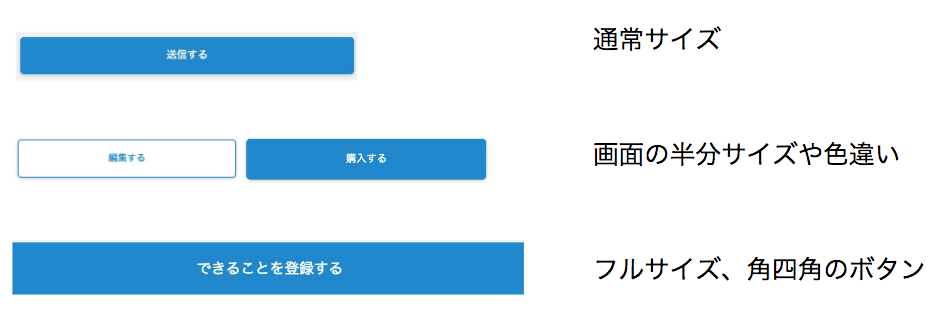
ボタンの種類を管理したい(色、サイズ、形)
HOC を利用して、コンポーネントの種類を管理
import React, { Component } from 'react';
import RaisedButton from 'material-ui/RaisedButton';

function createPrimaryButton(WrappedComponent) {
   return class designedButtonComponent extends Component {
       render() {
           return (<WrappedComponent {...this.props} primary={true} />);
       }
   }
}
export const PrimaryButton = createPrimaryButton(RaisedButton);
HOC(Higher-order-components) とは
- コンポーネントに関数を適応し、機能が合成されたコンポーネントを返す
- propsを新しく加えたり、ライフサイクルメソッドを追加することも可能
3種類のボタンコンポーネントを、独自の名前で定義する例
import { PrimaryButtonFullWidth, AccentButtonHalfWidth, SecondaryButtonRounded } from './buttons';
export const renderSomePageWithButton = buttonAction =>
<div>
   <PrimaryButtonFullWidth label={'プライマリボタン幅MAX'} />
   <SecondaryButtonRounded label={'角丸セカンダリボタン'} />
   <AccentButtonHalfWidth label={'アクセントボタン幅半分'} />
</div>


import React, { Component }from 'react';
import RaisedButton from 'material-ui/RaisedButton';
import { buttonColor, buttonSize, buttonShape } from './button_styles';

function createButton(WrappedComponent, color, size, shape) {
   return class designedButtonComponent extends Component {
       render() {
           return (<WrappedComponent
               {...this.props}
               {...buttonColor[color]}
               {...buttonSize[size]}
               {...buttonShape[shape]}
           />);
       }
   }
}
export const PrimaryButtonFullWidth = createButton(RaisedButton, 'primary', 'fullWidth', 'square');
export const SecondaryButtonRounded = createButton(RaisedButton, 'secondary', 'original', 'round');
export const AccentButtonHalfWidth = createButton(RaisedButton, 'accent', 'halfWidth', 'original');
Material-ui の RaisedButton コンポーネントに createButton という HOC の関数を適用して、スタイルの当たったコンポーネントを生成しています。
WrappedComponent という名前で、コンポーネントを引数にとり、新しく props を注入した WrappedComponent を return することで、WrappedComponent を元にしつつ、新しい props を持ったコンポーネントを作成することができます。
HOC パターンのメリット
- HOC を用いればコンポーネントに新しく props を追加できる
- material-ui など、既に作成されたコンポーネントなどにも柔軟に適応できる
- PrimaryButtonFullWidthなど、限定的な名前を持たせることで、呼び出し側のコードがリーダブルになる
などのメリットがあります。
さらに詳しい HOC の使い方については、 React の Higher-order Components の利用方法 に書いたので、ご覧ください。
ダイアログの yes, no でアクションを切り替えたい
- 「キャンセル(No)」で何もしない。
- 「はい(Yes)」で任意のアクションを実行(ログイン画面に遷移など)。
ボタンにアクションを毎回埋め込むのもいいけど、できれば、アクションをフックにダイアログを出すパターンとして共通化したい
ダイアログのコンポーネント
import Dialog from 'material-ui/Dialog';
import RaisedButton from 'material-ui/RaisedButton';

class GlobalDialog extends Component {
   props: {
       title: string;
       openFlag: boolean;
       okClickHandler: Function;
   };
   renderDialogButtons(): React.Element<*> {
       return (
           <div>
               <RaisedButton
           label="キャンセル" onClick={/*ダイアログを閉じる処理*/}/>
               <RaisedButton
           label="はい" onClick={this.props.okClickHandler} />
           </div>
       );
   }
   render() {
       return (
           <Dialog open={this.props.openFlag} title={this.props.title}
               actions={this.renderDialogButtons()} />
       );
   }
}
export default GlobalDialog;
- material-ui の Dialog を拡張して作った、ダイアログのコンポーネント。
- トップレベルのコンテナ内に設置(or HOC にする)。
- OK を押した時、props で受け取った、任意のアクションを発行できるようにしておく。
ダイアログで分岐させたい Action の呼び出し
meta に特定の key名を持つ Object を渡す。今回は 「dialogInfo」という key 名の Object を渡すことにした。
Action が必ず通過する Middleware で 「dialogInfo」という key 名をキャッチする予定。
const payload = {}
const meta = {
  dialogInfo: {
    title: 'ログインが必要な操作です',
  },
}
// dialog が出現する action になる
this.props.actions.update(payload, meta);
Middleware で meta 情報をキャッチし処理を分岐させる
export default (store: any) => (next: any) => (action: any) => {
   if (action.meta && action.meta.dialogInfo) {
       const payload = {
           ...action.meta.dialogInfo,
           okClickHandler: () => {
               // meta 情報を削除. 次のアクションで dialog を出さない
               delete action.meta.dialogInfo;
               next(action);
           },
       };
       return next(dialogOpen(payload));
   }
   // dialogInfo があれば上で return するからここに来ない
   next(action);
};
meta.dialogInfo があれば dialogOpen でダイアログを開くアクション(dialogOpen)を呼ぶ。この時、next(action) は呼ばないようにします。Middleware はnext(action)で次のアクションを呼び出すが、ここで next(action) を呼ばなければ、 Reducer に届きません。つまり、アクションを Middleware で せき止めることができます。
また、dialogOpen の okClickHandler に 本来実行する予定の Action を渡す。そうすることでユーザーが OK をクリックした際に、本来実行したかった Action を実行できます。(API コールとか、ログインページに遷移とか)
Middleware を活用すれば、A というアクションに紐づいて B という副作用を実行する。のような処理が書きやすくなります。
もっと詳しく知りたい場合は React × Redux で action 発行時に確認ダイアログを挟む middleware の実装例 をご参考に。
Middleware を活用する際のポイント
- どんなアクション呼び出しにも、共通した処理を書けるのがミドルウェアの特徴
- Action の引数を payload, meta に統一するとフックの処理が書きやすい
- ロジックを Middleware に集めることでテストしやすい
注意)Middleware は定義した順に next(action) で次の処理が呼び出される。
そのため dialogAction の次に api コールをしたい場合などは sagaMiddleware(API コール) の前に置く。と言うような工夫が必要
const enhancer = compose(
   applyMiddleware(
       routing, // 1番目に実行
       dialogChecker, // 2番目に実行
       sagaMiddleware, // 3番目に実行
   ),
);
こういった実装の他にも、画像のアップロード時のリサイズや、 API からスネークケースで渡ってくる json のレスポンスデータをキャメルケースに変換する処理など、副作用的なロジックを Middleware で行なっています。
ログインしている人だけ見れるページを作りたい
HOCを利用して、複数ページでも、1つの関数を呼び出せば使えるパターンにする。
loggedInRequired 関数(HOC)をかませば、ProjectContainer はログインしていないと見れないようにする仕組みにする。
import loggedInRequired from '../logged_in_required.js'
// 省略...
class ProjectContainer extends Component {
// 省略...
}

export default loggedInRequired(
   connect(mapStateToProps, mapDispatchToProps)
   (ProjectContainer)
);
HOC の実装
export default function loggedInRequired(WrappedComponent) {
   class loggedInRequiredComponent extends WrappedComponent {

       componentDidMount() {
           // react-redux のステートには this.store.getState() でアクセスできます
           if (!this.store.getState().session.userId) {
               // ログインしていないユーザが見た時のアクションを書く
           }
       }
       render() {
           if (!this.store.getState().session.userId) {
               // ログインしていないユーザが閲覧したらレンダリングしない
               return null;
           }
           return super.render();
       }
   }
   return loggedInRequiredComponent;
}
- ラップしたコンポーネント自身を extends している。(Inheritance Inversion(逆継承) と呼ばれるパターン)
- HOCのライフサイクルメソッドを、ラップしたコンポーネントに適応
- HOCから、ラップしたコンポーネントの state や props に thisでアクセス
- コンポーネントのレンダリングをハイジャックできる
参考:ReactのHigher Order Components詳解 : 実装の2つのパターンと、親Componentとの比較
ローカルストレージに state を保存したい
ユーザー情報など、扱っているステートをそのまま localStorage に入れて永続化したい場合は redux-persist が便利
- whiteList 形式で特定の state をローカルストレージに保存できる
- アプリ起動時に autoRehydrate で state を復元してくれる

redux-persist の設定(configureStore)
import { persistStore, autoRehydrate } from 'redux-persist';

const enhancer = compose(
  autoRehydrate(),
  applyMiddleware(
      routing,
      sagaMiddleware,
  ),
);

export default function configureStore(initialState) {
  const store = createStore(rootReducer, initialState, enhancer);

  persistStore(store, {
       whiteList: ["currentUser"]
  }, () => {
   // autoRehydrate が終わった後に呼ばれる
  });
  return store;
}
- redux-persist-transform-encrypt を使えばストレージを暗号化可能
-
redux-action-buffer と組み合わせば、アクションの発行を state が復元されるまで遅らせることができる
redux-persist の ver.5 以降では<PersistGate />コンポーネントで囲うことで、 autoRehydrate が行われるまで、レンダリングを遅らせてくれます。
テスト

- Javascript のアサーションには、おなじみ power-assert
- テストフレームワークには mocha
- Component のテストには enzyme(エンザイム)
Action のテスト
import assert from 'power-assert';
import * as actions from '../../src/actions/service';
import * as ActionTypes from '../../src/actions/action_types';

describe('service Action', () => {
   it('get', () => {
       const payload = {};
       const meta = {};
       const expectedAction = {
           type: ActionTypes.GET_SERVICE_START,
           payload,
           meta,
       };
       assert.deepStrictEqual(actions.get(payload), expectedAction);
   });
}
Reducer のテスト
import assert from 'power-assert';
import * as ActionTypes from '../../src/actions/action_types';
import reducer, { initialState } from '../../src/reducers/service';


describe('Service reducer', () => {
   it('GET_SERVICE_START で loadingFlag が true になること', () => {
       const executed = reducer(initialState, { type: ActionTypes.GET_SERVICE_START });
       const expected = {
           ...initialState,
           loadingFlag: true,
       };
       assert.deepStrictEqual(executed, expected);
   });
}
Component のテスト
import React from 'react';
import assert from 'power-assert';
import { shallow } from 'enzyme';
import Dialog from 'material-ui/Dialog';
import NDialog from '../../../../src/browser/components/common/n_dialog';

describe('NDialog component', () => {
   it('this.props.message がある場合は Dialog が描画されること', () => {
       const props = {
           closeNDialog: () => {},
           isOpen: true,
           message: 'foobar',
       };
       const component = shallow(<NDialog {...props} />);
       assert.ok(component.containsMatchingElement(Dialog));
   });
}
Middleware のテスト
import assert from 'power-assert';
import sinon from 'sinon';
import confirmationDialogChecker from '../../../src/middleware/common/dialog_checker';
import * as ActionTypes from '../../../src/actions/action_types';
import * as action from '../../../src/actions/confirmation_dialog';

const createFakeStore = () => {};
let spy;

describe('dialog_checker ミドルウェア', () => {
   beforeEach(() => {
       spy = sinon.spy(action, 'open');
   });
   afterEach(() => {
       action.open.restore();
   });


   it('action の meta に DialogInfo があれば確認ダイアログがでること', () => {
       const meta = {
           dialogInfo: {
               title: 'message',
           },
       };
       const action = {
           type: ActionTypes.GET_SERVICE_LIST_START,
           payload: {},
           meta,
       };
       const dispatch = confirmationDialogChecker(createFakeStore())(() => {});
       dispatch(action);
       assert.ok(spy.calledOnce);
       assert.equal(spy.args[0][0].title, meta.dialogInfo.title);
   });
}
テストのポイント
- ビジネスロジックを Middleware に集めて、Middleware のテストを厚めにやる
- Middleware にロジックを持っていくと Action, Reducer のテストが簡単になる
- 結果、Action, Reducer のテストは書いてて無駄に感じることもあるが、何か機能を消した時のレグレッションに気付けるので、書く意味はあると思う
- 新規サービスなどだと UI がすぐ変わるので components のテストは全てカバーしていない
モニタリング
エラーのモニタリングや、ユーザーの行動分析ログなどをどうやって収集するかについてです。
sentry

import Raven from 'raven-js';

Raven.config('https://セントリーのurl', {
     release: RELEASE,
     environment: process.env.NODE_ENV,
     // production, stating 環境以外のエラーを送信しない設定
     shouldSendCallback: () => {
         return ['production', 'staging'].indexOf(process.env.NODE_ENV) !== -1;
     },
 }).install();
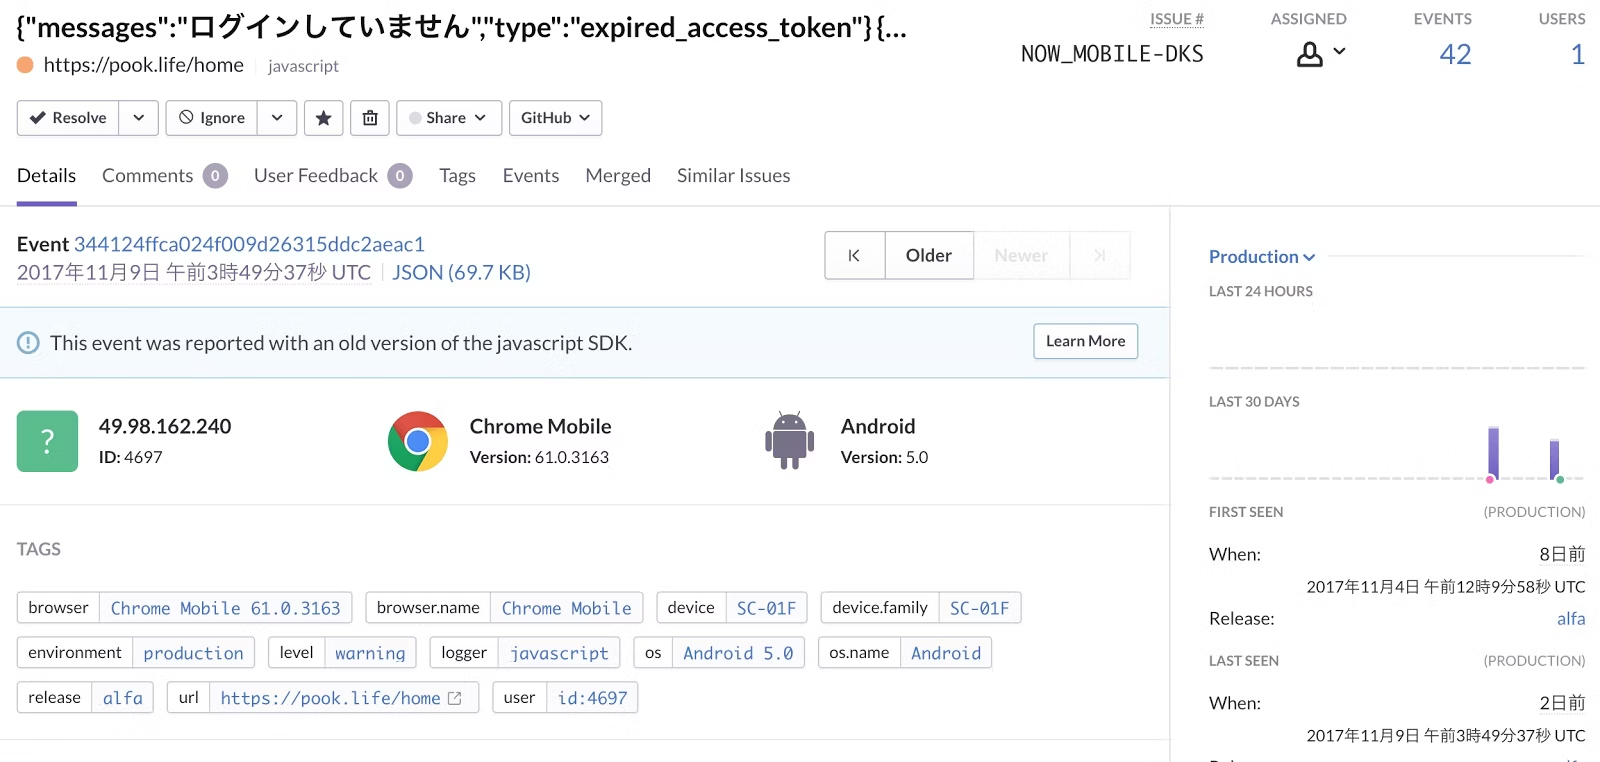
Sentry でよく使っている機能
エラー送信時にユーザー情報も付与できるので、お問い合わせ時に即原因究明できたりします。
「xxxさんからのお問い合わせ: yyyができません」
=>「あ、xxxさんエラー出てますね、直します。」
Raven.setUserContext({
   id: currentUser.id,
   displayName: currentUser.displayName,
});

ユーザー分析

Google Analytics in SPA.
PV計測などは、独自にイベントを発行する必要があります。
Middleware で react-router-redux の発行するアクションタイプを監視して、動的に pageview のイベントを発火させています。
つまり、ページ遷移ごとに GA の PV イベントを発行することで、ユーザーがとのページを見たかを計測します。
import * as ActionTypes from '../../actions/action_types';

export default (store: any) => (next: any) => (action: any) => {
   next(action);
   // react-router-redux の発行するアクションを監視
   if (action.type === ActionTypes.REACT_ROUTER_LOCATION_CHANGE) {
       const routing = store.getState().routing;
       const nextPath = routing.location.pathname;
       const query = routing.location.search;
       ga('set', 'page', nextPath + query);
       ga('send', 'pageview');
   }
};
(注意:上記の設定だと pathname がズレるそうです。)
[React.js/redux アプリでの Google Analytics のイベントトラッキングの設定]
(https://engineer.blog.lancers.jp/2017/09/google-analytics-redux/)
SPA って Google に index されるの?
A: されます

Fetch as Google でも js 実行後のレンダリング内容が表示され、キチンと読み込まれていることが確認できました。(SSR とかしてないです)

meta 情報の設定には react-helmet を利用すれば、ページごとに meta 情報を書き換えることができます。
// @flow
import React, { Component } from 'react';
import Helmet from 'react-helmet'; // see https://github.com/nfl/react-helmet

class DocumentMeta extends Component {
   props: {
       title?: string;
       keywords?: string;
       description?: string;
   }
   render() {
       return (
           <Helmet>
               <title>{this.props.title}</title>
               <meta name="keywords" content={this.props.keywords} />
               <meta name="description" content={this.props.description} />
           </Helmet>
       );
   }
}

export default DocumentMeta;
PWA っぽくする
- PWAって? Progressive Web Apps Roadshow Tokyo 2017 キーノート
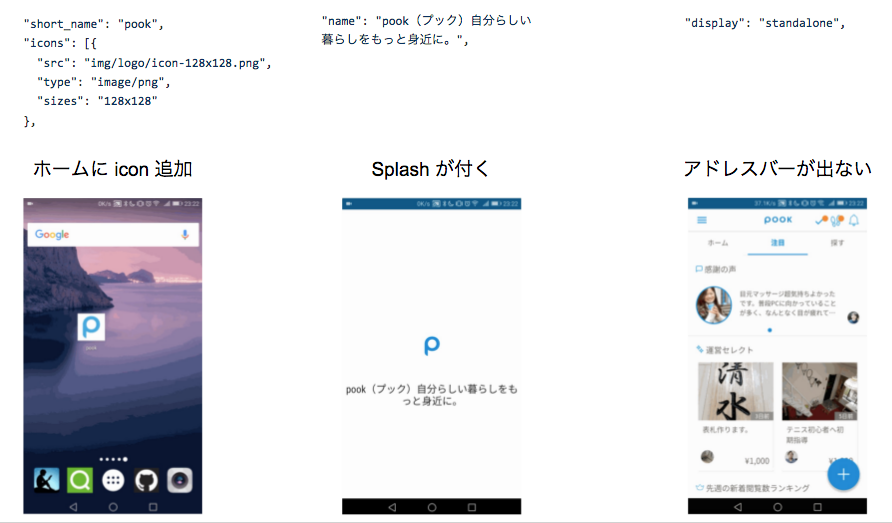
- manifest.json を書くと Android でネイティブアプリと同じように「ホームに追加」できたりします

manifest.json の詳しい設定方法は以下を参照ください。
https://developers.google.com/web/fundamentals/web-app-manifest/?hl=ja
{
 "short_name": "短いアプリの名前",
 "name": "長いアプリの名前",
 "icons": [{
   "src": "img/logo/icon-128x128.png",
   "type": "image/png",
   "sizes": "128x128"
 }, {
     **その他サイズの画像**
 }],
 "background_color": "#FFFFFF",
 "display": "standalone",
 "theme_color": "#0086D1",
 "start_url": "/home?utm_source=homescreen"
}
manifest.json を書くときのポイント

Splash をつけたり、アドレスバーをなくしたりできます。
PWA については ServiceWorker を使った実装なども書きたいとことですが、また後日。
開発体制とフロー
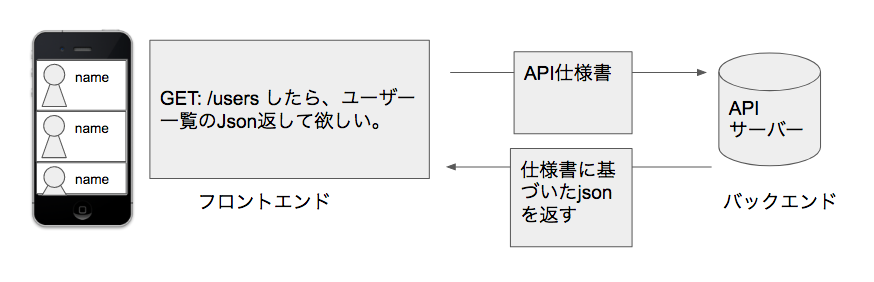
SPA の特性上バックエンドとフロントエンドを API で完全に分離できるため、一般的な WEB 開発とは少し違った方法(?)で開発したので、そのノウハウをシェアさせていただきます。
- バックエンド側、フロントエンド側で完全に分離
- フロントは自社内、バックエンドは拠点でリモート開発

開発の大まかな流れ
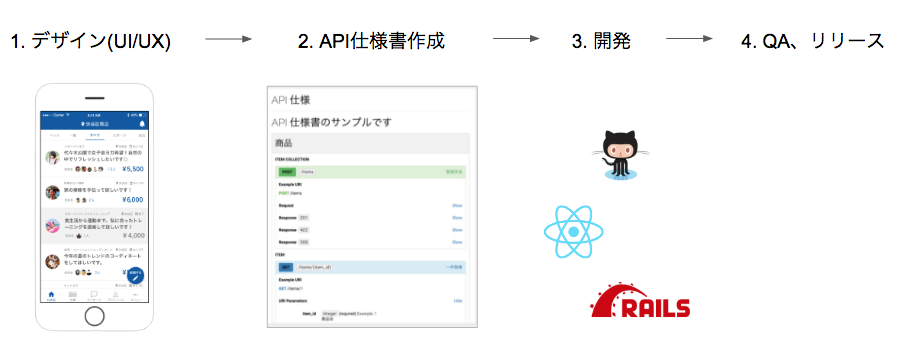
バックエンドとフロントエンドをリポジトリレベルで分離しているため、 API 仕様書が両者の設計図となります。そのため、 API 仕様書をメンテすることも必要です。
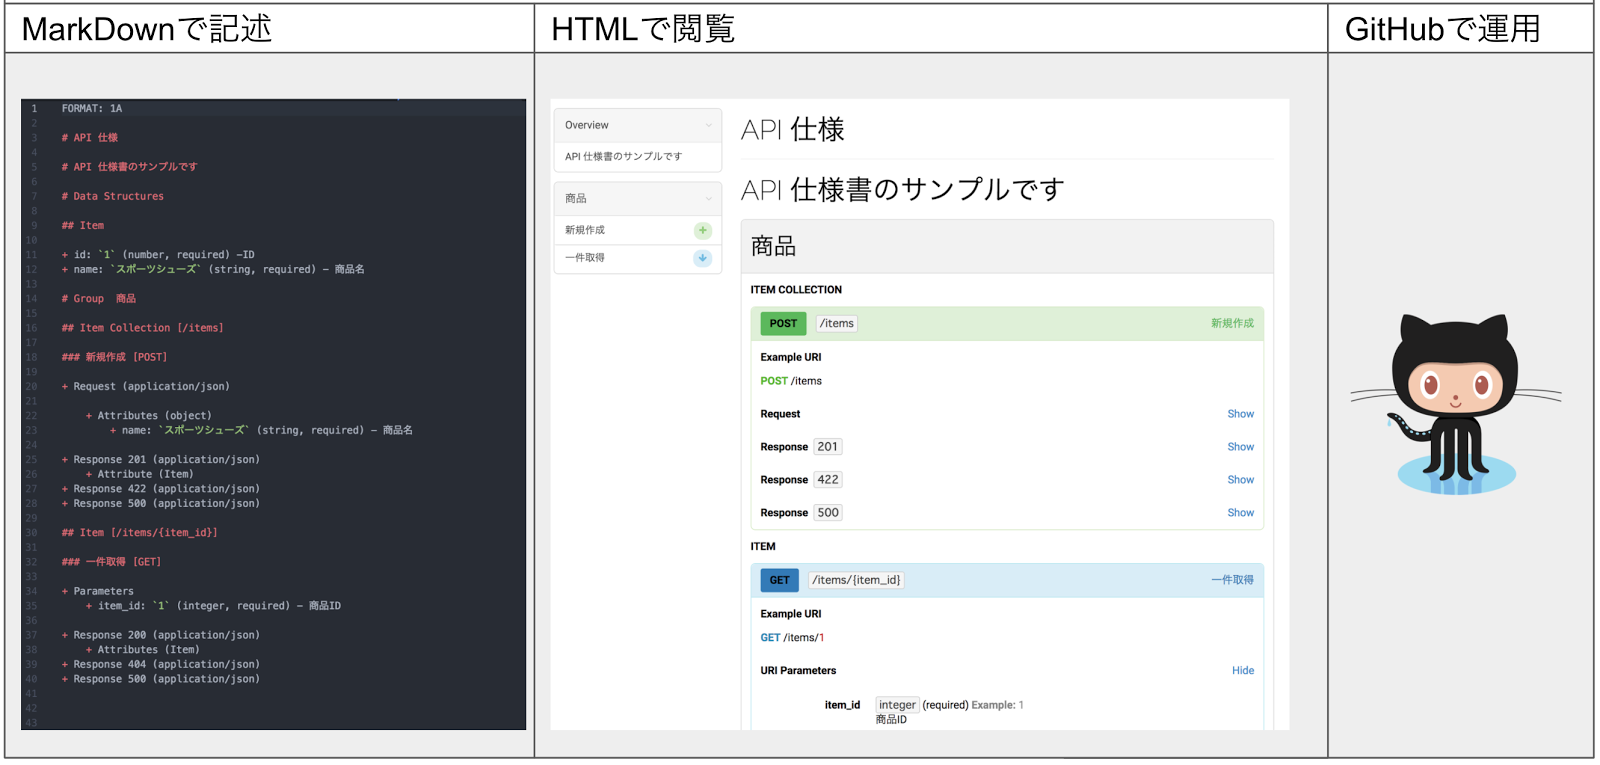
API ドキュメントを共通仕様として作成&運用
- API Blueprint という API仕様書を mark down で書ける構文を利用
- Github で管理し、PRで新規作成・更新し、機能の詳細は issue で管理
- API はフロントエンドエンジニアが設計
API仕様書の作成と運用
[API仕様書をMarkDownで書き、GitHubをつかって運用する方法]
(https://engineer.blog.lancers.jp/2016/12/api%E4%BB%95%E6%A7%98%E6%9B%B8%E3%82%92markdown%E3%81%A7%E6%9B%B8%E3%81%8D%E3%80%81github%E3%82%92%E3%81%A4%E3%81%8B%E3%81%A3%E3%81%A6%E9%81%8B%E7%94%A8%E3%81%99%E3%82%8B%E6%96%B9%E6%B3%95/) にも書きましたが、 API 仕様書を書いて、html などで見れるようにしておけば、仕様の確認も issue のリンクを貼っておけば楽だし、漏れも少なくなります。一番のメリットはプルリクエスト上で API の構成などについて議論できることです。バックエンドとフロントエンドで、両者の意志をすり合わせながら開発できるところが魅力的です。
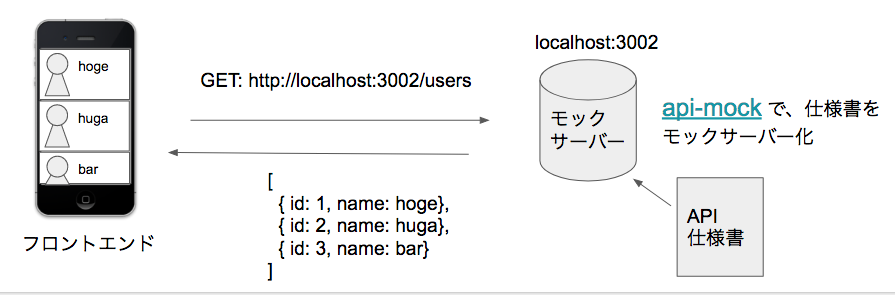
APIができるまではモックサーバーを使う
- API仕様書をそのままモックサーバーにできる仕組みが存在 (api-mock)
- API が完成していなくても、フロントエンドの実装に着手できる
フロントエンド開発者の1日(例)
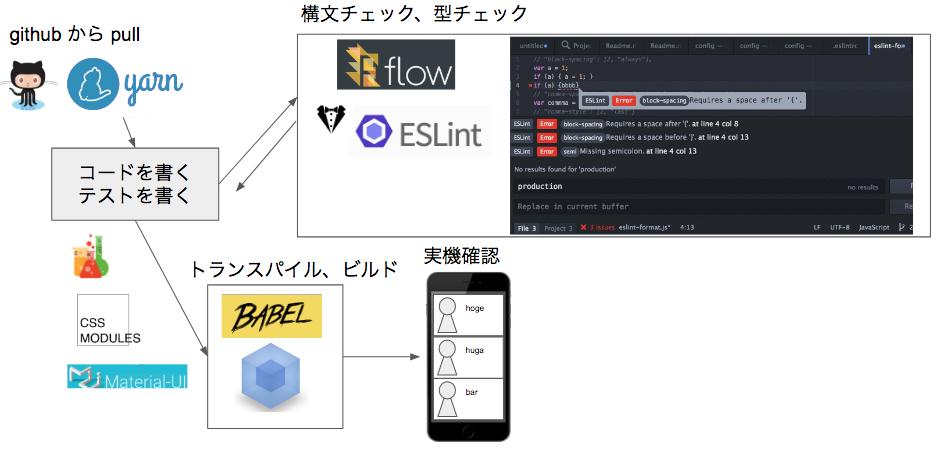
- github から 最新のコードを pull
- yarn でライブラリを更新
- コードとテストを書く
- ESLint や Flowtype が都度叱ってくれる
- ビルドして実機確認
- commit したら github に push しプルリクエストを作成
- circle ci が自動で回って、テストを実行
- テストが通っていれば、レビューしてもらう
- レビューが通ればデプロイ
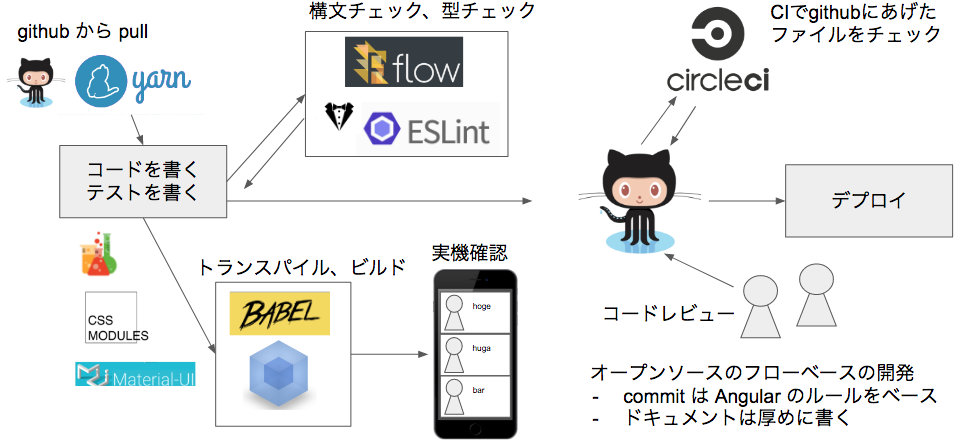
commit は【今日からできる】コミットメッセージに 「プレフィックス」 をつけるだけで、開発効率が上がった話 のように行なっています。
デプロイとインフラ
インフラの仕組みとしては AWS を利用しており、SPA のアプリケーション本体は S3(静的ホスティング) に置いて、js などは CloudFront から gzip で配信しています。
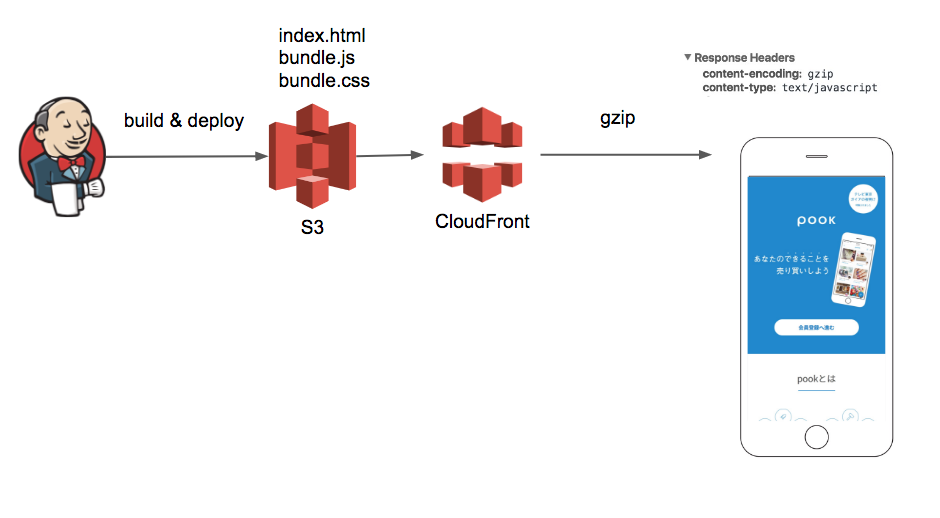
S3 に置いた index.html から EC2 の API サーバーにリクエストを送り、動的に JavaScript で表示を切り替えるという仕組みです。
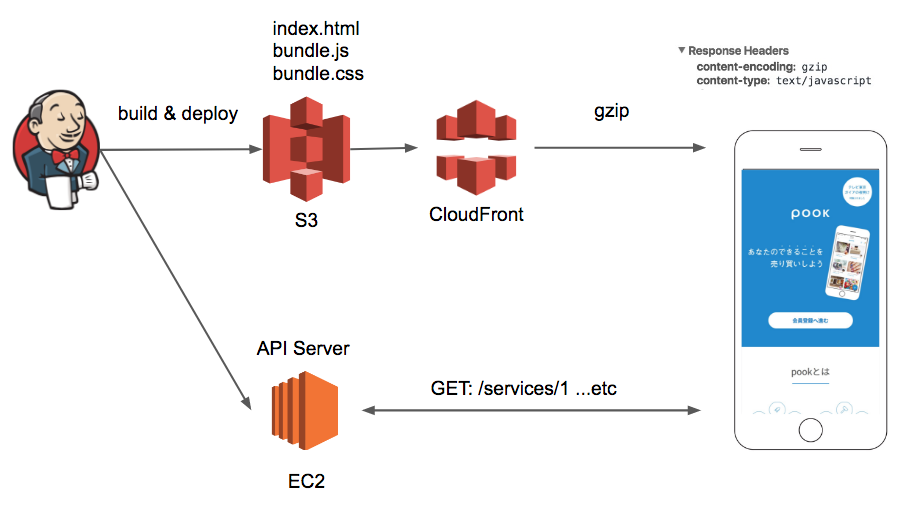
インフラ管理には terraform を利用して極力 GUI コンソールを使わないようにしています。
現在の API サーバーのデプロイについては ECS を用いて Docker の Container を立ち上げてブルーグリーンデプロイする仕組みなどを開発中です。
その辺りについては近々開催される勉強会で発表してもらう予定です。
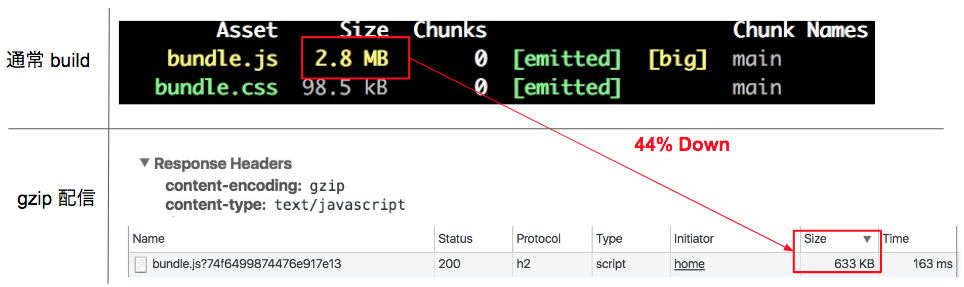
CloudFront から gzip で圧縮して配信
- Cloud Front の管理画面で、Compress Objects Automatically を Yes にするだけ
React Redux で SPA を開発、運用してみた課題感
- デザイナーがjsxを書くのに敷居が高く、HTML直書きより協業しにくい(反証もありそうなので強く言えない)
- Reducer がどんどん肥えていく => normalize したい
- コミュニティライブラリに依存しすぎると思わぬところでハマる(日本語が入力で勝手に確定されるとか)
- ビジネスロジックの置き場に悩む => Middleware においた
- FlowType入れたけど、型を使いこなせているか不安
- Google は js 動くが、 Facebook twitter は js 動かない。 OGP 画像がでない(こちらは少し解決したので、後日記事を書く予定)
- ユーザーがアプリと勘違いするので、アプリクオリティが求められる
- トレンドを追いかけつつ、プロダクトの製作は結構忙しい
- action, reducer, saga が冗長で、記述量が多くなって辛い
まとめと感想
React Redux で SPA を開発、運用して
- Redux は結構薄いフレームワークなので随所に工夫が必要(HOC とか Middleware とか)
- Middleware を活用するとコードの見通しは良くなる
- ユーザーが求める 「普通」 は確実に難易度が上がってきている
- 継続的に改善していける健全なコードを書く環境が必要そう
- コミュニティが盛り上がっているので、いろいろ楽しい
次章、React Redux の SPA をハイブリッドアプリにして速攻リリースした結果、得られた知見と実装例。需要がありそうなら書きます。