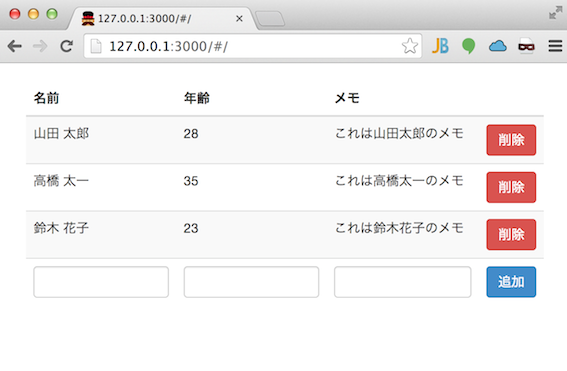
前々回の その①:考察編 、前回の その②:環境構築編 の続きで、その③:実装編 です。
-
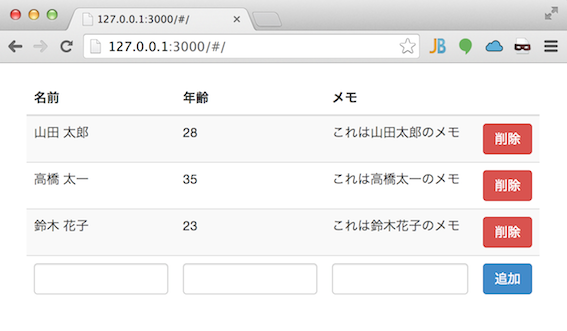
実際に Rails と AngularJS のアプリケーションを開発してみました。前にも載せましたが、こいうの。
-
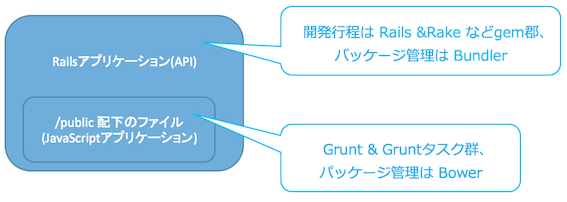
Rails と AngulaJS の関係は次のような感じ。Rails は API に徹します。画面まわりは AngularJS で。
-
フロントエンドのソースは、Rails と同一ソースツリー内にあり、稼働サーバにも Rails と同時にデプロイされますが(クロスドメイン、クロスオリジンではない)、Rails とは独立した開発環境を持ちます。
最終的なソースは GitHub に載せたので、ページ最後のリンクからご覧ください。
① Rails で Scaffold し CRUD の流れを生成
ゼロから作ってもいいのですが、手を抜くために Scaffold を元に作成します。
-
下記コマンドを実行。
$ cd rails_angular_app $ ./bin/rails g scaffold person name:string age:integer memo:text -
DBを migrate します。
$ cd rails_angular_app $ ./bin/rake db:create(もし作成されていない場合) $ ./bin/rake db:migrate -
ここで一旦、動作確認。
$ cd rails_angular_app $ ./bin/rails s -
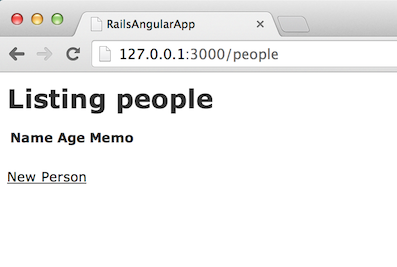
ブラウザで
http://127.0.0.1:3000/peopleへアクセスし、次のように表示されればOK。New Personリンクから適当にデータも登録しておきます。
② API用に Rails の Controller を修正
今回の仕様としては、GET /people.json でデータの一覧を、POST /people.json で新規データ作成を、DELETE /people/[id].json でデータの削除をするものとします。
rails_angular_app/app/controllers/people_controller.rb を次のようにします。
Scaffold からの変更点は、コメントで ADD と記載した箇所です。ていうか、ほぼ、いじらず。(もしアクセストークンの連携をする場合、どうやるのかしら。。)
class PeopleController < ApplicationController
  before_action :set_person, only: [:show, :edit, :update, :destroy]

  # ADD:認証は今回はスキップ。。
  skip_before_action :verify_authenticity_token

  # GET /people
  # GET /people.json
  def index
    @people = Person.all
    # ADD:一覧で JSON を返す
    render json: @people
  end

  # GET /people/1
  # GET /people/1.json
  # ADD:今回は使用しないのでコメントアウト
  #def show
  #end

  # GET /people/new
  # ADD:今回は使用しないのでコメントアウト
  #def new
  #  @person = Person.new
  #end

  # GET /people/1/edit
  # ADD:今回は使用しないのでコメントアウト
  #def edit
  #end

  # POST /people
  # POST /people.json
  def create
    @person = Person.new(person_params)

    respond_to do |format|
      if @person.save
        format.html { redirect_to @person, notice: 'Person was successfully created.' }
        format.json { render :show, status: :created, location: @person }
      else
        format.html { render :new }
        format.json { render json: @person.errors, status: :unprocessable_entity }
      end
    end
  end

  # PATCH/PUT /people/1
  # PATCH/PUT /people/1.json
  # ADD:今回は使用しないのでコメントアウト
  #def update
  #  respond_to do |format|
  #    if @person.update(person_params)
  #      format.html { redirect_to @person, notice: 'Person was successfully updated.' }
  #      format.json { render :show, status: :ok, location: @person }
  #    else
  #      format.html { render :edit }
  #      format.json { render json: @person.errors, status: :unprocessable_entity }
  #    end
  #  end
  #end

  # DELETE /people/1
  # DELETE /people/1.json
  def destroy
    @person.destroy
    respond_to do |format|
      format.html { redirect_to people_url, notice: 'Person was successfully destroyed.' }
      format.json { head :no_content }
    end
  end

  private
    # Use callbacks to share common setup or constraints between actions.
    def set_person
      @person = Person.find(params[:id])
    end

    # Never trust parameters from the scary internet, only allow the white list through.
    def person_params
      params.require(:person).permit(:name, :age, :memo)
    end
end
とりあえず GETメソッド だけ動作確認。ブラウザで http://127.0.0.1:3000/people にアクセスし、次のように表示されればOK。JSON 形式になってますね^^
③ クロスオリジン(クロスドメイン)対応
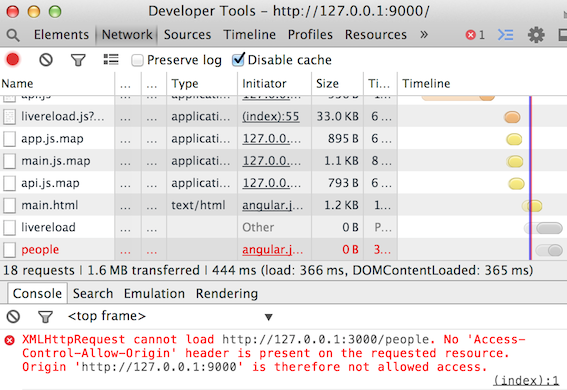
開発中は、Rails 側が 127.0.0.1:3000、AngularJS 側が 127.0.0.1:9000 となるので、AngularJS から Rails へアクセスすとクロスオリジンでエラーとなります(ポートを変更できても、どのみち同じポートではローカルサーバを起動できない。)。
そこで、クロスオリジンに簡単に対応できる、rack-cors という gem を導入します。Gemfile を修正し、
gem 'rack-cors', :require => 'rack/cors', group: [:development, :test]
bundle install します。
$ bundle install --path vendor/bundle
前回の bundle install 時に
rails_angular_app/.bundle/configが作成され、中に--path vendor/bundleが記載してあれば、コマンドラインでは--path vendor/bundleは不要です。
次に rails_angular_app/config/environments/development.rb に下記を追記します。(なので development 環境だけで有効となる。)
config.middleware.insert_before ActionDispatch::Static, Rack::Cors do
  allow do
    origins '*'
    resource '*', :headers => :any, :methods => [:get, :post, :delete]
  end
end
origins を 127.0.0.1:9000 としてもいいかと思います。
Railsサーバを再起動すると、GET、POST、DELETEメソッド時に Access-Control-Allow-Origin ヘッダが付与されるようになります。
④ AngularJS から、Rails が解釈できる形で POST できるようにする
app.coffee に config を追加(下ソースの2つ目)し、POSTデータの変換(そのままだと AngularJS からはJSONで送られてしまうので)、および、POST時にHTTPヘッダを追加するようにします。
"use strict"

angular.module("frontApp", [
  "ngSanitize",
  "ngRoute"
]).config(["$routeProvider", ($routeProvider) ->
    $routeProvider
      .when "/",
        templateUrl: "views/main.html"
        controller: "MainCtrl"
      .otherwise
        redirectTo: "/"
]).config(["$httpProvider", ($httpProvider) ->

    $httpProvider.defaults.transformRequest = (data) ->
      return data if data is `undefined`
      $.param data

    $httpProvider.defaults.headers.post = "Content-Type": "application/x-www-form-urlencoded; charset=UTF-8"
])
⑤ AngularJS のアプリケーション作成
ここは Rails とか関係なく、普通に作るだけです。今回つくったソースを簡単に説明します。
1. APIハンドリング用のFactory
Controllerに書くのもあれなので、Factoryに分けました。それぞれの API を呼び出すだけです。
"use strict"

angular.module("frontApp")
  .factory "Api", ($http) ->

    host = "http://127.0.0.1:3000"
    #host = ""

    getPeople: ->
      $http.get(host + "/people")
        .success (data, status, headers, config) ->

    postPeople: (obj) ->
      $http.post(host + "/people.json", obj)
        .success (data, status, headers, config) ->

    deletePeople: (id) ->
      $http.delete(host + "/people/" + id + ".json")
        .success (data, status, headers, config) ->
2. View
APIのレスポンス結果を ng-repeat で TABLE へ表示、ng-click に削除ボタンと追加ボタンのメソッドを定義、新規データ追加時のユーザの入力値は、ng-model で変数バインドしています。
デザインでは Twitter Bootstrap の class を利用しています。
削除ボタンの doDelete($index) の $index は、ng-repeat の N番目の N が格納されます。
ちなみに ng-controller を書いてないのは、app.coffee で既に View と Controller の対応づけがされている為です。
<div class="container">
    <table class="table table-striped">
        <thead>
            <tr>
                <th>名前</th>
                <th>年齢</th>
                <th>メモ</th>
                <th></th>
            </tr>
        </thead>
        <tbody>
            <tr ng-repeat="result in results">
                <td>{{result.name}}</td>
                <td>{{result.age}}</td>
                <td>{{result.memo}}</td>
                <td align="right"><button class="btn btn-danger" ng-click="doDelete($index)">削除</button></td>
            </tr>
            <tr>
                <td><input type="text" class="form-control" ng-model="new_name"></td>
                <td><input type="text" class="form-control" ng-model="new_age"></td>
                <td><input type="text" class="form-control" ng-model="new_memo"></td>
                <td align="right"><button class="btn btn-primary" ng-click="doPost()">追加</button></td>
            </tr>
        </tbody>
    </table>
</div>
3. Controller
- 先程の Factory を DI
- 初期表示時に、変数の初期化と、一覧データの取得
- 追加ボタン、削除ボタンが押された時の処理
を書きます。
POSTデータ(bodyの中身)は、JSON形式で用意します。key は、Rails の場合は モデル名[カラム名] とする必要があるみたいです。(少しハマった。Rails 標準の New 画面での POST リクエストを解析しました..)
新規データ追加時/削除時は、それぞれ $scope.results.push $scope.results.splice で、画面にも反映しています。こういう時は AngularJS は楽ですね。
一応、then で、非同期に API の結果を反映するようにしてあります。
"use strict"

angular.module("frontApp")
  .controller "MainCtrl", ["$scope", "Api", ($scope, Api) ->

    clearInput = ->
      $scope.new_name = ""
      $scope.new_age = ""
      $scope.new_memo = ""

    clearInput()

    Api.getPeople().then (res) ->
      $scope.results = res.data

    $scope.doPost = ->

      obj =
        "person[name]": $scope.new_name
        "person[age]": $scope.new_age
        "person[memo]": $scope.new_memo

      Api.postPeople(obj).then (res) ->
        $scope.results.push res.data
        clearInput()

    $scope.doDelete = (index) ->
      Api.deletePeople($scope.results[index].id).then (res) ->
        $scope.results.splice index, 1
]
4. index.html
yo で作成されたものほぼそのままで、追加した JavaScript ファイル(api.js)の読み込みだけを追記します。
<!-- build:js({.tmp,app}) scripts/scripts.js -->
<script src="scripts/app.js"></script>
<script src="scripts/controllers/main.js"></script>
<script src="scripts/services/api.js"></script>
<!-- endbuild -->
⑥ フロントエンドのソースを Rails 側へ展開
開発中は不要なのですが、稼働サーバにソースをあげたり、同一ドメイン(ポート)での動作確認をするために、フロントエンドのソースを Rials の public ディレクトリへ展開する設定をします。
(minify や concat なども、ここで対応されます。)
これは簡単で、Gruntのタスクで、dist の値を一つ書き換えるだけです。
〜
yeoman: {
  // configurable paths
  app: require('./bower.json').appPath || 'app',
  //dist: 'dist'
  dist: '../public'
},
〜
試しに展開してみます。まずは、APIの向き先ドメインを空(=自ホスト)へ変更し、
"use strict"

angular.module("frontApp")
  .factory "Api", ($http) ->

    #host = "http://127.0.0.1:3000"
    host = ""

    getPeople: ->
      $http.get(host + "/people")
        .success (data, status, headers, config) ->
〜
grunt build を実行します。
$ cd rails_angular_app/front
$ grunt build -f
ブラウザで、http://127.0.0.1:3000 へアクセスしてみます。
OKですね^^ あとは production 環境にデプロイすれば、きっと動くはず!
おわりに
- 今回のソースは GitHub に置きました。大したものではないですが、ご自由にご利用ください。
-
お手元で再現する場合は、
git cloneした後、次のようにすればいいかと思います(試してないのでたぶん)。$ cd rails_angular_app $ bundle install --path vendor/bundle $ ./bin/rake db:create $ ./bin/rake db:migrate $ cd front $ npm install $ bower install -
Rails の
publicディレクトリもコミットしておいたつもりですが、もし無ければ、次のようにしてフロントエンドのソースをpublicフォルダへ展開してください。$ cd rails_angular_app/front $ grunt build-
アプリケーションを動かすには、次のように Rails のローカルサーバを起動した後、ブラウザで
http://127.0.0.1:3000へアクセスしてください。$ cd rails_angular_app $ ./bin/rails s
-
- 時間は空いてしまうと思いますが、今回のようなテストアプリケーションでなく、実際のモバイルアプリケーションの運用で使えるよう、続編を書く予定です。
- Onsen UI (CSSフレームワーク) で、モバイルアプリのUIを作成
- Grape で API を作成
- マスタの管理画面を Active Admin で作成
- セキュリティ対応
- Heroku もしくは EC2(AWS)へのデプロイ
