概要
BluemixのRaspberryPi登録レシピに登場するデバイス用のsampleプログラムは、どんなにセンサーがたくさん付いていようが固定の4項目のデータのみをBluemixに送信する作りになっている。
Raspberry Pi 2にセンサーを付け加えて固定4項目以外のデータをBluemixで取得するには、sampleプログラムのソースコードを修正してビルドすれば良い。その方法を整理する。
整理している内に長くなってきたので、(1)Sampleプログラムの仕組みの整理と(2)どこをどのように変更すればよいのかを分けることにした。
(1) 仕組みの理解 (これ)
(2) センサーを付けてデータを拾う 温度センサーデジタル編
(3) センサーを付けてデータを拾う 温度センサーアナログ編
(4) センサーを付けてデータを拾う 温度センサーデジタル編(リベンジ)
(5) センサーを付けてデータを拾う 温度・湿度・気圧まとめて採取編
番外編 『ムック「日経Linux ラズパイマガジン 2015年春号 」電子工作入門キット パーツセット』に入っていたもの
構成のイメージ
IoTという構成で考えるとこんな感じ。下段ほどより具体的に。(図にしたい)
Things → Internet
センサー → デバイス → クラウド
センサー → Raspberry Pi 2(sysfs) → Bluemix(IoT Foundation)
↑ ↑
ポイント1 ポイント2,3,4
ポイント1 要素データの取得(センサーから)
センサーから取得するデータはRaspberry Pi 2のsysfs仮想ファイルシステムを参照することで取得可能らしい。
一般的にLinux上でデバイスの情報を読み取るには、Sysfs仮想ファイルシステムを通じて/sys/devices配下を参照することになる。
/sys/class配下はその直下のフォルダ名がデバイスの種類を表していてより人間に分かりやすい。/sys/class配下は/sys/device配下へのシンボリックリンクになっているので使い勝手の面からこちらを参照するでもよい。
Raspberry Pi 2ではセンサーとの物理的なI/Oの手段としてGPIOなるものを使えるので、これに対応する/sys/class/gpio配下を参照することでセンサーのデータを取得できる(らしい)。
「(1) 仕組みの理解」編ではsampleプログラムが/sys/class/thermal配下からRaspberry Pi 2のCPU温度を読み取る構成であることを確認し、「(2) センサーを付けてデータを拾う」編では/sys/class/gpio配下からセンサーのデータを参照するようにしてみる。
ポイント2 要素データの取得(sysfsから)
デバイス用のsampleプログラムで取得できる固定の4つの要素データとは次の通り。
| No. | 項目 | データ・ポイント | 値 |
|---|---|---|---|
| 1 | 名前 | d.myName | myPi(固定文字列) |
| 2 | CPU温度 | d.cputemp | 実測した温度(小数) |
| 3 | ロードアベレージ | d.cpuload | ロードアベレージ(小数) |
| 4 | 正弦(サイン)値 | d.sine | -1 ~ 1(小数) |
それぞれの値は次のように取得・生成している。
myName :
iot.hにべた書き。固定文字列になっている。デバイスの情報ではない。
# define DEVICE_NAME "myPi"
cputemp :
cpustat.cのgetCPUTemp()関数内で/sys/class/thermal/thermal_zone0/tempを読んでいる。
char cputemploc[255] = "/sys/class/thermal/thermal_zone0/temp";
float getCPUTemp() {
	FILE * cputemp = NULL;
	char buffer [SIZE];
	long tempinmillic;
	float tempinc;

	memset(buffer, 0, sizeof(buffer));
	cputemp = fopen(cputemploc, "r");

	fgets(buffer, SIZE, cputemp);

	tempinmillic = atol(buffer);
	tempinc = tempinmillic * 1.0 / 1000.0;

	fclose(cputemp);
	return tempinc;
}
cpuload :
cpustat.cのGetCPULoad()関数内で/proc/loadavgを読んでいる。
char cpuloadloc[255] = "/proc/loadavg";
float GetCPULoad() {

	FILE *f1;
        float load1,load5,load15;

        f1 = fopen(cpuloadloc, "r");
        fscanf(f1, "%f\t%f\t%f\t", &load1, &load5, &load15 );
	fclose(f1);
        return (load1);

}
sine :
iotmain.cでサイン(正弦)値を計算して生成する。デバイスの情報ではない。
float sineVal(float minValue, float maxValue, float duration, float count) {
	float sineValue;
	sineValue = sin(2.0 * PI * count / duration) * (maxValue - minValue) / 2.0;
	return sineValue;
}
ポイント3 JSONデータの組み立て
取得・生成した値を使ってJSONデータを組み立てる。ソースコードはiotmain.cとjsonator.c
JSONにしたい要素データを、いったんCの構造体に格納して、
  struct json {
	  char myname[100];
	  float cputemp;
	  float sine;
	  float cpuload;
  };

  /* This is the short hand for json */
  typedef struct json JsonMessage;
		JsonMessage json_message = { DEVICE_NAME, getCPUTemp(), sineVal(
				MIN_VALUE, MAX_VALUE, 16, count), GetCPULoad() };
generateJSON()メソッドを呼ぶことで、データ構造をCの構造体からJSON形式に変換している。
json = generateJSON(json_message);
char * generateJSON(JsonMessage passedrpi ) {
	char * jsonReturned;

	// 2 braces, 4 colons, 3 commas, 10 double-quotes makes it 19
	jsonReturned = calloc(1, sizeof passedrpi + sizeof(char) * 25);

	strcat(jsonReturned, "{\"d\":");
	strcat(jsonReturned, "{");

	strcat(jsonReturned, "\"myName\":\"");
	strcat(jsonReturned, passedrpi.myname);
	strcat(jsonReturned, "\",");
	char buffer[10];

	strcat(jsonReturned, "\"cputemp\":");
	sprintf(buffer, "%.2f", passedrpi.cputemp);
	strcat(jsonReturned, buffer);
	strcat(jsonReturned, ",");

	strcat(jsonReturned, "\"cpuload\":");
	sprintf(buffer, "%.2f", passedrpi.cpuload);
	strcat(jsonReturned, buffer);
	strcat(jsonReturned, ",");

	strcat(jsonReturned, "\"sine\":");
	sprintf(buffer, "%.2f", passedrpi.sine);
	strcat(jsonReturned, buffer);

	strcat(jsonReturned, "}");
	strcat(jsonReturned, "}");

	return jsonReturned;
}
MQTTでデータ送信する際は、具体的にはこんな感じの電文になる。(イメージ)
{"d":{"myName":"myPi","cputemp":46.54,"cpuload":0.00,"sine":-0.92}}
改行を入れて見やすくするとこんな感じ。(イメージ)
{
    "d":{
        "myName":"myPi",
        "cputemp":46.54,
        "cpuload":0.00,
        "sine":-0.92
    }
}
ポイント4 MQTTプロトコルでJSONデータを送信
MQTTプロトコルでpublishする。ソースコードはmqttPublisher.c
MQTTの構成要素
MQTTブローカー : BluemixのIoT Foundataionサービス
MQTTクライアント : デバイス用のsampleプログラム
MQTTの「トピック」はiotmain.cで次の通り指定している。
publish用 : iot-2/evt/status/fmt/json
subscribe用 : iot-2/cmd/reboot/fmt/json
char publishTopic[MAXBUF] = "iot-2/evt/status/fmt/json";
char subscribeTopic[MAXBUF] = "iot-2/cmd/reboot/fmt/json";
MQTT Publish
res = publishMQTTMessage(&client, publishTopic, json);
int publishMQTTMessage(MQTTAsync* client, char *topic, char *payload) {

	MQTTAsync_message pubmsg = MQTTAsync_message_initializer;
	MQTTAsync_responseOptions opts = MQTTAsync_responseOptions_initializer;
	int rc = MQTTASYNC_SUCCESS;

	opts.onSuccess = onSend;
	opts.context = *client;

	pubmsg.payload = payload;
	pubmsg.payloadlen = strlen(payload);
	pubmsg.qos = QOS;
	pubmsg.retained = 0;
	deliveredtoken = 0;

	if ((rc = MQTTAsync_sendMessage(*client, topic, &pubmsg, &opts))
			!= MQTTASYNC_SUCCESS) {
# ifdef ERROR
		syslog(LOG_ERR, "Failed to start sendMessage, return code %d\n", rc);
# endif
		return rc;
	}

# ifdef INFO
	syslog(LOG_DEBUG, "Waiting for publication of %s on topic %s\n", payload,
			topic);
# endif

	return rc;
}
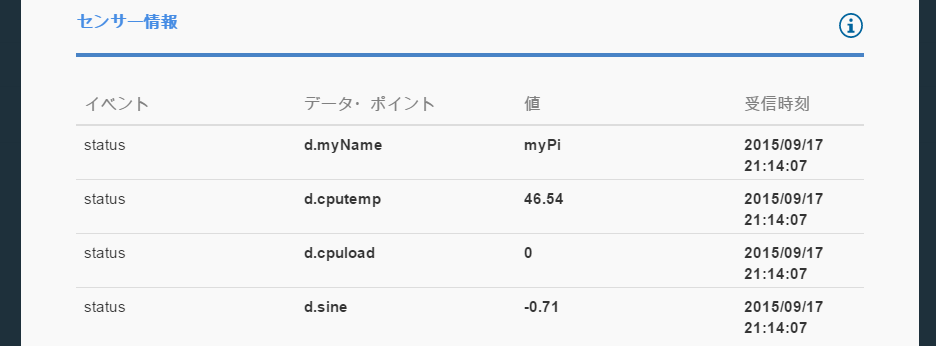
Bluemix IoTFのダッシュボードではこんな感じで表示されるのを確認できる。

続き
(2) センサーを付けてデータを拾う 温度センサーデジタル編
番外編 『ムック「日経Linux ラズパイマガジン 2015年春号 」電子工作入門キット パーツセット』に入っていたもの
環境
Raspberry Pi 2 Model B
Raspbian
Bluemix IoT Foundation
参考
BluemixのRaspberryPi登録レシピ
https://developer.ibm.com/recipes/tutorials/raspberry-pi-4/
BluemixのRaspberryPi登録レシピに登場するデバイス用のsampleプログラム
(Linux用のdaemonになっている)
https://github.com/ibm-messaging/iot-raspberrypi/blob/master/samples/c/
sysfs仮想ファイルシステムについて
(読んでもよく分からんが。。)
https://ja.wikipedia.org/wiki/Sysfs
CPUの温度を/sys/class/thermal/thermal_zone0/tempから拾う理由は?
http://unix.stackexchange.com/questions/167207/why-does-linux-store-cpu-temperatures-on-so-many-files
/sys/class/thermal配下の構成は?
https://www.kernel.org/doc/Documentation/thermal/sysfs-api.txt