【サーバーレスアーキテクチャ】をserverlessフレームワークで試す第2章 〜API Gateway利用編〜
あらすじ
今年も花粉が凄いですね。自分はずっと微熱出てる状況です。
会社にジョインしてから、もう2年くらい経ちました。
今回からは少し話題になっている「サーバーレスアーキテクチャ」というネタをシリーズで公開したいと思います。
※後々、リクエストに応じて更新することが多いのでストックしておくことをおすすめします。
自分は某社でCTOをしていますが、頭でっかちに理論ばっかり学習するよりは、イメージがなんとなく掴めるように学習し、実践の中で知識を深めていく方が効率的に学習出来ると考えています。
教育スタイルとしては正しい事をきっちりかっちり教えるのではなく、未経験レベルの人がなんとなく掴めるように、資料を構成していきます。
以下のようなシリーズネタで進めます。
| No. | 記事 |
|---|---|
| 1 | 【サーバーレスアーキテクチャ】をserverlessフレームワークで試す第1章 〜nodejsのtemplate利用編〜 |
| 2 | 【サーバーレスアーキテクチャ】をserverlessフレームワークで試す第2章 〜API Gateway利用編〜 |
| 3 | [【サーバーレスアーキテクチャ】をserverlessフレームワークで試す第3章 〜DynamoDB利用編〜] |
では、今回もはじめていきましょう!
はじめに
今回は前回【サーバーレスアーキテクチャ】をserverlessフレームワークで試す第1章 〜nodejsのtemplate利用編〜の記事と同様、serverlessのnodejsのtemplateを用いてAWS APIGatewayのエンドポイントを利用するにしてみましょう。
でははじめましょう
環境
Mac環境
10.11.6
node環境
$ nodebrew ls

v0.12.14
$ nodebrew install-binary v7.4.0
$ nodebrew ls
v0.12.14
v7.4.0
python環境
$ pyenv versions
  system
  2.7.12
$ pyenv install -v 3.5.2
$ eval "$(pyenv init -)"
$ pyenv shell 3.5.2
$ python --version
Python 3.5.2
awscli環境
$ pip install awscli
$ aws --version
aws-cli/1.11.9 Python/2.7.10 Darwin/15.6.0 botocore/1.4.66
serverless環境
$ npm install serverless -g
$ serverless --version
1.5.1
プロジェクト作成
前回【サーバーレスアーキテクチャ】をserverlessフレームワークで試す第1章 〜nodejsのtemplate利用編〜で作った「serverlesstest」というAWSプロファイルを引続き利用する形ですすめます。
いつも通り、serverlessコマンドでnodejsでapigatewayというプロジェクトを作って見ましょう。
$ serverless create --template aws-nodejs --provider aws --profile serverlesstest --path apigateway --verbose
作成されたプロジェクト
apigateway
├── handler.js
└── serverless.yml
API Gatewayを利用する
設定変更
$ cd ~/Documents/apigateway
$ ls .
handler.js
serverless.yml
LambdaのステージをtestにデフォルトのテストスクリプトをAPI Gateway経由で利用してみましょう。
変更箇所は以下の通りです。
今回からはdiffの結果を表示する形で楽しようと思います。
最初はイメージわかないと思うので、最終のファイル状況も併記しておきます。
--- serverless.yml.before	2017-03-06 18:26:48.000000000 +0900
+++ serverless.yml.after	2017-03-06 19:00:41.000000000 +0900
@@ -20,6 +20,9 @@
 provider:
   name: aws
   runtime: nodejs4.3
+  profile: serverlesstest
+  stage: test
+  region: ap-northeast-1

 # you can overwrite defaults here
 #  stage: dev
@@ -56,7 +59,12 @@
 functions:
   hello:
     handler: handler.hello
-
+    events:
+      - http:
+          path: hello
+          method: get
+          cors: true
+
 #    The following are a few example events you can configure
 #    NOTE: Please make sure to change your handler code to work with those events
 #    Check the event documentation for details
変更後のファイル(変更箇所だけを抜粋)
provider:
  name: aws
  runtime: nodejs4.3
  profile: serverlesstest
  stage: test
  region: ap-northeast-1

functions:
  hello:
    handler: handler.hello
    events:
      - http:
          path: hello
          method: get
          cors: true
デプロイ
修正が完了したら、デプロイをしてみましょう。
$ serverless deploy --provider aws --profile serverlesstest -v
デプロイが上手く行くと以下のようなインフォメーションが表示されるので
endpointsという箇所のURLをコピーしましょう。
API GateWayの情報を確認する。
Service Information
service: apigateway
stage: test
region: ap-northeast-1
api keys:
  None
endpoints:
  GET - https://xxxxxxxxxxxxxx.execute-api.ap-northeast-1.amazonaws.com/test/hello
functions:
  apigateway-test-hello: arn:aws:lambda:ap-northeast-1:xxxxxxxxxxxxxx:function:apigateway-test-hello

Stack Outputs
HelloLambdaFunctionArn: arn:aws:lambda:ap-northeast-1:xxxxxxxxxxxxxx:function:apigateway-test-hello
HelloLambdaFunctionQualifiedArn: arn:aws:lambda:ap-northeast-1:xxxxxxxxxxxxxx:function:apigateway-test-hello:1
ServiceEndpoint: https://xxxxxxxxxxxxxx.execute-api.ap-northeast-1.amazonaws.com/test
ServerlessDeploymentBucketName: apigateway-test-xxxxxxxxxxxxxx
ブラウザでアクセスしてみる
さきほどコピーしたエンドポイントのURLにブラウザでアクセスしてみましょう
以下の画像のように表示されれば成功です。

少しフライングしてDynamoDBにもアクセスしてみる
次回にDynamoDBにアクセスするRestfulなAPIを作る予定でしたが
少しフライングして、この回でもDynamoDBにアクセスして結果を読み取るようにしてみましょう。
いつも通り解説はほどほどに。
serverless.ymlを使って
- Lambdaで実行するユーザーにDynamoDBの周りの権限を付与(iamRoleStatementsらへん)
- resourcesでDynamoDBの設定も同時に設定
を設定しています。
serverless.ymlを変更する
--- serverless.yml.before	2017-03-06 19:00:41.000000000 +0900
+++ serverless.yml.after	2017-03-07 10:52:00.000000000 +0900
@@ -23,6 +23,17 @@
   profile: serverlesstest
   stage: test
   region: ap-northeast-1
+  iamRoleStatements:
+  - Effect: Allow
+    Action:
+      - dynamodb:DescribeTable
+      - dynamodb:Query
+      - dynamodb:Scan
+      - dynamodb:GetItem
+      - dynamodb:PutItem
+      - dynamodb:UpdateItem
+      - dynamodb:DeleteItem
+    Resource: "arn:aws:dynamodb:ap-northeast-1:*:*"

 # you can overwrite defaults here
 #  stage: dev
@@ -57,14 +68,14 @@
 #    - exclude-me-dir/**

 functions:
-  hello:
-    handler: handler.hello
+  readAll:
+    handler: handler.readAll
     events:
       - http:
-          path: hello
+          path: members
           method: get
           cors: true
-
+
 #    The following are a few example events you can configure
 #    NOTE: Please make sure to change your handler code to work with those events
 #    Check the event documentation for details
@@ -95,3 +106,21 @@
 #     NewOutput:
 #       Description: "Description for the output"
 #       Value: "Some output value"
+resources:
+  Resources:
+    MembersDynamoDbTable:
+      Type: 'AWS::DynamoDB::Table'
+      DeletionPolicy: Retain
+      Properties:
+        AttributeDefinitions:
+          -
+            AttributeName: id
+            AttributeType: S
+        KeySchema:
+          -
+            AttributeName: id
+            KeyType: HASH
+        ProvisionedThroughput:
+          ReadCapacityUnits: 1
+          WriteCapacityUnits: 1
+        TableName: 'members'
handler.jsを変更する
次の章でDynamoDBを使ったRestfulなAPIを作ってみようと考えていましたが
たいしたレベルでもないので、フライングして今回の章でもDynamoDBにアクセスして
結果を取得するようなAPIを作ってみましょう。
--- handler.js.before	2017-03-06 14:47:50.000000000 +0900
+++ handler.js.after	2017-03-07 10:29:24.000000000 +0900
@@ -1,16 +1,17 @@
 'use strict';

-module.exports.hello = (event, context, callback) => {
-  const response = {
-    statusCode: 200,
-    body: JSON.stringify({
-      message: 'Go Serverless v1.0! Your function executed successfully!',
-      input: event,
-    }),
-  };
+const membersReadAll = require('./members-read-all.js');

-  callback(null, response);
+module.exports.readAll = (event, context, callback) => {
+  membersReadAll(event, (error, result) => {
+    const response = {
+      statusCode: 200,
+      headers: {
+        "Access-Control-Allow-Origin" : "*"
+      },
+      body: JSON.stringify(result),
+    };

-  // Use this code if you don't use the http event with the LAMBDA-PROXY integration
-  // callback(null, { message: 'Go Serverless v1.0! Your function executed successfully!', event });
+    context.succeed(response);
+  });
 };
members-read-all.jsを作成する
nodejs用のaws-sdkのライブラリを使ってアクセスするスクリプトを作ってみましょう
単純にDynamoDBのmembersというテーブルに対してscanをした結果を取得するだけの
スクリプトです。
'use strict';

const AWS = require('aws-sdk');
const dynamoDb = new AWS.DynamoDB.DocumentClient();

module.exports = (event, callback) => {
  const params = {
    TableName: 'members',
  };

  return dynamoDb.scan(params, (error, data) => {
    if (error) {
      callback(error);
    }
    callback(error, data.Items);
  });
};
ライブラリをインストールする
nodejsで使うライブラリをインストールしましょう。
今回はpackage.jsonなども使わずインストールしてます。
$ npm install aws-sdk --save
これでプロジェクトフォルダの配下にnode_modulesが作成されて対象のライブラリが保存されました。
デプロイ
長かったですね。実際にデプロイしてみましょう。
$ serverless deploy --provider aws --profile serverlesstest -v
デプロイ結果から、エンドポイントをコピーしブラウザからもアクセスしてみましょう。
https://xxxxxxxxxxxxxx.execute-api.ap-northeast-1.amazonaws.com/test/members
「[]」という結果が表示されましたか?
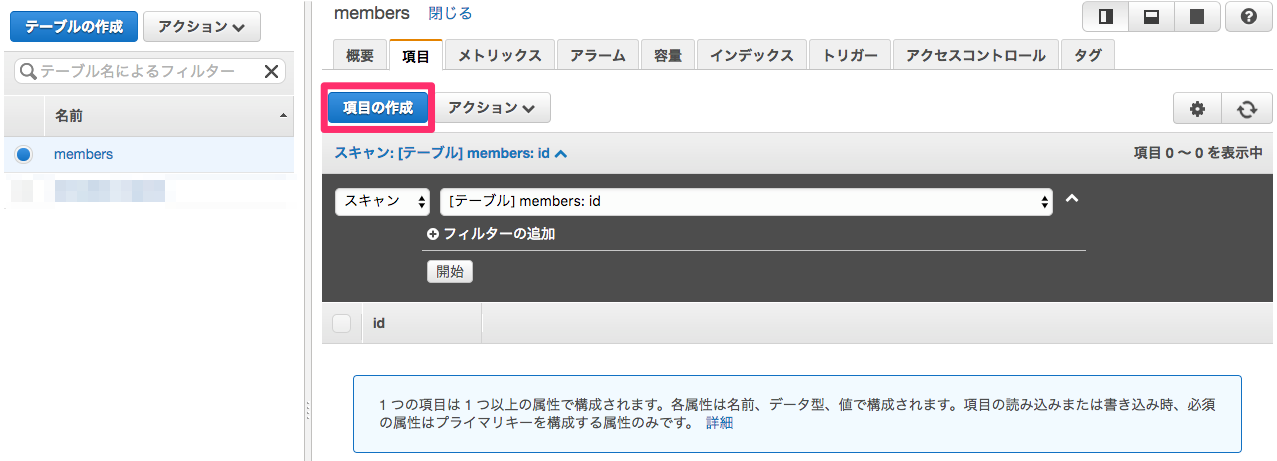
AWSコンソールからDynamoDBを確認する

DynamoDBにデータをいれる
データが空な事を確認するというのもつまらないので
AWSコンソール画面から手動でデータを登録してみましょう。
DynamoDBのテーブルに項目を作成
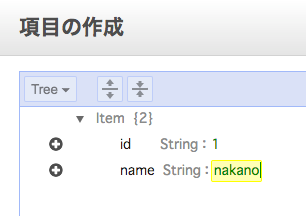
DynamoDBのテーブルにデータを登録
今回はidとnameで登録してみましょう。
API Gateway経由でDynamoDBの結果を確認する
再度ブラウザで
https://xxxxxxxxxxxxxx.execute-api.ap-northeast-1.amazonaws.com/test/members
にアクセスして、さきほど登録したDynamoDBの値が取得出来るか確認してみましょう。

編集後記
少しフライングしてDynamoDBまで連携させてみました。APIの結果を表示するところまでしかネタに含めなかったのでイマイチ実感がわかないと思いますが、余力のある人はAPIを利用する側も作ってみてください。
次回は、もう少しCRUDをRestfulな感じで対応出来るAPIを作ってみようと思います。
お楽しみに。