// 当記事は, 以下親記事の Setup Flowの一部です.
// AWS IoT Device SDK for Ruby を使ってみた
update Raspbian
console
sudo apt-get update
sudo apt-get upgrade
sudo apt-get install -y git libssl-dev libreadline-dev
Install C library for Broadcom BCM 2835 as used in Raspberry Pi
console
mkdir ~/bcm
cd ~/bcm
wget http://www.airspayce.com/mikem/bcm2835/bcm2835-1.50.tar.gz
tar zxvf bcm2835-1.50.tar.gz
cd bcm2835-1.50
./configure
make
sudo make check
sudo make install
Install rbenv
console
touch ~/rbenv-install.sh
chmod 755 ~/rbenv-install.sh
vim ~/rbenv-install.sh
// 書き込み
rbenv-install.sh
MY_GROUP="pi"
if [ "$MY_GROUP" = "" ] ; then
    echo '!!! undefined variable MY_GROUP.'
    echo '!!!'
    echo '!!! ex.) MY_GROUP=staff'
    echo '!!!'
    exit 1
fi

cd /usr/local
git clone git://github.com/sstephenson/rbenv.git rbenv
mkdir rbenv/shims rbenv/versions
chgrp -R $MY_GROUP rbenv
chmod -R g+rwxX rbenv

git clone git://github.com/sstephenson/ruby-build.git ruby-build
cd ruby-build
./install.sh

echo 'export RBENV_ROOT="/usr/local/rbenv"'     >> /etc/profile.d/rbenv.sh
echo 'export PATH="/usr/local/rbenv/bin:$PATH"' >> /etc/profile.d/rbenv.sh
echo 'eval "$(rbenv init -)"'                   >> /etc/profile.d/rbenv.sh
console
sudo bash ~/rbenv-install.sh
// ssh再接続で rbenv有効化
Install ruby
console
sudo rbenv install 2.3.1
rbenv global 2.3.1
gem install bundler

sudo su -
rbenv global 2.3.1
visudo
visudo
# secure_pathへ, rbenv pathsを追記
# Defaults        secure_path="/usr/local/sbin:/usr/local/bin:/usr/sbin:/usr/bin:/sbin:/bin"
Defaults        secure_path="/usr/local/sbin:/usr/local/bin:/usr/sbin:/usr/bin:/sbin:/bin:/usr/local/rbenv/bin:/usr/local/rbenv/shims"
console
exit
Install Gems
console
mkdir ~/aws-iot-device-sdk-ruby
cd ~/aws-iot-device-sdk-ruby

vim ./Gemfile
Gemfile
source "https://rubygems.org"

gem "aws_iot_device"
gem "dht-sensor-ffi"
console
bundle install --path ./vendor/bundle
Create script
console
cd ~/aws-iot-device-sdk-ruby
vim ./main.rb
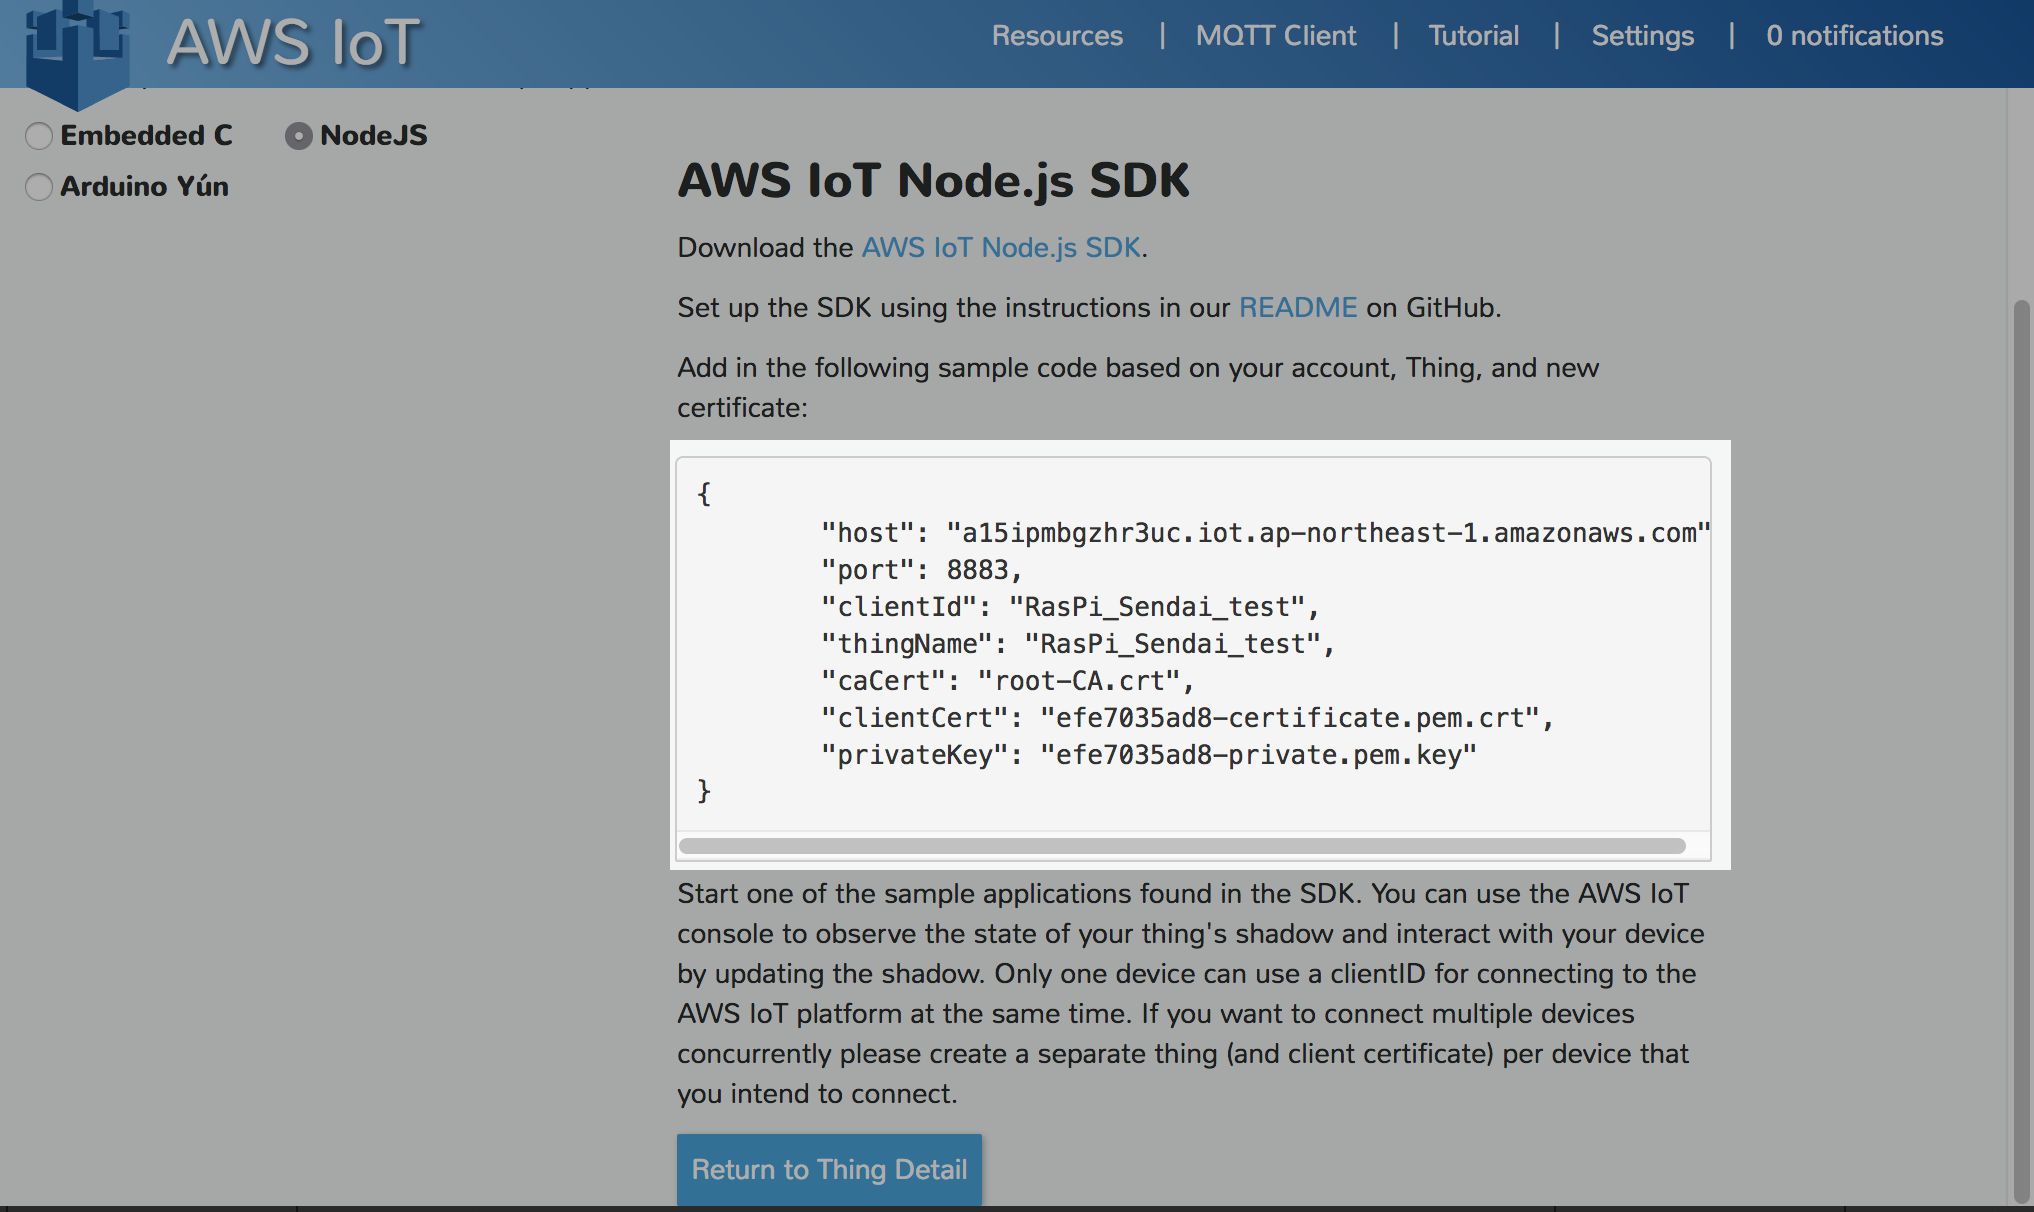
// 以下, @host, @thing部分を修正.
// 前工程 IoT creat thing の際に取得した変数群の中の host, thingの値になります.
// 以下, 参考SS
main.rb
require 'dht-sensor-ffi'
require 'aws_iot_device'
require 'optparse'
require 'json'
require 'pp'


class Iot
  def initialize()
    @host = "xxxxxxxxxxxxxx.ap-northeast-1.amazonaws.com"
    @port = 8883
    @certificate_path = "/home/pi/cert/certificate.pem.crt"
    @private_key_path = "/home/pi/cert/private.pem.key"
    @root_ca_path     = "/home/pi/cert/root-CA.crt"
    @thing = "yyyyyyyyyyyyyyyy"
  end

  def run
    my_shadow_client = AwsIotDevice::MqttShadowClient::ShadowClient.new
    my_shadow_client.configure_endpoint(@host, @port)
    my_shadow_client.configure_credentials(@root_ca_path, @private_key_path, @certificate_path)

    my_shadow_client.connect
    my_shadow_client.create_shadow_handler_with_name(@thing, true)

    filter_callback = Proc.new do |message|
      puts "Executing the specific callback for topic: #{message.topic}\n##########################################\\n"
    end

    delta_callback = Proc.new do |delta|
      message = JSON.parse(delta.payload)
      puts "Catching a new message : #{message["state"]["message"]}\n##########################################\n"
    end

    my_shadow_client.register_delta_callback(delta_callback)

    while true
      pp temp_and_humi = generate_json
      my_shadow_client.update_shadow(temp_and_humi, filter_callback, 5)

      sleep 55
    end

    my_shadow_client.disconnect
  end

  def read_enviroments
    pp value = DhtSensor.read(4, 11) # pin=4, sensor type=DHT-11
  end


  def generate_json
    value = read_enviroments
    temp_and_humi = "{\"state\":{\"desired\":{\"temperature\":\"#{value.temperature}\",\"humidity\":\"#{value.humidity}\"},\"reported\":{\"temperature\":\"#{value.temperat\
ure}\",\"humidity\":\"#{value.humidity}\"}}}"
  end
end


iot = Iot.new
iot.run
// 当ruby scriptは, SDKのsample scriptを元に作成しています.
console
pi@raspberrypi:~/aws-iot-device-sdk-ruby $ sudo ruby main.rb
# <DhtSensor::Reading:0x55ab1c58 @humidity=31.0, @temperature=25.0>
"{\"state\":{\"desired\":{\"temperature\":\"25.0\",\"humidity\":\"31.0\"},\"reported\":{\"temperature\":\"25.0\",\"humidity\":\"31.0\"}}}"
Executing the specific callback for topic: $aws/things/RasPi_sendai_test/shadow/update/accepted
########################################## \n
以上で, 温度/湿度をAWS IoTへ送信し, Lambdaを通して, Influx DBへDataを送信し始める.
通信状況の確認は, AWS IoT UIから確認可能. 以下, 参考SS
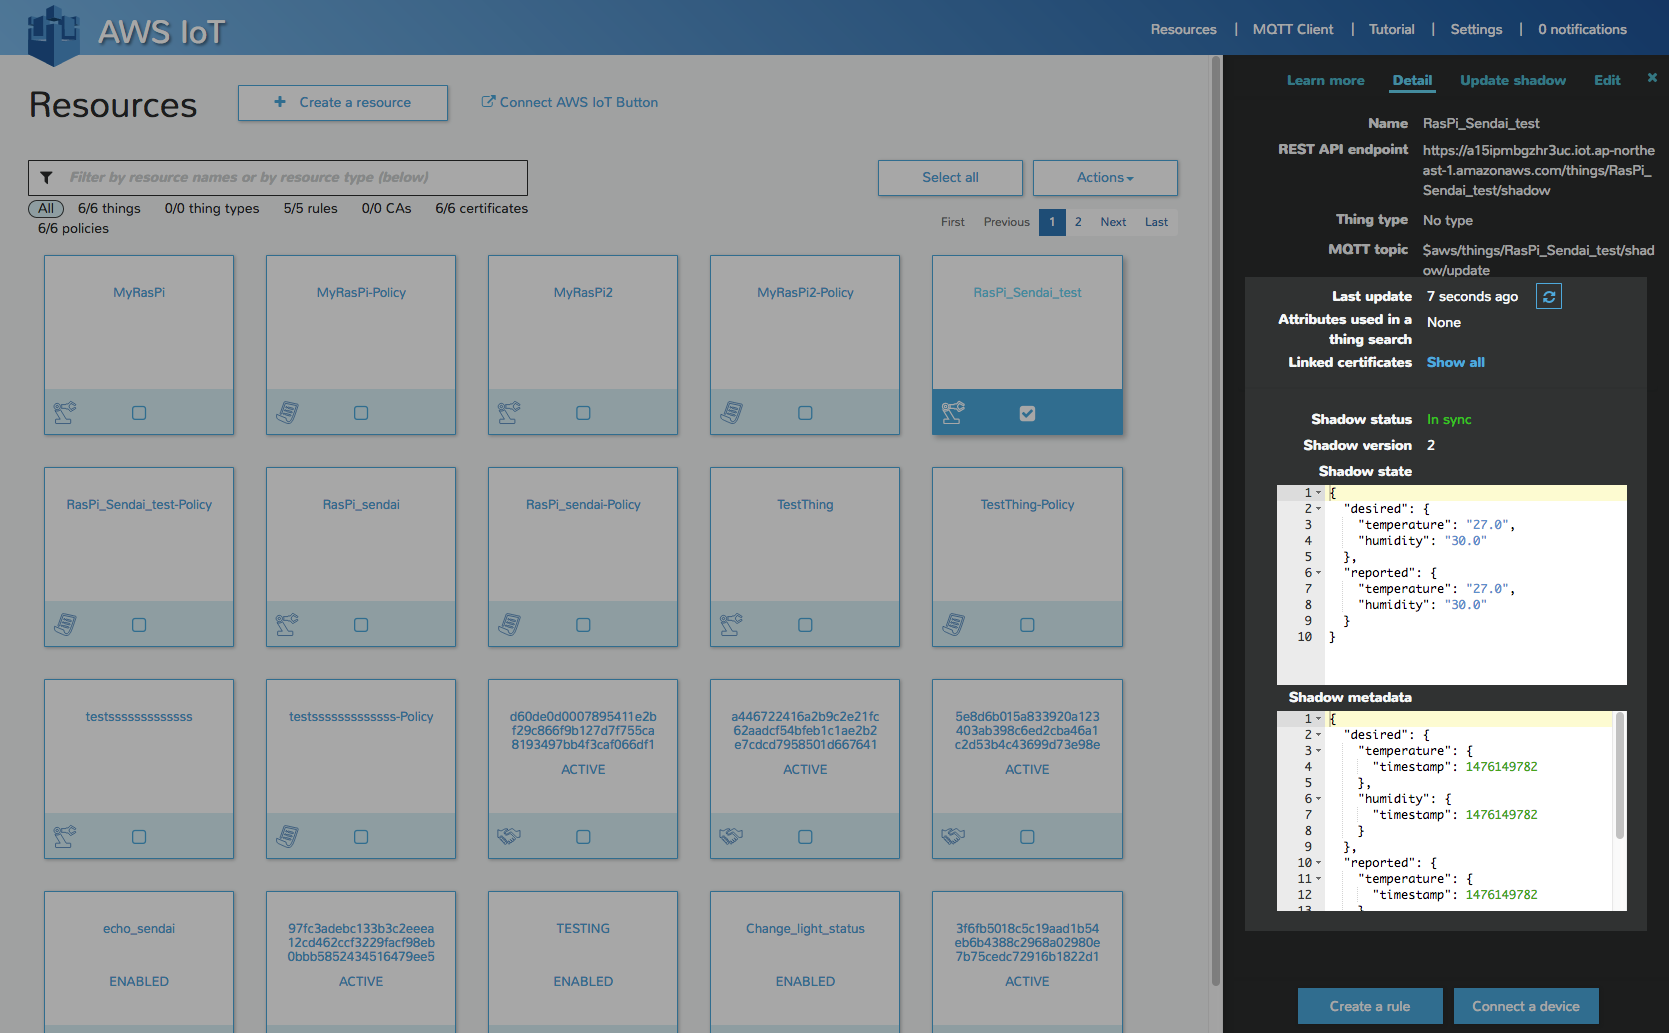
以上.
続いて, #5 - Influx DB構築