6-3. CentOS7.1の設定
ネットワークの設定が終わったので、ここからはTeraTermで操作します。

6-3-1. ホスト名の変更
cent701ホスト名の変更
[root@localhost ~]# hostnamectl set-hostname cent701 ⏎
cent702ホスト名の変更
[root@localhost ~]# hostnamectl set-hostname cent702 ⏎
cent703ホスト名の変更
[root@localhost ~]# hostnamectl set-hostname cent703 ⏎
6-3-2. cent701/cent702/cent703をHOSTSファイルへ登録
HOSTSファイルへの登録
[root@localhost ~]# vim /etc/hosts ⏎
【HOSTSファイル追加内容】
10.110.217.146 cent701 cent701.softlayer.com
10.110.217.147 cent702 cent702.softlayer.com
10.110.217.148 cent703 cent703.softlayer.com
6-3-3. ファイアーウォール 、SELinuxをオフ
今回は、テスト目的なので機能をオフにしました。本稼働の時は設定してください。
ファイアウォールの停止、無効化
firewalldの停止
[root@localhost ~]# systemctl stop firewalld ⏎
firewalldの無効化
[root@localhost ~]# systemctl disable firewalld ⏎

SELinuxの無効化
SELinuxの無効化
[root@localhost ~]# vim /etc/selinux/config ⏎
【config変更】
SELINUX=disabled
6-3-4. 時刻同期の設定
ここでは、時刻同期に「chrony」を使用しました。
SoftLayerのNTP「time.service.networklayer.com」を指定します。
SoftLayer-NTPの登録
[root@localhost ~]# vim /etc/chrony.conf ⏎
【chrony.conf追加】
server time.service.networklayer.com
6-3-5. リブート
ここまでの設定を反映するために、システムをリブートします。
リブート
[root@localhost ~]# reboot ⏎
 以上で「6-3. CentOS7.1の設定」完了です。
6-4. サーバー間の設定
cent701/cent702/cent703相互にパスワード無しでSSH接続できるように設定します。
6-4-1. 秘密鍵、公開鍵の作成
/root/.ssh/ ディレクトリーの作成
.sshディレクトリーの作成
[root@cent701 ~]# mkdir ~/.ssh ⏎
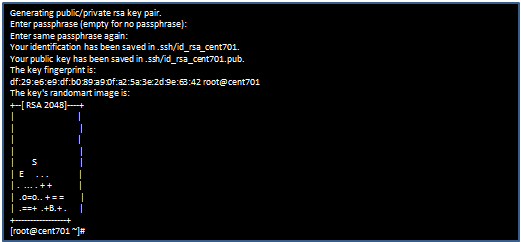
秘密鍵、公開鍵の作成
パスフレーズは指定しません。
秘密鍵、公開鍵の作成
[root@cent701 ~]# ssh-keygen -t rsa -f .ssh/id_rsa_${HOSTNAME} ⏎
cent702/cent703の公開鍵をcent701に集めます。
cent702の公開鍵をcent701へコピー
[root@cent702 ~]# scp ~/.ssh/id_rsa_${HOSTNAME}.pub root@cent701:~/.ssh/ ⏎
cent703の公開鍵をcent701へコピー
[root@cent703 ~]# scp ~/.ssh/id_rsa_${HOSTNAME}.pub root@cent701:~/.ssh/ ⏎
すべての公開鍵をcent701のauthorized_keysに追記します。
公開鍵をcent701のauthorized_keysに追記
[root@cent701 ~]# cat ~/.ssh/id_rsa_cent701.pub > ~/.ssh/authorized_keys ⏎
[root@cent701 ~]# cat ~/.ssh/id_rsa_cent702.pub >> ~/.ssh/authorized_keys ⏎
[root@cent701 ~]# cat ~/.ssh/id_rsa_cent703.pub >> ~/.ssh/authorized_keys ⏎
cent701のauthorized_keysをcent702/cent703へ配布します。
authorized_keysを配付
[root@cent701 ~]# scp ~/.ssh/authorized_keys root@cent702:~/.ssh/ ⏎
[root@cent701 ~]# scp ~/.ssh/authorized_keys root@cent703:~/.ssh/ ⏎
ssh設定ファイルの編集
ssh_configの編集
[root@cent701 ~]# vim /etc/ssh/ssh_config ⏎
【編集箇所】
RSAAuthentication yes
PasswordAuthentication no
IdentityFile ~/.ssh/id_rsa_ホスト名
ホスト名には各サーバーのホスト名を入力してください。
sshの再起動
sshの再起動
[root@cent701 ~]# /usr/sbin/sshd –t ⏎
[root@cent701 ~]# systemctl restart sshd.service ⏎
ssh接続の確認
ssh接続の確認cent701⇒cent702
[root@cent701 ~]# ssh cent702 ⏎
ssh接続の確認cent701⇒cent703
[root@cent701 ~]# ssh cent703 ⏎
同様に、cent702⇒cent701 /cent702⇒cent703 / cent703⇒cent701 /cent703⇒cent702も確認します。
以上で「6-4. サーバー間の設定」完了です。
◇「その1:仮想マシンの作成~GuestOSの導入」 ◆「その2:CentOS7.1の設定~サーバー間の設定」 ◇「その3:Spectrum Scaleインストール」 ◇「その4:クラスターの構築~クライアントPCから接続確認」