AMP⚡️対応していますか? AMP自体は今はシンプルなルールなので作るだけなら簡単ですが、既存のWebサービスに導入するとなると結構厄介な部分があります。僕が困ったのは、 width / height属性を指定していない画像が沢山ある これです。
AMPでは、画像を表示するタグ<amp-img>のwidth / height属性は指定必須なんです。
WordPressやMovableTypeであれば、デフォルトで属性値が入っていたような気がしますが、オリジナルのCMSだったり、それ以外のベタなページであったり。表示パフォーマンス的にも指定してあったほうが良いので、手抜きの負債なんですが…🙇🏻
整理すると…
問題点
- アスペクト比がバラバラな画像が大量にある
-
<img>タグにはwidth / height属性がない
解決策
- アスペクト比はすべて同じにする
- 指定アスペクト比の画像サイズにリサイズする
- 切り抜きはしないで、余白部分を作る
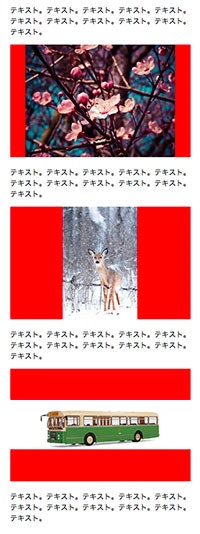
イメージで言うと、全ての画像をこんな感じにリサイズするということです。これでアスペクト比、というか画像サイズ自体が統一されます。(分かりやすく、余白の背景色を赤にしてありますが、本来はページの背景色にして馴染ませます)
縦長画像
横長画像
弱点
すごい横長/縦長な画像に適用すると余白部分が大きくなって、ページの中で画像が浮いてしまう可能性があります…。
これで、すべての<amp-img>のwidth / heightを固定にできます。この例だと width=400 / height=250 の画像サイズに統一しているので、すべての画像を以下のように書くことができます。
<p><amp-img src="sample.jpg" width="400" height="250"></p>
nginx / ngx_small_lightで解決
上記の問題を簡単に解決したい!というわけで、ngx_small_lightという素晴らしいnginxモジュールがあるので、これを使ってみます。ngx_small_lightは良い感じに画像をリサイズしてくれるモジュールです。http_image_filter_moduleよりも高機能。
インストール
ImageMagickを利用するのでインストールします。また、手動でnginxビルドしてモジュール組込するのが面倒なので、nginx-buildを利用します。
$ sudo yum install -y git gcc ImageMagick ImageMagick-devel pcre pcre-devel
$ wget https://github.com/cubicdaiya/nginx-build/releases/download/v0.7.2/nginx-build-linux-amd64-0.7.2.tar.gz
$ tar zxvf nginx-build-linux-amd64-0.7.2.tar.gz
$ sudo mv nginx-build /usr/local/bin/
$ vi modules3rd.ini
[ngx_small_light]
form=git
url=https://github.com/cubicdaiya/ngx_small_light.git
rev=v0.6.15
shprov=./setup
$ nginx-build -v 1.9.11 -d work -m modules3rd.ini
これでビルド完了です。最後にインストールします。
$ cd work/nginx/1.9.11/nginx-1.9.11
$ sudo make install
これで/usr/local/nginx/sbin/nginxにインストールされます。起動スクリプトに関してはnginxの画像キャッシュサーバにリサイズ機能を付けたを参照してください。
設定
ngx_small_lightの設定をします。img.example.comから、オリジナルの画像サーバが置いてあるwww.example.comへリバースプロキシさせつつ、/small_lightのURLの場合リサイズをかます感じです。
server {
    listen       80;
    server_name  img.example.com;

    root /var/www;

    small_light on;
    location / {
        proxy_pass http://www.example.com/;
    }
    location ~ small_light[^/]*/(.+)$ {
        set $file $1;
        rewrite ^ /$file;
    }
}
これで3つのURLでアクセスできる状態になっています。
- オリジナルURL: http://www.example.com/img/1.jpg
- プロキシURL: http://img.example.com/img/1.jpg
- リサイズURL: http://www.example.com/small_light/img/1.jpg
最後のリサイズURLに対して、ngx_small_lightのパラメータを渡すとリサイズしてくれます。
こんな感じです。small_lightの後ろに(cw=400,ch=250,dw=400,dh=250,cc=ff0000)とパラメータを渡します。パラメータはたくさんあるので色々試すと面白いです(参照: cubicdaiya/ngx_small_light)。
cw/chとdw,dhを同じ値にするのがポイントです。あとはccでHEXを渡すと余白部分を塗りつぶすことができます。
サンプルAMP HTML
<!doctype html>
<html ⚡>
  <head>
    <meta charset="utf-8">
    <link rel="canonical" href="http://www.example.com/">
    <script async src="https://cdn.ampproject.org/v0.js"></script>
    <style type="text/css">
    article {
      width: 400px;
      margin: 10px auto;
    }
    </style>
  </head>
  <body>
  <article>
    <p>テキスト。テキスト。テキスト。テキスト。テキスト。テキスト。テキスト。テキスト。テキスト。テキスト。テキスト。</p>
    <p><amp-img src="http://img.example.com/small_light(cw=400,ch=250,dw=400,dh=250,cc=ff0000)/sample.jpg" width="400" height="250" ></P>
    <p>テキスト。テキスト。テキスト。テキスト。テキスト。テキスト。テキスト。テキスト。テキスト。テキスト。テキスト。</p>
    <p><amp-img src="http://img.example.com/small_light(cw=400,ch=250,dw=400,dh=250,cc=ff0000)/sample2.jpg" width="400" height="250" ></P>
    <p>テキスト。テキスト。テキスト。テキスト。テキスト。テキスト。テキスト。テキスト。テキスト。テキスト。テキスト。</p>
    <p><amp-img src="http://img.example.com/small_light(cw=400,ch=250,dw=400,dh=250,cc=ff0000)/sample3.jpg" width="400" height="250" ></P>
    <p>テキスト。テキスト。テキスト。テキスト。テキスト。テキスト。テキスト。テキスト。テキスト。テキスト。テキスト。</p>
  </article>
  </body>
</html>
表示イメージ
良い感じですね!


