はじめに
先日、FPGAでDeep Learningしてみるという記事で、PYNQやBNN-PYNQについて書きました。前回の記事では、PYNQ-Z1 Boardという比較的安価なFPGAボードの紹介と、あらかじめ準備されたデモ(Cifar10)の実行までを行いました。そこで今回は、あらかじめ準備されたデモから少し発展して、きゅうりの選果を行ってみます。
事前説明
BNN-PYNQをカスタムするには
前回の記事にも書きましたが、Deep Learningは、大きく学習と推論で構成されます。BNN-PYNQでは、推論のみが実装されています(学習はCPU/GPUで実施する必要があります)。そのため、BNN-PYNQをカスタムするということは、学習にあわせて、推論のネットワーク構造やパラメーターを変更することになります。
前回のCifar10を例に取ると、BNN-PYNQでは、下記の流れでJupyter上のアプリケーションからFPGA上のDeep Learning処理が行われています。前回、CPU/FPGAの速度比較結果がありましたが、あれは下記#4でどちらの共有ライブラリ(python_hw/sw)を読み込むのかを切り替えることで実現されていました。
| # | ファイル | 概要 | カスタム方法 |
|:----------:|:------------|:------------|:-------------|:-------------|
| 1 | Cifar10.ipynb | アプリケーションです。前回は、デモを実行するための、Jupyterファイルでした。 | |
| 2 | bnn.py | BNN-PYNQをPythonで実行するためのライブラリです。 | |
| 3 | X-X-thres.bin
X-X-weights.bin
classes.txt | パラメーターファイルです。CPU/GPUで学習した結果をBNN-PYNQで取り込むために使われます。 | BinaryNets for Pynq - Training Networks |
| 4 | python_sw-cnv-pynq.so | CPUでDeep Learningを実行するための共有ライブラリです。 | make-sw.sh python_sw |
| | python_hw-cnv-pynq.so | FPGAでDeep Learningを実行するための共有ライブラリです。 | make-sw.sh python_hw |
| 5 | cnv-pynq-pynq.bit | FPGAで処理を実行するためのビットストリームファイルです。Overlayを切り替えた際は、このファイルが切り替わって読み込まれます。 | make-hw.sh |
今回は、BNN-PYNQをカスタムしますが、いきなりネットワーク構造を再構築することはハードルがあるため、Cifar10と同じネットワーク構造のまま、読み込むパラメーターを変更してみたいと思います。
きゅうりの選果
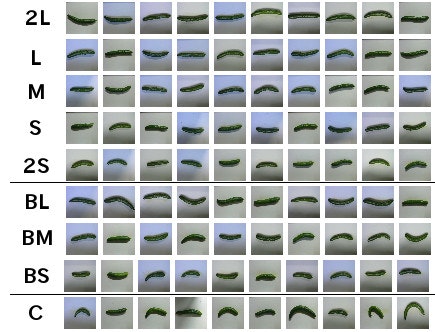
一時期話題になったため、ご存じの方も多いかと思いますが、きゅうりの画像を基に、その等級を9種類に分類する問題です。
TensorFlowでディープラーニングによる『キュウリ』の仕分け
学習に必要なデータは、GitHubに公開されていますので、これを利用させて頂きます。GitHubにはProtoType-1, 2の2つが公開されていますが、今回はデータセットのフォーマットがCifar10に近いProtoType-1を用います。
GitHub - workpiles/CUCUMBER-9
- 2L〜2S
良品。色艶がよく、比較的まっすぐで太さも偏っていないもの。大きさにより2Lから2Sまで5段階に選別される。- BL〜BS
B品。色合いが悪かったり、少し曲がっていたり太さが不均一なもの。大きさによりL〜Sまで3段階に選別される。- C
C品。形の悪いもの。
いくつかのブログを見ると、正答率は工夫なしに実施して80%前後のようです。今回は、ネットワーク構造を変更しないため、これは非常にありがたいです。
実施内容
学習(CPU/GPUインスタンスで実施)
FPGAでロードするパラメーターデータを作成します。上の表にも記載しましたが、GitHubに公開されている手順に従って実施します。
BinaryNets for Pynq - Training Networks
なお、このパラメーターファイルの作成は、CPU/GPUにて行う必要があります。今回は、Azure上にGPUインスタンス(NC6 Ubuntu 16.04)を立てて行いました。
GPU環境の構築
Nvidia Drivers、CUDA、cuDNNをインストールします。
Nvidia Driversのインストール
$ wget http://developer.download.nvidia.com/compute/cuda/repos/ubuntu1604/x86_64/cuda-repo-ubuntu1604_8.0.61-1_amd64.deb
$ sudo dpkg -i cuda-repo-ubuntu1604_8.0.61-1_amd64.deb
$ sudo apt-get update
CUDAのインストール
$ sudo apt-get install cuda -y
cuDNNのインストール
※ インストールするためには、NvidiaにDeveloper登録し、ファイルをダウンロードする必要があります。NVIDIA cuDNN
$ sudo dpkg -i libcudnn5_5.1.10-1+cuda8.0_amd64.deb libcudnn5-dev_5.1.10-1+cuda8.0_amd64.deb
PATHの設定
$ sudo sh -c "echo 'CUDA_HOME=/usr/local/cuda' >> /etc/profile.d/cuda.sh"
$ sudo sh -c "echo 'export LD_LIBRARY_PATH=\${LD_LIBRARY_PATH}:\${CUDA_HOME}/lib64' >> /etc/profile.d/cuda.sh"
$ sudo sh -c "echo 'export LIBRARY_PATH=\${LIBRARY_PATH}:\${CUDA_HOME}/lib64' >> /etc/profile.d/cuda.sh"
$ sudo sh -c "echo 'export C_INCLUDE_PATH=\${C_INCLUDE_PATH}:\${CUDA_HOME}/include' >> /etc/profile.d/cuda.sh"
$ sudo sh -c "echo 'export CXX_INCLUDE_PATH=\${CXX_INCLUDE_PATH}:\${CUDA_HOME}/include' >> /etc/profile.d/cuda.sh"
$ sudo sh -c "echo 'export PATH=\${PATH}:\${CUDA_HOME}/bin' >> /etc/profile.d/cuda.sh"
インスタンスの再起動
$ sudo reboot
インストールの確認
$ nvidia-smi
Thu Mar 30 07:42:52 2017
+-----------------------------------------------------------------------------+
| NVIDIA-SMI 375.39                 Driver Version: 375.39                    |
|-------------------------------+----------------------+----------------------+
| GPU  Name        Persistence-M| Bus-Id        Disp.A | Volatile Uncorr. ECC |
| Fan  Temp  Perf  Pwr:Usage/Cap|         Memory-Usage | GPU-Util  Compute M. |
|===============================+======================+======================|
|   0  Tesla K80           Off  | 8CFC:00:00.0     Off |                    0 |
| N/A   38C    P0    75W / 149W |      0MiB / 11439MiB |     97%      Default |
+-------------------------------+----------------------+----------------------+

+-----------------------------------------------------------------------------+
| Processes:                                                       GPU Memory |
|  GPU       PID  Type  Process name                               Usage      |
|=============================================================================|
|  No running processes found                                                 |
+-----------------------------------------------------------------------------+
Pythonのインストール
Pythonライブラリ(Theano, Lasagne, Numpy, Pylearn2)をインストールします。また、Python 2.7を使うため、最初にpyenvをインストールしています。
pyenv & Python 2.7のインストール
$ sudo apt-get install git gcc make openssl libssl-dev libbz2-dev libreadline-dev libsqlite3-dev
$ git clone https://github.com/yyuu/pyenv.git ~/.pyenv
$ vi .bashrc
export PYENV_ROOT="$HOME/.pyenv"
export PATH="$PYENV_ROOT/bin:$PATH"
eval "$(pyenv init -)"
$ source .bashrc
$ env PYTHON_CONFIGURE_OPTS="--enable-shared" pyenv install 2.7.13
$ pyenv global 2.7.13
Pythonライブラリ(Theano, Lasagne, Numpy, Pylearn2)のインストール
$ pip install --user git+https://github.com/Theano/Theano.git@rel-0.9.0beta1
$ pip install --user https://github.com/Lasagne/Lasagne/archive/master.zip
$ echo "[global]" >> ~/.theanorc
$ echo "floatX = float32" >> ~/.theanorc
$ echo "device = gpu" >> ~/.theanorc
$ echo "openmp = True" >> ~/.theanorc
$ echo "openmp_elemwise_minsize = 200000" >> ~/.theanorc
$ echo "" >> ~/.theanorc
$ echo "[nvcc]" >> ~/.theanorc
$ echo "fastmath = True" >> ~/.theanorc
$ echo "" >> ~/.theanorc
$ echo "[blas]" >> ~/.theanorc
$ echo "ldflags = -lopenblas" >> ~/.theanorc
$ git clone https://github.com/lisa-lab/pylearn2
$ cd pylearn2/
$ python setup.py develop --user
データセットの準備
学習するデータセットを準備します。今回はGitHubからきゅうりの画像データを使わせて頂きます。
$ git clone https://github.com/workpiles/CUCUMBER-9.git
$ cd CUCUMBER-9/prototype_1/
$ tar -zxvf cucumber-9-python.tar.gz
プログラムの準備
学習で読み込むデータセットを変更するために、Xilinxのプログラムを少し変更します。主な変更点は、下記の2点です。
- ロードするデータをCUCUMBER9に変更
- 分類のクラス数9に変更
BNN-PYNQからプログラムを取得
$ git clone https://github.com/Xilinx/BNN-PYNQ.git
$ cd BNN-PYNQ/bnn/src/training/
学習する際に実行するプログラムの変更
きゅうりの画像データを読み込んで学習を実行するcucumber9.pyを作成します。
$ cp cifar10.py cucumber9.py
$ vi cucumber9.py
バイナリデータ変換プログラムの変更
BNN-PYNQでは、2値化されたデータを扱います。そのため、実数のパラメーターデータをバイナリに変換する必要があります。きゅうりの画像データを学習してできあがったパラメーターデータをバイナリに変換するcucumber9-gen-binary-weights.pyを作成します。
$ cp cifar10-gen-binary-weights.py cucumber9-gen-binary-weights.py
$ vi cucumber9-gen-binary-weights.py
学習の実行
学習するための、環境、データ、プログラムが準備できましたので、プログラムを実行します。
$ pwd /home/ubuntu/BNN-PYNQ/bnn/src/training
$ python cucumber9.py
WARNING (theano.sandbox.cuda): The cuda backend is deprecated and will be removed in the next release.  Please switch to the gpuarray backend. You can get more information about how to switch at this URL:
 https://github.com/Theano/Theano/wiki/Converting-to-the-new-gpu-back-end%28gpuarray%29

Using gpu device 0: Tesla K80 (CNMeM is disabled, cuDNN 5110)
/home/ubuntu/.local/lib/python2.7/site-packages/theano/tensor/basic.py:2144: UserWarning: theano.tensor.round() changed its default from `half_away_from_zero` to `half_to_even` to have the same default as NumPy. Use the Theano flag `warn.round=False` to disable this warning.
  "theano.tensor.round() changed its default from"
batch_size = 50
alpha = 0.1
epsilon = 0.0001
W_LR_scale = Glorot
num_epochs = 500
LR_start = 0.001
LR_fin = 3e-07
LR_decay = 0.983907435305
save_path = cucumber9_parameters.npz
train_set_size = 2475
shuffle_parts = 1
Loading CUCUMBER9 dataset...
Building the CNN...
W_LR_scale = 20.0499
H = 1
W_LR_scale = 27.7128
H = 1
W_LR_scale = 33.9411
H = 1
W_LR_scale = 39.1918
H = 1
W_LR_scale = 48.0
H = 1
W_LR_scale = 55.4256
H = 1
W_LR_scale = 22.6274
H = 1
W_LR_scale = 26.1279
H = 1
W_LR_scale = 18.6369
H = 1
Training...
Epoch 1 of 500 took 6.08435511589s
  LR:                            0.001
  training loss:                 1.48512187053
  validation loss:               2.05507221487
  validation error rate:         61.1111117734%
  best epoch:                    1
  best validation error rate:    61.1111117734%
  test loss:                     2.05507221487
  test error rate:               61.1111117734%

…

Epoch 500 of 500 took 5.53324913979s
  LR:                            3.04906731299e-07
  training loss:                 0.0024273797482
  validation loss:               0.132337698506
  validation error rate:         14.2222222355%
  best epoch:                    205
  best validation error rate:    11.9999999387%
  test loss:                     0.124302371922
  test error rate:               11.9999999387%
しばらくすると、学習が終了し、パラメーターファイルが出来上がります。
$ ls
cucumber9_parameters.npz
パラメーターデータのバイナリ化
実数のパラメーターデータをバイナリに変換します。
$ python cucumber9-gen-binary-weights.py
cucumber9_parameters.npz
バイナリのパラメーターデータが出来上がります。このファイルをPYNQで読み込ませます。
$ ls binparam-cnv-pynq/
0-0-thres.bin     0-3-weights.bin   1-12-thres.bin    1-20-weights.bin  1-2-thres.bin     1-9-weights.bin   2-3-thres.bin     3-11-weights.bin  3-6-thres.bin    6-0-weights.bin
0-0-weights.bin   0-4-thres.bin     1-12-weights.bin  1-21-thres.bin    1-2-weights.bin   2-0-thres.bin     2-3-weights.bin   3-12-thres.bin    3-6-weights.bin  7-0-thres.bin
0-10-thres.bin    0-4-weights.bin   1-13-thres.bin    1-21-weights.bin  1-30-thres.bin    2-0-weights.bin   2-4-thres.bin     3-12-weights.bin  3-7-thres.bin    7-0-weights.bin
0-10-weights.bin  0-5-thres.bin     1-13-weights.bin  1-22-thres.bin    1-30-weights.bin  2-10-thres.bin    2-4-weights.bin   3-13-thres.bin    3-7-weights.bin  8-0-thres.bin
0-11-thres.bin    0-5-weights.bin   1-14-thres.bin    1-22-weights.bin  1-31-thres.bin    2-10-weights.bin  2-5-thres.bin     3-13-weights.bin  3-8-thres.bin    8-0-weights.bin
0-11-weights.bin  0-6-thres.bin     1-14-weights.bin  1-23-thres.bin    1-31-weights.bin  2-11-thres.bin    2-5-weights.bin   3-14-thres.bin    3-8-weights.bin  8-1-thres.bin
0-12-thres.bin    0-6-weights.bin   1-15-thres.bin    1-23-weights.bin  1-3-thres.bin     2-11-weights.bin  2-6-thres.bin     3-14-weights.bin  3-9-thres.bin    8-1-weights.bin
0-12-weights.bin  0-7-thres.bin     1-15-weights.bin  1-24-thres.bin    1-3-weights.bin   2-12-thres.bin    2-6-weights.bin   3-15-thres.bin    3-9-weights.bin  8-2-thres.bin
0-13-thres.bin    0-7-weights.bin   1-16-thres.bin    1-24-weights.bin  1-4-thres.bin     2-12-weights.bin  2-7-thres.bin     3-15-weights.bin  4-0-thres.bin    8-2-weights.bin
0-13-weights.bin  0-8-thres.bin     1-16-weights.bin  1-25-thres.bin    1-4-weights.bin   2-13-thres.bin    2-7-weights.bin   3-1-thres.bin     4-0-weights.bin  8-3-thres.bin
0-14-thres.bin    0-8-weights.bin   1-17-thres.bin    1-25-weights.bin  1-5-thres.bin     2-13-weights.bin  2-8-thres.bin     3-1-weights.bin   4-1-thres.bin    8-3-weights.bin
0-14-weights.bin  0-9-thres.bin     1-17-weights.bin  1-26-thres.bin    1-5-weights.bin   2-14-thres.bin    2-8-weights.bin   3-2-thres.bin     4-1-weights.bin  classes.txt
0-15-thres.bin    0-9-weights.bin   1-18-thres.bin    1-26-weights.bin  1-6-thres.bin     2-14-weights.bin  2-9-thres.bin     3-2-weights.bin   4-2-thres.bin
0-15-weights.bin  1-0-thres.bin     1-18-weights.bin  1-27-thres.bin    1-6-weights.bin   2-15-thres.bin    2-9-weights.bin   3-3-thres.bin     4-2-weights.bin
0-1-thres.bin     1-0-weights.bin   1-19-thres.bin    1-27-weights.bin  1-7-thres.bin     2-15-weights.bin  3-0-thres.bin     3-3-weights.bin   4-3-thres.bin
0-1-weights.bin   1-10-thres.bin    1-19-weights.bin  1-28-thres.bin    1-7-weights.bin   2-1-thres.bin     3-0-weights.bin   3-4-thres.bin     4-3-weights.bin
0-2-thres.bin     1-10-weights.bin  1-1-thres.bin     1-28-weights.bin  1-8-thres.bin     2-1-weights.bin   3-10-thres.bin    3-4-weights.bin   5-0-thres.bin
0-2-weights.bin   1-11-thres.bin    1-1-weights.bin   1-29-thres.bin    1-8-weights.bin   2-2-thres.bin     3-10-weights.bin  3-5-thres.bin     5-0-weights.bin
0-3-thres.bin     1-11-weights.bin  1-20-thres.bin    1-29-weights.bin  1-9-thres.bin     2-2-weights.bin   3-11-thres.bin    3-5-weights.bin   6-0-thres.bin
推論(PYNQで実施)
パラメーターデータの配置
先ほど作成したパラメーターデータをPYNQに転送します。
$ sudo mkdir /opt/python3.6/lib/python3.6/site-packages/bnn/params/cucumber9
$ sudo ls /opt/python3.6/lib/python3.6/site-packages/bnn/params/cucumber9/
0-0-thres.bin     0-3-weights.bin   1-12-thres.bin    1-20-weights.bin  1-2-thres.bin     1-9-weights.bin   2-3-thres.bin     3-11-weights.bin  3-6-thres.bin    6-0-weights.bin
0-0-weights.bin   0-4-thres.bin     1-12-weights.bin  1-21-thres.bin    1-2-weights.bin   2-0-thres.bin     2-3-weights.bin   3-12-thres.bin    3-6-weights.bin  7-0-thres.bin
0-10-thres.bin    0-4-weights.bin   1-13-thres.bin    1-21-weights.bin  1-30-thres.bin    2-0-weights.bin   2-4-thres.bin     3-12-weights.bin  3-7-thres.bin    7-0-weights.bin
0-10-weights.bin  0-5-thres.bin     1-13-weights.bin  1-22-thres.bin    1-30-weights.bin  2-10-thres.bin    2-4-weights.bin   3-13-thres.bin    3-7-weights.bin  8-0-thres.bin
0-11-thres.bin    0-5-weights.bin   1-14-thres.bin    1-22-weights.bin  1-31-thres.bin    2-10-weights.bin  2-5-thres.bin     3-13-weights.bin  3-8-thres.bin    8-0-weights.bin
0-11-weights.bin  0-6-thres.bin     1-14-weights.bin  1-23-thres.bin    1-31-weights.bin  2-11-thres.bin    2-5-weights.bin   3-14-thres.bin    3-8-weights.bin  8-1-thres.bin
0-12-thres.bin    0-6-weights.bin   1-15-thres.bin    1-23-weights.bin  1-3-thres.bin     2-11-weights.bin  2-6-thres.bin     3-14-weights.bin  3-9-thres.bin    8-1-weights.bin
0-12-weights.bin  0-7-thres.bin     1-15-weights.bin  1-24-thres.bin    1-3-weights.bin   2-12-thres.bin    2-6-weights.bin   3-15-thres.bin    3-9-weights.bin  8-2-thres.bin
0-13-thres.bin    0-7-weights.bin   1-16-thres.bin    1-24-weights.bin  1-4-thres.bin     2-12-weights.bin  2-7-thres.bin     3-15-weights.bin  4-0-thres.bin    8-2-weights.bin
0-13-weights.bin  0-8-thres.bin     1-16-weights.bin  1-25-thres.bin    1-4-weights.bin   2-13-thres.bin    2-7-weights.bin   3-1-thres.bin     4-0-weights.bin  8-3-thres.bin
0-14-thres.bin    0-8-weights.bin   1-17-thres.bin    1-25-weights.bin  1-5-thres.bin     2-13-weights.bin  2-8-thres.bin     3-1-weights.bin   4-1-thres.bin    8-3-weights.bin
0-14-weights.bin  0-9-thres.bin     1-17-weights.bin  1-26-thres.bin    1-5-weights.bin   2-14-thres.bin    2-8-weights.bin   3-2-thres.bin     4-1-weights.bin  classes.txt
0-15-thres.bin    0-9-weights.bin   1-18-thres.bin    1-26-weights.bin  1-6-thres.bin     2-14-weights.bin  2-9-thres.bin     3-2-weights.bin   4-2-thres.bin
0-15-weights.bin  1-0-thres.bin     1-18-weights.bin  1-27-thres.bin    1-6-weights.bin   2-15-thres.bin    2-9-weights.bin   3-3-thres.bin     4-2-weights.bin
0-1-thres.bin     1-0-weights.bin   1-19-thres.bin    1-27-weights.bin  1-7-thres.bin     2-15-weights.bin  3-0-thres.bin     3-3-weights.bin   4-3-thres.bin
0-1-weights.bin   1-10-thres.bin    1-19-weights.bin  1-28-thres.bin    1-7-weights.bin   2-1-thres.bin     3-0-weights.bin   3-4-thres.bin     4-3-weights.bin
0-2-thres.bin     1-10-weights.bin  1-1-thres.bin     1-28-weights.bin  1-8-thres.bin     2-1-weights.bin   3-10-thres.bin    3-4-weights.bin   5-0-thres.bin
0-2-weights.bin   1-11-thres.bin    1-1-weights.bin   1-29-thres.bin    1-8-weights.bin   2-2-thres.bin     3-10-weights.bin  3-5-thres.bin     5-0-weights.bin
0-3-thres.bin     1-11-weights.bin  1-20-thres.bin    1-29-weights.bin  1-9-thres.bin     2-2-weights.bin   3-11-thres.bin    3-5-weights.bin   6-0-thres.bin
テストデータの配置
推論に使うテストデータをPYNQにダウンロードします。
$ git clone https://github.com/workpiles/CUCUMBER-9.git
$ cd CUCUMBER-9/prototype_1/
$ tar -zxvf cucumber-9-python.tar.gz
推論の実行
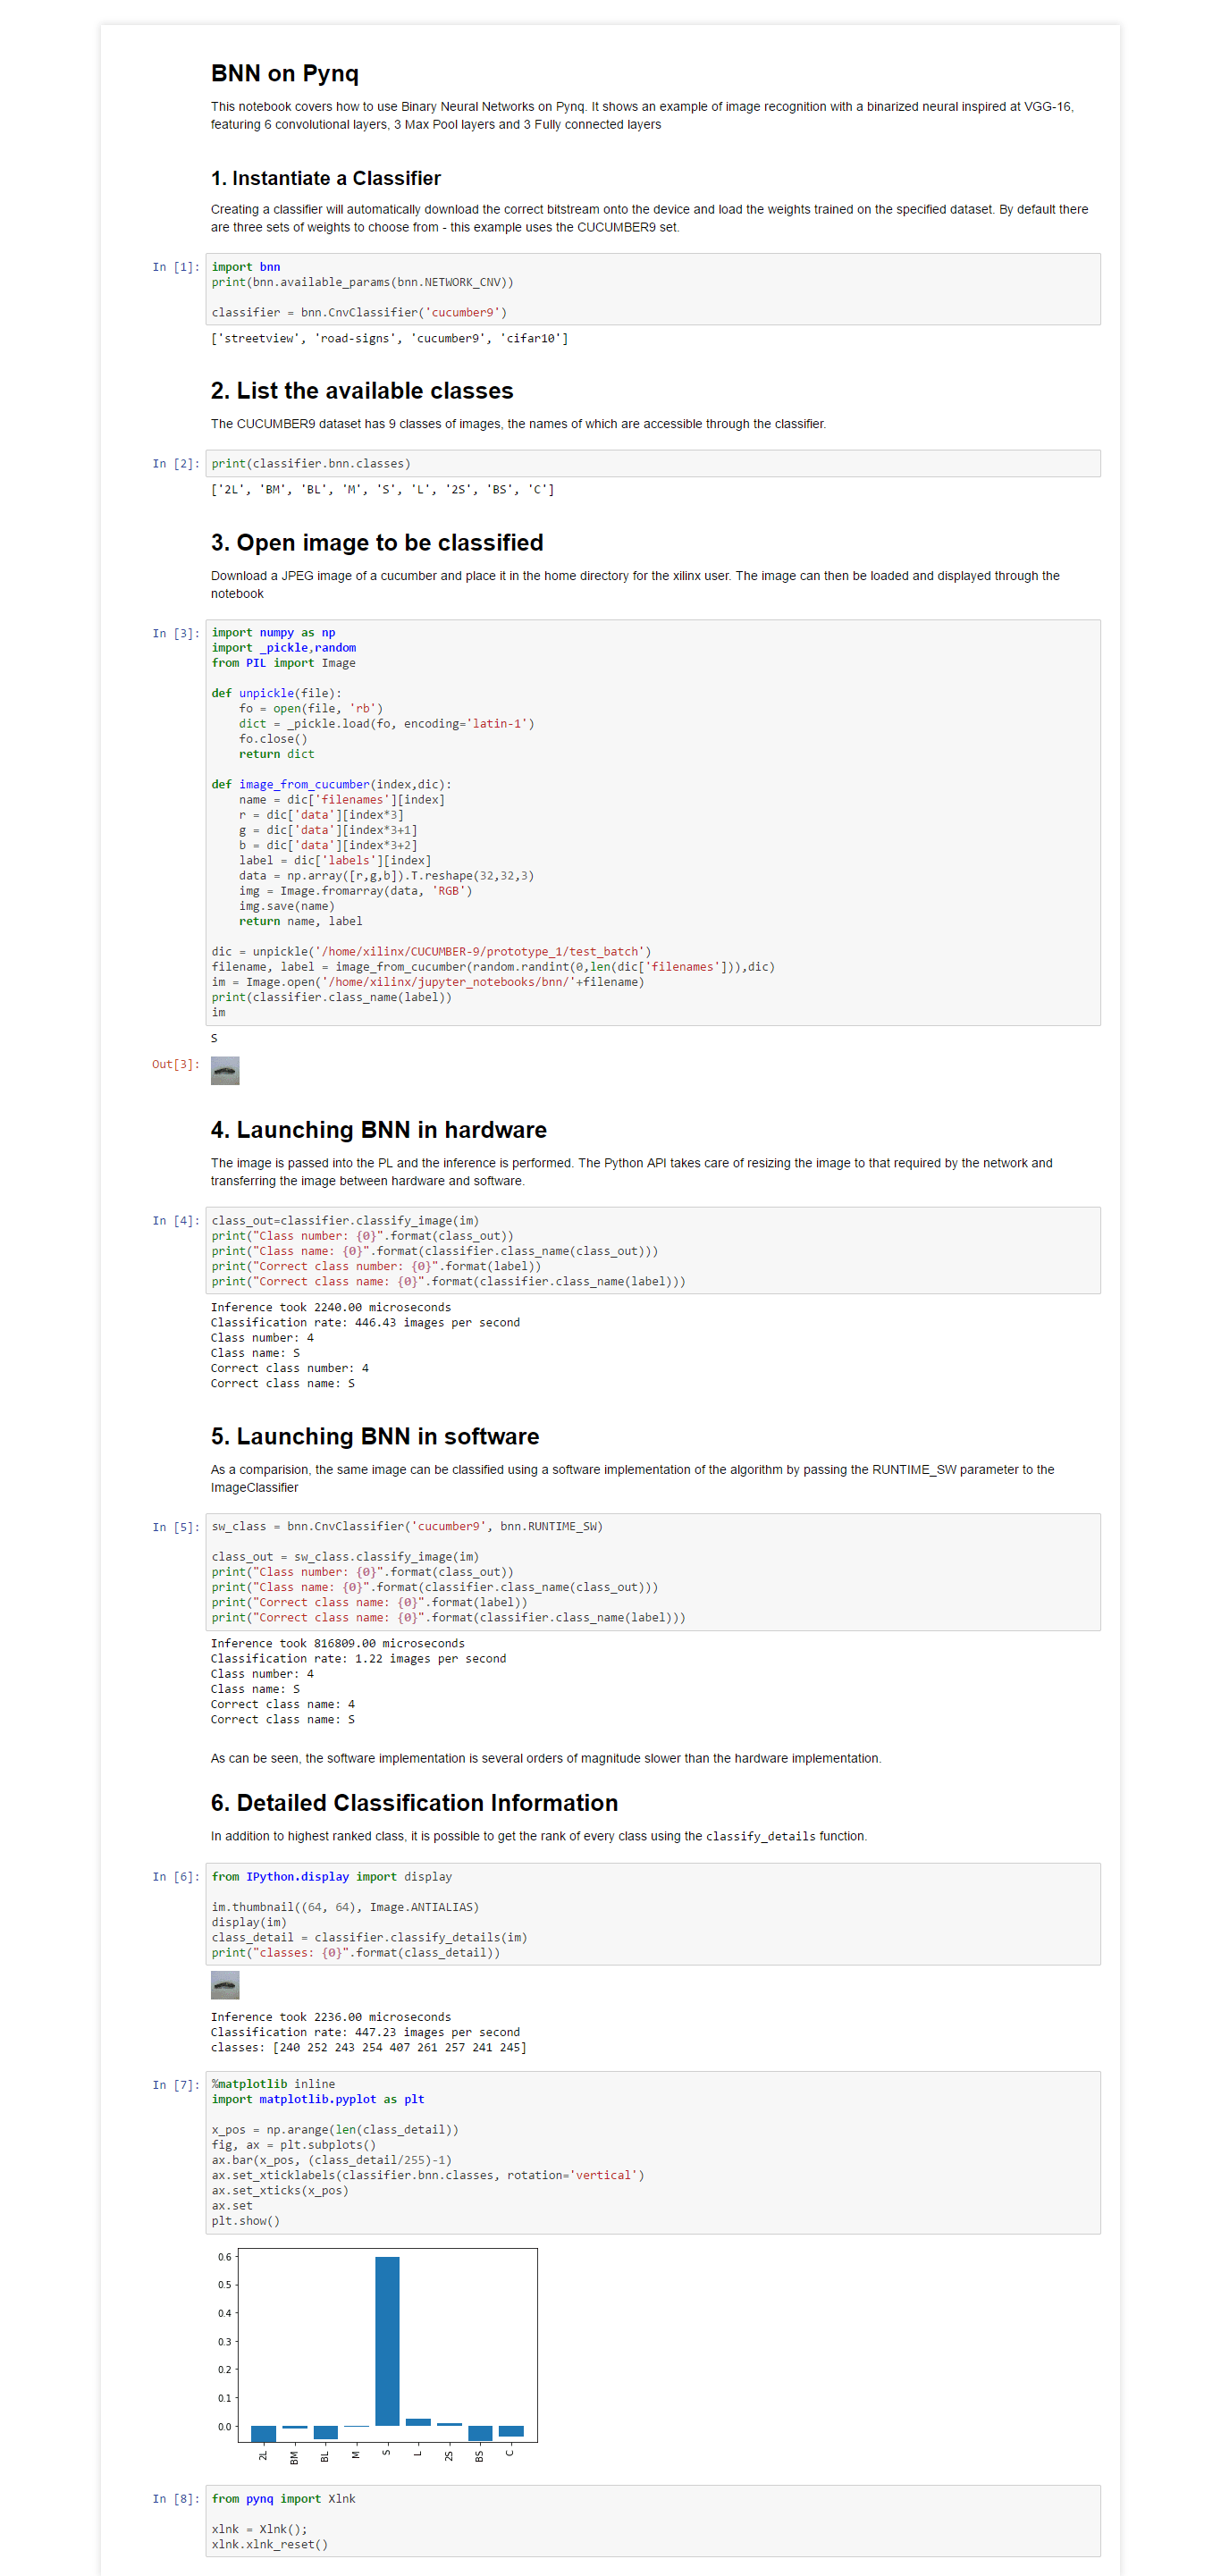
前回のデモと同様にJupyterから実行してみます。CUCUMBER9を実行する際は、下記の通り、パラメーターとしてcucumber9を読み込むように指定します。
classifier = bnn.CnvClassifier('cucumber9')
実行結果は下記キャプチャの通りです。
正しく分類できていますね!
また、実行時間は下記の通りです。PYNQのCPUが貧弱だということはありますが、FPGAの方が360倍程度早い結果となりました。
Inference took 2240.00 microseconds
Classification rate: 446.43 images per second
Inference took 816809.00 microseconds
Classification rate: 1.22 images per second
参考
プログラムを書く際に、下記のブログを参考にさせて頂きました。
おわりに
今回、PYNQはモバイルバッテリーで動かしてみました。とても省電力なことに驚きました。

