CoreOSでKeepalivedを使った冗長化+負荷分散
前回記事構成のcoreos01及びcoreos04を利用しています。
【CoreOS】fleet + docker + keepalived(VRRP+VIPのみ)で簡単LB
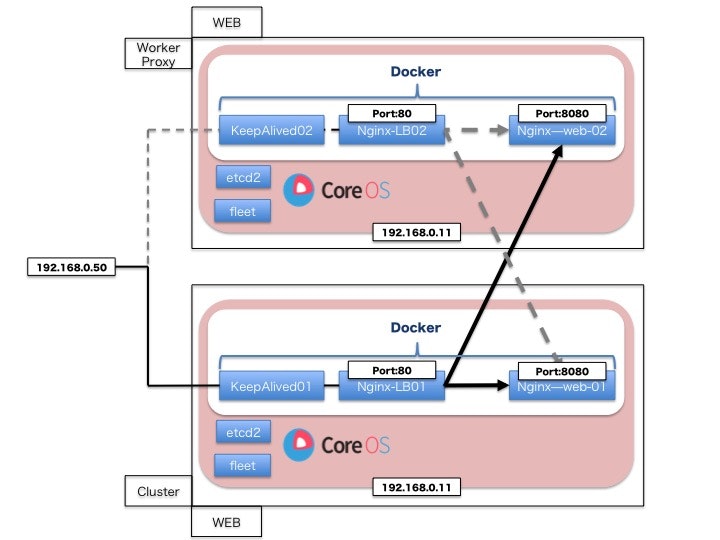
構成
(1)IPアドレス192.168.0.50のVIP(virtual ip)を持ったサーバーにアクセス
(2)Docker-Nginx 80番ポートに着信
(3)80番ポート着信後Docker-Nignx-Proxyが、Docker-nginx-webのcoreos01/coreos04のそれぞれの8080ポートにNAT転送
Unitファイル(systemd / fleet)を作成
UNITファイルを作成 X-FLEETにはcoreos01/coreos04のそれぞれのmachine-idを入れましょう。
[Unit]
Description=NginxLB
After=docker.service
Requires=docker.service
ConditionPathExists=/srv/lb/lb.conf

[Service]
EnvironmentFile=/etc/environment
TimeoutStartSec=0
Restart=always
ExecStartPre=/usr/bin/docker pull nginx:1.7.10
ExecStartPre=-/usr/bin/docker kill %p
ExecStartPre=-/usr/bin/docker rm %p
ExecStart=/usr/bin/docker run --rm \
  --name %p \
  --net host \
  -v /srv/lb/lb.conf:/etc/nginx/nginx.conf:ro \
  nginx:1.7.10 \
  nginx
ExecStop=/usr/bin/docker stop -t 2 %p

[X-Fleet]
MachineID=5b1639bd3cc347cf8fac0b9f597369e3
lb.conf
server {
    listen       80;
    server_name  www.example.jp;
    proxy_set_header Host            $host;
    proxy_set_header X-Real-IP       $remote_addr;
    proxy_set_header X-Forwarded-For $proxy_add_x_forwarded_for;
    proxy_set_header X-Forwarded-Host $host;
    proxy_set_header X-Forwarded-Server $host;

    location / {
        proxy_pass http://backend;
    }
}

#ロードバランサ設定
upstream backend {
      ip_hash;
      server 192.168.0.10:8080 max_fails=3 fail_timeout=30s ;
      server 192.168.0.11:8080 max_fails=3 fail_timeout=30s ;
      server 127.0.0.1:8080  down;
}
あらかじめlb.confをばら撒きます
#coreos01
scp lb.conf core@192.168.0.10:/home/core/
ssh core@192.168.0.10
sudo mkdir -p /srv/lb/
sudo cp -a lb.conf /srv/lb/

#coreos04
scp lb.conf core@192.168.0.11:/home/core/
ssh core@192.168.0.11
sudo mkdir -p /srv/lb/
sudo cp -a lb.conf /srv/lb/
fleet(systemd)にUnitを登録します。
fleetctl submit nginx-lb@{1,2}
fleetctl load nginx-lb@{1,2}
fleetctl start nginx-lb@{1,2}

fleetctl list-units --full
UNIT			MACHINE						ACTIVE	SUB
keepalived@1.service	5b1639bd3cc347cf8fac0b9f597369e3/192.168.0.10	active	running
keepalived@2.service	6d28316711484f039eca4408627fdb0c/192.168.0.11	active	running
nginx-lb@1.service	5b1639bd3cc347cf8fac0b9f597369e3/192.168.0.10	active	running
nginx-lb@2.service	6d28316711484f039eca4408627fdb0c/192.168.0.11	active	running
ここまで設定できれば、192.168.0.50にアクセスして[502 Bad Gateway]の表示がnginxから出力されると思います。
次回はバックエンドの8080ポート(実際のWEBサービス)の設定に移ります。
続き
【CoreOS】冗長化構成 Keepalived+NginxLB+NginxWEB(完)
前回記事ご紹介:
【CoreOS】fleet + docker + keepalived(VRRP+VIPのみ)で簡単LB
【CoreOS】cloud-config解説〜インストール
Mac + Virtualbox + CoreOS + etcd2 + fleet の基本設定(1)
Mac + Virtualbox + CoreOS + etcd2 + fleet の基本設定(2)
Mac + Virtualbox + CoreOS + etcd2 + fleet の基本設定(完)
