概要
前回(Angular入門: Component/ServiceをTestまで含めて試す)の続きです。
今回は
- 通信処理の書き方
- テストの書き方
- 動作確認・デプロイ
を書いていきます。
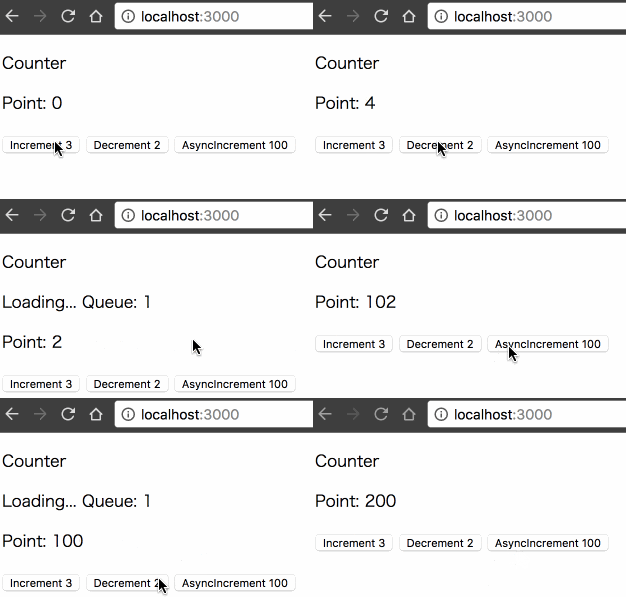
作った画面
要件としては、前回分に加えて
- AsyncIncrementボタンを押すと、サーバーにデータを取りに行って非同期に数字が加算される。
という形です。
環境
- angular-cli: beta-32
- Angular: 2.4
- NodeJS: 6.9
ソースコードはこちら↓
https://github.com/uryyyyyyy/angularSample/tree/async
前提:APIサーバー
SPAの場合は、フロントのリソースはS3などのホスティングサービスから配信するかもしれません。
その場合はAPIサーバーのエンドポイントは別のホストになることが有り得ます。
本記事ではそのような配信体系を想定して、動作確認用にexpressでAPIサーバーを立てます。
コードはすごくシンプルにこんな感じです。
const express = require('express');
const app = express();

app.get('/api/count', (req, res) => {
  res.contentType('application/json');
  res.header("Access-Control-Allow-Origin", "*");
  const obj = {"num": 100};
  setTimeout(() => res.json(obj), 1000);
  //res.status(400).json(obj); //for error testing
});


// CORSを許可する
app.use((req, res, next) => {
  res.header("Access-Control-Allow-Origin", "*");
  res.header("Access-Control-Allow-Headers", "Origin, X-Requested-With, Content-Type, Accept");
  next();
});

app.listen(9000, (err) => {
  if (err) {
    console.log(err);
  }
  console.log("server start at port 9000")
});
これで、別ホストからのAPI問い合わせに対してもレスポンスを返せるようになります。
(/api/count は後で画面から叩くエンドポイントです。)
Service
src
import {Injectable} from '@angular/core';
import {Http, Headers, Response} from '@angular/http';
import {Observable, BehaviorSubject} from 'rxjs/Rx';
import {environment} from '../../environments/environment';
import {ErrorObservable} from 'rxjs/observable/ErrorObservable';

export const messageEndPoint = `${environment.host}/api/count`;

@Injectable()
export class CounterService {

  point: BehaviorSubject<number> = new BehaviorSubject(0);

  //①
  headers: Headers = new Headers({
    'Content-Type': 'application/json',
    'Accept': 'application/json',
    'X-Requested-With': 'XMLHttpRequest'
  });

  constructor(private http: Http) { }

  /* ... */

  //②
  fetchNumber(): Observable<{num: number}> {
    return this.http.get(messageEndPoint, {headers: this.headers})
      .map(res => {
        if (res.status === 200) {
          return res.json();
        } else {
          throw new Error(`response.status is bad: ${res.status}`);
        }
      }).catch(err => this.handleError(err));
  }

  //③
  private handleError(error: Response | any): ErrorObservable<string> {
    let errMsg: string;
    if (error instanceof Response) {
      const body = error.json() || '';
      const err = body.error || JSON.stringify(body);
      errMsg = `${error.status} - ${error.statusText || ''} ${err}`;
    } else {
      errMsg = error.message ? error.message : error.toString();
    }
    // console.error(errMsg);
    return Observable.throw(errMsg);
  }

  //④
  asyncIncrement(): Observable<{num: number}> {
    return this.fetchNumber()
      .do((obj: {num: number}) => this.point.next(this.point.getValue() + obj.num));
  }

}
今回はServiceの中で通信処理を行うので、HttpモジュールをDIしています。
画面から叩くメソッドは④の asyncIncrement です。ここでは、②の fetchNumber() から来たStreamの中で副作用を用いて状態を更新して、呼び出し元(画面側)にStreamを返しているだけです。(ちなみに、状態の更新は最新の値を元に行われるので、race conditionの心配はありません。)
②では、通信を行って結果の成否で処理を振り分けています。失敗時には③の handleError というところで良い感じにエラーメッセージを作っています。
ちなみに、①でheaderを指定してあげてサーバーでも対応することで、CSRFを(ほとんどの場合)防ぐことができます。
test
import {BaseRequestOptions, Http, Response, ResponseOptions} from '@angular/http';
import {MockBackend, MockConnection} from '@angular/http/testing';
import {CounterService, messageEndPoint} from './counter.service';
import {Observable} from 'rxjs/Rx';

describe('CounterService', () => {

  const defaultOptions = new BaseRequestOptions();

  //①
  it('asyncIncrement() should query url', () => {
    const httpMock: any = {get: () => null};
    spyOn(httpMock, 'get').and.returnValue(Observable.of());
    const service = new CounterService(httpMock);
    service.fetchNumber().subscribe();
    expect(httpMock.get).toHaveBeenCalledTimes(1);
    expect(httpMock.get).toHaveBeenCalledWith(messageEndPoint, jasmine.any(Object));
  });

  //②
  it('asyncIncrement() should increase point', () => {
    const backend = new MockBackend();
    const service = new CounterService(new Http(backend, defaultOptions));
    backend.connections.subscribe((connection: MockConnection) => {
      connection.mockRespond(new Response(new ResponseOptions({
        status: 200,
        body: JSON.stringify({num: 100})
      })));
    });
    expect(service.point.getValue()).toBe(0);
    service.asyncIncrement().subscribe();
    expect(service.point.getValue()).toBe(100);
  });

  //③
  it('asyncIncrement() should fail with bad response', () => {
    const backend = new MockBackend();
    const service = new CounterService(new Http(backend, defaultOptions));
    backend.connections.subscribe((connection: MockConnection) => {
      connection.mockRespond(new Response(new ResponseOptions({
        status: 400,
        body: JSON.stringify({error: 'WTF'})
      })));
    });
    service.asyncIncrement().subscribe(null, (err: string) => {
      expect(err).toBe(`response.status is bad: 400`);
    });
  });
});
ここでは3つのテストを行っています。
①では、通信処理を行うときに正しいURLに問い合わせていることの確認をします。
②では、通信処理の成功時に状態が正しく変わることの確認をします。
ここは少々特殊で、AngularのHttpモジュールは内部にBackendというものを持っていて、実質ここで通信処理が行われます。Angularではここのテスト用にMockBackendというオブジェクトを用意していて、MockBackendにconnectionが要求された時にダミーのレスポンスが返るように設定することができます。
こうすることで、 http.get が任意のレスポンスを返すようにし、色々な挙動のテストをすることができるのです。(ぶっちゃけAngularのHttpモジュールめんどくさいのですが、Angular wayに乗っかっておきます。)
③では、通信処理の失敗時にSubscriberにエラーを通知できることの確認をします。
先ほど同様でレスポンスに400を返すことで、Subscriberにエラーが渡ってきます。
以上となります。
前回同様、ここはAngularの基盤に依存していないので、あえて自前でDIすることでテストを書いてみました。
Component
src
<p>Counter</p>
<p *ngIf="isLoading()">Loading... Queue: {{loadingCount}}</p>
<p>Point: {{point}}</p>
<button (click)="increment(3)">Increment 3</button>
<button (click)="decrement(2)">Decrement 2</button>
<button (click)="asyncIncrement()">AsyncIncrement 100</button>
import { Component } from '@angular/core';
import {CounterService} from './services/counter.service';

@Component({
  selector: 'app-root',
  templateUrl: './app.component.html',
  styleUrls: ['./app.component.scss']
})
export class AppComponent {

  loadingCount = 0; // 複数リクエストが来ることがあるのでboolでなくnumber

  /* ... */

  async asyncIncrement() {
    this.loadingCount ++;
    try {
      await this.counterService.asyncIncrement().toPromise();
    } catch (err) {
      console.error(err);
    } finally {
      this.loadingCount --;
    }
  }

  isLoading(): boolean {
    return this.loadingCount !== 0;
  }
}
非同期処理である、 asyncIncrement を呼ぶところを追加しています。
ここでは、返り値のObservableを使いやすいようにPromiseに変換して、成否に応じて処理を分岐させています。
また、「loading中を示すぐるぐるするやつ」を表示するための状態である loadingCount を管理させるようにしていて、通信中は「Loading...」の表示がされるようになっています。
test
import {TestBed} from '@angular/core/testing';
import {AppComponent} from './app.component';
import {BehaviorSubject} from 'rxjs/Rx';
import {CounterService} from './services/counter.service';

describe('AppComponent', () => {

  /* ... */

  //①
  it('should call asyncIncrement', () => {
    const fixture = TestBed.createComponent(AppComponent);
    const service = fixture.debugElement.injector.get(CounterService);
    spyOn(service, 'asyncIncrement');
    const button = fixture.debugElement.nativeElement.querySelectorAll('button')[2];
    button.click();
    expect(service.asyncIncrement).toHaveBeenCalledTimes(1);
    expect(service.asyncIncrement).toHaveBeenCalledWith();
  });

  //②
  it('should log when asyncIncrement failed', async () => {
    const fixture = TestBed.createComponent(AppComponent);
    const service = fixture.debugElement.injector.get(CounterService);
    spyOn(service, 'asyncIncrement').and.returnValue(Observable.throw('WTF'));
    spyOn(console, 'error');
    const button = fixture.debugElement.nativeElement.querySelectorAll('button')[2];
    await button.click();
    expect(console.error).toHaveBeenCalledTimes(1);
    expect(console.error).toHaveBeenCalledWith('WTF');
  });
});
①は前回と同じで、ボタンを押したらちゃんとServiceの asyncIncrement が呼ばれていることを確認しています。
②は、 asyncIncrement がエラーを返した場合のテストです。この画面ではconsole.errorが呼ばれることになっているのでそれをテストしています。
注意点としては、 asyncIncrement をPromiseとして扱っているため、async/awaitで書いてあげる必要があることです。
動作確認
npm run build
をした後に、
npm run server:static
//別プロセスとして
npm run server:api
でAPIサーバと静的リソース配信サーバを立ち上げて、
localhost:3000で動作確認できます。
デプロイ
APIサーバのエンドポイントは開発時と本番時で違いますよね?
こういう時はAngular CLIで作ったプロジェクトに備わっている environment という仕組みで、本番ビルド時の定数値を書き換えることで実現できます。
import {Environment} from '../main';
export const environment: Environment = {
  production: true,
  host: 'http://production.example.com'
};
次回はルーティングを扱ってようと思います。
