概要
SPAを作る上で最初に考えるであろう、
- Viewの描画やイベント処理の流れ
- Serviceでのロジックの書き方
- テストの書き方
- 動作確認・デプロイ
を私見で書いていきます。
「もっと良い書き方あるよ」「こういうときどうするんだ」などなどお気軽にコメント頂ければと思います。
環境
- angular-cli: beta-32
- Angular: 2.4
- NodeJS: 6.9
公式からAngular CLIというのが提供されていて、推奨っぽいのでこれを用います。(近々RCが出るとかいう話があるそうで。)
ソースコードはこちら↓
https://github.com/uryyyyyyy/angularSample/tree/helloWorld
最初のうちにstrictNullChecksを付けておくことをオススメします。
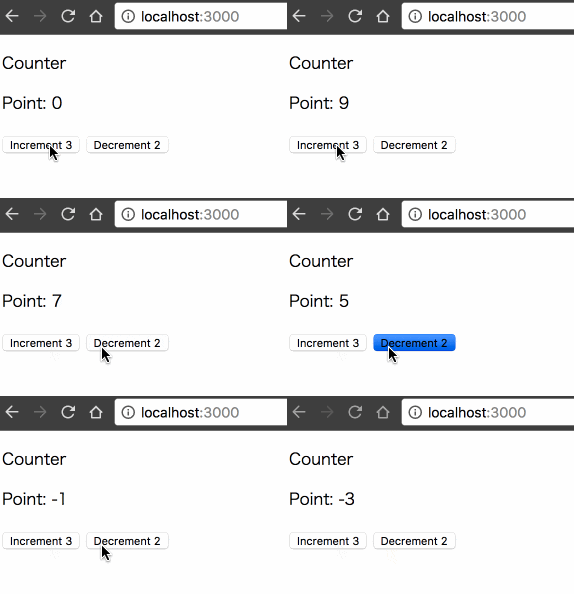
作った画面
すごくシンプルな表示を扱うものです。
要件として、
- Incrementボタンを押すと同期的に数字が加算される
- Decrementボタンを押すと同期的に数字が減算される
という感じです。
Component
src
こんな感じです。
<p>Counter</p>
<p>Point: {{point}}</p>
<button (click)="increment(3)">Increment 3</button>
<button (click)="decrement(2)">Decrement 2</button>
import { Component } from '@angular/core';
import {CounterService} from './services/counter.service';

@Component({
  selector: 'app-root',
  templateUrl: './app.component.html',
  styleUrls: ['./app.component.scss']
})
export class AppComponent {

  point: number;

  constructor(private counterService: CounterService) {
    this.point = counterService.point.getValue();
    counterService.point.subscribe((v) => this.point = v);
  }

  increment() {
    this.counterService.increment(3);
  }

  decrement() {
    this.counterService.decrement(2);
  }
}
ボタンをクリックするとserviceへイベントを通知して、その結果をsubscribeして画面に表示しています。簡単ですね。
余談:状態管理について
状態管理は、Reactではfluxアーキテクチャや、reduxというデファクト実装がありますが、Angularではそういうデファクトと言えるものはまだ無いようです。
個人的に良いと思っている設計としては、
- そのComponentや子の表示のために必要な状態
- Componentで管理する
- 複数のComponentで共有したい状態・ドメインモデルなどの永続化したい状態
- Serviceで管理する
という感じで考えています。今回だと、Pointの値はちゃんと扱おうということでServiceで管理しています。
test
import {TestBed} from '@angular/core/testing';
import {AppComponent} from './app.component';
import {BehaviorSubject} from 'rxjs/Rx';
import {CounterService} from './services/counter.service';

describe('AppComponent', () => {
  //①
  const counterServiceMock = {
    point: new BehaviorSubject(0),
    increment: () => void(0)
  };

  //②
  beforeEach(() => {
    TestBed.configureTestingModule({
      declarations: [AppComponent],
      providers: [
        {provide: CounterService, useValue: counterServiceMock}
      ]
    }).compileComponents();
  });

  //③
  it('should create', () => {
    const fixture = TestBed.createComponent(AppComponent);
    const component = fixture.componentInstance;
    expect(component).toBeTruthy();
  });

  //④
  it(`should have point value`, () => {
    const fixture = TestBed.createComponent(AppComponent);
    fixture.detectChanges();
    const app = fixture.debugElement.componentInstance;
    expect(app.point).toEqual(0);
  });

  //⑤
  it('should render point', () => {
    const fixture = TestBed.createComponent(AppComponent);
    fixture.detectChanges();
    const compiled = fixture.debugElement.nativeElement;
    const pTag = compiled.querySelectorAll('p')[1];
    expect(pTag.textContent).toContain(`Point: 0`);
    const service = fixture.debugElement.injector.get(CounterService);
    service.point.next(3);
    fixture.detectChanges();
    expect(pTag.textContent).toContain(`Point: 3`);
  });

  //⑥
  it('should call increment', () => {
    const fixture = TestBed.createComponent(AppComponent);
    const service = fixture.debugElement.injector.get(CounterService);
    spyOn(service, 'increment');
    const button = fixture.debugElement.nativeElement.querySelectorAll('button')[0];
    button.click();
    expect(service.increment).toHaveBeenCalledTimes(1);
    expect(service.increment).toHaveBeenCalledWith(3);
  });
});
少々特殊なので順を追って説明します。
まず、AppComponentの単体テストなので、InjectされるServiceは本物じゃなくてダミーを使うのが一般的です。
②のbeforeEachでTestBed.configureTestingModuleを呼ぶことで、Test用のModulesを用意します。ここではAppComponentのテストなのでdeclarationsにAppComponent、providersにその依存であるCounterServiceを用意します。
ちなみに、単体テストにおいては他のクラスは実体でなくダミーを用いるのが一般的です。
ここでは①にあるように、本物のServiceでなく counterServiceMock を渡してあげることで、単体テストで考えることが減ります。
以降、このTestBedを使ってテストを行います。
③では、実際にAppComponentをインスタンス化できているかどうかを見ています。HTMLの記述がバグってたりすると怒られるようです。
④では、インスタンスがpointという値を持っているかを見ています。
⑤では、DOMに適切な表示がされていること、さらにはserviceの状態が変わるとその表示が変わることを確認しています。少々クセがありますが見ていきましょう。
まずDOMへの表示はZone.jsが変更を検知することで行われるため、テストにおいては fixture.detectChanges() を呼び出すことで表示されます。
次に変更の検知ですが、ここではServiceが状態持っているため、変更するにはまずDIされたserviceを取り出して、状態を更新してあげます。
この後に再度 fixture.detectChanges() を呼ぶことで、最新の値で表示がされます。
⑥では、ボタンをクリックしたときにServiceの関数が叩かれることを確認しています。
⑤と同様にDIされたserviceを取得して、spyを差し込むことで呼ばれたことが確認できます。
Service
src
import {Injectable} from '@angular/core';
import {BehaviorSubject} from 'rxjs/Rx';

export const messageEndPoint = `${environment.host}/api/count`;

@Injectable()
export class CounterService {

  //①
  point: BehaviorSubject<number> = new BehaviorSubject(0);

  constructor() { }

  //②
  increment(num: number): void {
    const current = this.point.getValue();
    this.point.next(current + num);
  }

  decrement(num: number): void {
    const current = this.point.getValue();
    this.point.next(current - num);
  }

}
今回はすごく簡単な例なのでシンプルです。
①で、Observableなオブジェクト(point)を作って、変更があるとSubscribeしている全てに変更を通知します。
②では、そのpointに新しい値をpushしています。
これだけです。特に迷わないですかね。
test
import {CounterService} from './counter.service';

describe('CounterService', () => {

  it('increment() should increase point', () => {
    const service = new CounterService();
    service.increment(3);
    expect(service.point.getValue()).toBe(3);
  });
});
ServiceはAngularに依存していないので、普通のオブジェクトとしてテストが書けますね。
なので、特筆することはありません。
動作確認
動作確認ですが、個人的に ng serve でなく ng build --watch を使うのが好きです。
ng serve は手軽に動かせるしroutingも対応してて便利なのですが、ちょっと黒魔術感が強いので。。
ng build を使うと、デプロイ時と同じような構成で扱えるので重宝しています。代わりにroutingとかしようとすると色々と設定が必要になってしまうので、expressを立てています。
S3のようなホスティングサービスでも同じような設定をします。 Link
あとはテストはデフォルトではwatchがかかってしまうので、CI上で走らせるには ng test --watch=false などをする必要があります。ついでにlintのチェックも一緒にかければなお良しです。。
このあたりの設定はpackage.jsonに書いてあるので参考にして頂ければ。
デプロイ
ここまで問題がなければ、 ng build などで生成したファイル群をサーバーに置いておけばバッチリです。
フロントエンドでルーティングさせる場合は、他のURLパスへのアクセスの際にルートindex.htmlを返してあげる処理を挟む必要がありますが、そのくらいです。Link
